reset ACURA RDX 2010 Repair Manual
[x] Cancel search | Manufacturer: ACURA, Model Year: 2010, Model line: RDX, Model: ACURA RDX 2010Pages: 514, PDF Size: 30.21 MB
Page 247 of 514

2. Insert a disc into the disc slotwhen the disc load indicator turns
green, and ‘‘LOAD ’’appears on the
upper display at the same time.
Insert the disc only about halfway;
the drive will pull it in the rest of
the way. You will see the disc
number blinking on the upper
display, and the disc load indicator
turns red again and blinks as the
CD is loaded.
Do not try to insert a disc until
‘‘ LOAD ’’appears. You could
damage the audio unit.
3. You will see ‘‘DISC READ ’’on the
upper display, then the system
begins to play the CD.
You can load a CD into an empty
position while a CD is playing. Press
the AUDIO button to view the audio
control display. Select the empty
position (‘‘ No Disc’’is shown on the
audio control display) by rotating the
interface dial. Then press ENTER on
the selector to enter your selection.
The current CD stops playing and
starts the loading sequence. The CD
just loaded will play. You can also select the empty
position by pressing the appropriate
preset button.
You can load a disc(s) in any mode
(AM, FM, XM, or AUX) if you do not
select an empty position.
You cannot select the empty position
if there is no disc in the changer.
EMPTY POSITION
CONTINUED
Playing Discs (Models with navigation system)
243
Features
09/07/07 15:02:04 10 ACURA RDX MMC North America Owner's M 50 31STK630 enu
ProCarManuals.com
2010 RDX
Page 248 of 514
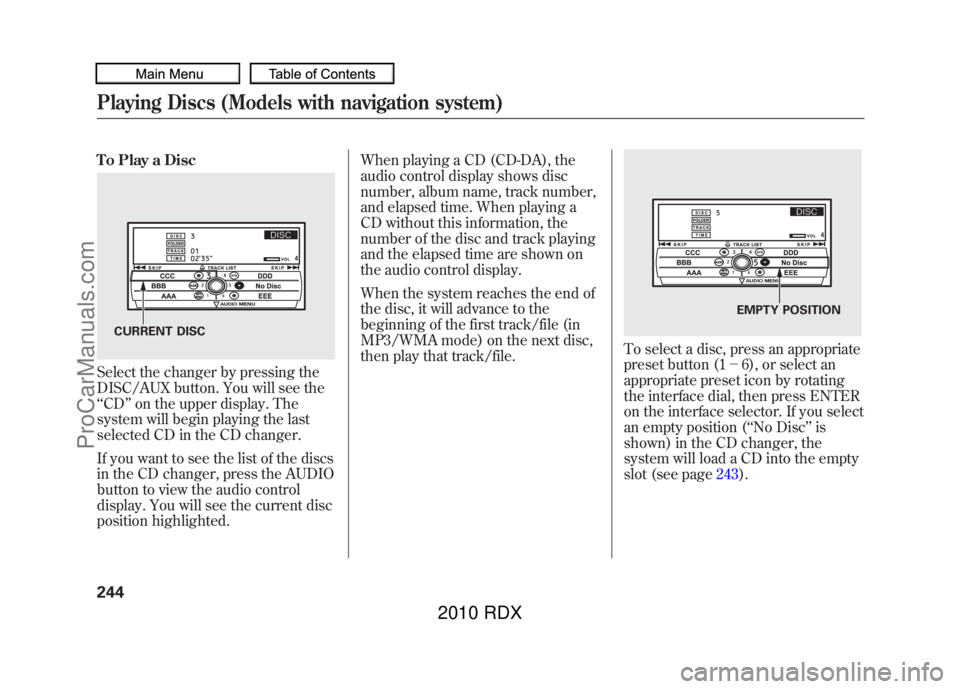
To Play a DiscSelect the changer by pressing the
DISC/AUX button. You will see the
‘‘CD ’’on the upper display. The
system will begin playing the last
selected CD in the CD changer.
If you want to see the list of the discs
in the CD changer, press the AUDIO
button to view the audio control
display. You will see the current disc
position highlighted. When playing a CD (CD-DA), the
audio control display shows disc
number, album name, track number,
and elapsed time. When playing a
CD without this information, the
number of the disc and track playing
and the elapsed time are shown on
the audio control display.
When the system reaches the end of
the disc, it will advance to the
beginning of the first track/file (in
MP3/WMA mode) on the next disc,
then play that track/file.
To select a disc, press an appropriate
preset button (1
-6), or select an
appropriate preset icon by rotating
the interface dial, then press ENTER
on the interface selector. If you select
an empty position ( ‘‘No Disc’’ is
shown) in the CD changer, the
system will load a CD into the empty
slot (see page 243).
CURRENT DISC
EMPTY POSITION
Playing Discs (Models with navigation system)24409/07/07 15:02:04 10 ACURA RDX MMC North America Owner's M 50 31STK630 enu
ProCarManuals.com
2010 RDX
Page 257 of 514

Playing a DVD-A Disc
You can play a DVD-A disc in the CD
changer. The disc controls are same
as previously described.
To Pause a Disc
To pause a disc, press the preset
button which corresponds to the
current disc. To play the disc again,
press the preset button again.To Stop Playing a Disc
If you turn the system off while a disc
is playing, either with the PWR/VOL
knob or by turning off the ignition
switch, the disc will stay in the drive.
When you turn the system back on,
the disc will begin playing where it
left off.
To take the system out of disc mode,
press the AM/FM, or DISC/AUX, or
button to switch to the radio,
or satellite radio, or auxiliary input
while a disc is playing. When you
return to disc mode by pressing the
DISC/AUX button, play will continue
at the same point that it left off. Removing Discs from the Changer
To remove the disc that is currently
playing, press and release the eject
(
) button. You will see
‘‘EJECT ’’
on the upper display. When you
remove the disc from the slot, the
system begins the load sequence so
you can load another disc in that
position. If you do not load another
disc within 10 seconds, the system
selects the previous mode (AM,
FM1, FM2, or XM Radio).
If you do not remove the disc from
the slot, the system will reload the
disc after 10 seconds and put the CD
changer in pause mode. To begin
playing the disc, press the DISC/
AUX button.
CONTINUED
Playing Discs (Models with navigation system)
253
Features
09/07/07 15:02:04 10 ACURA RDX MMC North America Owner's M 50 31STK630 enu
ProCarManuals.com
2010 RDX
Page 258 of 514
To remove a different disc from the
changer, first select it by pressing
the corresponding number on the
preset button or turning the interface
knob, and pressing ENTER on the
interface selector. When that disc
begins playing, press the eject
button.
Press and hold the eject button until
you hear a beep to remove all the
discs from the changer.
You can also eject discs when the
ignition switch is off by pressing the
eject button. The disc that was last
selected is ejected first. You can eject
the rest of the discs one at a time.Protecting Discs
For information on how to handle
and protect compact discs, see page
257.
Disc Changer Error Messages
For information, see page
255.
Adjusting the Sound
For information, see page 224.Playing Discs (Models with navigation system)25409/07/07 15:02:04 10 ACURA RDX MMC North America Owner's M 50 31STK630 enu
ProCarManuals.com
2010 RDX
Page 267 of 514
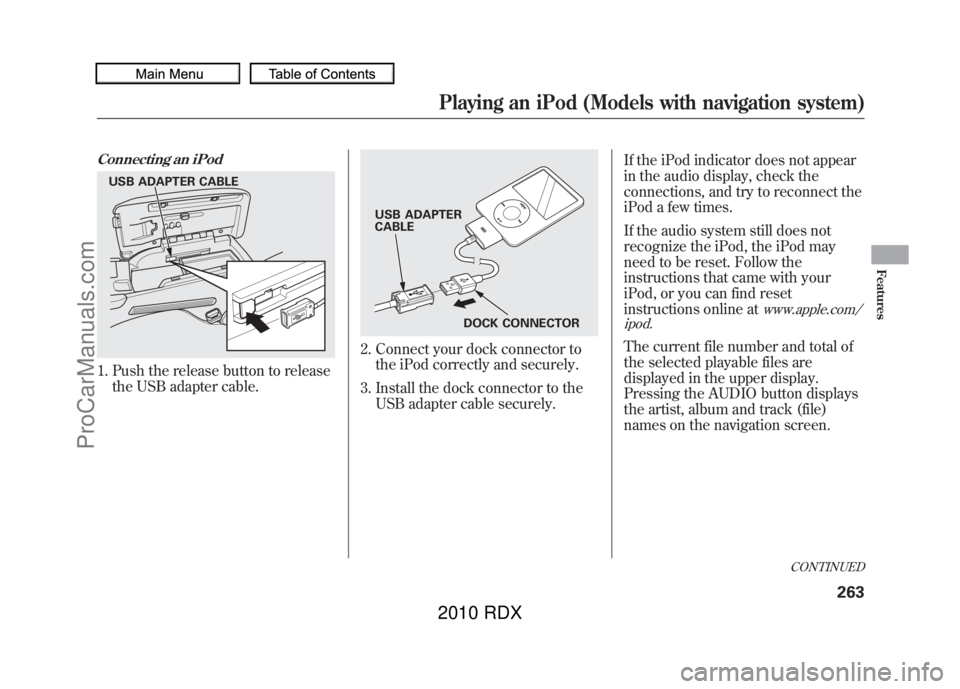
Connecting an iPod1. Push the release button to releasethe USB adapter cable.
2. Connect your dock connector tothe iPod correctly and securely.
3. Install the dock connector to the USB adapter cable securely. If the iPod indicator does not appear
in the audio display, check the
connections, and try to reconnect the
iPod a few times.
If the audio system still does not
recognize the iPod, the iPod may
need to be reset. Follow the
instructions that came with your
iPod, or you can find reset
instructions online at
www.apple.com/
ipod.
The current file number and total of
the selected playable files are
displayed in the upper display.
Pressing the AUDIO button displays
the artist, album and track (file)
names on the navigation screen.
USB ADAPTER CABLE
USB ADAPTER
CABLE
DOCK CONNECTOR
CONTINUED
Playing an iPod (Models with navigation system)
263
Features
09/07/07 15:02:04 10 ACURA RDX MMC North America Owner's M 50 31STK630 enu
ProCarManuals.com
2010 RDX
Page 293 of 514

Three controls for the audio system
are mounted in the steering wheel
hub. They let you control basic
functions without removing your
hand from the steering wheel.
The VOL button adjusts the volume
up (
) or down (
). Press the top or
bottom of the button, hold it until the
desired volume is reached, then
release it.
The MODE button changes the mode.On vehicles without navigation systemPressing the MODE button
repeatedly cycles through all
possible media sources whether they
are present or not.On vehicles with navigation systemPressing the MODE button
repeatedly cycles through all
present, connected media sources.
Media sources that are not present
or connected will not appear when
cycling with the MODE button. If you are listening to the radio, use
the CH button to change stations.
Each time you press and release the
top (+
) of the button, the system
goes to the next preset station on the
band you are listening to. Press and
release the bottom (- ) to go back to
the previous station.
To activate the seek function, press
and hold the top (+) or bottom (- )
of the CH button until you hear a
beep. The system searches up or
down from the current frequency to
find a station with a strong signal.
MODE BUTTON
VOL BUTTON CH BUTTON
CONTINUED
Remote Audio Controls
289
Features
09/07/07 15:02:04 10 ACURA RDX MMC North America Owner's M 50 31STK630 enu
ProCarManuals.com
2010 RDX
Page 294 of 514

If you are playing a disc, the system
skips to the beginning of the next
track (file in MP3 or WMA format)
each time you press the top (+)of
the CH button. Press the bottom (-)
to return to the beginning of the
current track/file. Press it twice to
return to the previous track/file.
To select a different disc (folder in
MP3/WMA mode), press and hold
the top (+ ) or bottom (- ) of the CH
button until you hear a beep. If you are listening to XM Radio, use
the CH button to change channels.
Each time you press the top (+
)of
the button, the system goes to the
next preset channel. Press the
bottom (- ) to go back to the
previous preset channel.
To go to the next channel of the
category you are listening to, press
and hold the top (+ ) or bottom (-)
of the CH button until you hear a
beep. If you are playing a USB flash
memory device or iPod with the USB
adapter cable, press and release the
top (+
) of the CH button to skip
forward to the beginning of the next
file. Press the bottom (- ) to skip
backward to the beginning of the
current file. Press it twice to return to
the previous file.
When playing a USB flash memory
device, you can also use the seek
function to skip the folder. To
activate this, press and hold either
side of the CH button until you hear
a beep.Remote Audio Controls29009/07/07 15:02:04 10 ACURA RDX MMC North America Owner's M 50 31STK630 enu
ProCarManuals.com
2010 RDX
Page 296 of 514
Your vehicle's audio system will
disable itself if it is disconnected
from electrical power for any reason.
To make it work again, you must
enter a specific five-digit code with
the preset bars or buttons
(depending on models). Because
there are hundreds of number
combinations possible from the five
digits, making the system work
without knowing the exact code is
nearly impossible.
You should have received a card that
lists your audio system code number
and serial number. It is best to store
this card in a safe place at home. In
addition, you should write the audio
system's serial number in this
owner's manual.
If you lose the card, you must obtain
the code number from your dealer.
To do this, you will need the audio
system's serial number.NOTE:
If you have a My Acura account, you
can retrieve the anti-theft code
online.
If your vehicle's battery is
disconnected or goes dead, the audio
system will disable itself. If this
happens, you will see
‘‘
’’on
the center or upper display
(depending on models) the next time
you turn on the system. Use the
preset bars or buttons (depending on
models) to enter the five-digit code.
The code is located on the radio code
card included in your owner's
manual kit. When it is entered
correctly, the radio will start playing. If you make a mistake entering the
code, do not start over; complete the
five-digit sequence, then enter the
correct code. You have ten tries to
enter the correct code. If you are
unsuccessful in ten attempts, you
must then leave the system on for 1
hour before trying again.
The system will retain your AM and
FM presets even if power is
disconnected.
Radio Theft Protection29209/07/07 15:02:04 10 ACURA RDX MMC North America Owner's M 50 31STK630 enu
ProCarManuals.com
2010 RDX
Page 297 of 514
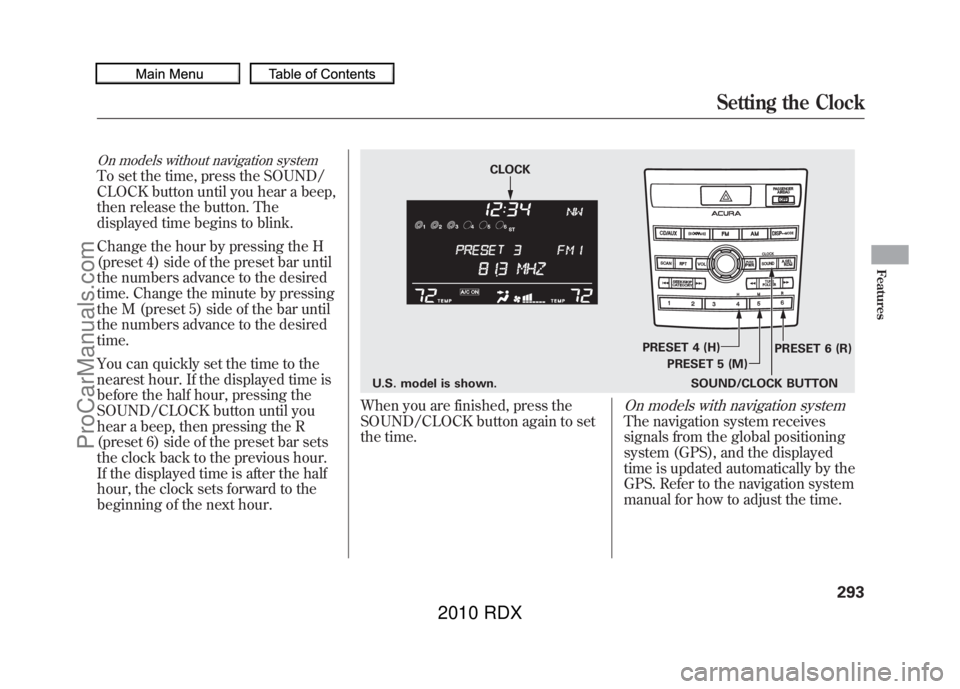
On models without navigation systemTo set the time, press the SOUND/
CLOCK button until you hear a beep,
then release the button. The
displayed time begins to blink.
Change the hour by pressing the H
(preset 4) side of the preset bar until
the numbers advance to the desired
time. Change the minute by pressing
the M (preset 5) side of the bar until
the numbers advance to the desired
time.
You can quickly set the time to the
nearest hour. If the displayed time is
before the half hour, pressing the
SOUND/CLOCK button until you
hear a beep, then pressing the R
(preset 6) side of the preset bar sets
the clock back to the previous hour.
If the displayed time is after the half
hour, the clock sets forward to the
beginning of the next hour.
When you are finished, press the
SOUND/CLOCK button again to set
the time.
On models with navigation systemThe navigation system receives
signals from the global positioning
system (GPS), and the displayed
time is updated automatically by the
GPS. Refer to the navigation system
manual for how to adjust the time.
U.S. model is shown.SOUND/CLOCK BUTTONPRESET 6 (R)
PRESET 4 (H)
PRESET 5 (M)
CLOCK
Setting the Clock
293
Features
09/07/07 15:02:04 10 ACURA RDX MMC North America Owner's M 50 31STK630 enu
ProCarManuals.com
2010 RDX
Page 298 of 514

The security system helps to protect
your vehicle and valuables from
theft. The horn sounds and a
combination of headlights, parking
lights, side marker lights, and
taillights flashes if someone attempts
to break into your vehicle or remove
the radio. This alarm continues for 2
minutes, then the system resets. To
reset an alarming system before the
2 minutes have elapsed, unlock the
driver's door with the key or the
remote transmitter.
The security system automatically
sets 15 seconds after you lock the
doors, hood, and the tailgate. For the
system to activate, you must lock the
doors and the tailgate from the
outside with the key, driver's lock
tab, door lock master switch, or
remote transmitter. The security
system indicator on the instrument
panel starts blinking immediately to
show you the system is setting itself.
Once the security system is set,
opening any door, the tailgate, or the
hood without using the key or the
remote transmitter, will cause the
alarm to activate. It will also activate
if the audio unit is removed from the
dashboard or the wiring is cut.The alarm will also be activated if a
passenger inside the locked vehicle
turns the ignition switch on.
The security system will not set if the
hood, tailgate, or any door is not fully
closed. Before you leave the vehicle,
make sure the doors, tailgate, and
hood are securely closed.
NOTE:
To see if the system is set
after you exit the vehicle, press the
LOCK button on the remote
transmitter within 5 seconds. If the
system is set, a beep will sound.
Do not attempt to alter this system or
add other devices to it.
SECURITY SYSTEM INDICATOR
Security System29409/07/07 15:02:04 10 ACURA RDX MMC North America Owner's M 50 31STK630 enu
ProCarManuals.com
2010 RDX