battery ACURA RDX 2010 Owners Manual
[x] Cancel search | Manufacturer: ACURA, Model Year: 2010, Model line: RDX, Model: ACURA RDX 2010Pages: 514, PDF Size: 30.21 MB
Page 69 of 514

Malfunction Indicator
Lamp
You will also see a ‘‘CHECK
EMISSION SYSTEM ’’message on the
multi-information display. For more
information, see page 466.Low Oil Pressure
Indicator
The engine can be severely damaged if
this indicator flashes or stays on when
the engine is running. For more
information, see page 465.
You will also see a ‘‘OIL PRESSURE
LOW ’’message on the multi-
information display (see page 79).Charging System
Indicator
If this indicator comes on when the
engine is running, the battery is not
being charged, and you will also see a
‘‘ CHECK CHARGING SYSTEM ’’
message on the multi-information
display. For more information, see
page 465.
A/T Temperature
Indicator
This indicator monitors the
temperature of the automatic
transmission fluid. If it comes on
while driving, it means the
transmission fluid temperature is too
high. Pull to the side of the road
when it is safe, shift to Park, and let
the engine idle until the indicator
goes out.
You will also see a ‘‘CHECK
TRANSMISSION ’’message on the
multi-information display (see page
80).
Continuing to drive with the A/T
temperature indicator on may cause
serious damage to the transmission.
Supplemental Restraint
System (SRS) Indicator
This indicator comes on for several
seconds when you turn the ignition
switch to the ON (II) position. If it
comes on at any other time, it
indicates a potential problem with
your front airbags. This indicator will
also alert you to a potential problem
with your side airbags, passenger's
side airbag automatic cutoff system,
automatic seat belt tensioners, side
curtain airbags, driver's seat position
sensor, and the front passenger's
weight sensors. You will also see a
‘‘ CHECK AIRBAG SYSTEM ’’
message on the multi-information
display (see page 80). For more
information, see page 32.
CONTINUED
Instrument Panel Indicators
65
Instruments and Controls
09/07/07 15:02:04 10 ACURA RDX MMC North America Owner's M 50 31STK630 enu
ProCarManuals.com
2010 RDX
Page 81 of 514

Maintenance Minder
The multi-information display in the
instrument panel shows you the
engine oil life and maintenance
service items when the ignition
switch is in the ON (II) position. This
information helps to keep you aware
of the periodic maintenance your
vehicle needs for continued trouble-
free driving. Refer to page411for
more information.
INST. MPG (U.S. models)/INST.
L/100 km (Canadian models)
This shows your instant fuel
economy.
When you turn off the engine, INST.
MPG or INST. L/100 km is also
reset. RANGE
This shows the estimated distance
you can travel on the fuel remaining
in the fuel tank. This distance is
estimated from the fuel economy you
received over the last several miles
(U.S.) or kilometers (Canada), so it
will vary with changes in speed,
traffic, etc.
When the battery is disconnected, or
you refuel, RANGE is also reset.
ELAPSED TIME
This shows the accumulated
traveling time since you last reset it.
When you turn the ignition switch to
the ON (II) position, ELAPSED
TIME is reset.
You can customize the ELAPSED
TIME reset condition on the multi-
information display (see page
95).AVG. SPEED
This shows the average speed you
are traveling in miles per hour (mph)
for U.S. models or kilometers per
hour (km/h) for Canadian models.
When you reset Trip A, AVG. SPEED
is also reset.
AVG. FUEL A/B
This shows your vehicle's average
fuel economy in mpg (U.S. models)
or liter/100 km (Canadian models)
since you last reset Trip A or Trip B.
You can customize the Trip A and
AVG. FUEL A reset condition on the
multi-information display (see page
93).
The average fuel economy will be
reset when you reset the trip meter,
or if the vehicle's battery goes dead
or is disconnected.
CONTINUED
Multi-Information Display
77
Instruments and Controls
09/07/07 15:02:04 10 ACURA RDX MMC North America Owner's M 50 31STK630 enu
ProCarManuals.com
2010 RDX
Page 127 of 514

You should have received a key
number tag with your keys. You will
need this key number if you ever
have to get a lost key replaced. Use
only Acura-approved key blanks.
These keys contain electronic
circuits that are activated by the
immobilizer system. They will not
work to start the engine if the circuits
are damaged.●Protect the keys from direct
sunlight, high temperature, and
high humidity.●Do not drop the keys or set heavy
objects on them.●Keep the keys away from liquids.
If they get wet, dry them
immediately with a soft cloth.
The valet key does not contain a
battery. Do not try to take it apart.
Retractable Master KeyThe master key can be retracted into
the remote transmitter. To use the
key, push the release button to
release the key from the transmitter.
The key should be fully extended. To
retract the key, push the release
button and at the same time push the
key into the remote transmitter until
it is securely latched. Always use the fully-extended key
when you insert it to the ignition
switch. If the key does not fully
extend, the immobilizer system may
not operate properly and may
prevent the engine from starting.
The key may come in contact with
your finger while being retracted or
extended. Make sure your fingers do
not touch the pivot of the key when
retracting or extending the key.RELEASE BUTTON
Push
Keys and Locks
123
Instruments and Controls
09/07/07 15:02:04 10 ACURA RDX MMC North America Owner's M 50 31STK630 enu
ProCarManuals.com
2010 RDX
Page 135 of 514

Remote Transmitter Care●Avoid dropping or throwing the
transmitter.●Protect the transmitter from
extreme temperature.●Do not immerse the transmitter in
any liquid.●If you lose a transmitter, the
replacement needs to be
reprogrammed by your dealer.Replacing the Transmitter Battery
If it takes several pushes on the
button to lock or unlock the doors
and the tailgate, replace the battery
as soon as possible.
Battery type: CR1616
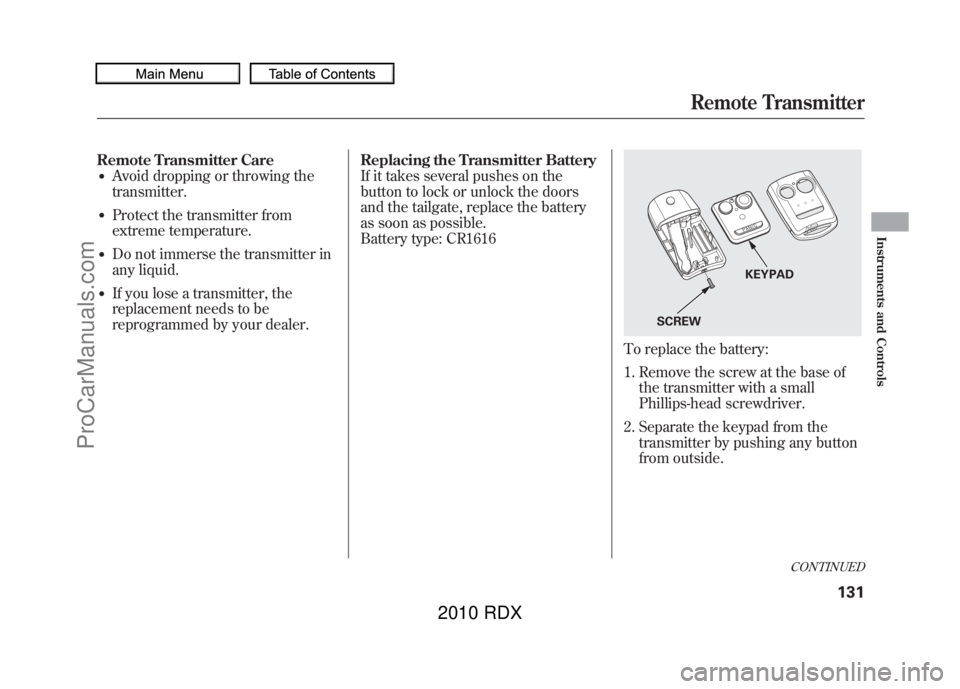
To replace the battery:
1. Remove the screw at the base of
the transmitter with a small
Phillips-head screwdriver.
2. Separate the keypad from the transmitter by pushing any button
from outside.
SCREW KEYPAD
CONTINUED
Remote Transmitter
131
Instruments and Controls
09/07/07 15:02:04 10 ACURA RDX MMC North America Owner's M 50 31STK630 enu
ProCarManuals.com
2010 RDX
Page 136 of 514

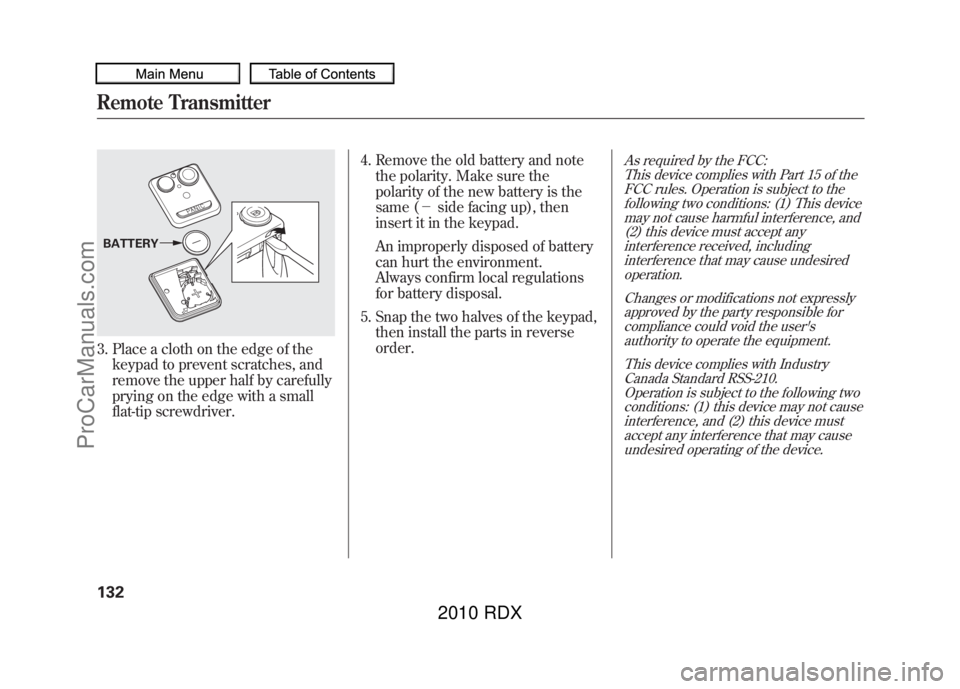
3. Place a cloth on the edge of thekeypad to prevent scratches, and
remove the upper half by carefully
prying on the edge with a small
flat-tip screwdriver. 4. Remove the old battery and note
the polarity. Make sure the
polarity of the new battery is the
same (- side facing up), then
insert it in the keypad.
An improperly disposed of battery
can hurt the environment.
Always confirm local regulations
for battery disposal.
5. Snap the two halves of the keypad, then install the parts in reverse
order.
As required by the FCC:
This device complies with Part 15 of theFCC rules. Operation is subject to the
following two conditions: (1) This devicemay not cause harmful interference, and(2) this device must accept any
interference received, includinginterference that may cause undesiredoperation.
Changes or modifications not expresslyapproved by the party responsible for
compliance could void the user'sauthority to operate the equipment.
This device complies with IndustryCanada Standard RSS-210.
Operation is subject to the following twoconditions: (1) this device may not causeinterference, and (2) this device must
accept any interference that may causeundesired operating of the device.
BATTERYRemote Transmitter13209/07/07 15:02:04 10 ACURA RDX MMC North America Owner's M 50 31STK630 enu
ProCarManuals.com
2010 RDX
Page 145 of 514

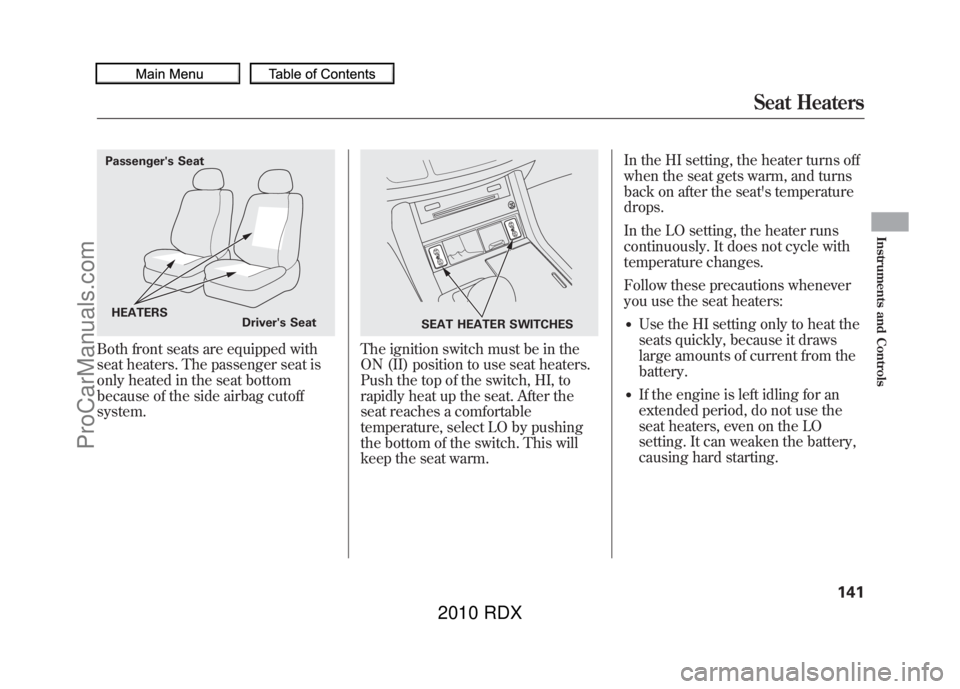
Both front seats are equipped with
seat heaters. The passenger seat is
only heated in the seat bottom
because of the side airbag cutoff
system.
The ignition switch must be in the
ON (II) position to use seat heaters.
Push the top of the switch, HI, to
rapidly heat up the seat. After the
seat reaches a comfortable
temperature, select LO by pushing
the bottom of the switch. This will
keep the seat warm.In the HI setting, the heater turns off
when the seat gets warm, and turns
back on after the seat's temperature
drops.
In the LO setting, the heater runs
continuously. It does not cycle with
temperature changes.
Follow these precautions whenever
you use the seat heaters:
●Use the HI setting only to heat the
seats quickly, because it draws
large amounts of current from the
battery.●If the engine is left idling for an
extended period, do not use the
seat heaters, even on the LO
setting. It can weaken the battery,
causing hard starting.
Passenger's Seat
HEATERS Driver's Seat
SEAT HEATER SWITCHES
Seat Heaters
141
Instruments and Controls
09/07/07 15:02:04 10 ACURA RDX MMC North America Owner's M 50 31STK630 enu
ProCarManuals.com
2010 RDX
Page 296 of 514

Your vehicle's audio system will
disable itself if it is disconnected
from electrical power for any reason.
To make it work again, you must
enter a specific five-digit code with
the preset bars or buttons
(depending on models). Because
there are hundreds of number
combinations possible from the five
digits, making the system work
without knowing the exact code is
nearly impossible.
You should have received a card that
lists your audio system code number
and serial number. It is best to store
this card in a safe place at home. In
addition, you should write the audio
system's serial number in this
owner's manual.
If you lose the card, you must obtain
the code number from your dealer.
To do this, you will need the audio
system's serial number.NOTE:
If you have a My Acura account, you
can retrieve the anti-theft code
online.
If your vehicle's battery is
disconnected or goes dead, the audio
system will disable itself. If this
happens, you will see
‘‘
’’on
the center or upper display
(depending on models) the next time
you turn on the system. Use the
preset bars or buttons (depending on
models) to enter the five-digit code.
The code is located on the radio code
card included in your owner's
manual kit. When it is entered
correctly, the radio will start playing. If you make a mistake entering the
code, do not start over; complete the
five-digit sequence, then enter the
correct code. You have ten tries to
enter the correct code. If you are
unsuccessful in ten attempts, you
must then leave the system on for 1
hour before trying again.
The system will retain your AM and
FM presets even if power is
disconnected.
Radio Theft Protection29209/07/07 15:02:04 10 ACURA RDX MMC North America Owner's M 50 31STK630 enu
ProCarManuals.com
2010 RDX
Page 312 of 514

Help Features●To hear general HFL information,
including help on pairing a phone
or setting up the system, say
‘‘Tutorial. ’’●For help at any time, including a
list of available commands, say
‘‘Hands free help.’’
Information DisplayAs an incoming call notification, you
will see the following display:
Some phones may send battery,
signal strength, and roaming status
information to HFL.
SIGNAL
STRENGTH HFL MODE
MESSAGE BATTERY
LEVEL
STATUS
ROAM
STATUS PHONE DIALING
Bluetooth
®HandsFreeLink
®
30809/07/07 15:02:04 10 ACURA RDX MMC North America Owner's M 50 31STK630 enu
ProCarManuals.com
2010 RDX
Page 317 of 514

To use HFL, you need to pair your
Bluetooth-compatible cell phone to
the system.
Phone Setup
This command group is available for
paired cell phones.Phone pairing tips●You cannot pair your phone while
the vehicle is moving.●Your phone must be in discovery
or search mode to pair. Refer to
your phone’s manual.●Up to six phones can be paired.●Your phone’ s battery may drain
faster when it is paired to HFL.●If after three minutes your phone
is not ready to pair or a phone is
not found, the system will time out
and return to idle.
To pair a cell phone:1. Press and release the HFL Talk button. If you are pairing a phone
for the first time, HFL will give you
information about the pairing
process. If it is not the first phone
you are pairing, say ‘‘Phone
setup ’’and say ‘‘Pair .’’
2. Follow the HFL prompts and put your phone in discovery or search
mode. HFL will give you a 4-digit
pairing code and begin searching
for your phone.
3. When your phone finds a Bluetooth device, select HFL from
the options and enter the 4-digit
code from the previous step.
4. Follow the HFL prompts and name the newly paired phone.
On U.S. vehicles with navigationsystemOnce the pairing process is
completed, AcuraLink may display a
connection confirmation screen. This
screen is used to create a data
connection between your cell phone
and the AcuraLink system. You can
choose to set up the data connection
later, or do it later. If you want to do
it now, exit the HFL menu by
pressing the HFL Back button one or
more times.
CONTINUED
Bluetooth
®HandsFreeLink
®
313
Features
09/07/07 15:02:04 10 ACURA RDX MMC North America Owner's M 50 31STK630 enu
ProCarManuals.com
2010 RDX
Page 320 of 514

Making a Call
You can make calls using any phone
number or a name in the HFL
phonebook. You can also redial the
last number called.
HFL uses a Class 2 Bluetooth, which
means, the maximum range between
your phone and vehicle is 30 feet (10
meters).
During a call, HFL allows you to talk
up to 30 minutes after you remove
the key from the ignition switch.
However, this may weaken the
vehicle’s battery.
To make a call using a phone
number:Press and release the HFL Talk
button before a command.
1. Say ‘‘Call ’’or ‘‘Dial .’’
2. Follow the HFL prompts and say the phone number you want to
dial.
3. Follow the HFL prompts to confirm the number and say ‘‘Call ’’
or ‘‘Dial .’’
Once connected, you will hear the
person you called through the audio
speakers.
To make a call using a name in the HFL phonebook:Press and release the HFL Talk
button before a command.
1. Say ‘‘Call ’’or ‘‘Dial .’’
2. Follow the HFL prompts and say the name stored in the HFL
phonebook that you want to call.
3. Follow the HFL prompts to confirm the name and make the
call.
Bluetooth
®HandsFreeLink
®
31609/07/07 15:02:04 10 ACURA RDX MMC North America Owner's M 50 31STK630 enu
ProCarManuals.com
2010 RDX