navigation update Acura RDX 2011 Navigation Manual
[x] Cancel search | Manufacturer: ACURA, Model Year: 2011, Model line: RDX, Model: Acura RDX 2011Pages: 176, PDF Size: 4.42 MB
Page 4 of 176
Navigation System3
Table of Contents
Edit Waypoint Search Area ........... 107
Guidance Mode.......... .................... 108
Clock Adjustment ........................ 109
Auto Daylight................................. 109
Auto Time Zone.............................. 110
Daylight Savings Time (DST) Selection
(Change DST Schedul e) ............. 110
Time Adjustment ............................ 110
Vehicle......................................... 111
Off-road Tracking ...... .................... 111
Correct Vehicle Position ............... 111
Verbal Reminder ............................ 112
Color ............................................ 112
Map Color...................................... 113
Menu Color .................................... 113
Switching Display Mode Manually .......... .......................... 113
Switching Display Mode Automatically ............................. 114
AcuraLink/Messages ................... 115
Traffic & Weather Status............. 115
System Information ..................... 116
Rearview Camera ....................... 116
Visible Range of the Rearview
Image .......................................... 116
Rearview Camera Brightness Adjustment .................................. 117
System Initialization ................ 118
System Initialization ....................118
Entering the Secur ity Code ..........118
GPS Initialization ........................119
Map Matching..............................119
System Limitations .................. 120
Database Limitations............... 122
Client Assistance ...................... 124
Reporting Errors ..........................124
Acura Automobile Client Services.....................................124
Visiting Your Dealer ...................125
Obtaining a Navigation Update DVD .........................................125
Changing the DVD ......................126
PC Card........................................127
Coverage Areas ........................ 128
Map Coverage..............................128
U.S. Detailed Cover age Areas ....... 128
Canada Detailed Coverage Areas........................................... 133
Operation in Alaska and Hawaii.......................................143
Alaska ............................................ 143
Hawaii............................................ 143 Information Screen Differences ..... 144
Shipping a Vehicle To or From
Hawaii ........................................ 145
Frequently Asked Questions ... 146
Troubleshooting ....................... 154
Glossary .................................... 155
Glossary .......................................155
Voice Command Index ............ 158
Global Commands .......................158
Navigation General Commands...158
Navigation Display Commands ...159
Find Place Commands .................160
Climate Control Commands ........161
Temperature Voice Commands ...162
Radio Voice Commands ..............162
CD Voice Commands ..................163
DVD Voice Commands ...............164
AUX Voice Commands ...............164
INFO Screen Voice Commands ................................165
SETUP Screen (Main Setup) Commands ................................165
On-Screen Commands .................166
On-Screen Spelling Assist .............. 166
Index ......................................... 170
Page 21 of 176
20Navigation System
Getting Started
Map Screen Description
Zoom In/Out
Rotate the Interface Dial knob to
change the map scale. Zooming in
increases the detail, while zooming out
gives you a wide area view. After
changing the scale, give the system a
few moments to update the display.
Map Scrolling
To view other map areas, move the
Interface Dial left, right, up, or down.
The map will shift in that direction. To
return the map to you r current location,
press either the MAP/GUIDE ,
CANCEL , or NAVI BACK button on
the steering wheel.
Displaying Current Location
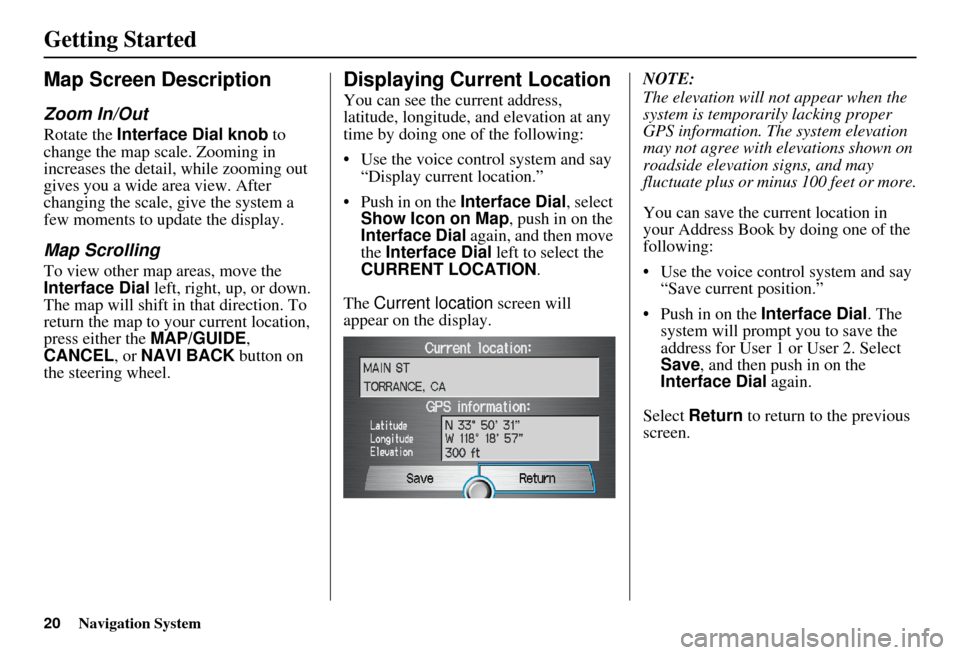
You can see the current address,
latitude, longitude, a nd elevation at any
time by doing one of the following:
• Use the voice control system and say “Display current location.”
• Push in on the Interface Dial, select
Show Icon on Map , push in on the
Interface Dial again, and then move
the Interface Dial left to select the
CURRENT LOCATION .
The Current location screen will
appear on the display. NOTE:
The elevation will not appear when the
system is temporarily lacking proper
GPS information. Th
e system elevation
may not agree with elevations shown on
roadside elevation signs, and may
fluctuate plus or minus 100 feet or more.
You can save the current location in
your Address Book by doing one of the
following:
• Use the voice control system and say “Save current position.”
• Push in on the Interface Dial. The
system will prompt you to save the
address for User 1 or User 2. Select
Save , and then push in on the
Interface Dial again.
Select Return to return to the previous
screen.
Page 22 of 176
Navigation System21
Getting Started
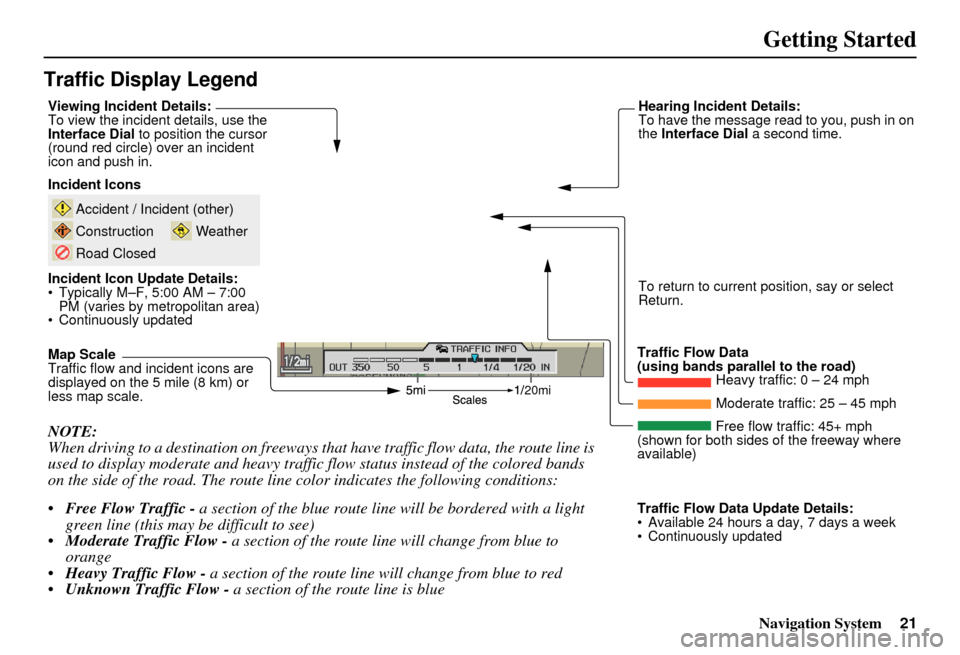
Traffic Display Legend
20mi
NOTE:
When driving to a destination on freeways that have traffic flow data, the route line is
used to display moderate and heavy traffic flow status instead of the colored bands
on the side of the road. The route line color indicates the following conditions:
Free Flow Traffic - a section of the blue route line will be bordered with a light
green line (this may be difficult to see)
Moderate Traffic Flow - a section of the route line will change from blue to
orange
Heavy Traffic Flow - a section of the route line will change from blue to red
Unknown Traffic Flow - a section of the route line is blue
Map Scale
Traffic flow and incident icons are
displayed on the 5 mile (8 km) or
less map scale. Incident Icons
Incident Icon Update Details:
Typically M–F, 5:00 AM – 7:00
PM (varies by metropolitan area)
Continuously updated
Accident / Incident (other)
Construction
Road Closed
Weather
Traffic Flow Data
(using bands parallel to the road) Heavy traffic: 0 – 24 mph
Moderate traffic: 25 – 45 mph
Free flow traffic: 45+ mph
(shown for both sides of the freeway where
available)
Viewing Incident Details:
To view the incident
details, use the
Interface Dial to position the cursor
(round red circle) over an incident
icon and push in. Hearing Incident Details:
To have the message read to you, push in on
the
Interface Dial a second time.
To return to current position, say or select
Return.
Traffic Flow Data Update Details:
Available 24 hours a day, 7 days a week
Continuously updated
Page 26 of 176
Navigation System25
Getting Started
No Traffic Incidents
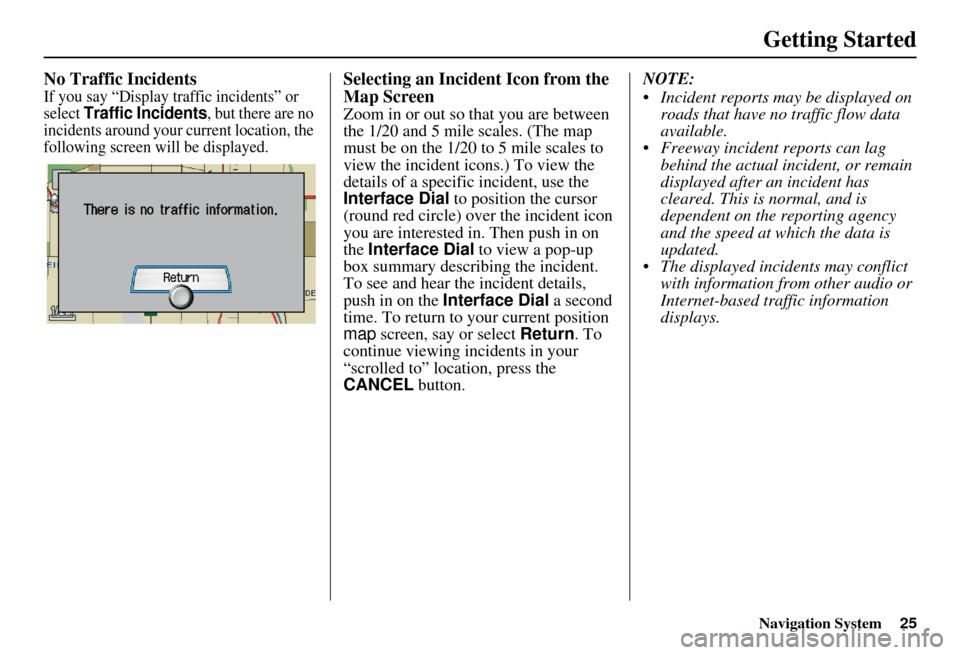
If you say “Display traffic incidents” or
select Traffic Incidents, but there are no
incidents around your current location, the
following screen will be displayed.
Selecting an Incident Icon from the
Map Screen
Zoom in or out so that you are between
the 1/20 and 5 mile scales. (The map
must be on the 1/20 to 5 mile scales to
view the incident icons.) To view the
details of a specific incident, use the
Interface Dial to position the cursor
(round red circle) over the incident icon
you are interested in. Then push in on
the Interface Dial to view a pop-up
box summary describing the incident.
To see and hear the incident details,
push in on the Interface Dial a second
time. To return to your current position
map screen, say or select Return. To
continue viewing incidents in your
“scrolled to” location, press the
CANCEL button. NOTE:
Incident reports may be displayed on
roads that have no traffic flow data
available.
Freeway incident reports can lag behind the actual incident, or remain
displayed after an incident has
cleared. This is normal, and is
dependent on the reporting agency
and the speed at which the data is
updated.
The displayed inci dents may conflict
with information from other audio or
Internet-based traffic information
displays.
Page 62 of 176
Navigation System61
Map Scale
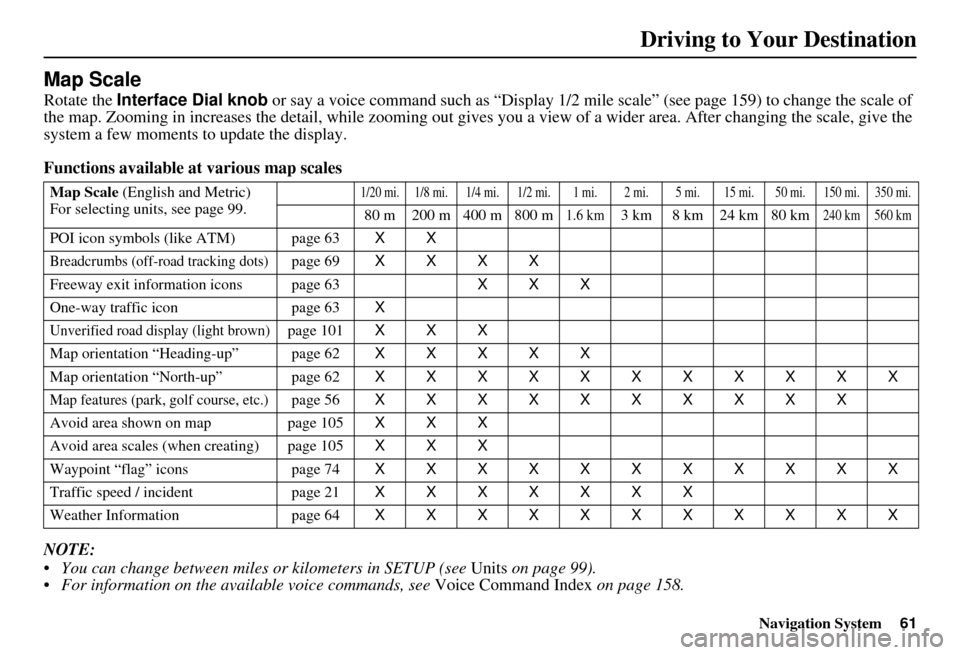
Rotate the Interface Dial knob or say a voice command such as “Display 1/2 m ile scale” (see page 159) to change the scale of
the map. Zooming in increases the detail, while zooming out gives you a view of a wider area. After changing the scale, give th e
system a few moments to update the display.
Functions available at various map scales
NOTE:
You can change between miles or kilometers in SETUP (see Units on page 99).
For information on the available voice commands, see Voice Command Index on page 158.
Map Scale (English and Metric)
For selecting uni ts, see page 99.1/20 mi.1/8 mi. 1/4 mi. 1/2 mi. 1 mi. 2 mi. 5 mi. 15 mi. 50 mi. 150 mi. 350 mi.
80 m 200 m 400 m 800 m1.6 km3 km 8 km 24 km 80 km240 km 560 km
POI icon symbols (like ATM) page 63 XX
Breadcrumbs (off-road tracking dots)page 69XXXX
Freeway exit information icons page 63 XXX
One-way traffic icon page 63X
Unverified road display (light brown)page 101 XXX
Map orientation “Heading-up” page 62 XXXXX
Map orientation “North-up” page 62 XXXXXXXXXXX
Map features (park, golf course, etc.)page 56XXXXXXXXXX
Avoid area shown on map page 105 XXX
Avoid area scales (when creating) page 105 XXX
Waypoint “flag” icons page 74XXXXXXXXXXX
Traffic speed / incident page 21XXXXXXX
Weather Information page 64XXXXXXXXXXX
Driving to Your Destination
Page 92 of 176
Navigation System91
System Setup
SETUP Mode
The SETUP function consists of two
main screens that allow you to change
and update information in the system.
To display the SETUP screen ( Main
Setup ), use the voice control system
and say “Setup” or press the SETUP
button. To change it to the SETUP
screen ( Other), select the “Other” tab.
You can switch screens by selecting the
tab.
You can use the voice control system to
select any item on the SETUP screen.
NOTE:
If some items appear to be grayed out and cannot be selected, it is because
you did not select OK on the initial
Disclaimer screen. See System Start-
up on page 17.
For information on the available voice commands, see Voice
Command Index on page 165.
SETUP Screen (Main Setup)
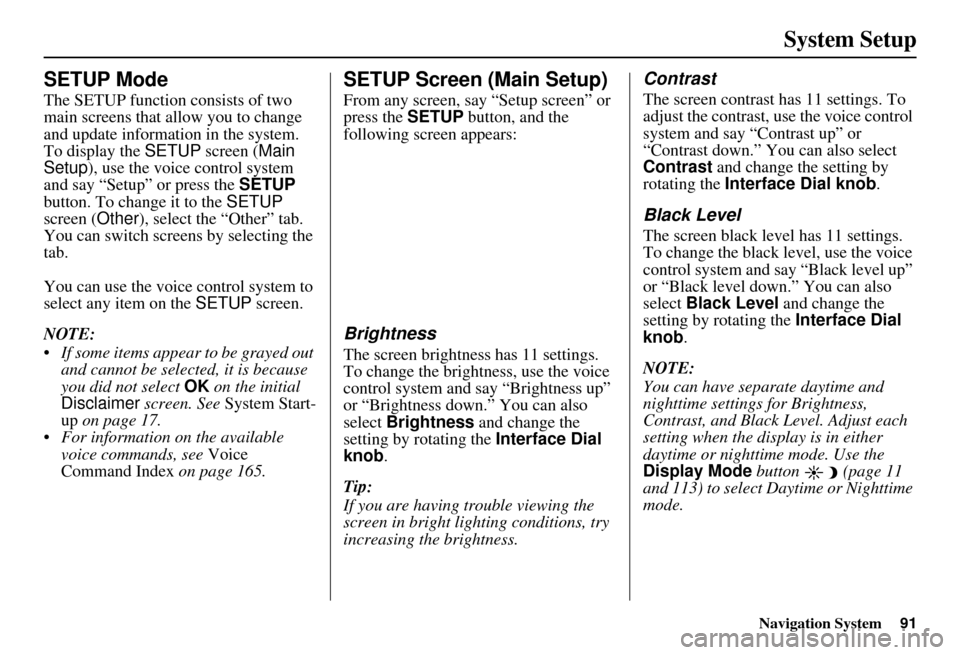
From any screen, say “Setup screen” or
press the SETUP button, and the
following screen appears:
Brightness
The screen brightness has 11 settings.
To change the brightness, use the voice
control system and say “Brightness up”
or “Brightness down.” You can also
select Brightness and change the
setting by rotating the Interface Dial
knob .
Tip:
If you are having trouble viewing the
screen in bright li ghting conditions, try
increasing the brightness.
Contrast
The screen contrast has 11 settings. To
adjust the contrast, use the voice control
system and say “Contrast up” or
“Contrast down.” You can also select
Contrast and change the setting by
rotating the Interface Dial knob .
Black Level
The screen black level has 11 settings.
To change the black level, use the voice
control system and say “Black level up”
or “Black level down.” You can also
select Black Level and change the
setting by rotating the Interface Dial
knob.
NOTE:
You can have separate daytime and
nighttime settings for Brightness,
Contrast, and Black Level. Adjust each
setting when the display is in either
daytime or nighttime mode. Use the
Display Mode button (page 11
and 113) to select Daytime or Nighttime
mode.
Page 117 of 176
116Navigation System
System Setup
System Information
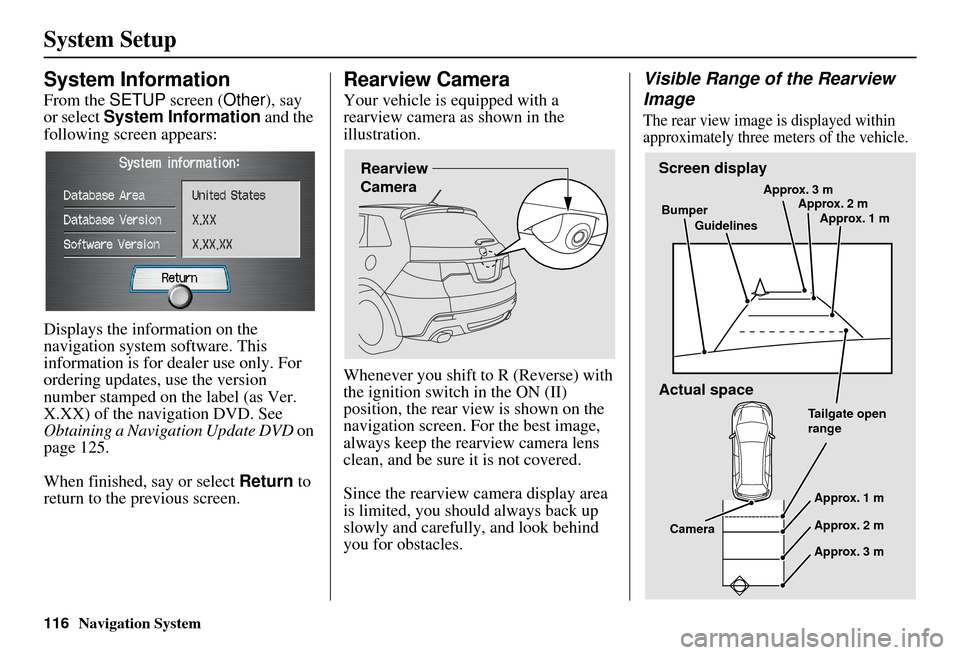
From the SETUP screen ( Other), say
or select System Information and the
following screen appears:
Displays the information on the
navigation system software. This
information is for de aler use only. For
ordering updates, use the version
number stamped on the label (as Ver.
X.XX) of the navigation DVD. See
Obtaining a Navigation Update DVD on
page 125.
When finished, say or select Return to
return to the previous screen.
Rearview Camera
Your vehicle is equipped with a
rearview camera as shown in the
illustration.
Whenever you shift to R (Reverse) with
the ignition switch in the ON (II)
position, the rear view is shown on the
navigation screen. For the best image,
always keep the rearview camera lens
clean, and be sure it is not covered.
Since the rearview camera display area
is limited, you should always back up
slowly and carefully, and look behind
you for obstacles.
Visible Range of the Rearview
Image
The rear view image is displayed within
approximately three meters of the vehicle.
Rearview
CameraScreen display
Actual space
Bumper
Guidelines Approx. 3 m
Approx. 2 m
Approx. 1 m
Tailgate open
range Approx. 1 m
Approx. 2 m
Approx. 3 m
Camera
Page 123 of 176
122Navigation System
Database Limitations
You will find that some points of
interest (POI) may be missing when you
search the database. This can be caused
if at the time the database was gathered,
the name was misspelled, the place was
improperly categorized, or the POI
change is not yet in the database. This
means you may not find places listed
that you know exist. This is also true for
police agencies and hospitals. In
outlying areas, facilities listed may not
be the closest. Always check with local
information sources if you need law
enforcement or hospital services.
Every effort has been made to verify
that the system’s database was accurate
at the time it was created. However,
businesses do close or relocate, and new
businesses start in the old locations. For
this reason, you may occasionally find
inaccurate information when you select
and drive to a point of interest (for
example, a restaurant is now a jewelry
store). The number of these inaccuracies
increases the longer you go without an
update. The digitized map database reflects
conditions as they existed at various
points in time before production.
Accordingly, your
DVD may contain
inaccurate or incomplete data or
information due to the passage of time,
road construction, changing conditions,
or other causes.
Due to ongoing software and database
improvements, navigation disc versions
may change in the middle of a
production year. The version shipped
with your vehicle was the most recent
available at the time of production and
is considered standard equipment for
that vehicle. There is no free program to
retrofit early production vehicles with
the latest disc. For DVD ordering
information, see page 125. In addition, this database does not
include, analyze, proc
ess, consider, or
reflect any of the following categories
of information:
• Neighborhood quality or safety
• Population density
• Availability or proximity of law enforcement
• Emergency, rescue, medical, or other assistance
• Construction work, zones, or hazards
• Legal restrictions (such as vehicular type, weight, load, height, and speed
restrictions)
• Road slope or grade
• Bridge height, width, weight, or other limits
Page 125 of 176
124Navigation System
Client Assistance
Reporting Errors
Occasionally, you may encounter
database errors.
• If the error pertains to freeways and main “verified” roads shown in black
on the map, then report it either
online at
http://update.navteq.com/ , or to
Acura Client Services.
• If the error involves a light brown “unverified” road, then do not report
it. These areas have not been verified
and are provided for reference only
(see Map Overview on page 6).
• For errors in points of interest (POI), like a business that has changed its
name, do not report them. Keep in
mind that depending on when the data
was collected and when your DVD
was purchased, the database can be
out of date. The business may have
not reported the change(s), or not be
in the database at all. Update
Navigation DVDs are available for
purchase, usually in the fall of each
year. • If the error does not involve the
database, such as vehicle position
icon errors, screen error messages, or
other GPS-related errors, see
Frequently Asked Questions on
page 146, System Limitations on
page 120, or Troubleshooting on
page 154.
Acura Automobile Client
Services
Telephone: (800) 382-2238
Fax: (310) 783-3535
Mail:
Acura Navi
America Honda Motor Co., Inc.
Acura Client Services
MS 500-2N-7E
1919 Torrance Blvd.
Torrance, CA 90501-2746
Page 126 of 176
Navigation System125
Client Assistance
Visiting Your Dealer
We strive to make this manual as
complete as possible and to answer all
questions regarding operation of the
system. Occasionally, you may run into
a specific issue that you cannot find in
the book. You may save yourself a trip
to the dealer by fi rst consulting the
following resources:
• The Troubleshooting section (see page 154).
• The Frequently Asked Questions (FAQs) section (see page 146).
• The FAQs found on the online DVD order site (see “Obtaining a
Navigation Update DVD”).
• For detailed questions regarding HFL, audio, or other systems that
interact with the navigation system,
see your Owner’s Manual, or the
Advanced Technology Guide.
• For traffic-related issues, see the “Real-Time Traffic Display” section
(on page 22) and FAQs (on
page 146). • Call Acura Client Services (see
“Acura Automobile Client Services”
on page 124).
• For database or PO I issues, follow the
guidelines in the “Reporting Errors”
section (see page 124).
If your question is still unanswered and
you wish to visit the dealer, please be
prepared to demonstrate the issue to the
service consultant. That way, the service
consultant can document the issue for
the factory to allo w more efficient
troubleshooting.
Some issues may at first seem random,
but you may notice a pattern. For
example, they only occur when you
enter a specific address, or when driving
on a certain road, or just when it’s cold.
This information is very useful to the
service consultant. Be patient, the
service consultant may be unfamiliar
with your specific issue.
Obtaining a Navigation
Update DVD
Acura is continually expanding the
scope of the navigation system.
Upgraded software may be made
available to navigation system owners
periodically, usually in the fall of each
year.
To purchase an updated DVD or a
replacement DVD, call the Acura
Navigation Disc Fulfillment Center at
(888) 549-3798. You can also order
online by going to the Acura Store link
at www.acuranavi.com.
NOTE:
DVDs are not available at your dealer. However, the dealer may
order a DVD for you as a courtesy.
There is no program for free DVD
updates.
The DVD order line staff cannot answer technical questions regarding
navigation operation, coverage, or
POIs.