warning Acura RDX 2011 Navigation Manual
[x] Cancel search | Manufacturer: ACURA, Model Year: 2011, Model line: RDX, Model: Acura RDX 2011Pages: 176, PDF Size: 4.42 MB
Page 3 of 176
2Navigation System
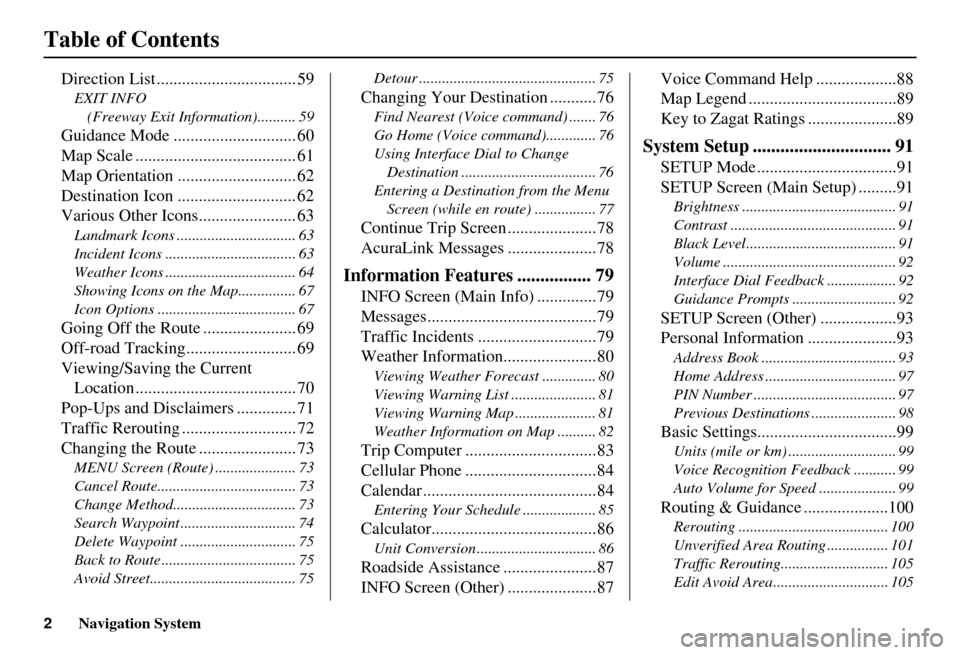
Table of Contents
Direction List ................................. 59
EXIT INFO (Freeway Exit Information).......... 59
Guidance Mode ............................. 60
Map Scale ...................................... 61
Map Orientation ............................ 62
Destination Icon ............................ 62
Various Other Icons....................... 63
Landmark Icons .......... ..................... 63
Incident Icons .................................. 63
Weather Icons .................................. 64
Showing Icons on the Map............... 67
Icon Options .................................... 67
Going Off the Route ...................... 69
Off-road Tracking.......................... 69
Viewing/Saving the Current Location ...................................... 70
Pop-Ups and Disclaimers .............. 71
Traffic Rerouting ........................... 72
Changing the Route ....................... 73
MENU Screen (Route) ..................... 73
Cancel Route.................................... 73
Change Method................................ 73
Search Waypoint .............................. 74
Delete Waypoint .............................. 75
Back to Route ................................... 75
Avoid Street...................................... 75 Detour .............................................. 75
Changing Your Destination ...........76
Find Nearest (Voice
command) ....... 76
Go Home (Voice co mmand)............. 76
Using Interface Dial to Change Destination ................................... 76
Entering a Destination from the Menu Screen (while en route) ................ 77
Continue Trip Screen .....................78
AcuraLink Messages .....................78
Information Features ................ 79
INFO Screen (Main Info) ..............79
Messages........................................79
Traffic Incidents ............................79
Weather Information......................80
Viewing Weather Forecast .............. 80
Viewing Warning List ...................... 81
Viewing Warning Map ..................... 81
Weather Information on Map .......... 82
Trip Computer ...............................83
Cellular Phone ...............................84
Calendar .........................................84
Entering Your Schedule ................... 85
Calculator.......................................86
Unit Conversion ............................... 86
Roadside Assistance ......................87
INFO Screen (Other) .....................87 Voice Command Help ...................88
Map Legend ...................................89
Key to Zagat Ratings .....................89
System Setup .............................. 91
SETUP Mode .................................91
SETUP Screen (Main Setup) .........91
Brightness ........................................ 91
Contrast ........................................... 91
Black Level....................................... 91
Volume ............................................. 92
Interface Dial Feedback .................. 92
Guidance Prompts ......
..................... 92
SETUP Screen (Other) ..................93
Personal Information .....................93
Address Book ................................... 93
Home Address .................................. 97
PIN Number ..................................... 97
Previous Destinations ...................... 98
Basic Settings.................................99
Units (mile or km) ............................ 99
Voice Recognition Fe edback ........... 99
Auto Volume for Speed .................... 99
Routing & Guidance ....................100
Rerouting ....................................... 100
Unverified Area Routing ................ 101
Traffic Rerouting............................ 105
Edit Avoid Area.............................. 105
Page 7 of 176
Navigation System
Introduction
While driving, do not look at the screen
or operate the system controls for more
than a second or so at a time, and only
after deciding you can do so safely. Pull
to the side of the road if you need more
time to look at the screen or operate the
controls. The navigation system is designed to
provide route information to help you
reach your destination. However, this
route guidance may sometimes conflict
with current road
conditions such as
street closures, road construction,
detours, and out-of-date map data.
Additionally, the system itself has
certain limitations (see page 120).
Therefore, you must verify the audio
and visual route information provided
by the system by car efully observing the
roadway, signs and signals, etc. If you
are unsure, proceed with caution.
Always use your own good judgment,
and obey traffic laws while driving.
Map Overview
Current Street
The current street on which your vehicle
is located appears at the bottom of the
map screen (see page 19). A message
saying “Not on a digitized road” may
appear instead when you drive half a
mile away from a mapped road. For
more details, see Off-road Tracking on
page 69.
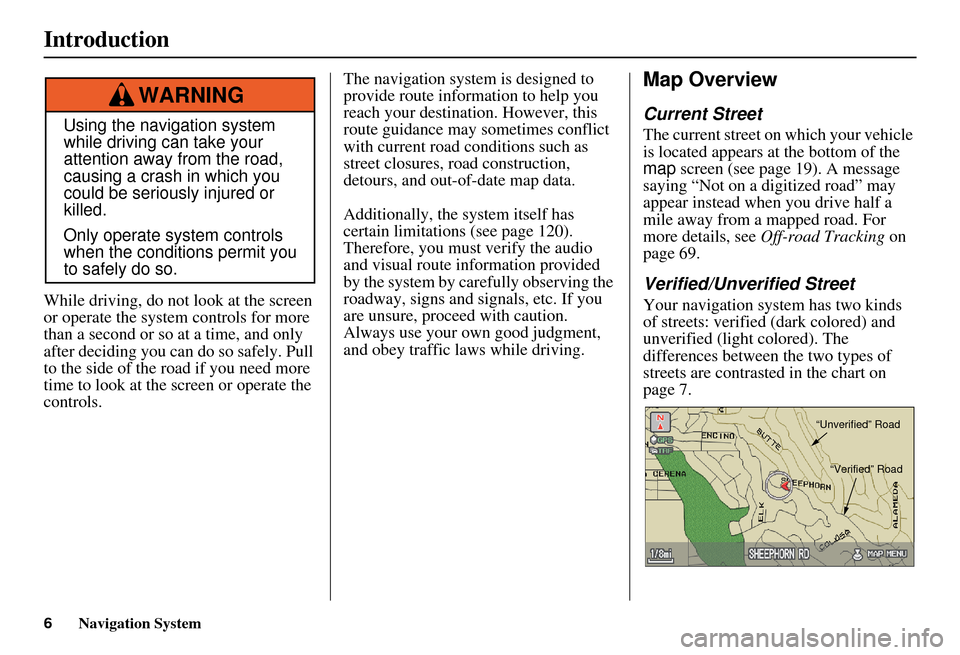
Verified/Unverified Street
Your navigation system has two kinds
of streets: verified (dark colored) and
unverified (light colored). The
differences between the two types of
streets are contrasted in the chart on
page 7.
Using the navigation system
while driving can take your
attention away from the road,
causing a crash in which you
could be seriously injured or
killed.
Only operate system controls
when the conditions permit you
to safely do so.
WARNING
“Unverified” Road
“Verified” Road
6
Page 20 of 176
Navigation System19
Getting Started
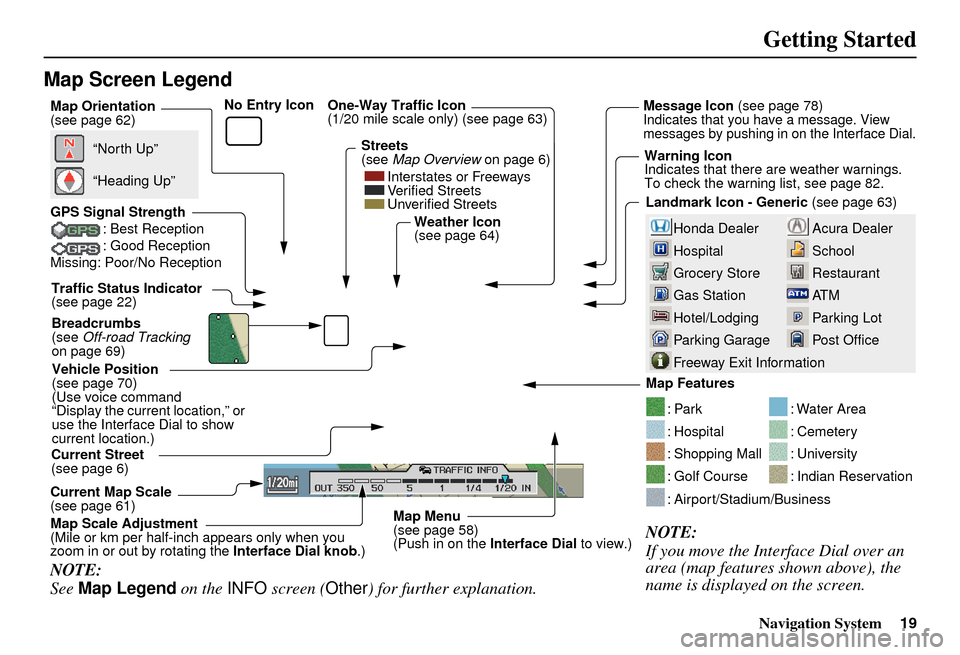
Map Screen Legend
Acura Dealer
School
Restaurant
AT M
Parking Lot
Post OfficeHonda Dealer
Hospital
Grocery Store
Gas Station
Hotel/Lodging
Parking Garage
Freeway Exit Information
Vehicle Position
(see page 70)
(Use voice command
“Display the current location,” or
use the Interface Dial to show
current location.) Landmark Icon - Generic
(see page 63)
Current Map Scale
(see page 61) Map Features
NOTE:
If you move the Interface Dial over an
area (map features shown above), the
name is displayed on the screen.
: Par k
: Hospital
: Shopping Mall
: Golf Course
: Water Area
: Cemetery
: University
: Indian Reservation
: Airport/Stadium/Business
Current Street
(see page 6)
NOTE:
See
Map Legend on the INFO screen ( Other) for further explanation.
GPS Signal Strength
: Best Reception
: Good Reception
Missing: Poor/No Reception
“North Up”
“Heading Up”
Map Orientation
(see page 62)
Map Menu
(see page 58)
(Push in on the Interface Dial to view.)
Map Scale Adjustment
(Mile or km per half-inch appears only when you
zoom in or out by rotating the
Interface Dial knob.)
Traffic Status Indicator
(see page 22)
Breadcrumbs
(see Off-road Tracking
on page 69) Weather Icon
(see page 64)
One-Way Traffic Icon
(1/20 mile scale only) (see page 63) Message Icon
(see page 78)Indicates that you ha ve a message. View
messages by pushing in on the Interface Dial.
Warning Icon
Indicates that there are weather warnings.
To check the warning list, see page 82.
Streets
(see
Map Overview on page 6)
Interstates or Freeways
Verified Streets
Unverified Streets
No Entry Icon
Page 59 of 176
58Navigation System
Driving to Your Destination
Distance and Time to
Destination
When you select a destination, the
distance to the destination is the actual
road distance of the calculated route,
and not “as the crow flies.” When
viewing a list of destinations (points of
interest), such as restaurants, the
distance is “as the crow flies” (see Sort
by Distance to Travel on page 37).
The displayed time to the destination
may differ from the actual travel time
because the time is calculated based on
the posted road speed data and your
current speed. If part of your route
includes unverified roads, the “distance”
and “time to go” for that portion is
estimated using 25 mph as an average
speed.
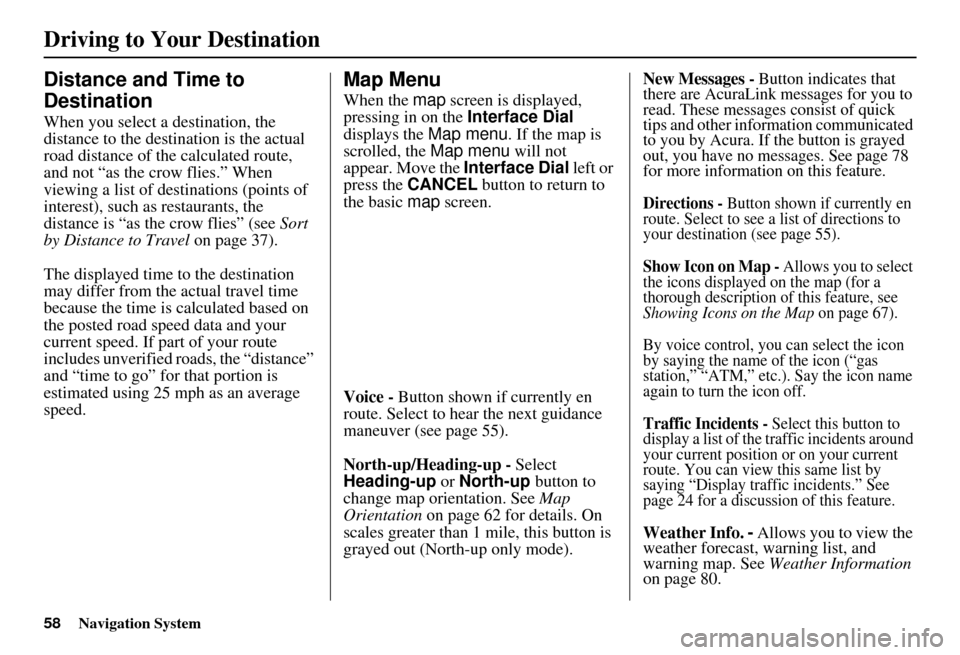
Map Menu
When the map screen is displayed,
pressing in on the Interface Dial
displays the Map menu. If the map is
scrolled, the Map menu will not
appear. Move the Interface Dial left or
press the CANCEL button to return to
the basic map screen.
Voice - Button shown if currently en
route. Select to hear the next guidance
maneuver (see page 55).
North-up/Heading-up - Select
Heading-up or North-up button to
change map orientation. See Map
Orientation on page 62 for details. On
scales greater than 1 mile, this button is
grayed out (North-up only mode).
New Messages - Button indicates that
there are AcuraLink messages for you to
read. These messages consist of quick
tips and other information communicated
to you by Acura. If the button is grayed
out, you have no messages. See page 78
for more information on this feature.
Directions - Button shown if currently en
route. Select to see a list of directions to
your destination (see page 55).
Show Icon on Map - Allows you to select
the icons displayed on the map (for a
thorough description of this feature, see
Showing Icons on the Map on page 67).
By voice control, you can select the icon
by saying the name of the icon (“gas
station,” “ATM,” etc.). Say the icon name
again to turn the icon off.
Traffic Incidents - Select this button to
display a list of the traffic incidents around
your current position or on your current
route. You can view this same list by
saying “Display traffic incidents.” See
page 24 for a discussion of this feature.
Weather Info. - Allows you to view the
weather forecast, warning list, and
warning map. See Weather Information
on page 80.
Page 68 of 176
Navigation System67
Showing Icons on the Map
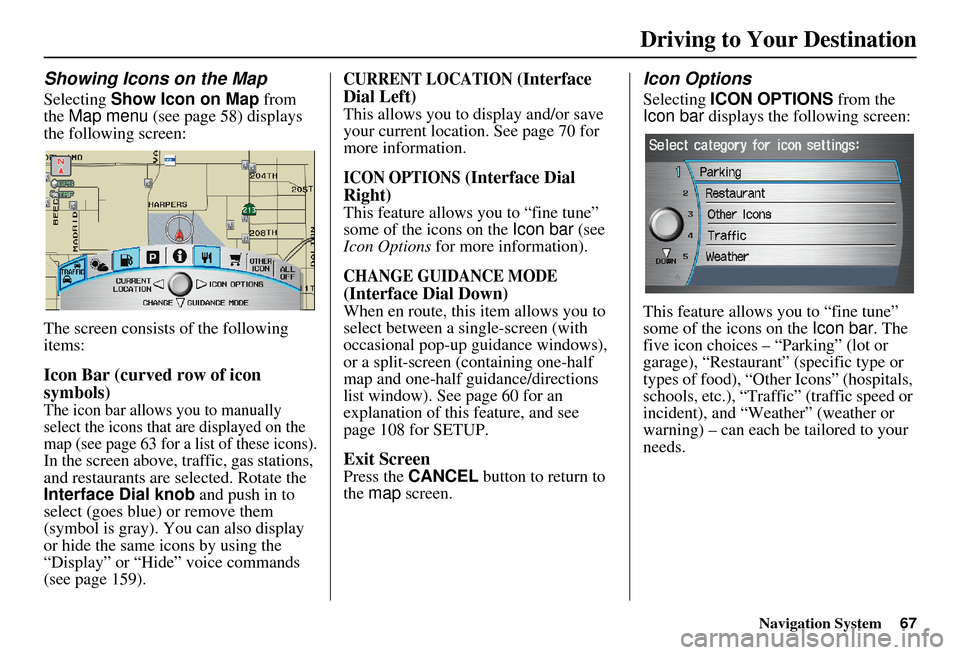
Selecting Show Icon on Map from
the Map menu (see page 58) displays
the following screen:
The screen consists of the following
items:
Icon Bar (curved row of icon
symbols)
The icon bar allows you to manually
select the icons that are displayed on the
map (see page 63 for a list of these icons).
In the screen above, traffic, gas stations,
and restaurants are selected. Rotate the
Interface Dial knob and push in to
select (goes blue) or remove them
(symbol is gray). You can also display
or hide the same icons by using the
“Display” or “Hide” voice commands
(see page 159).
CURRENT LOCATION (Interface
Dial Left)
This allows you to display and/or save
your current location. See page 70 for
more information.
ICON OPTIONS (Interface Dial
Right)
This feature allows you to “fine tune”
some of the icons on the Icon bar (see
Icon Options for more information).
CHANGE GUIDANCE MODE
(Interface Dial Down)
When en route, this item allows you to
select between a single-screen (with
occasional pop-up guidance windows),
or a split-screen (containing one-half
map and one-half guidance/directions
list window). See page 60 for an
explanation of this feature, and see
page 108 for SETUP.
Exit Screen
Press the CANCEL button to return to
the map screen.
Icon Options
Selecting ICON OPTIONS from the
Icon bar displays the following screen:
This feature allows you to “fine tune”
some of the icons on the Icon bar. The
five icon choices – “Parking” (lot or
garage), “Restaurant” (specific type or
types of food), “Other Icons” (hospitals,
schools, etc.), “Traffic” (traffic speed or
incident), and “Weather” (weather or
warning) – can each be tailored to your
needs.
Driving to Your Destination
Page 81 of 176
80Navigation System
Information Features
Weather Information
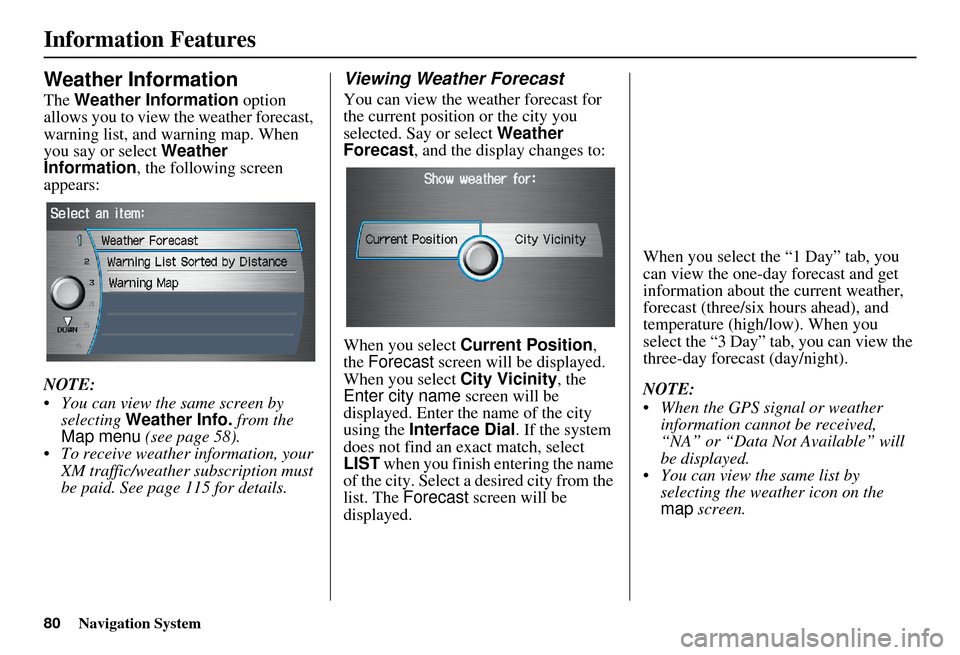
The Weather Information option
allows you to view the weather forecast,
warning list, and warning map. When
you say or select Weather
Information , the following screen
appears:
NOTE:
You can view the same screen by selecting Weather Info. from the
Map menu (see page 58).
To receive weather information, your XM traffic/weather subscription must
be paid. See page 115 for details.
Viewing Weather Forecast
You can view the weather forecast for
the current position or the city you
selected. Say or select Weather
Forecast , and the display changes to:
When you select Current Position ,
the Forecast screen will be displayed.
When you select City Vicinity, the
Enter city name screen will be
displayed. Enter the name of the city
using the Interface Dial . If the system
does not find an exact match, select
LIST when you finish entering the name
of the city. Select a desired city from the
list. The Forecast screen will be
displayed. When you select the “1 Day” tab, you
can view the one-day forecast and get
information about th
e current weather,
forecast (three/six hours ahead), and
temperature (high/low). When you
select the “3 Day” tab, you can view the
three-day forecast (day/night).
NOTE:
When the GPS signal or weather information cannot be received,
“NA” or “Data Not Available” will
be displayed.
You can view the same list by selecting the weather icon on the
map screen.
Page 82 of 176
Navigation System81
Information Features
Viewing Warning List
You can view a list of all weather
warnings in the United States. Say or
select Warning List Sorted by
Distance , and the display changes to:
You can view three types of lists by
selecting a sorting method from “All
US,” “Within 500mi,” or “On Route.” A
warning icon in the list indicates that
your vehicle is in the warning area, or
the calculated route runs through the
area. When you select a listed item by
pushing in on the Interface Dial, the
detailed information will be displayed. Say “Read List” or move the
Interface
Dial down, and the information will be
read to you.
NOTE:
The “On Route” tab can be selected only when en route.
Scrolling through the Weather Warning screen is disabled when the
vehicle is moving.
Viewing Warning Map
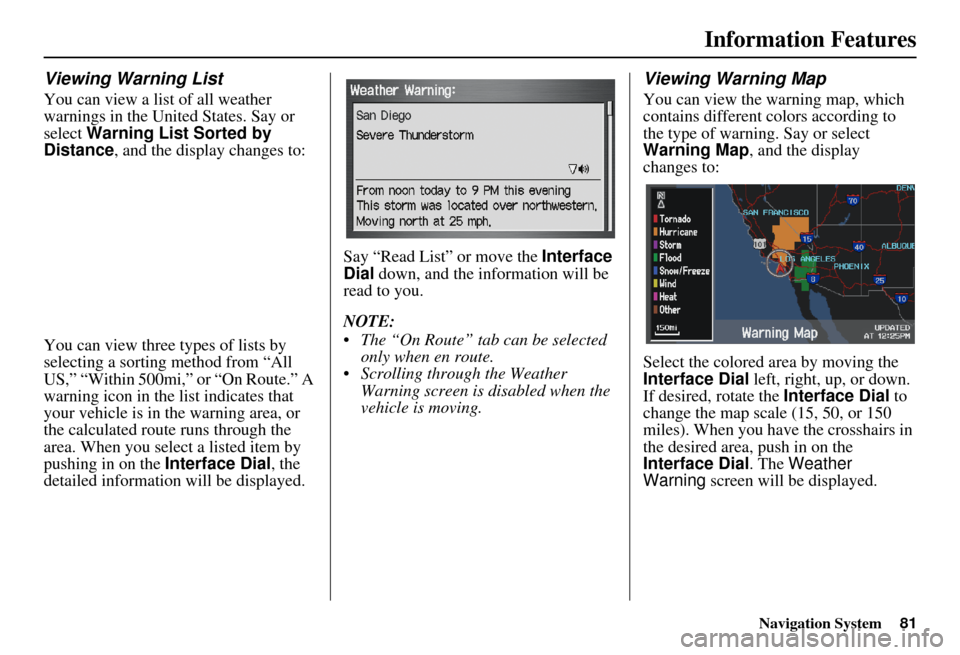
You can view the warning map, which
contains different co lors according to
the type of warning. Say or select
Warning Map, and the display
changes to:
Select the colored ar ea by moving the
Interface Dial left, right, up, or down.
If desired, rotate the Interface Dial to
change the map scale (15, 50, or 150
miles). When you have the crosshairs in
the desired area, push in on the
Interface Dial . The Weather
Warning screen will be displayed.
Page 83 of 176
82Navigation System
Information Features
Weather Information on Map
Weather Icons
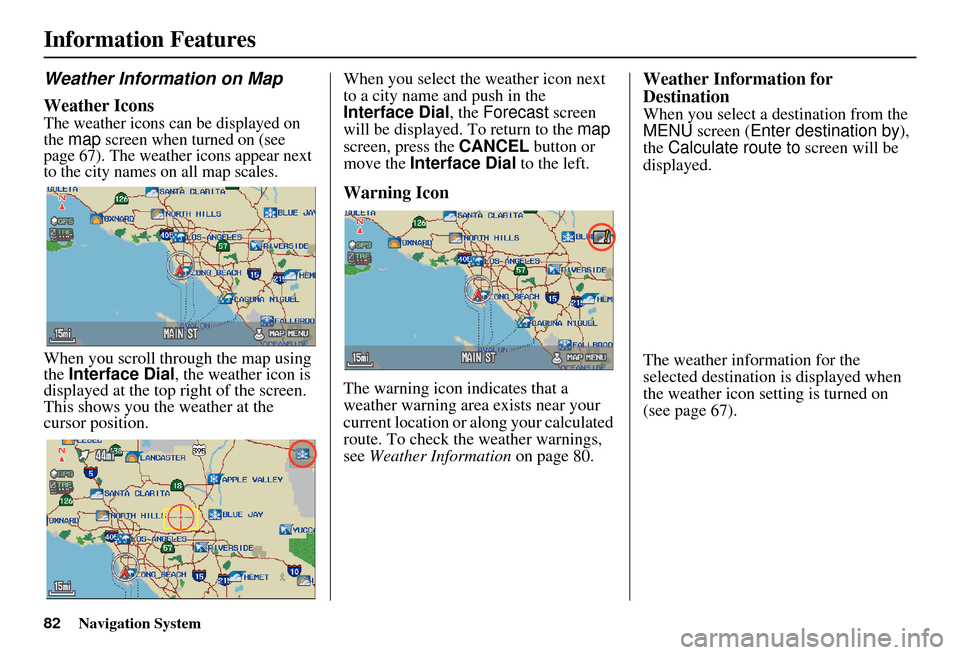
The weather icons can be displayed on
the map screen when turned on (see
page 67). The weather icons appear next
to the city names on all map scales.
When you scroll through the map using
the Interface Dial , the weather icon is
displayed at the top right of the screen.
This shows you the weather at the
cursor position. When you select the weather icon next
to a city name and push in the
Interface Dial
, the Forecast screen
will be displayed. To return to the map
screen, press the CANCEL button or
move the Interface Dial to the left.
Warning Icon
The warning icon indicates that a
weather warning area exists near your
current location or along your calculated
route. To check the weather warnings,
see Weather Information on page 80.
Weather Information for
Destination
When you select a destination from the
MENU screen (Enter destination by ),
the Calculate route to screen will be
displayed.
The weather information for the
selected destination is displayed when
the weather icon setting is turned on
(see page 67).
Page 84 of 176
Navigation System83
Information Features
You can also view the weather
information for your destination when
you select the destination directly from
the map screen (use the Interface Dial
to position the target mark on your
desired destination, and then push in on
the Interface Dial ).
NOTE:
When the GPS signal or weather
information cannot be received, “NA”
will be displayed. When the system cal
culates a route and
there is a warning on the route, the
following screen will be displayed:
Select Check Info. , and the warning
list will be displayed (see page 81).Trip Computer
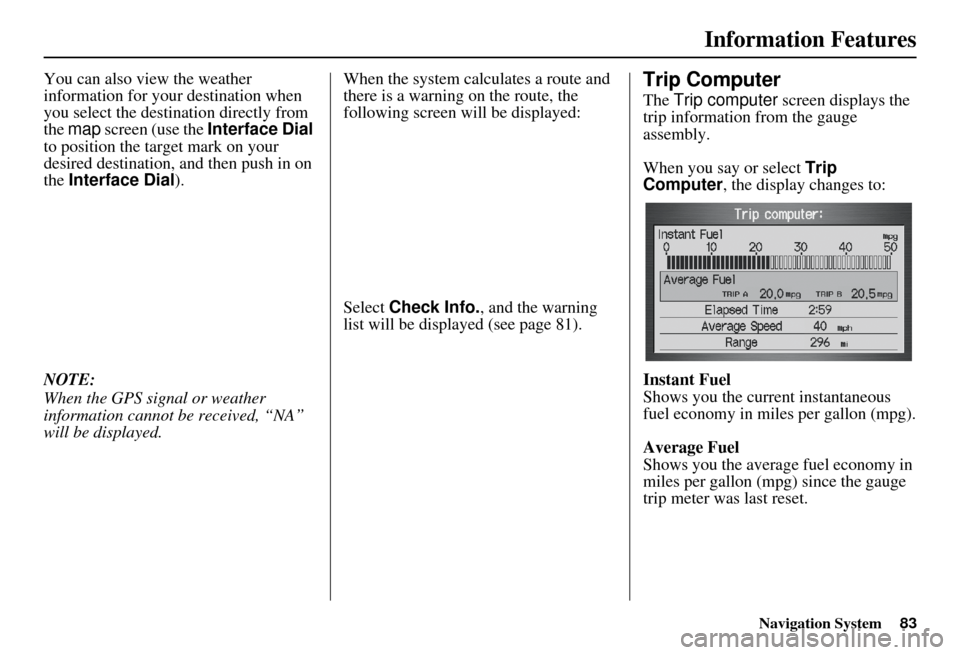
The Trip computer screen displays the
trip information from the gauge
assembly.
When you say or select Trip
Computer , the display changes to:
Instant Fuel
Shows you the current instantaneous
fuel economy in miles per gallon (mpg).
Average Fuel
Shows you the averag e fuel economy in
miles per gallon (mpg) since the gauge
trip meter was last reset.
Page 87 of 176
86Navigation System
Information Features
Delete
From the Calendar screen, select the
date of the schedule you wish to
remove. To remove the schedule, say or
select DELETE .
Done
Once you have finished entering the
schedule, say or select DONE. The
Calendar screen is redisplayed and the
entered schedule is shown.
NOTE:
You can only enter one message per day.
A maximum of 50 entries can be stored in the schedule. After you
reach 50 entries, a warning message
will appear telling you that the limit
has been reached. You can clear any
older entries as needed.
To reactivate a previous message, turn the Reminder setting from OFF
to ON . If it is not turned on, the
reminder will not be displayed when
you start the vehicle.
The system displays active calendar entries only after you answer OK on
the Disclaimer screen.
For more information, see System
Start-up on page 17.
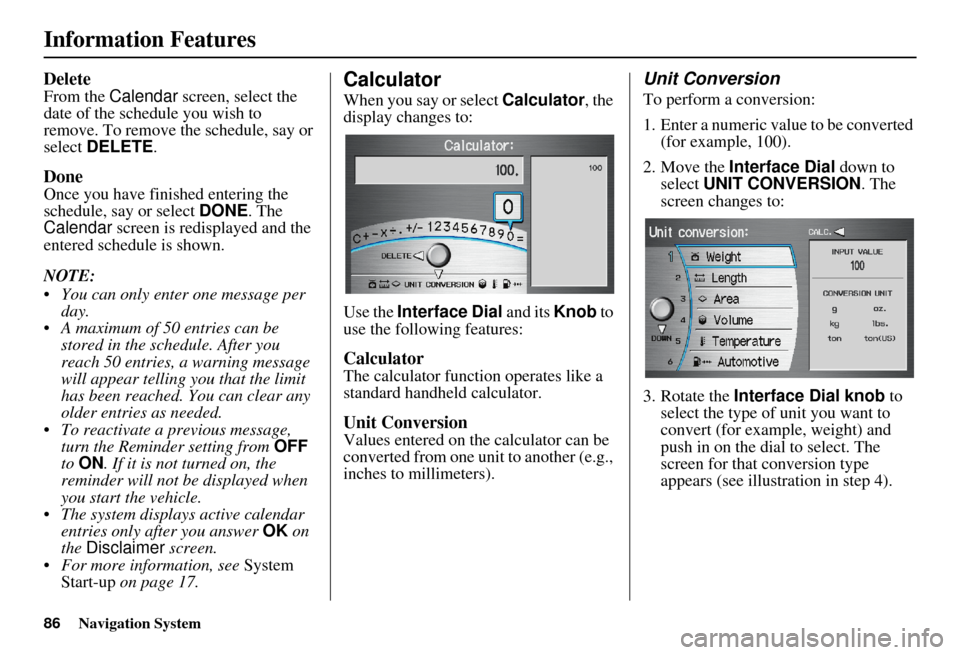
Calculator
When you say or select Calculator, the
display changes to:
Use the Interface Dial and its Knob to
use the following features:
Calculator
The calculator function operates like a
standard handheld calculator.
Unit Conversion
Values entered on the calculator can be
converted from one unit to another (e.g.,
inches to millimeters).
Unit Conversion
To perform a conversion:
1. Enter a numeric value to be converted (for example, 100).
2. Move the Interface Dial down to
select UNIT CONVERSION . The
screen changes to:
3. Rotate the Interface Dial knob to
select the type of unit you want to
convert (for example, weight) and
push in on the dial to select. The
screen for that conversion type
appears (see illustration in step 4).