brake Acura RDX 2011 Service Manual
[x] Cancel search | Manufacturer: ACURA, Model Year: 2011, Model line: RDX, Model: Acura RDX 2011Pages: 517, PDF Size: 27.89 MB
Page 434 of 517
Check the fluid level in the brake
fluid reservoir monthly.
Independent of the maintenance
minder display, replace the brake
fluid every 3 years.Always use Honda Heavy Duty
Brake Fluid DOT 3. If it is not
available, you should use only DOT 3
or DOT 4 fluid, from a sealed
container, as a temporary
replacement.
Using any non-Honda brake fluid can
cause corrosion and decrease the life
of the system. Have the brake
system flushed and refilled with
Honda Heavy Duty Brake Fluid
DOT 3 as soon as possible.
Brake fluid marked DOT 5 is not
compatible with your vehicle's
braking system and can cause
extensive damage.
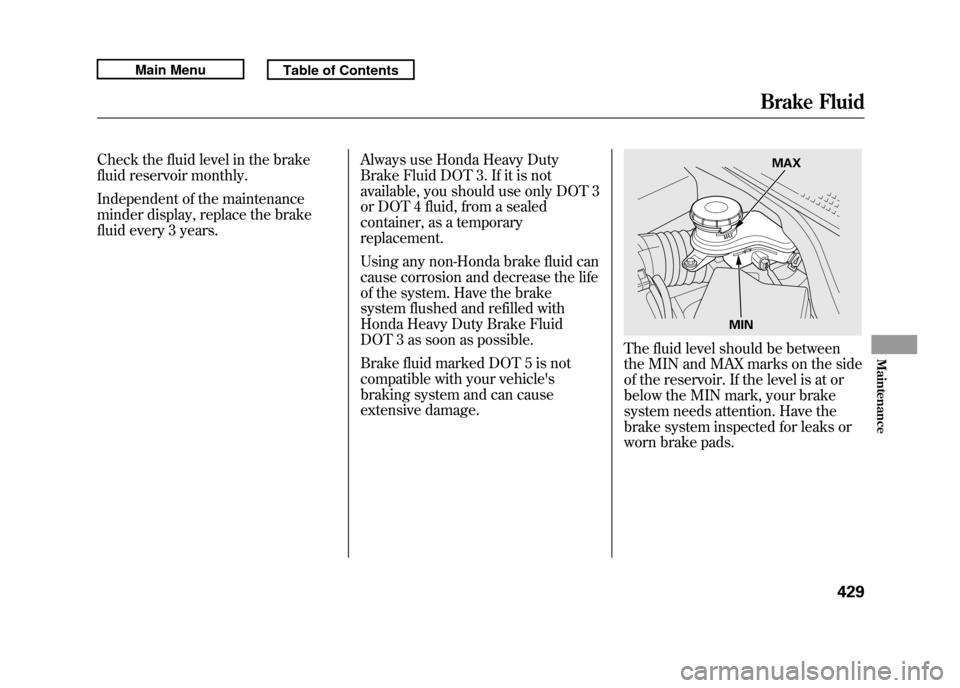
The fluid level should be between
the MIN and MAX marks on the side
of the reservoir. If the level is at or
below the MIN mark, your brake
system needs attention. Have the
brake system inspected for leaks or
worn brake pads.
MAX
MINBrake Fluid
429
Maintenance
10/06/08 17:42:32 11 ACURA RDX MMC North America Owner's M 50 31STK640 enu
Page 439 of 517
5. Turn on the lights to make surethe new bulb is working.
6. Reinstall the socket into the light assembly by turning it clockwise
until it locks.
7. Reinstall the light assembly cover. Replacing Rear Bulbs
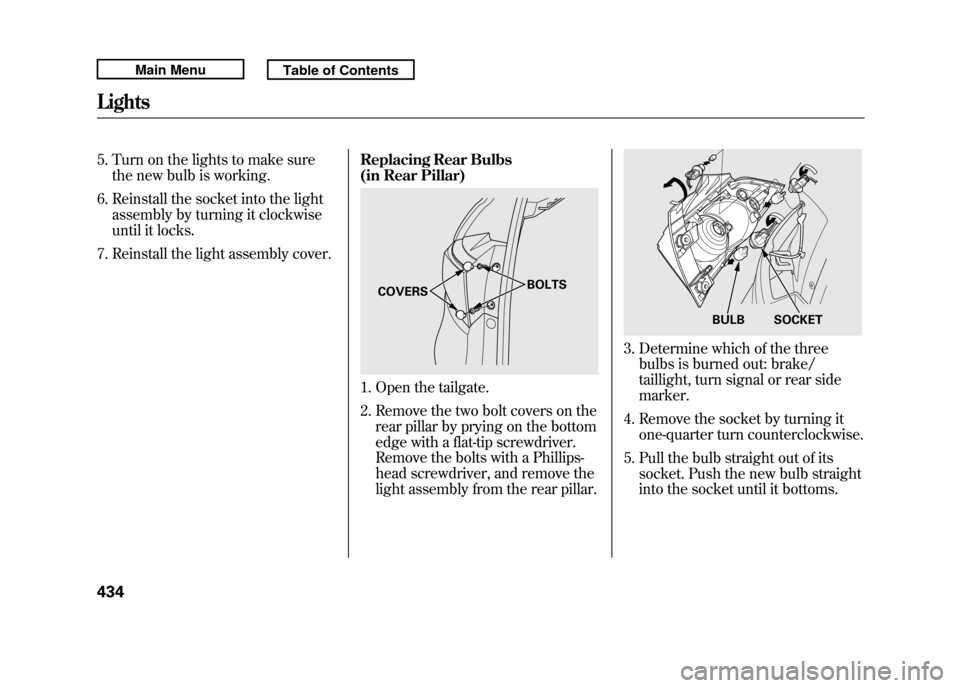
(in Rear Pillar)
1. Open the tailgate.
2. Remove the two bolt covers on the
rear pillar by prying on the bottom
edge with a flat-tip screwdriver.
Remove the bolts with a Phillips-
head screwdriver, and remove the
light assembly from the rear pillar.
3. Determine which of the threebulbs is burned out: brake/
taillight, turn signal or rear side
marker.
4. Remove the socket by turning it one-quarter turn counterclockwise.
5. Pull the bulb straight out of its socket. Push the new bulb straight
into the socket until it bottoms.
COVERS BOLTS
BULB SOCKET
Lights43410/06/08 17:42:32 11 ACURA RDX MMC North America Owner's M 50 31STK640 enu
Page 441 of 517
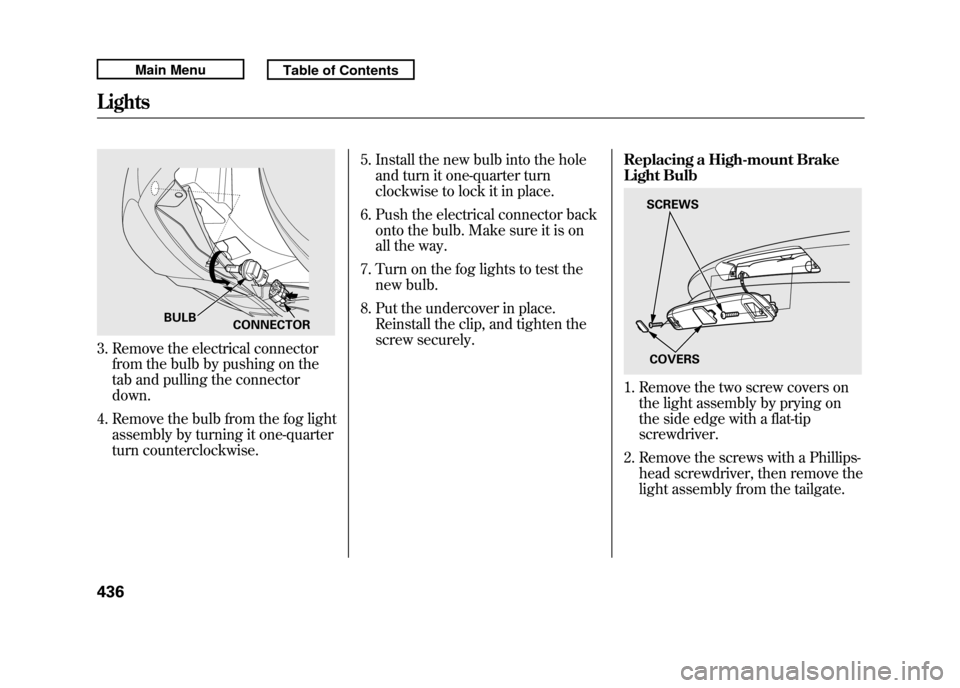
3. Remove the electrical connectorfrom the bulb by pushing on the
tab and pulling the connector
down.
4. Remove the bulb from the fog light assembly by turning it one-quarter
turn counterclockwise. 5. Install the new bulb into the hole
and turn it one-quarter turn
clockwise to lock it in place.
6. Push the electrical connector back onto the bulb. Make sure it is on
all the way.
7. Turn on the fog lights to test the new bulb.
8. Put the undercover in place. Reinstall the clip, and tighten the
screw securely. Replacing a High-mount Brake
Light Bulb
1. Remove the two screw covers on
the light assembly by prying on
the side edge with a flat-tip
screwdriver.
2. Remove the screws with a Phillips- head screwdriver, then remove the
light assembly from the tailgate.
CONNECTOR
BULB
SCREWS
COVERS
Lights43610/06/08 17:42:32 11 ACURA RDX MMC North America Owner's M 50 31STK640 enu
Page 442 of 517
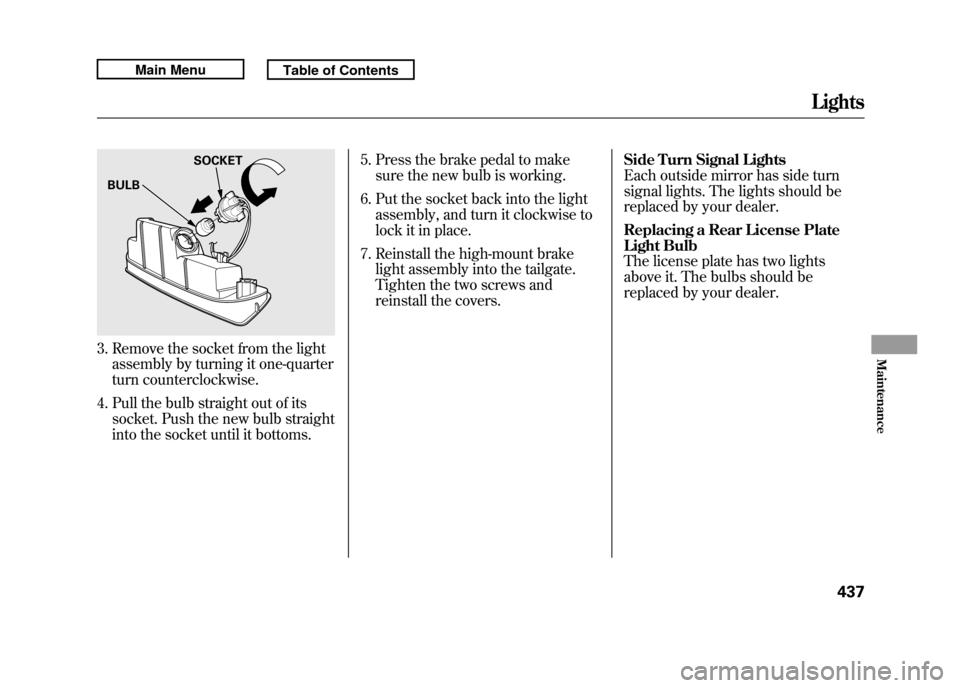
3. Remove the socket from the lightassembly by turning it one-quarter
turn counterclockwise.
4. Pull the bulb straight out of its socket. Push the new bulb straight
into the socket until it bottoms. 5. Press the brake pedal to make
sure the new bulb is working.
6. Put the socket back into the light assembly, and turn it clockwise to
lock it in place.
7. Reinstall the high-mount brake light assembly into the tailgate.
Tighten the two screws and
reinstall the covers. Side Turn Signal Lights
Each outside mirror has side turn
signal lights. The lights should be
replaced by your dealer.
Replacing a Rear License Plate
Light Bulb
The license plate has two lights
above it. The bulbs should be
replaced by your dealer.BULB
SOCKET
Lights
437
Maintenance
10/06/08 17:42:32 11 ACURA RDX MMC North America Owner's M 50 31STK640 enu
Page 454 of 517
Tire Chains
Mount tire chains on your tires when
required by driving conditions or
local laws. Install them only on the
front tires.
Because your vehicle has limited tire
clearance, Acura strongly
recommends using the chains listed
below, made by Security Chain
Company (SCC).
Cable type: Shur Grip Z
SZ343When installing cables, follow the
manufacturer's instructions, and
mount them as tight as you can.
Make sure they are not contacting
the brake lines or suspension. Drive
slowly with them installed. If you
hear them coming into contact with
the body or chassis, stop and
investigate. Remove them as soon as
you begin driving on cleared roads.
Traction devices that are the wrong size
or improperly installed can damage
your vehicle's brake lines, suspension,
body, and wheels. Stop driving if they
are hitting any part of the vehicle.
Using the wrong chains, or not
properly installing chains, can
damage the brake lines and
cause a crash in which you can
be seriously injured or killed.
Follow all instructions in this
owner's manual regarding the
selection and use of tire chains.
Tires
449
Maintenance
10/06/08 17:42:32 11 ACURA RDX MMC North America Owner's M 50 31STK640 enu
Page 456 of 517

On models without navigation systemIf your vehicle's battery is
disconnected, or goes dead, the time
setting will be reset to 1:00. To set
the time again, follow the setting
procedure (see page 293).
If your vehicle's battery is
disconnected or goes dead, the audio
system will disable itself. The next
time you turn on the radio you will
see‘‘
’’in the frequency
display. Use the preset bars or preset
buttons (depending on models) to
enter the five-digit code (see page
292).
On models with
navigation system
The navigation system will also
disable itself. The next time you turn
on the ignition switch, the system
will require you to enter a PIN before
it can be used. Refer to the
navigation system manual. Vehicle Storage
If you need to park your vehicle for
an extended period (more than 1
month), there are several things you
should do to prepare it for storage.
Proper preparation helps prevent
deterioration and makes it easier to
get your vehicle back on the road. If
possible, store your vehicle indoors.
●Fill the fuel tank.●Wash and dry the exterior
completely.●Clean the interior. Make sure the
carpeting, floor mats, etc., are
completely dry.●Leave the parking brake off. Put
the transmission in Park.
CONTINUED
Checking the Battery, Vehicle Storage
451
Maintenance
10/06/08 17:42:32 11 ACURA RDX MMC North America Owner's M 50 31STK640 enu
Page 458 of 517

This section covers the more
common problems that motorists
experience with their vehicles. It
gives you information about how to
safely evaluate the problem and what
to do to correct it. If the problem has
stranded you on the side of the road,
you may be able to get going again. If
not, you will also find instructions on
getting your vehicle towed.Compact Spare Tire
....................
454
Changing a Flat Tire
...................
455
If the Engine Won't Start
.............
459
Jump Starting
..............................
461
If the Engine Overheats
..............
463
Low Oil Pressure Indicator
.........
465
Charging System Indicator
.........
465
Malfunction Indicator Lamp
........
466
Brake System Indicator
...............
467
Fuses
..........................................
469
Fuse Locations
............................
473
Emergency Towing
.....................
475
Taking Care of the Unexpected
453
Taking Care of the Unexpected
10/06/08 17:42:32 11 ACURA RDX MMC North America Owner's M 50 31STK640 enu
Page 460 of 517
If you have a flat tire while driving,
stop in a safe place to change it.
Drive slowly along the shoulder until
you get to an exit or an area that is
far away from the traffic lanes.
The vehicle can easily roll off
the jack, seriously injuring
anyone underneath.
Follow the directions for
changing a tire exactly, and
never get under the vehicle
when it is supported only by the
jack.1. Park the vehicle on firm, level, and
non-slippery ground. Put the
transmission in Park. Apply the
parking brake.
If you are towing a trailer, unhitch
it.
2. Turn on the hazard warning lights, and turn the ignition switch to the
LOCK (0) position. Have all
passengers get out of the vehicle
while you change the tire.
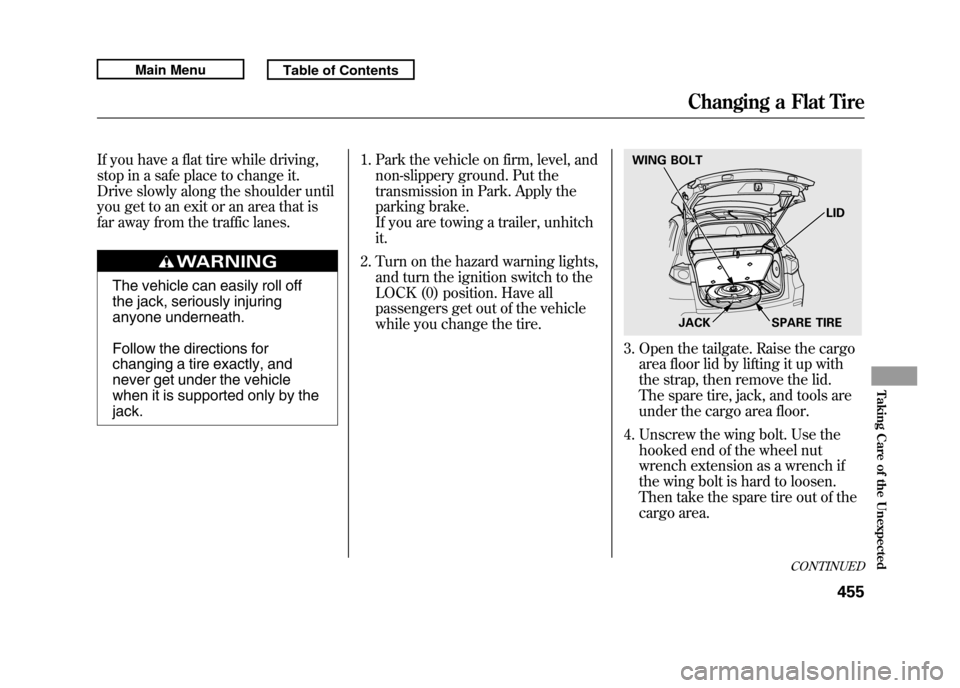
3. Open the tailgate. Raise the cargoarea floor lid by lifting it up with
the strap, then remove the lid.
The spare tire, jack, and tools are
under the cargo area floor.
4. Unscrew the wing bolt. Use the hooked end of the wheel nut
wrench extension as a wrench if
the wing bolt is hard to loosen.
Then take the spare tire out of the
cargo area.WING BOLT
JACK SPARE TIRELID
CONTINUED
Changing a Flat Tire
455
Taking Care of the Unexpected
10/06/08 17:42:32 11 ACURA RDX MMC North America Owner's M 50 31STK640 enu
Page 462 of 517

8. Use the extension and the wheelnut wrench as shown to raise the
vehicle until the flat tire is off the
ground.
9. Remove the wheel nuts, then remove the flat tire. Handle the
wheel nuts carefully; they may be
hot from driving. Place the flat tire
on the ground with the outside
surface facing up.
10. Before mounting the spare tire, wipe any dirt off the mounting
surface of the wheel and hub with
a clean cloth. Wipe the hub
carefully; it may be hot from
driving. 11. Put on the spare tire. Put the
wheel nuts back on finger-tight,
then tighten them in a crisscross
pattern with the wheel nut wrench
until the wheel is firmly against the
hub. Do not try to tighten the
wheel nuts fully.
12. Lower the vehicle to the ground, and remove the jack.
WHEEL NUT WRENCH EXTENSION
BRAKE HUB
CONTINUED
Changing a Flat Tire
457
Taking Care of the Unexpected
10/06/08 17:42:32 11 ACURA RDX MMC North America Owner's M 50 31STK640 enu
Page 466 of 517

Although this seems like a simple
procedure, you should take several
precautions.
A battery can explode if you do
not follow the correct
procedure, seriously injuring
anyone nearby.
Keep all sparks, open flames,
and smoking materials away
from the battery.
You cannot start your vehicle by
pushing or pulling it.
To Jump Start Your Vehicle:1. Open the hood, and check the physical condition of the battery.
In very cold weather, check the
condition of the electrolyte. If it
seems slushy or frozen, do not try
jump starting until it thaws.If a battery sits in extreme cold, the
electrolyte inside can freeze. Attempting
to jump start with a frozen battery can
cause it to rupture.
2. Turn off all electrical accessories:heater, A/C, climate control, audio
system, lights, etc. Put the
transmission in Park, and set the
parking brake.
The numbers in the illustration
show you the order to connect the
jumper cables.
BOOSTER
BATTERYCONTINUED
Jump Starting
461
Taking Care of the Unexpected
10/06/08 17:42:32 11 ACURA RDX MMC North America Owner's M 50 31STK640 enu