display Acura RDX 2014 Repair Manual
[x] Cancel search | Manufacturer: ACURA, Model Year: 2014, Model line: RDX, Model: Acura RDX 2014Pages: 363, PDF Size: 13.7 MB
Page 200 of 363
199
uuBluetooth ® HandsFreeLink ®u HFL Menus
Continued
*1: Appears only when a phone is connected to HFL.
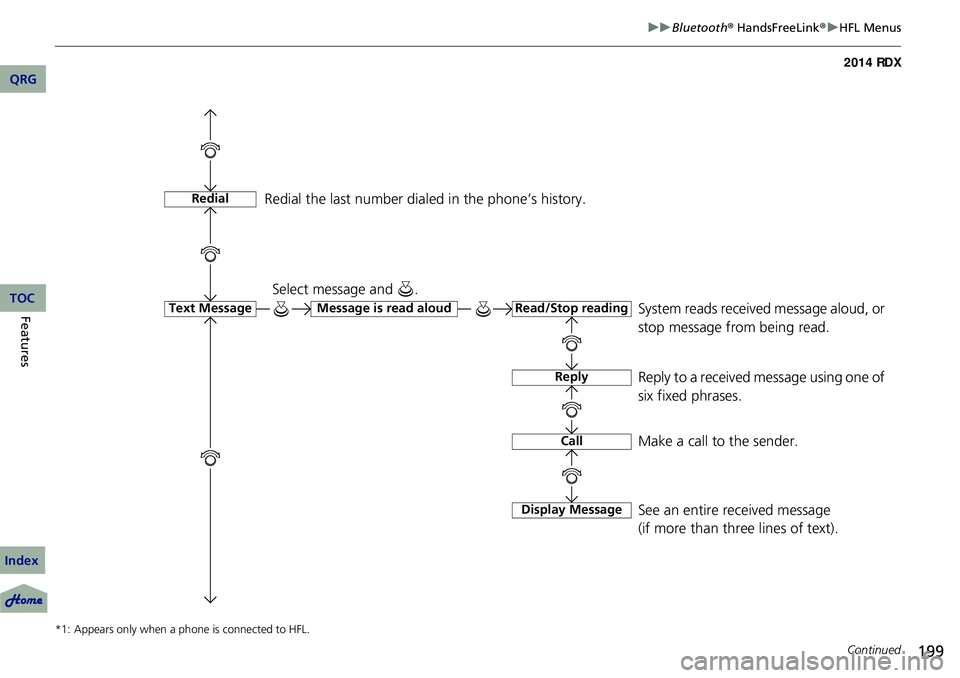
Redial
Text MessageRead/Stop readingMessage is read aloud
Reply
Call
Display Message
System reads received message aloud, or
stop message from being read.
Select message and .
Reply to a received message using one of
six fixed phrases.
Make a call to the sender.
See an entire received message
(if more than three lines of text).
Redial the last number dial
ed in the phone’s history.
QRG
Index
FeaturesTOC
Page 204 of 363
Continued203
uuBluetooth ® HandsFreeLink ®u HFL Menus
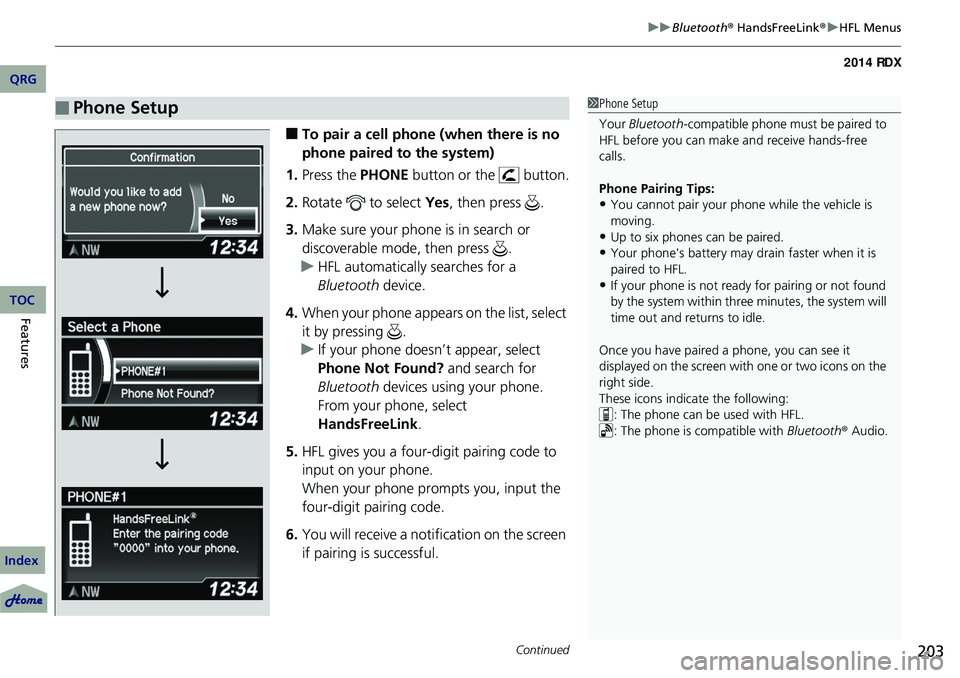
■To pair a cell phone (when there is no
phone paired to the system)
1. Press the PHONE button or the button.
2. Rotate to select Yes, then press .
3. Make sure your phone is in search or
discoverable mode, then press .
u HFL automatically searches for a
Bluetooth device.
4. When your phone appears on the list, select
it by pressing .
u If your phone doesn’t appear, select
Phone Not Found? and search for
Bluetooth devices using your phone.
From your phone, select
HandsFreeLink .
5. HFL gives you a four-digit pairing code to
input on your phone.
When your phone prompts you, input the
four-digit pairing code.
6. You will receive a notification on the screen
if pairing is successful.
■Phone Setup1Phone Setup
Your Bluetooth -compatible phone must be paired to
HFL before you can make and receive hands-free
calls.
Phone Pairing Tips:
•You cannot pair your phone while the vehicle is
moving.
•Up to six phones can be paired.
•Your phone's battery may dr ain faster when it is
paired to HFL.
•If your phone is not ready for pairing or not found
by the system within three minutes, the system will
time out and returns to idle.
Once you have paired a phone, you can see it
displayed on the screen with one or two icons on the
right side.
These icons indicate the following: : The phone can be used with HFL.
: The phone is compatible with Bluetooth® Audio.
QRG
Index
FeaturesTOC
Page 211 of 363
uuBluetooth ® HandsFreeLink ®u HFL Menus
210
Features
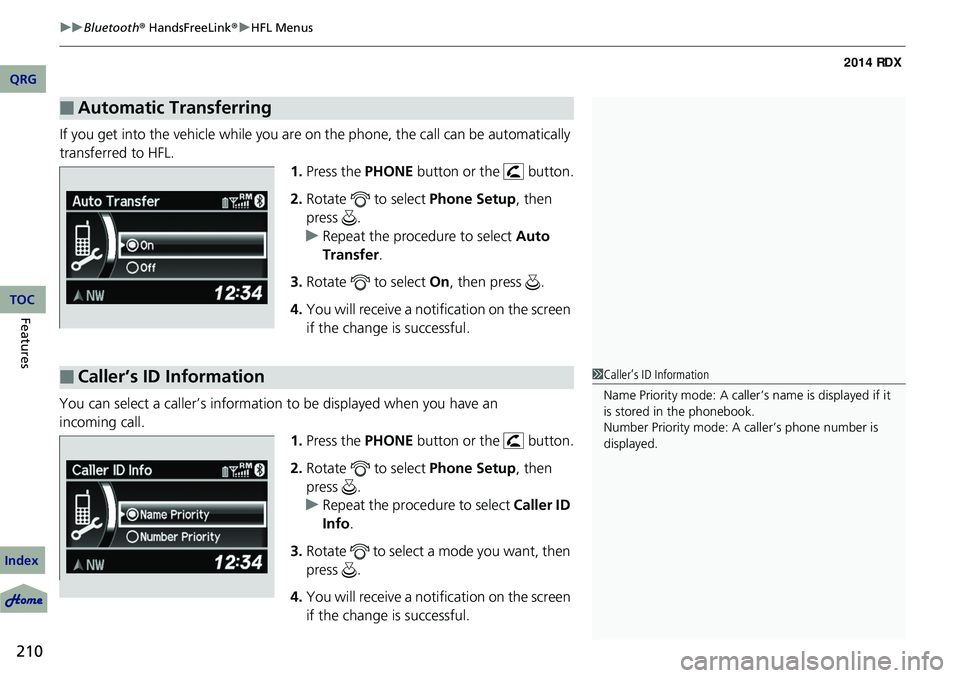
If you get into the vehicle while you are on the phone, the call can be automatically
transferred to HFL. 1.Press the PHONE button or the button.
2. Rotate to select Phone Setup, then
press .
u Repeat the procedure to select Auto
Transfer .
3. Rotate to select On, then press .
4. You will receive a notification on the screen
if the change is successful.
You can select a caller’s information to be displayed when you have an
incoming call. 1.Press the PHONE button or the button.
2. Rotate to select Phone Setup, then
press .
u Repeat the procedure to select Caller ID
Info .
3. Rotate to select a mode you want, then
press .
4. You will receive a notification on the screen
if the change is successful.
■Automatic Transferring
■Caller’s ID Information1Caller’s ID Information
Name Priority mode: A caller’s name is displayed if it
is stored in the phonebook.
Number Priority mode: A caller’s phone number is
displayed.
QRG
Index
TOC
Page 221 of 363
uuBluetooth ® HandsFreeLink ®u HFL Menus
220
Features
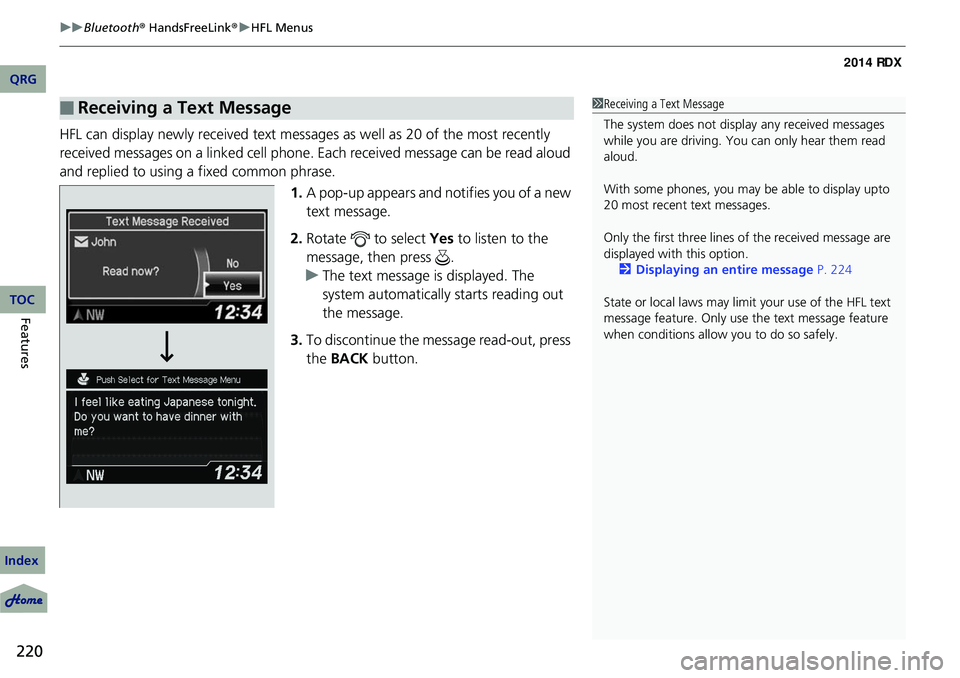
HFL can display newly received text message s as well as 20 of the most recently
received messages on a linked cell phone. Eac h received message can be read aloud
and replied to using a fixed common phrase.
1.A pop-up appears and notifies you of a new
text message.
2. Rotate to select Yes to listen to the
message, then press .
u The text message is displayed. The
system automatically starts reading out
the message.
3. To discontinue the message read-out, press
the BACK button.
■Receiving a Text Message1Receiving a Text Message
The system does not display any received messages
while you are driving. You can only hear them read
aloud.
With some phones, you may be able to display upto
20 most recent text messages.
Only the first three lines of the received message are
displayed with this option.
2 Displaying an entire message P. 224
State or local laws may limit your use of the HFL text
message feature. Only use the text message feature
when conditions allow you to do so safely.
QRG
Index
TOC
Page 222 of 363
Continued221
uuBluetooth ® HandsFreeLink ®u HFL Menus
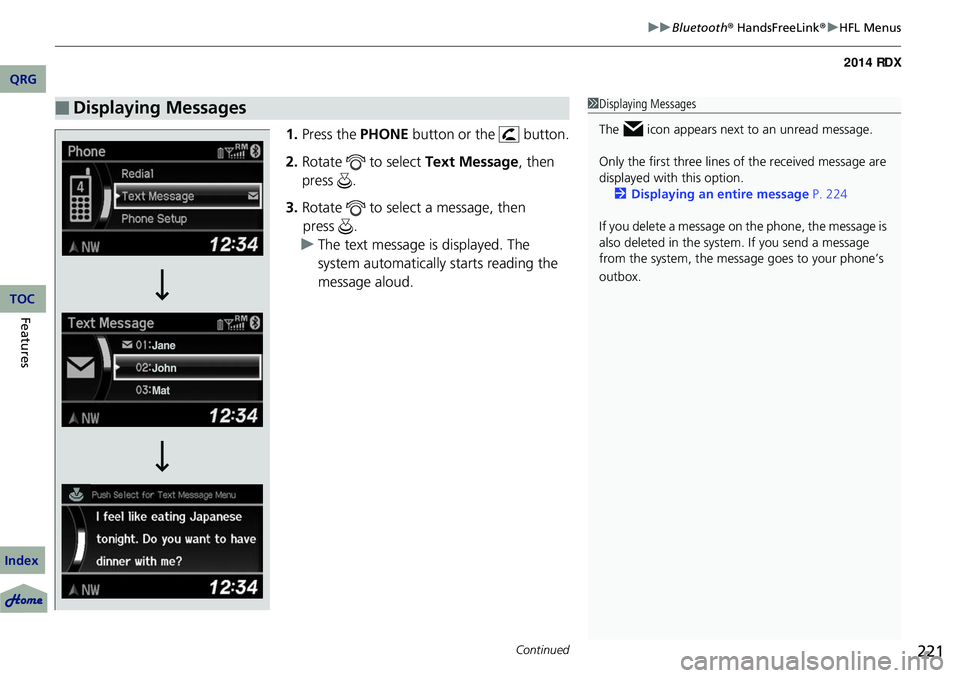
1. Press the PHONE button or the button.
2. Rotate to select Text Message, then
press .
3. Rotate to select a message, then
u The text message is displayed. The
system automatically starts reading the
message aloud.
■Displaying Messages1Displaying Messages
The icon appears next to an unread message.
Only the first three lines of the received message are
displayed with this option.
2 Displaying an entire message P. 224
If you delete a message on the phone, the message is
also deleted in the system. If you send a message
from the system, the message goes to your phone’s
outbox.
QRG
Index
FeaturesTOC
press .
Page 223 of 363
uuBluetooth ® HandsFreeLink ®u HFL Menus
222
Features
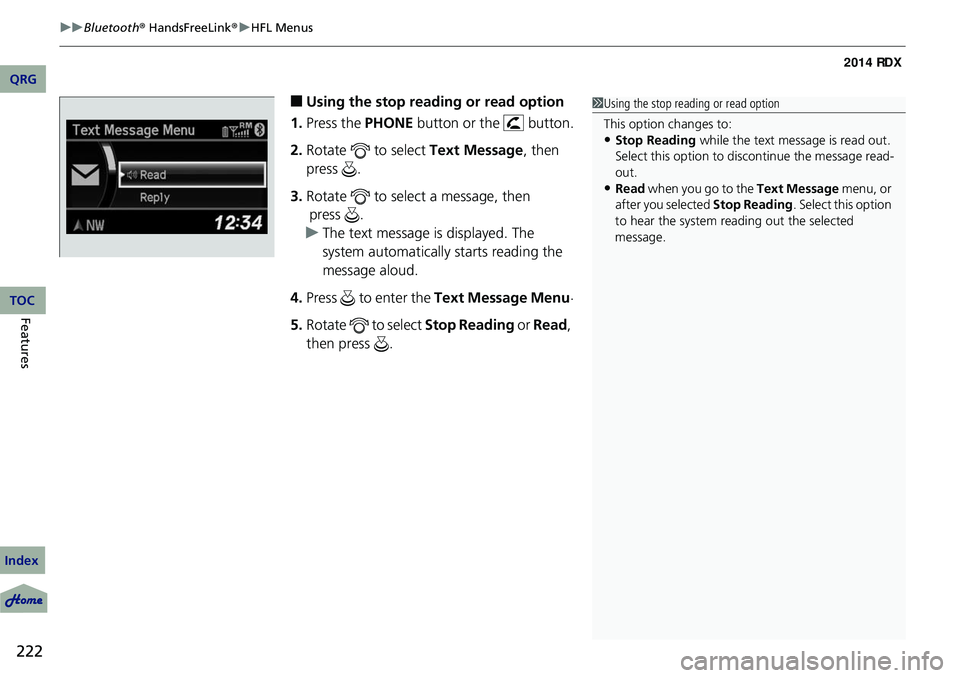
■Using the stop read ing or read option
1. Press the PHONE button or the button.
2. Rotate to select Text Message, then
press .
3. Rotate to select a message, then
u The text message is displayed. The
system automatically starts reading the
message aloud.
4. Press to enter the Text Message Menu .
5. Rotate to select Stop Reading or Read,
then press .1 Using the stop reading or read option
This option changes to:
•Stop Reading while the text message is read out.
Select this option to discontinue the message read-
out.
•Read when you go to the Text Message menu, or
after you selected Stop Reading. Select this option
to hear the system re ading out the selected
message.
QRG
Index
TOC
press .
Page 224 of 363
Continued223
uuBluetooth ® HandsFreeLink ®u HFL Menus
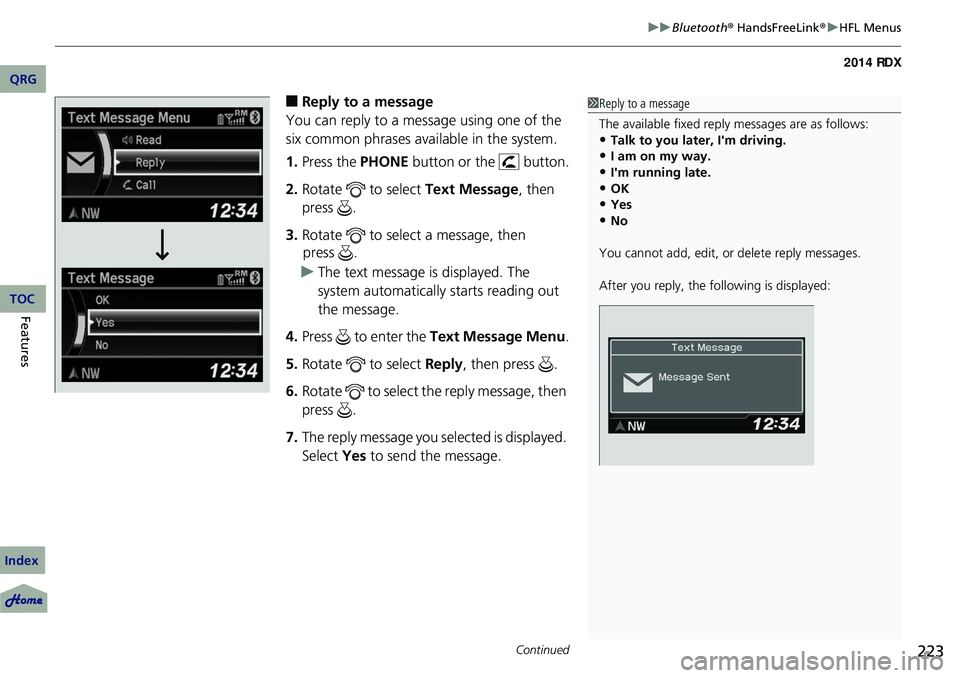
■Reply to a message
You can reply to a message using one of the
six common phrases ava ilable in the system.
1. Press the PHONE button or the button.
2. Rotate to select Text Message, then
press .
3. Rotate to select a message, then
u The text message is displayed. The
system automatically starts reading out
the message.
4. Press to enter the Text Message Menu .
5. Rotate to select Reply, then press .
6. Rotate to select the reply message, then
press .
7. The reply message you selected is displayed.
Select Yes to send the message.1Reply to a message
The available fixed reply messages are as follows:
•Talk to you later, I'm driving.
•I am on my way.
•I'm running late.•OK
•Yes
•No
You cannot add, edit, or delete reply messages.
After you reply, the fo llowing is displayed:
QRG
Index
FeaturesTOC
press .
Page 225 of 363
224
uuBluetooth ® HandsFreeLink ®u HFL Menus
Features
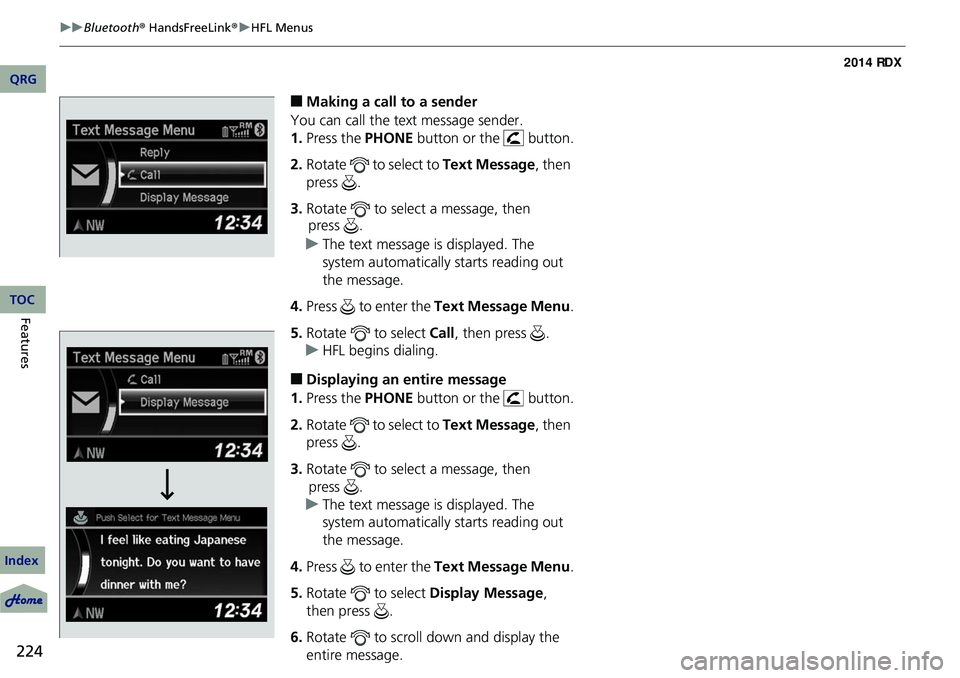
■Making a call to a sender
You can call the text message sender.
1. Press the PHONE button or the button.
2. Rotate to select to Text Message, then
press .
3. Rotate to select a message, then
u The text message is displayed. The
system automatically starts reading out
the message.
4. Press to enter the Text Message Menu .
5. Rotate to select Call, then press .
u HFL begins dialing.
■Displaying an entire message
1. Press the PHONE button or the button.
2. Rotate to select to Text Message, then
press .
3. Rotate to select a message, then
u The text message is displayed. The
system automatically starts reading out
the message.
4. Press to enter the Text Message Menu .
5. Rotate to select Display Message,
then press .
6. Rotate to scroll down and display the
entire message.
QRG
Index
TOC
press .
press .
Page 226 of 363
225
Compass*
When you set the power mode to ON, the compass self-calibrates, and the compass
display appears.
Compass Calibration
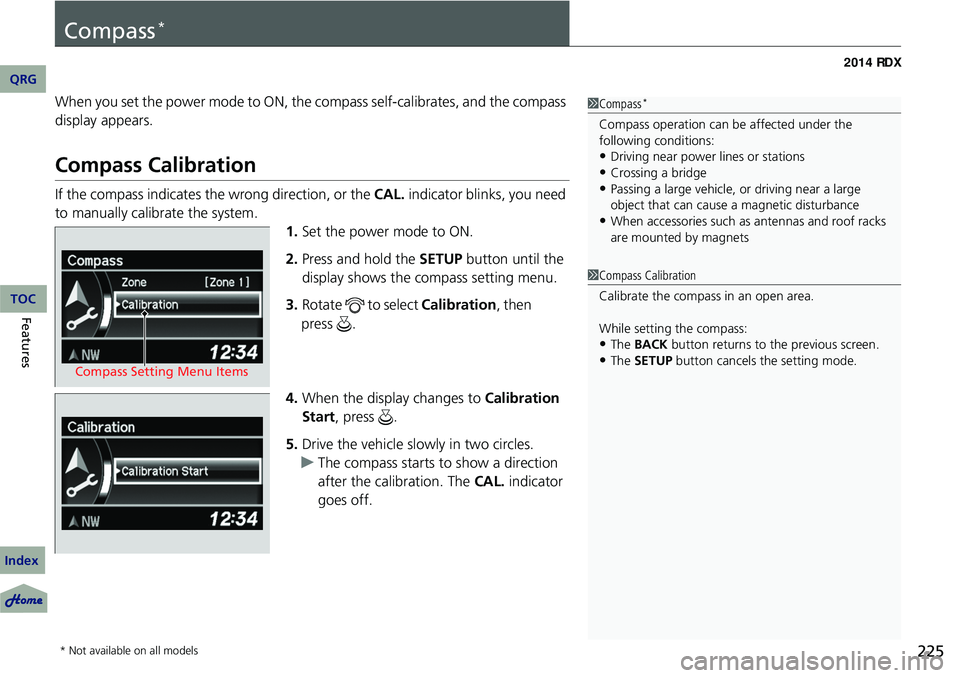
If the compass indicates the wrong direction, or the CAL. indicator blinks, you need
to manually calibrate the system.
1.Set the power mode to ON.
2. Press and hold the SETUP button until the
display shows the compass setting menu.
3. Rotate to select Calibration, then
4. When the display changes to Calibration
Start, press .
5. Drive the vehicle slow ly in two circles.
u The compass starts to show a direction
after the calibration. The CAL. indicator
goes off.
1 Compass*
Compass operation can be affected under the
following conditions:
•Driving near power lines or stations•Crossing a bridge
•Passing a large vehicle, or driving near a large
object that can cause a magnetic disturbance
•When accessories such as antennas and roof racks
are mounted by magnets
Compass Setting Menu Items
1 Compass Calibration
Calibrate the compass in an open area.
While setting the compass:
•The BACK button returns to the previous screen.•The SETUP button cancels the setting mode.
* Not available on all models
QRG
Index
FeaturesTOC
press .
Page 227 of 363
226
uuCompass*uCompass Zone Selection
Features
Compass Zone Selection
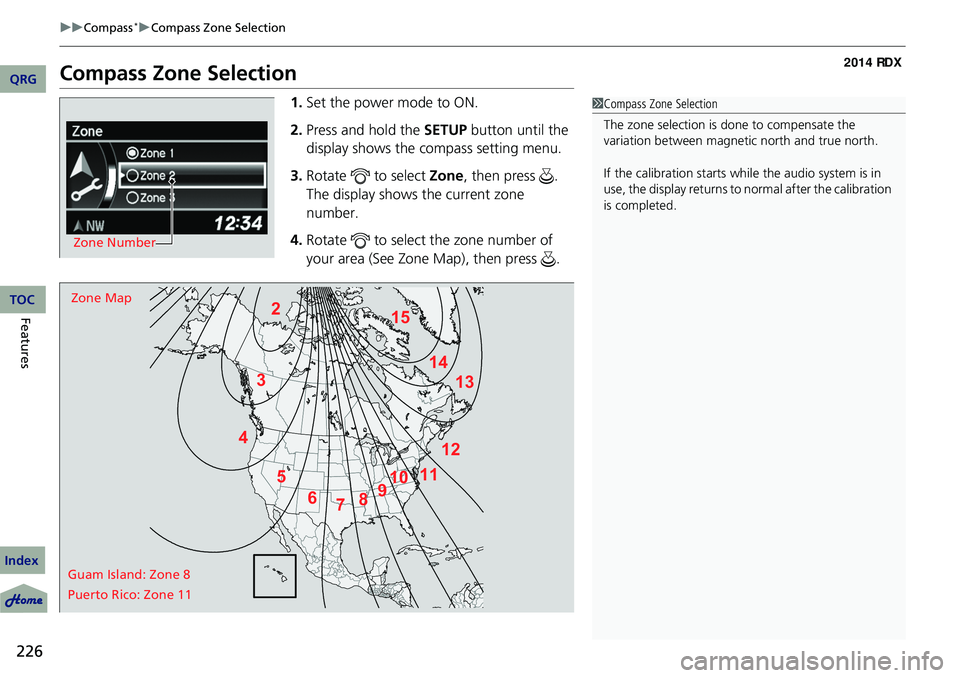
1. Set the power mode to ON.
2. Press and hold the SETUP button until the
display shows the compass setting menu.
3. Rotate to select Zone, then press .
The display shows the current zone
number.
4. Rotate to select the zone number of
your area (See Zone Map), then press .
Zone Number
2
3
4 5678910
111213
14
15Zone Map
Guam Island: Zone 8
Puerto Rico: Zone 11
1 Compass Zone Selection
The zone selection is done to compensate the
variation between magneti c north and true north.
If the calibration starts while the audio system is in
use, the display returns to normal after the calibration
is completed.
QRG
Index
TOC