display Acura RDX 2015 Owner's Manual
[x] Cancel search | Manufacturer: ACURA, Model Year: 2015, Model line: RDX, Model: Acura RDX 2015Pages: 71, PDF Size: 18.23 MB
Page 42 of 71
76 || 77
NAVIGATION
NAVIGATION
TABLE OF
CONTENTS
VISUAL INDEX
SAFETY
INFORMATION
INSTRUMENT PANEL
VEHICLE
CONTROLS
AUDIO AND
CONNECTIVITY
BLUETOOTH®
HANDSFREELINK®
ACURALINK®
INDEX
VOICE COMMAND INDEX
CLIENT
INFORMATION
SPECIFICATIONS
MAINTENANCE
HANDLING THE UNEXPECTED
DRIVING
NAVIGATION
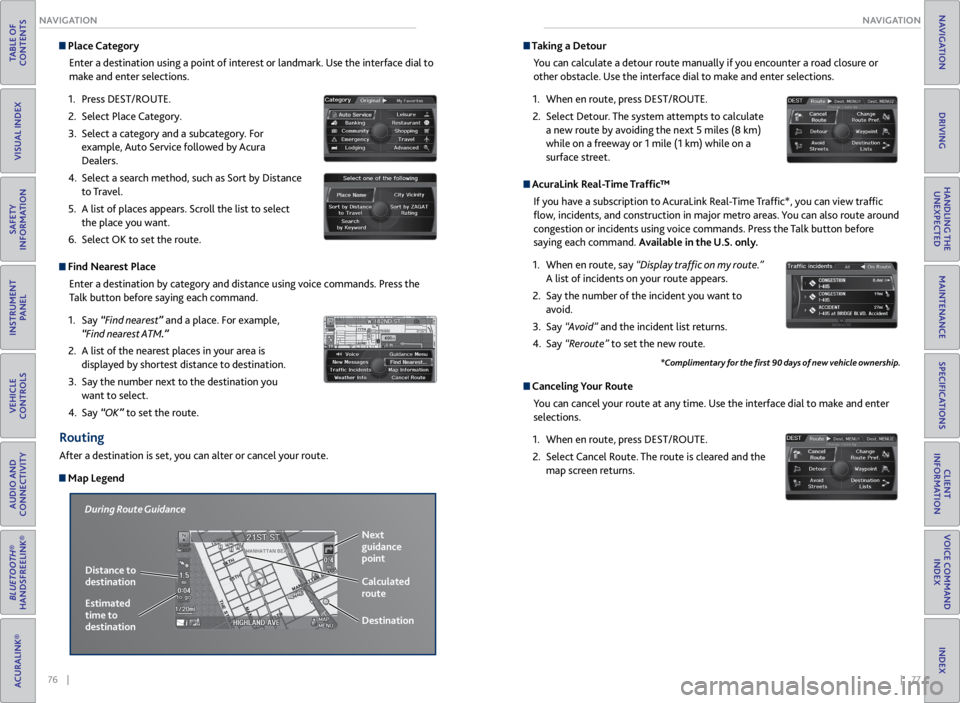
Place Category
Enter a destination using a point of interest or landmark. Use the interface dial to
make and enter selections.
1. Press DEST/ROUTE.
2. Select Place Category.
3. Select a category and a subcategory. For
example, Auto Service followed by Acura
Dealers.
4. Select a search method, such as Sort by Distance
to Travel.
5. A list of places appears. Scroll the list to select
the place you want.
6. Select OK to set the route.
Find Nearest Place
Enter a destination by category and distance using voice commands. Press the
Talk button before saying each command.
1. Say “Find nearest” and a place. For example,
“Find nearest ATM.”
2. A list of the nearest places in your area is
displayed by shortest distance to destination.
3. Say the number next to the destination you
want to select.
4. Say “OK” to set the route.
Routing
After a destination is set, you can alter or cancel your route.
Map Legend
During Route Guidance
Next
guidance
point
Distance to
destination Calculated
route
Estimated
time to
destination Destination
Taking a
Detour
You can calculate a detour route manually if you encounter a road closure or
other obstacle. Use the interface dial to make and enter selections.
1. When en route, press DEST/ROUTE.
2. Select Detour. The system attempts to calculate
a new route by avoiding the next 5 miles (8 km)
while on a freeway or 1 mile (1 km) while on a
surface street.
AcuraLink Real-Time Traffic™
If you have a subscription to AcuraLink Real-Time Traffic*, you can view traffic
flow, incidents, and construction in major metro areas. You can also route around
congestion or incidents using voice commands. Press the Talk button before
saying each command. Available in the U.S. only.
1. When en route, say “Display traffic on my route.”
A list of incidents on your route appears.
2. Say the number of the incident you want to
avoid.
3. Say “Avoid” and the incident list returns.
4. Say “Reroute” to set the new route.
Canceling Your Route
You can cancel your route at any time. Use the interface dial to make and enter
selections.
1. When en route, press DEST/ROUTE.
2. Select Cancel Route. The route is cleared and the
map screen returns.
*Complimentary for the first 90 days of new vehicle ownership.
Page 48 of 71

88 || 89
DRIVING
DRIVING
TABLE OF
CONTENTS
VISUAL INDEX
SAFETY
INFORMATION
INSTRUMENT PANEL
VEHICLE
CONTROLS
AUDIO AND
CONNECTIVITY
BLUETOOTH®
HANDSFREELINK®
ACURALINK®
INDEX
VOICE COMMAND INDEX
CLIENT
INFORMATION
SPECIFICATIONS
MAINTENANCE
HANDLING THE UNEXPECTED
DRIVING
NAVIGATION
Cruise Control
Maintain a constant vehicle speed without having to keep your foot on the
accelerator pedal. Use cruise control on freeways or open roads where you can
travel at a constant speed with little acceleration or deceleration.
Improper use of the cruise control can lead to a crash.
Use cruise control only when traveling on open highways in good weather.
WARNING
Activating and Setting the Vehicle Speed1. Press CRUISE. The CRUISE MAIN indicator appears.
2. Accelerate to the desired speed (above 25 mph).
Press DECEL/SET and take your foot off the pedal
to set the speed. The CRUISE CONTROL indicator
appears.
Adjusting the Vehicle Speed
Press RES/ACCEL to increase or DECEL/SET to decrease.
Each time you press the button, the vehicle speed is
increased or decreased by about 1 mph (1.6 km/h).
If you keep the button pressed, the vehicle speed
increases or decreases until you release it.
Canceling Cruise ControlPress CANCEL or the brake pedal. The CRUISE
CONTROL indicator goes off.
After cruise control has been canceled, you can still
resume the prior set speed by pressing RES/ACCEL
while driving at a speed of at least 25 mph (40 km/h).
Press CRUISE to turn the system off.
CRUISE button
RES/ACCEL button
DECEL/SET button
CANCEL button
Multi-View Rear Camera
When you shift into Reverse (R), a real-time image of the area behind your vehicle
is shown in the display, along with helpful parking guidelines.
The rear camera view is restricted. You cannot see the corner ends of the bumper or what is underneath
the bumper. Its unique lens also makes objects appear closer or farther than they actually are.
Visually confirm that it is safe to drive before backing up. Certain conditions (such as weather, lighting,
and high temperatures) may also restrict the rear view. Do not rely on the rearview display, which does
not give you all information about conditions at the rear of your vehicle.
Wide view Normal view Top down view
Press the
selector knob
or interface
dial to toggle
between views.
Models with navigation
Press CANCEL to turn the guidelines on or off.
Rotate the interface dial to adjust screen brightness.
This only changes the brightness of the rear view.
Page 49 of 71
90 || 91
HANDLING THE UNEXPECTED
DRIVING
TABLE OF
CONTENTS
VISUAL INDEX
SAFETY
INFORMATION
INSTRUMENT PANEL
VEHICLE
CONTROLS
AUDIO AND
CONNECTIVITY
BLUETOOTH®
HANDSFREELINK®
ACURALINK®
INDEX
VOICE COMMAND INDEX
CLIENT
INFORMATION
SPECIFICATIONS
MAINTENANCE
HANDLING THE UNEXPECTED
DRIVING
NAVIGATION
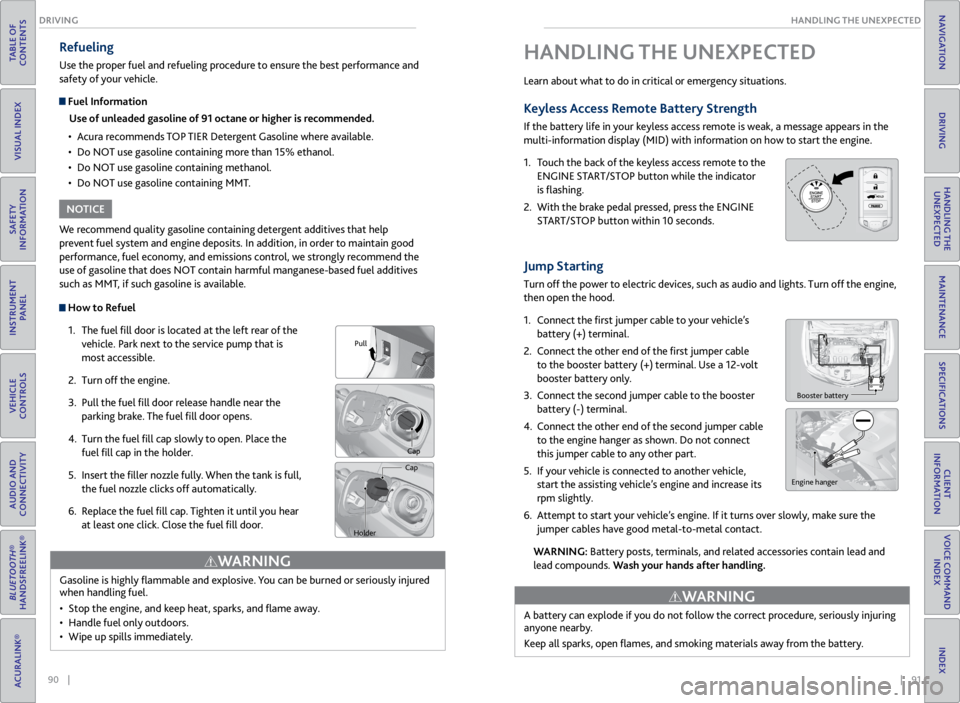
How to Refuel
1. The fuel fill door is located at the left rear of the
vehicle. Park next to the service pump that is
most accessible.
2. Turn off the engine.
3. Pull the fuel fill door release handle near the
parking brake. The fuel fill door opens.
4. Turn the fuel fill cap slowly to open. Place the
fuel fill cap in the holder.
5. Insert the filler nozzle fully. When the tank is full,
the fuel nozzle clicks off automatically.
6. Replace the fuel fill cap. Tighten it until you hear
at least one click. Close the fuel fill door.
Refueling
Use the proper fuel and refueling procedure to ensure the best performance and
safety of your vehicle.
Fuel Information
Use of unleaded gasoline of 91 octane or higher is recommended.
• Acura recommends TOP TIER Detergent Gasoline where available.
• Do NOT use gasoline containing more than 15% ethanol.
• Do NOT use gasoline containing methanol.
• Do NOT use gasoline containing MMT.
We recommend quality gasoline containing detergent additives that help
prevent fuel system and engine deposits. In addition, in order to maintain good
performance, fuel economy, and emissions control, we strongly recommend the
use of gasoline that does NOT contain harmful manganese-based fuel additives
such as MMT, if such gasoline is available.
NOTICE
Gasoline is highly flammable and explosive. You can be burned or seriously injured
when handling fuel.
• Stop the engine, and keep heat, sparks, and flame away.
• Handle fuel only outdoors.
• Wipe up spills immediately.
WARNING
Pull
Cap
Cap
Holder
Learn about what to do in critical or emergency situations.
Keyless Access Remote Battery Strength
If the battery life in your keyless access remote is weak, a message appears in the
multi-information display (MID) with information on how to start the engine.
1. Touch the back of the keyless access remote to the
ENGINE START/STOP button while the indicator
is flashing.
2. With the brake pedal pressed, press the ENGINE
START/STOP button within 10 seconds.
Jump Starting
Turn off the power to electric devices, such as audio and lights. Turn off the engine,
then open the hood.
1. Connect the first jumper cable to your vehicle’s
battery (+) terminal.
2. Connect the other end of the first jumper cable
to the booster battery (+) terminal. Use a 12-volt
booster battery only.
3. Connect the second jumper cable to the booster
battery (-) terminal.
4. Connect the other end of the second jumper cable
to the engine hanger as shown. Do not connect
this jumper cable to any other part.
5. If your vehicle is connected to another vehicle,
start the assisting vehicle’s engine and increase its
rpm slightly.
6. Attempt to start your vehicle’s engine. If it turns over slowly, make sure the
jumper cables have good metal-to-metal contact.
WARNING: Battery posts, terminals, and related accessories contain lead and
lead compounds. Wash your hands after handling.
HANDLING THE UNEXPECTED
Booster battery
HOLD
Engine hanger
A battery can explode if you do not follow the correct procedure, seriously injuring
anyone nearby.
Keep all sparks, open flames, and smoking materials away from the battery.
WARNING
Page 51 of 71

94 || 95
HANDLING THE UNEXPECTED
HANDLING THE UNEXPECTED
TABLE OF
CONTENTS
VISUAL INDEX
SAFETY
INFORMATION
INSTRUMENT PANEL
VEHICLE
CONTROLS
AUDIO AND
CONNECTIVITY
BLUETOOTH®
HANDSFREELINK®
ACURALINK®
INDEX
VOICE COMMAND INDEX
CLIENT
INFORMATION
SPECIFICATIONS
MAINTENANCE
HANDLING THE UNEXPECTED
DRIVING
NAVIGATION
Emergency Engine Stop
The ENGINE START/STOP button may be used to stop the engine due to an
emergency situation even while driving. If you must stop the engine, choose one of
the following operations:
• Press and hold the ENGINE START/STOP
button for three seconds, OR
• Firmly press the ENGINE START/STOP button
three times.
The steering wheel will not lock. The power mode changes to ACCESSORY, unless
the shift lever is in Park (P), in which case the power mode changes to VEHICLE OFF.
Because turning off the engine also disables the power assist the engine provides to
the steering and braking systems, it will require significantly more physical effort
and time to steer and slow the vehicle. Downshift gears and use both feet on the
brake pedal, if necessary, to slow the vehicle and stop immediately in a safe place.
Trying to lift or tow your vehicle by the bumpers will cause serious damage. The
bumpers are not designed to support the vehicle’s weight.
Improper towing such as towing behind a motorhome or other motor vehicle can
damage the transmission.
NOTICE
NOTICE
Emergency Towing
Call a professional towing service if you need to tow your vehicle.
All models
Flat bed equipment: The operator loads your vehicle on the back of a truck. This is
the best way to transport your vehicle.
2WD models
Wheel lift equipment: The tow truck uses two pivoting arms that go under the front
tires and lift them off the ground. The rear tires remain on the ground. This is an
acceptable way to tow your vehicle. Do not press the button while driving unless it is absolutely necessary for the
engine to be switched off.
Tire Pressure Monitoring System (TPMS)
Monitors the tire pressure while you are driving.
If your vehicle’s tire pressure becomes significantly low, the low tire pressure
indicator comes on and a message appears on the multi-information display.
What to Do
Stop your vehicle in a safe place. Adjust the tire pressure to the specified level on
a label on the driver’s doorjamb.
Driving on an extremely underinflated tire can cause it to overheat. An overheated
tire can fail. Always inflate your tires to the specified pressure.
NOTICE
Press the INFO button to
scroll to the tire pressure
monitor to see which
tire(s) have low pressure.
Tire
pressure
monitor
The
specific
tire is
displayed.
Page 55 of 71

102 || 103
MAINTENANCE
MAINTENANCE
TABLE OF
CONTENTS
VISUAL INDEX
SAFETY
INFORMATION
INSTRUMENT PANEL
VEHICLE
CONTROLS
AUDIO AND
CONNECTIVITY
BLUETOOTH®
HANDSFREELINK®
ACURALINK®
INDEX
VOICE COMMAND INDEX
CLIENT
INFORMATION
SPECIFICATIONS
MAINTENANCE
HANDLING THE UNEXPECTED
DRIVING
NAVIGATION
Learn about basic maintenance that you can perform on the vehicle yourself, as
well as information about how to best maintain the vehicle.
Safety Precautions
Some of the most important safety precautions are listed below; however,
we cannot warn you of every conceivable hazard that can arise in performing
maintenance. Only you can decide whether or not you should perform a given task.
Maintenance Safety
• To reduce the possibility of fire or explosion, keep cigarettes, sparks, and flames
away from the battery and all fuel-related parts.
• Never leave rags, towels, or other flammable objects under the hood.
• To clean parts, use a commercially available degreaser or parts cleaner, not
gasoline.
• Wear eye protection and protective clothing when working with the battery or
compressed air.
• Do not run the engine in confined spaces where carbon monoxide gas can
accumulate.
Vehicle Safety
• The vehicle must be stationary, and parked on level ground with the parking
brake set and the engine off.
• Be aware that hot parts can burn you.
• Be aware that moving parts can injure you.
MAINTENANCE
Improperly maintaining this vehicle or failing to correct a problem before
driving can cause a crash in which you can be seriously hurt or killed.
Always follow the inspection and maintenance recommendations according to
the schedules in this guide.
WARNING
Failure to properly follow maintenance instructions and precautions can cause
you to be seriously hurt or killed.
Always follow the procedures and precautions in this guide.
WARNING
Maintenance Minder™
Reminds you when indicated maintenance service is due.
When maintenance is due, the system message indicator comes on and the
Maintenance Minder appears on the multi-information display every time you turn
the vehicle on. Press the info button to change displays.
Maintenance Minder Service Codes
These codes indicate what services are due on your vehicle.
*1: If the message SERVICE does not appear more than 12 months after the display is\
reset, change the
engine oil every year .
#: See information on maintenance and emissions warranty.*2:If you drive in dusty conditions, replace the air cleaner element every 15,000 miles (24,000 km).
*3: If you drive primarily in urban areas that have high concentrations of i\
ndustrial soot and pollution from
diesel-powered vehicles, replace the dust and pollen �lter every 15,000 miles (24,000 km).
CODEMaintenance Main Items
A•Replace engine oi l*1
B•Replace engine oil*1 and oil �lter•Inspect front and rear brakes, service as necessary•Check parking brake adjustment•Inspect tie rod ends, steering gearbox, and boot s•Inspect suspension components•Inspect driveshaft boots•Inspect brake hoses and lines (Including ABS/VSA)•Inspect all �uid levels and condition of �uid s•Inspect exhaust system#
•Inspect fuel lines and connections#
*4:If you drive regularly in very high temperatures (over 110 °F, 43 °C), \
in very low temperatures (under -
20 °F, -29 °C), or tow a tra iler, repl ace ever y 60,000 mi les/100,000 km .
CODE Maintenance Sub Items
1
•Rotate tires
2
•Replace air cleaner element*2
•Replace dust and pollen �lte r*3
•Inspect drive belt
3
•Replace transmission and transfer �uid*
4•Replace spark plugs•Replace timing belt an d inspect water pump*4
•Inspect valve clearance
5
•Replace engine coolant
6
•Replace rear differential �uid*
System
message
indicator
Main
itemSub item
Maintenance Minder
Page 56 of 71
104 || 105
MAINTENANCE
MAINTENANCE
TABLE OF
CONTENTS
VISUAL INDEX
SAFETY
INFORMATION
INSTRUMENT PANEL
VEHICLE
CONTROLS
AUDIO AND
CONNECTIVITY
BLUETOOTH®
HANDSFREELINK®
ACURALINK®
INDEX
VOICE COMMAND INDEX
CLIENT
INFORMATION
SPECIFICATIONS
MAINTENANCE
HANDLING THE UNEXPECTED
DRIVING
NAVIGATION
*1: If the message SERVICE does not appear more than 12 months after the display is\
reset, change the
engine oil every year .
#: See information on maintenance and emissions warranty.*2:If you drive in dusty conditions, replace the air cleaner element every 15,000 miles (24,000 km).
*3: If you drive primarily in urban areas that have high concentrations of i\
ndustrial soot and pollution from
diesel-powered vehicles, replace the dust and pollen �lter every 15,000 miles (24,000 km).
CODE Maintenance Main Items
A
•Replace engine oi l*1
B•Replace engine oil*1 and oil �lter•Inspect front and rear brakes, service as necessary•Check parking brake adjustment•Inspect tie rod ends, steering gearbox, and boot s•Inspect suspension components•Inspect driveshaft boots•Inspect brake hoses and lines (Including ABS/VSA)•Inspect all �uid levels and condition of �uid s•Inspect exhaust system#
•Inspect fuel lines and connections#
*4:If you drive regularly in very high temperatures (over 110 °F, 43 °C), \
in very low temperatures (under -
20 °F, -29 °C), or tow a tra iler, repl ace ever y 60,000 mi les/100,000 km .
CODEMaintenance Sub Item s
1
•Rotate tires
2•Replace air cleaner element*2
•Replace dust and pollen �lte r*3
•Inspect drive belt
3
•Replace transmission and transfer �uid*
4•Replace spark plugs•Replace timing belt an d inspect water pump*4
•Inspect valve clearance
5
•Replace engine coolant
6•Replace rear differential �uid*
• Independent of the Maintenance Minder information, replace the brake fluid
every 3 years.
• Inspect idle speed every 160,000 miles (256,000 km).
• Adjust the valves during services A, B, 1, 2, or 3 if they are noisy.
U.S. models
Maintenance, replacement, or repair of emissions control devices and systems
may be done by any automotive repair establishment or individuals using
parts that are certified to EPA standards.
According to state and federal regulations, failure to perform maintenance on the
maintenance main items marked with # will not void your emissions warranties.
However, all maintenance services should be performed in accordance with the
intervals indicated by the multi-information display.
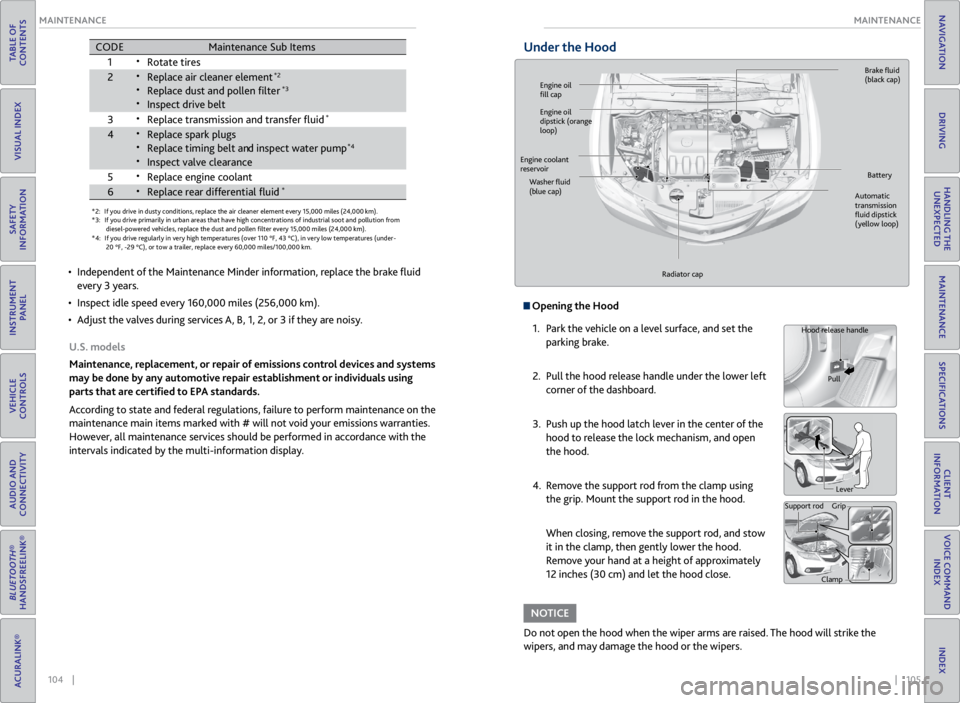
Under the Hood
Opening the Hood
1. Park the vehicle on a level surface, and set the
parking brake.
2. Pull the hood release handle under the lower left
corner of the dashboard.
3. Push up the hood latch lever in the center of the
hood to release the lock mechanism, and open
the hood.
4. Remove the support rod from the clamp using
the grip. Mount the support rod in the hood.
When closing, remove the support rod, and stow
it in the clamp, then gently lower the hood.
Remove your hand at a height of approximately
12 inches (30 cm) and let the hood close.
Do not open the hood when the wiper arms are raised. The hood will strike the
wipers, and may damage the hood or the wipers.
NOTICE
Hood release handle
Pull
Lever
Support rod Grip
Clamp
Engine oil
fill cap Brake
fluid
(black cap)
Automatic
transmission
fluid dipstick
(yellow loop)
Washer
fluid
(blue cap) Battery
Engine coolant
reservoir
Radiator cap
Engine oil
dipstick (orange
loop)
Page 57 of 71
106 || 107
MAINTENANCE
MAINTENANCE
TABLE OF
CONTENTS
VISUAL INDEX
SAFETY
INFORMATION
INSTRUMENT PANEL
VEHICLE
CONTROLS
AUDIO AND
CONNECTIVITY
BLUETOOTH®
HANDSFREELINK®
ACURALINK®
INDEX
VOICE COMMAND INDEX
CLIENT
INFORMATION
SPECIFICATIONS
MAINTENANCE
HANDLING THE UNEXPECTED
DRIVING
NAVIGATION
Engine Oil
Park the vehicle on level ground, and wait approximately three minutes after
turning the engine off before you check the oil.
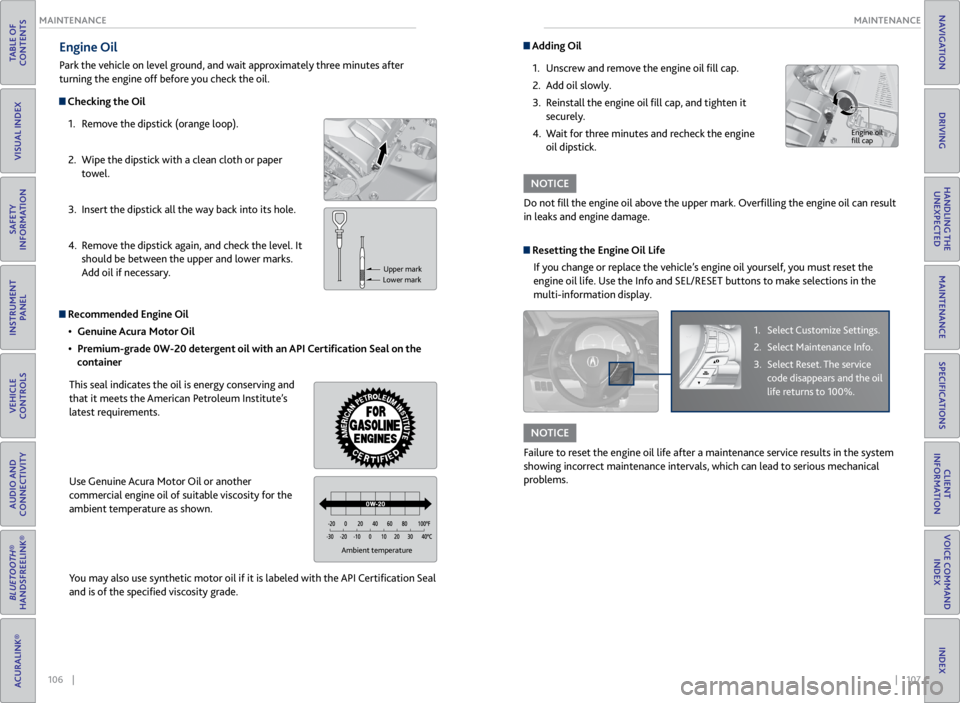
Checking the Oil
1. Remove the dipstick (orange loop).
2. Wipe the dipstick with a clean cloth or paper
towel.
3. Insert the dipstick all the way back into its hole.
4. Remove the dipstick again, and check the level. It
should be between the upper and lower marks.
Add oil if necessary.
Recommended Engine Oil
• Genuine Acura Motor Oil
• Premium-grade 0W-20 detergent oil with an API Certification Seal on the
container
This seal indicates the oil is energy conserving and
that it meets the American Petroleum Institute’s
latest requirements.
Use Genuine Acura Motor Oil or another
commercial engine oil of suitable viscosity for the
ambient temperature as shown.
You may also use synthetic motor oil if it is labeled with the API Certification Seal
and is of the specified viscosity grade.
Upper mark
Lower mark
Ambient temperature
Adding Oil
1. Unscrew and remove the engine oil fill cap.
2. Add oil slowly.
3. Reinstall the engine oil fill cap, and tighten it
securely.
4. Wait for three minutes and recheck the engine
oil dipstick.
Do not fill the engine oil above the upper mark. Overfilling the engine oil can result
in leaks and engine damage.
NOTICE
Engine oil
fill cap
Resetting the Engine Oil Life If you change or replace the vehicle’s engine oil yourself, you must reset the
engine oil life. Use the Info and SEL/RESET buttons to make selections in the
multi-information display.
1. Select Customize Settings.
2. Select Maintenance Info.
3. Select Reset. The service
code disappears and the oil
life returns to 100%.
Failure to reset the engine oil life after a maintenance service results in the system
showing incorrect maintenance intervals, which can lead to serious mechanical
problems.
NOTICE
Page 64 of 71

120 || 121
CLIENT INFORMATION
SPECIFICATIONS
TABLE OF
CONTENTS
VISUAL INDEX
SAFETY
INFORMATION
INSTRUMENT PANEL
VEHICLE
CONTROLS
AUDIO AND
CONNECTIVITY
BLUETOOTH®
HANDSFREELINK®
ACURALINK®
INDEX
VOICE COMMAND INDEX
CLIENT
INFORMATION
SPECIFICATIONS
MAINTENANCE
HANDLING THE UNEXPECTED
DRIVING
NAVIGATION
Vehicle Light Bulbs
Engine and Fuel Fluids
*1:2 WD models
*2 :A WD models
Mode lAcura RDX
No. of Passengers :
Fron t2
Rear 3
Tota l5
Weights :Gross Vehicle
Weight Ratin gU.S.:4,850 lbs (2,200 kg )*14,982 lbs (2,260 kg)*2Canada:2,260 kgGross Axle Weight
Rating (Front)U.S.:2,557 lbs (1,160 kg )*12,623 lbs (1,190 kg)*2Canada:1,190 kgGross Axle Weight
Rating (Rear)U.S.:2,293 lbs (1,040 kg )*12,381 lbs (1,080 kg)*2Canada:1,080 kg
Gross Combined Weight
Ratin g U.S.: 6,349 lbs (2,880 kg
)*1 6,482 lbs (2,940 kg)*2Canada: 2,940 kgAir Conditioning:Refrigerant Type HFC-134a (R-134a)Charge Quantity15.2 – 16.9 oz (430 – 480 g)Lubricant TypeND-OIL8
Engine Specifcations
FuelDisplacemen t211.8 cu-in (3,471 cm3)
Spark Plugs NG
KI LZKR7B11
DENSO SXU22HCR11
TypeUnleaded premium gasoline, Pump
octane number of 91 or higher
Fuel Tank Capacity 16 US gal (60.5 �)
Light \fulb s
\fr ake Flui\bHead lights (High Beams)60W (HB3 )
Headlights (Low Beams) 35W (D2S)*55W (H11)*Fog Lights*55W (H11)
Si
de Turn Si gnal Lights
(on Door Mirrors)LE D
Rear Side Mark er/Brake/Taillights21/5W
P
C
3
s
t
h
g
i
l
l
i
a
T
Back-Up Lights16W
High-Mount Brake Ligh t16W
Cargo Area Lights5W
Interior LightsMap LightsLEDCe iling Light8W
Console Compartment Ligh t1.4W
Foot LightLED
Specife dAcura Heavy Duty Brake Fluid DOT 3
*not applicable to all models
Automatic Transmis\Dsion Fluid
Rear Di\ferential Fl\Duid*
Transfer Assembl\b Flu\Did*
SpecifedAcura Automatic Tr\Fansmission F\fuid AT\FF DW- \b
Capacity Change 3.3 US qt (3.\b � )
SpecifedAcura A\f\f Whee\f Driv\Fe F\fuid (DPSF)
Ca pacit yC hange\b .32 US qt (\b.25 � )
SpecifedAcura Hypoid Gear \FOi\f HGO- \b
Ca pacit yC hange0 .43 US qt (0.4\b � )
Engine Oil
Engine Coolan tRecommended·Genuine Acura Mot\For Oi\f 0W-20
·API Premium-grade \F0W-20 detergent oi \f
Capacity Change
4.23 US qt (4.0 � )
Change
inc\fuding
f\fter 4.55 US qt (4.3 �
)
SpecifedAcura Long-Life Ant\Fi freeze/Coo\fant Type\F2
Ratio 50/50 with disti\f\fe\Fd water
Capacity\b.75 US ga\f (6.6 �)\F
(change inc\fuding the remaining 0.\b93 US ga\f (0.73 �) in the re\Fserve tank )
Tire
Regu\fa r Size
P235/60R\b8 \b02V
Pressure
ps i (kPa[kgf/c m2])33 (23
0 [2.3])
Compact
Spar e Size
T\b65/90R\b7 \b05M
Pressure
ps i (kPa[kgf/c m
2])60 (42
0 [4.2])
Whee\f Size Regu\fa
r \b8 x 7.5J
Compact Spar e\b7 x 4T
Brake Flui dSpecifedAcura Heavy Duty B\Frake F\fuid DOT 3
*not app\ficab\fe to \Fa\f\f mode\fs
Washer Fluid
Tank CapacityU.S.: 2.6 US qt (2.\F5 �)
Canada: 5.\b US qt (4.8\F5 �)
SPECIFICATIONS
*1:2 WD models
*2 :A WD models
Mode lAcura RDX
No. of Passengers :
Fron t2
Rear 3
Tota l5
Weights :Gross Vehicle
Weight Ratin gU.S.:4,850 lbs (2,200 kg )*14,982 lbs (2,260 kg)*2Canada:2,260 kgGross Axle Weight
Rating (Front)U.S.:2,557 lbs (1,160 kg )*12,623 lbs (1,190 kg)*2Canada:1,190 kgGross Axle Weight
Rating (Rear)U.S.:2,293 lbs (1,040 kg )*12,381 lbs (1,080 kg)*2Canada:1,080 kg
Gross Combined Weight
Ratin g U.S.: 6,349 lbs (2,880 kg
)*1 6,482 lbs (2,940 kg)*2Canada: 2,940 kgAir Conditioning:Refrigerant Type HFC-134a (R-134a)Charge Quantity15.2 – 16.9 oz (430 – 480 g)Lubricant TypeND-OIL8
Engine Specifcations
FuelDisplacemen t211.8 cu-in (3,471 cm3)
Spark Plugs NG
KI LZKR7B11
DENSO SXU22HCR11
TypeUnleaded premium gasoline, Pump
octane number of 91 or higher
Fuel Tank Capacity 16 US gal (60.5 �)
Light \fulb s
\fr ake Flui\bHead lights (High Beams)60W (HB3 )
Headlights (Low Beams) 35W (D2S)*55W (H11)*Fog Lights*55W (H11)
Si
de Turn Si gnal Lights
(on Door Mirrors)LE D
Rear Side Mark er/Brake/Taillights21/5W
P
C
3
s
t
h
g
i
l
l
i
a
T
Back-Up Lights16W
High-Mount Brake Ligh t16W
Cargo Area Lights5W
Interior LightsMap LightsLEDCe iling Light8W
Console Compartment Ligh t1.4W
Foot LightLED
Specife dAcura Heavy Duty Brake Fluid DOT 3
*not applicable to all models
Tires
Automatic Transmis\Dsion Flui d
Rear Di\ferential Fl\Duid *
Transfer Assembl\b Flu\Did*
SpecifedAcura Automatic Tr\Fansmission F\fuid AT\FF DW- \b
Capacity Change 3.3 US qt (3.\b � )
Specife d Acura A\f\f Whee\f Driv\Fe F\fuid (DPSF)
Ca pacit yC hange\b .32 US qt (\b.25 � )
Specife d Acura Hypoid Gear \FOi\f HGO- \b
Ca pacit yC hange0 .43 US qt (0.4\b � )
Engine Oil
Engine Coolan t
Recommended ·Genuine Acura Mot\For Oi\f 0W-20
·API Premium-grade \F0W-20 detergent oi
\f
Capacity Change
4.23 US qt (4.0 � )
Change
inc\fuding
f\fter 4.55 US qt (4.3 �
)
Specifed Acura Long-Life Ant\Fi freeze/Coo\fant Type\F2
Ratio 50/50 with disti\f\fe\Fd water
Capacity \b.75 US ga\f (6.6 �)\F
(change
inc\fuding the remaining 0.\b93 US ga\f
(0.73 �) in the re\Fserve tank )
Tire
Regu\fa rSizeP235/60R\b8 \b02VPressure
ps i (kPa[kgf/c m2])33 (230 [2.3])
Compact
Spar e Size
T\b65/90R\b7 \b05M
Pressure
ps i (kPa[kgf/c m
2])60 (42
0 [4.2])
Whee\f SizeRegu\fa r\b8 x 7.5 JCompact Spar e\b7 x 4T
Brake FluidSpecifedAcura Heavy Duty B\Frake F\fuid DOT 3
*not app\ficab\fe to \Fa\f\f mode\fs
Washer Fluid
Tank CapacityU.S.: 2.6 US qt (2.\F5 �)
Ca
nada: 5.\b US qt (4.8\F5 �)
Learn about information specific to you as an Acura client and how to get help.
Frequently Asked Questions/Troubleshooting
Below are some frequently asked questions and troubleshooting items that you
may have about the vehicle.
Q: How do I set the vehicle clock?
A: For vehicles without navigation, see page 44. For vehicles with navigation, the
time is automatically set using GPS signals.
Q: Why doesn’t the vehicle start when I press the ENGINE START/STOP button?
A: The brake pedal must be pressed to start the engine.
Q: What is the AUTO setting on my headlight lever?
A: When in the AUTO position, the vehicle’s exterior lights will automatically turn
on or off depending on the ambient lighting.
Q: Only the driver’s door unlocks when I shift to Park (P). Can all doors unlock?
A: You can change door lock or unlock settings in the multi-information display
using the Customize Settings menus. See page 27.
Q: Why won’t the driver’s door unlock when I grab the door handle, even though the
keyless access remote is within range?
A: If you pull the handle too quickly, the system may not have time to confirm the
door is unlocked. Wait to hear a beep to confirm the door is unlocked. If you are
wearing gloves, the system may be slow to respond.
Q: After my battery was disconnected or went dead, the audio system is asking for a
code. Where do I find this?
A: In most cases, you do not need to enter a code. Turn on the vehicle and the audio
system, and press and hold the power button until the system reactivates.
Q: Why can’t I operate Pandora through the audio system?
A: Audio may be streaming through Bluetooth® Audio. Make sure Pandora mode is
selected and the phone cable is properly connected to the USB adapter. Some
phones may prompt you to “Allow” a connection.
Q: Is my phone compatible with Bluetooth features?
A: Visit www.acura.com/handsfreelink (U.S) or www.handsfreelink.ca (Canada) to
check phone compatibility for Bluetooth® Audio, Bluetooth® HandsFreeLink®,
and SMS text messaging.
CLIENT INFORMATION
Page 66 of 71
124 || 125
VOICE COMMAND INDEX
VOICE COMMAND INDEX
TABLE OF
CONTENTS
VISUAL INDEX
SAFETY
INFORMATION
INSTRUMENT PANEL
VEHICLE
CONTROLS
AUDIO AND
CONNECTIVITY
BLUETOOTH®
HANDSFREELINK®
ACURALINK®
INDEX
VOICE COMMAND INDEX
CLIENT
INFORMATION
SPECIFICATIONS
MAINTENANCE
HANDLING THE UNEXPECTED
DRIVING
NAVIGATION
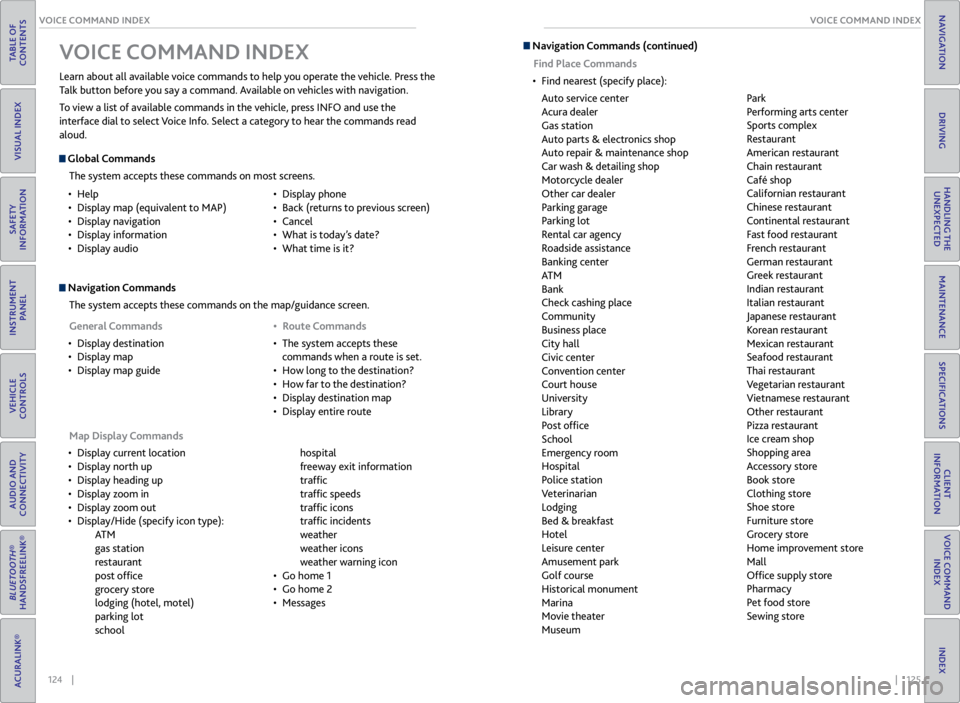
Navigation Commands
The system accepts these commands on the map/guidance screen.
Map Display Commands
• Display current location
• Display north up
• Display heading up
• Display zoom in
• Display zoom out
• Display/Hide (specify icon type):
AT M
gas station
restaurant
post office
grocery store
lodging (hotel, motel)
parking lot
school hospital
freeway exit information
traffic
traffic speeds
traffic icons
traffic incidents
weather
weather icons
weather warning icon
• Go home 1
• Go home 2
• Messages
Learn about all available voice commands to help you operate the vehicle. Press the
Talk button before you say a command. Available on vehicles with navigation.
To view a list of available commands in the vehicle, press INFO and use the
interface dial to select Voice Info. Select a category to hear the commands read
aloud.
V
OICE COMMAND INDEX
Global Commands
The system accepts these commands on most screens.
• Help
• Display map (equivalent to MAP)
• Display navigation
• Display information
• Display audio •
Display phone
• Back (returns to previous screen)
• Cancel
• What is today’s date?
• What time is it?
General Commands
• Display destination
• Display map
• Display map guide •
Route Commands
• The system accepts these
commands when a route is set.
• How long to the destination?
• How far to the destination?
• Display destination map
• Display entire route
Navigation Commands (continued)
Find Place Commands
• Find nearest (specify place):
Auto service center
Acura dealer
Gas station
Auto parts & electronics shop
Auto repair & maintenance shop
Car wash & detailing shop
Motorcycle dealer
Other car dealer
Parking garage
Parking lot
Rental car agency
Roadside assistance
Banking center
AT M
Bank
Check cashing place
Community
Business place
City hall
Civic center
Convention center
Court house
University
Library
Post office
School
Emergency room
Hospital
Police station
Veterinarian
Lodging
Bed & breakfast
Hotel
Leisure center
Amusement park
Golf course
Historical monument
Marina
Movie theater
Museum Park
Performing arts center
Sports complex
Restaurant
American restaurant
Chain restaurant
Café shop
Californian restaurant
Chinese restaurant
Continental restaurant
Fast food restaurant
French restaurant
German restaurant
Greek restaurant
Indian restaurant
Italian restaurant
Japanese restaurant
Korean restaurant
Mexican restaurant
Seafood restaurant
Thai restaurant
Vegetarian restaurant
Vietnamese restaurant
Other restaurant
Pizza restaurant
Ice cream shop
Shopping area
Accessory store
Book store
Clothing store
Shoe store
Furniture store
Grocery store
Home improvement store
Mall
Office supply store
Pharmacy
Pet food store
Sewing store
Page 69 of 71
130 || 131
INDEX
VOICE COMMAND INDEX
TABLE OF
CONTENTS
VISUAL INDEX
SAFETY
INFORMATION
INSTRUMENT PANEL
VEHICLE
CONTROLS
AUDIO AND
CONNECTIVITY
BLUETOOTH®
HANDSFREELINK®
ACURALINK®
INDEX
VOICE COMMAND INDEX
CLIENT
INFORMATION
SPECIFICATIONS
MAINTENANCE
HANDLING THE UNEXPECTED
DRIVING
NAVIGATION
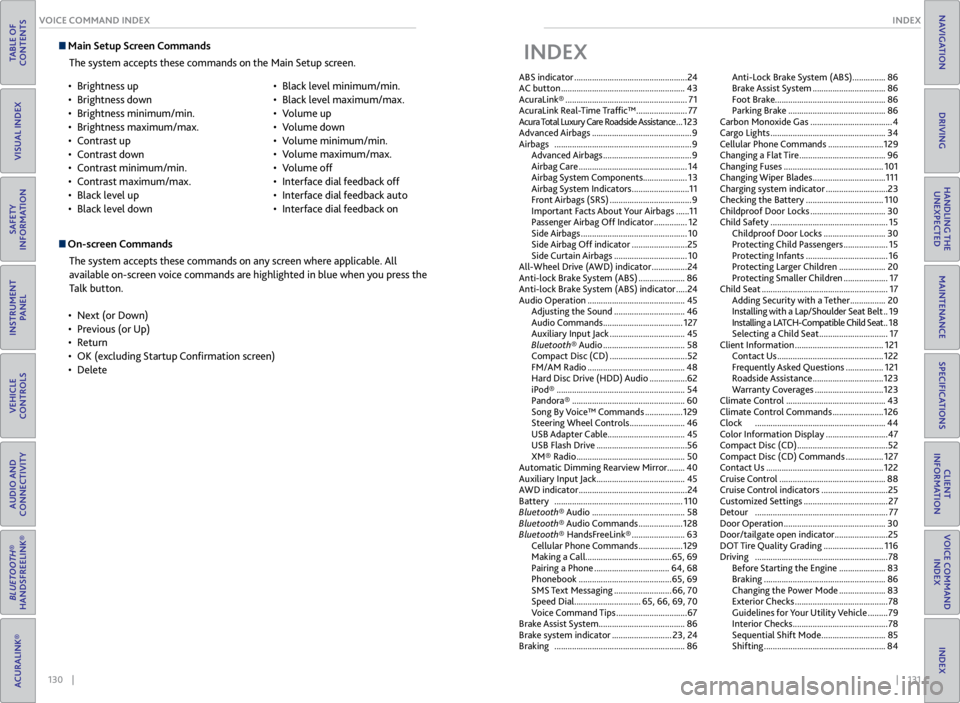
Main Setup Screen Commands
The system accepts these commands on the Main Setup screen.
On-screen CommandsThe system accepts these commands on any screen where applicable. All
available on-screen voice commands are highlighted in blue when you press the
Talk button.
• Next (or Down)
• Previous (or Up)
• Return
• OK (excluding Startup Confirmation screen)
• Delete
•
Brightness up
• Brightness down
• Brightness minimum/min.
• Brightness maximum/max.
• Contrast up
• Contrast down
• Contrast minimum/min.
• Contrast maximum/max.
• Black level up
• Black level down •
Black level minimum/min.
• Black level maximum/max.
• Volume up
• Volume down
• Volume minimum/min.
• Volume maximum/max.
• Volume off
• Interface dial feedback off
• Interface dial feedback auto
• Interface dial feedback on
INDEX
ABS indicator ................................................... 24
AC button ........................................................ 43
AcuraLink® ....................................................... 71
AcuraLink Real-Time Traffic™ ....................... 77
Acura Total Luxury Care Roadside Assistance ... 123
Advanced Airbags ............................................. 9
Airbags .............................................................. 9
Advanced Airbags ........................................ 9
Airbag Care ................................................. 14
Airbag System Components ....................13
Airbag System Indicators .......................... 11
Front Airbags (SRS) ..................................... 9
Important Facts About Your Airbags ...... 11
Passenger Airbag Off Indicator ............... 12
Side Airbags ................................................ 10
Side Airbag Off indicator ......................... 25
Side Curtain Airbags ................................. 10
All-Wheel Drive (AWD) indicator ................ 24
Anti-lock Brake System (ABS) ..................... 86
Anti-lock Brake System (ABS) indicator ..... 24
Audio Operation ............................................ 45
Adjusting the Sound ................................ 46
Audio Commands .................................... 127
Auxiliary Input Jack .................................. 45
Bluetooth® Audio ..................................... 58
Compact Disc (CD) ................................... 52
FM/AM Radio ............................................ 48
Hard Disc Drive (HDD) Audio ................. 62
iPod® .......................................................... 54
Pandora® ................................................... 60
Song By Voice™ Commands ................. 129
Steering Wheel Controls ......................... 46
USB Adapter Cable ................................... 45
USB Flash Drive ......................................... 56
XM® Radio ................................................. 50
Automatic Dimming Rearview Mirror ........40
Auxiliary Input Jack ........................................ 45
AWD indicator ................................................. 24
Battery .......................................................... 110
Bluetooth® Audio .......................................... 58
Bluetooth® Audio Commands .................... 128
Bluetooth® HandsFreeLink® ........................ 63
Cellular Phone Commands .................... 129
Making a Call ....................................... 65, 69
Pairing a Phone .................................. 64, 68
Phonebook .......................................... 65, 69
SMS Text Messaging .......................... 66, 70
Speed Dial .............................. 65, 66, 69, 70
Voice Command Tips ................................ 67
Brake Assist System ....................................... 86
Brake system indicator ........................... 23, 24
Braking ........................................................... 86Anti-Lock Brake System (ABS) ...............
86
Brake Assist System ................................. 86
Foot Brake .................................................. 86
Parking Brake ............................................ 86
Carbon Monoxide Gas ..................................... 4
Cargo Lights .................................................... 34
Cellular Phone Commands ......................... 129
Changing a Flat Tire ....................................... 96
Changing Fuses ............................................. 101
Changing Wiper Blades ................................. 111
Charging system indicator ............................ 23
Checking the Battery ................................... 110
Childproof Door Locks .................................. 30
Child Safety ..................................................... 15
Childproof Door Locks ............................ 30
Protecting Child Passengers .................... 15
Protecting Infants ..................................... 16
Protecting Larger Children ..................... 20
Protecting Smaller Children .................... 17
Child Seat ......................................................... 17
Adding Security with a Tether ................ 20
Installing with a Lap/Shoulder Seat Belt .. 19
Installing a LATCH-Compatible Child Seat .. 18
Selecting a Child Seat ............................... 17
Client Information ........................................ 121
Contact Us ................................................ 122
Frequently Asked Questions ................. 121
Roadside Assistance ................................ 123
Warranty Coverages ............................... 123
Climate Control ............................................. 43
Climate Control Commands ....................... 126
Clock ........................................................... 44
Color Information Display ............................ 47
Compact Disc (CD) ......................................... 52
Compact Disc (CD) Commands ................. 127
Contact Us ..................................................... 122
Cruise Control ................................................ 88
Cruise Control indicators .............................. 25
Customized Settings ...................................... 27
Detour ............................................................ 77
Door Operation .............................................. 30
Door/tailgate open indicator ........................ 25
DOT Tire Quality Grading ........................... 116
Driving ............................................................ 78
Before Starting the Engine ..................... 83
Braking ....................................................... 86
Changing the Power Mode ..................... 83
Exterior Checks .......................................... 78
Guidelines for Your Utility Vehicle ......... 79
Interior Checks ........................................... 78
Sequential Shift Mode ............................. 85
Shifting ....................................................... 84