buttons Acura RDX 2015 Owner's Guide
[x] Cancel search | Manufacturer: ACURA, Model Year: 2015, Model line: RDX, Model: Acura RDX 2015Pages: 71, PDF Size: 18.23 MB
Page 4 of 71
| 1
VISUAL INDEX
INDEX
VOICE COMMAND
INDEX
CLIENT
INFORMATION
SPECIFICATIONS
MAINTENANCE
HANDLING THE UNEXPECTED
DRIVING
NAVIGATION
TABLE OF
CONTENTS
VISUAL INDEX
SAFETY
INFORMATION
INSTRUMENT PANEL
VEHICLE
CONTROLS
AUDIO AND
CONNECTIVITY
BLUETOOTH®
HANDSFREELINK®
ACURALINK®
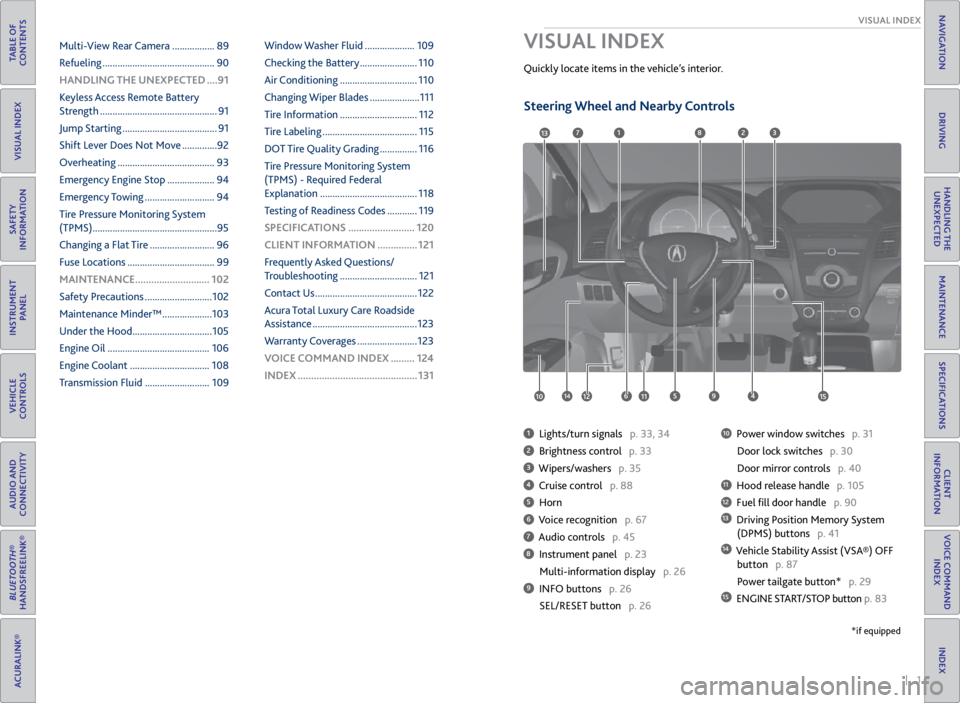
1 Lights/turn signals p. 33, 34
2 Brightness control p. 33
3 Wipers/washers p. 35
4 Cruise control p. 88
5 Horn
6 Voice recognition p. 67
7 Audio controls p. 45
8 Instrument panel p. 23
Multi-information display p. 26
9 INFO buttons p. 26
SEL/RESET button p. 26
10 Power window switches p. 31
Door lock switches p. 30
Door mirror controls p. 40
11 Hood release handle p. 105
12 Fuel fill door handle p. 90
13 Driving Position Memory System
(DPMS) buttons p. 41
14 Vehicle Stability Assist (VSA®) OFF
button p. 87
Power tailgate button* p. 29
15 ENGINE START/STOP button p. 83
VISUAL INDEX
Quickly locate items in the vehicle’s interior.
1
45961012
7283
11
13
1415
*if equipped
Multi-View Rear Camera ................. 89
Refueling ............................................. 90
HANDLING THE UNEXPECTED ....91
Keyless Access Remote Battery
Strength ............................................... 91
Jump Starting ...................................... 91
Shift Lever Does Not Move .............. 92
Overheating ....................................... 93
Emergency Engine Stop ................... 94
Emergency Towing ............................ 94
Tire Pressure Monitoring System
(TPMS) .................................................. 95
Changing a Flat Tire .......................... 96
Fuse Locations ................................... 99
MAINTENANCE ............................ 102
Safety Precautions ........................... 102
Maintenance Minder™ .................... 103
Under the Hood ................................ 105
Engine Oil ......................................... 106
Engine Coolant ................................ 108
Transmission Fluid .......................... 109Window Washer Fluid ....................
109
Checking the Battery ....................... 110
Air Conditioning ............................... 110
Changing Wiper Blades .................... 111
Tire Information ............................... 112
Tire Labeling ...................................... 115
DOT Tire Quality Grading ............... 116
Tire Pressure Monitoring System
(TPMS) - Required Federal
Explanation ....................................... 118
Testing of Readiness Codes ............ 119
SPECIFICATIONS ......................... 120
CLIENT INFORMATION ............... 121
Frequently Asked Questions/
Troubleshooting ............................... 121
Contact Us ......................................... 122
Acura Total Luxury Care Roadside
Assistance .......................................... 123
Warranty Coverages ........................ 123
V OICE COMMAND INDEX ......... 124
INDEX ............................................. 131
Steering Wheel and Nearby Controls
Page 5 of 71
2 || 3
SAFETY
VISUAL INDEX
TABLE OF
CONTENTS
VISUAL INDEX
SAFETY
INFORMATION
INSTRUMENT PANEL
VEHICLE
CONTROLS
AUDIO AND
CONNECTIVITY
BLUETOOTH®
HANDSFREELINK®
ACURALINK®
INDEX
VOICE COMMAND INDEX
CLIENT
INFORMATION
SPECIFICATIONS
MAINTENANCE
HANDLING THE UNEXPECTED
DRIVING
NAVIGATION
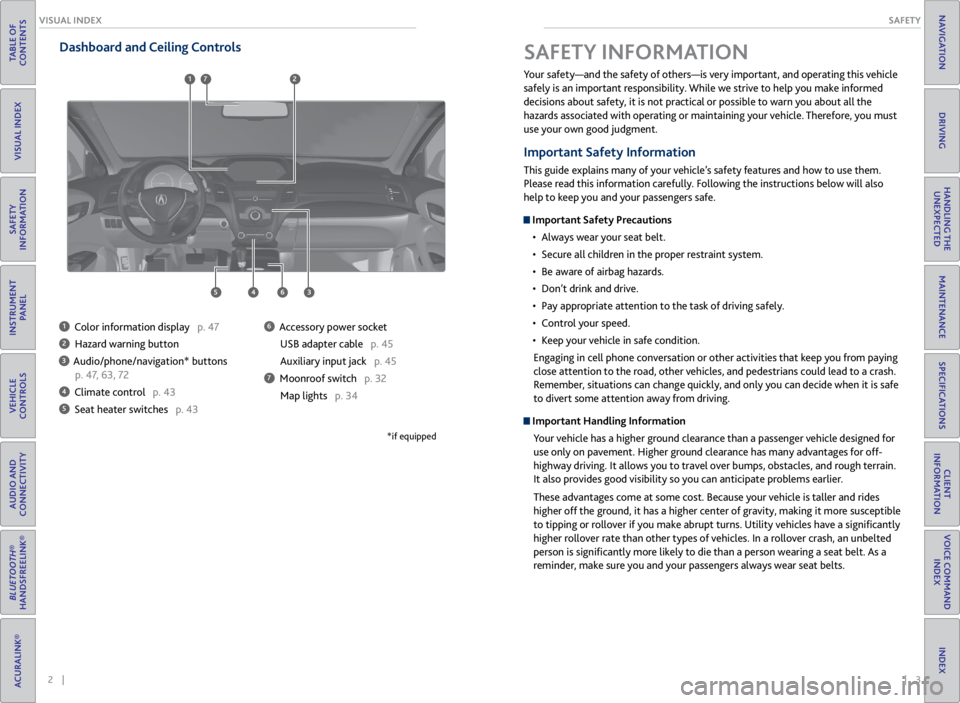
Dashboard and Ceiling Controls
1 Color information display p. 47
2 Hazard warning button
3 Audio/phone/navigation* buttons
p. 47, 63, 72
4 Climate control p. 43
5 Seat heater switches p. 43
6 Accessory power socket
USB adapter cable p. 45
Auxiliary input jack p. 45
7 Moonroof switch p. 32Map lights p. 34
*if equipped
Your safety—and the safety of others—is very important, and operating this vehicle
safely is an important responsibility. While we strive to help you make informed
decisions about safety, it is not practical or possible to warn you about all the
hazards associated with operating or maintaining your vehicle. Therefore, you must
use your own good judgment.
Important Safety Information
This guide explains many of your vehicle’s safety features and how to use them.
Please read this information carefully. Following the instructions below will also
help to keep you and your passengers safe.
Important Safety Precautions• Always wear your seat belt.
• Secure all children in the proper restraint system.
• Be aware of airbag hazards.
• Don’t drink and drive.
• Pay appropriate attention to the task of driving safely.
• Control your speed.
• Keep your vehicle in safe condition.
Engaging in cell phone conversation or other activities that keep you from paying
close attention to the road, other vehicles, and pedestrians could lead to a crash.
Remember, situations can change quickly, and only you can decide when it is safe
to divert some attention away from driving.
Important Handling Information Your vehicle has a higher ground clearance than a passenger vehicle designed for
use only on pavement. Higher ground clearance has many advantages for off-
highway driving. It allows you to travel over bumps, obstacles, and rough terrain.
It also provides good visibility so you can anticipate problems earlier.
These advantages come at some cost. Because your vehicle is taller and rides
higher off the ground, it has a higher center of gravity, making it more susceptible
to tipping or rollover if you make abrupt turns. Utility vehicles have a significantly
higher rollover rate than other types of vehicles. In a rollover crash, an unbelted
person is significantly more likely to die than a person wearing a seat belt. As a
reminder, make sure you and your passengers always wear seat belts.
SAFETY INFORMATION
6453
712
Page 17 of 71
26 || 27
INSTRUMENT P
ANEL
INSTRUMENT P ANEL
TABLE OF
CONTENTS
VISUAL INDEX
SAFETY
INFORMATION
INSTRUMENT PANEL
VEHICLE
CONTROLS
AUDIO AND
CONNECTIVITY
BLUETOOTH®
HANDSFREELINK®
ACURALINK®
INDEX
VOICE COMMAND INDEX
CLIENT
INFORMATION
SPECIFICATIONS
MAINTENANCE
HANDLING THE UNEXPECTED
DRIVING
NAVIGATION
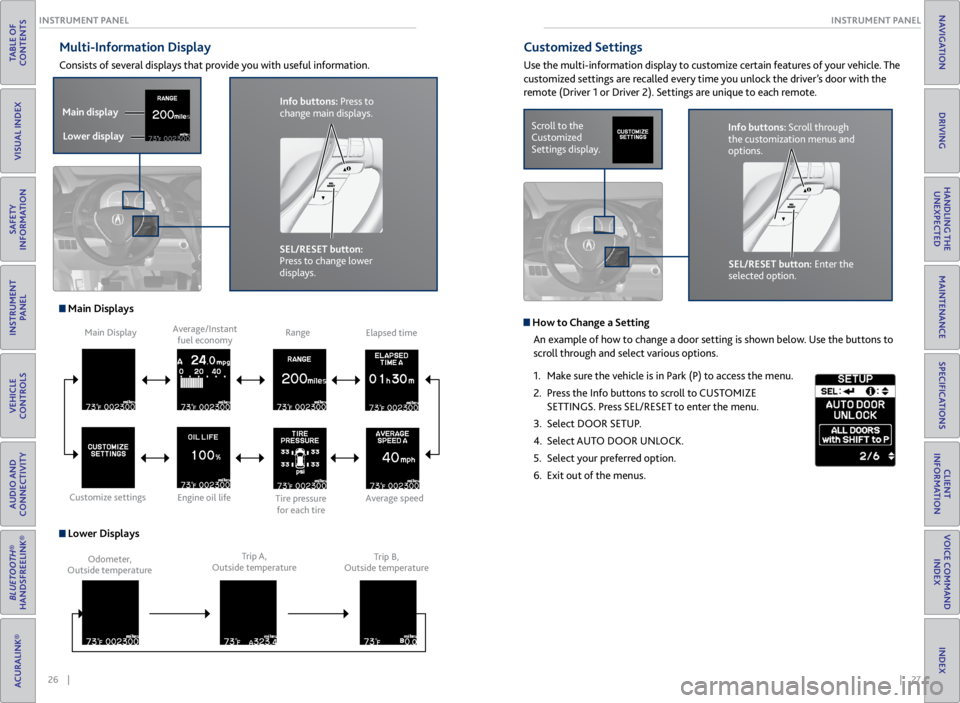
Multi-Information Display
Consists of several displays that provide you with useful information.
Main Displays
Lower Displays
Main Display
Customize settings Average/Instant
fuel economy
Engine oil life Range
Tire pressure for each tireElapsed time
Average speed
Odometer,
Outside temperature Trip A,
Outside temperature Trip B,
Outside temperature
Customized Settings
Use the multi-information display to customize certain features of your vehicle. The
customized settings are recalled every time you unlock the driver’s door with the
remote (Driver 1 or Driver 2). Settings are unique to each remote.
Scroll to the
Customized
Settings display.
SEL/RESET button: Enter the
selected option.Info buttons: Scroll through
the customization menus and
options.
Info buttons: Press to
change main displays.
Main display
Lower display
SEL/RESET button:
Press to change lower
displays.
How to Change a Setting
An example of how to change a door setting is shown below. Use the buttons to
scroll through and select various options.
1. Make sure the vehicle is in Park (P) to access the menu.
2. Press the Info buttons to scroll to CUSTOMIZE
SETTINGS. Press SEL/RESET to enter the menu.
3. Select DOOR SETUP.
4. Select AUTO DOOR UNLOCK.
5. Select your preferred option.
6. Exit out of the menus.
Page 24 of 71
40 || 41
VEHICLE CONTROLS
VEHICLE CONTROLS
TABLE OF
CONTENTS
VISUAL INDEX
SAFETY
INFORMATION
INSTRUMENT PANEL
VEHICLE
CONTROLS
AUDIO AND
CONNECTIVITY
BLUETOOTH®
HANDSFREELINK®
ACURALINK®
INDEX
VOICE COMMAND INDEX
CLIENT
INFORMATION
SPECIFICATIONS
MAINTENANCE
HANDLING THE UNEXPECTED
DRIVING
NAVIGATION
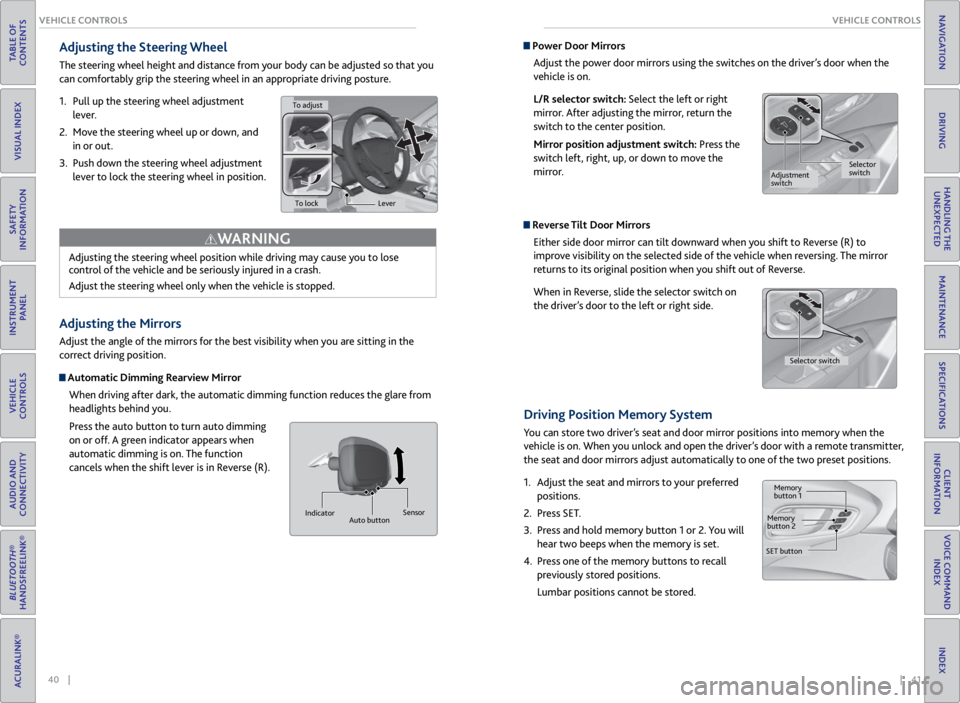
Adjusting the Steering Wheel
The steering wheel height and distance from your body can be adjusted so that you
can comfortably grip the steering wheel in an appropriate driving posture.
1. Pull up the steering wheel adjustment
lever.
2. Move the steering wheel up or down, and
in or out.
3. Push down the steering wheel adjustment
lever to lock the steering wheel in position.
Adjusting the Mirrors
Adjust the angle of the mirrors for the best visibility when you are sitting in the
correct driving position.
Automatic Dimming Rearview Mirror
When driving after dark, the automatic dimming function reduces the glare from
headlights behind you.
Press the auto button to turn auto dimming
on or off. A green indicator appears when
automatic dimming is on. The function
cancels when the shift lever is in Reverse (R).
Adjusting the steering wheel position while driving may cause you to lose
control of the vehicle and be seriously injured in a crash.
Adjust the steering wheel only when the vehicle is stopped.
WARNING
Indicator
Auto button Sensor
Power Door Mirrors
Adjust the power door mirrors using the switches on the driver’s door when the
vehicle is on.
L/R selector switch: Select the left or right
mirror. After adjusting the mirror, return the
switch to the center position.
Mirror position adjustment switch: Press the
switch left, right, up, or down to move the
mirror.
Reverse Tilt Door MirrorsEither side door mirror can tilt downward when you shift to Reverse (R) to
improve visibility on the selected side of the vehicle when reversing. The mirror
returns to its original position when you shift out of Reverse.
When in Reverse, slide the selector switch on
the driver’s door to the left or right side.
Driving Position Memory System
You can store two driver’s seat and door mirror positions into memory when the
vehicle is on. When you unlock and open the driver’s door with a remote transmitter,
the seat and door mirrors adjust automatically to one of the two preset positions.
1. Adjust the seat and mirrors to your preferred
positions.
2. Press SET.
3. Press and hold memory button 1 or 2. You will
hear two beeps when the memory is set.
4. Press one of the memory buttons to recall
previously stored positions.
Lumbar positions cannot be stored.
To adjust
To lock Lever
Selector
switch
Adjustment
switch
Memory
button 1
Memory
button 2
SET button Selector switch
Page 25 of 71
42 || 43
VEHICLE CONTROLS
VEHICLE CONTROLS
TABLE OF
CONTENTS
VISUAL INDEX
SAFETY
INFORMATION
INSTRUMENT PANEL
VEHICLE
CONTROLS
AUDIO AND
CONNECTIVITY
BLUETOOTH®
HANDSFREELINK®
ACURALINK®
INDEX
VOICE COMMAND INDEX
CLIENT
INFORMATION
SPECIFICATIONS
MAINTENANCE
HANDLING THE UNEXPECTED
DRIVING
NAVIGATION
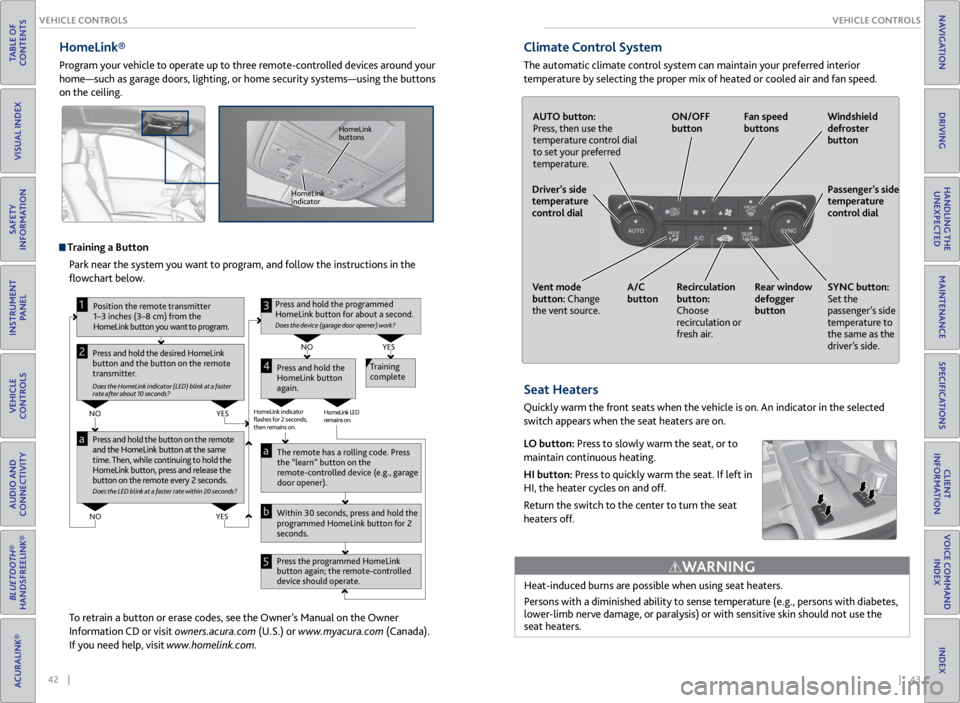
HomeLink®
Program your vehicle to operate up to three remote-controlled devices around your
home—such as garage doors, lighting, or home security systems—using the buttons
on the ceiling.
Training a Button
Park near the system you want to program, and follow the instructions in the
flowchart below.
To retrain a button or erase codes, see the Owner’s Manual on the Owner
Information CD or visit owners.acura.com (U.S.) or www.myacura.com (Canada).
If you need help, visit www.homelink.com.
Press and hold the button on the r emote
and the HomeLink button at the same
time. Then, while continuing to hold the
HomeLink button, pr ess and release the
button on the r emote every 2 seconds.
Does the LED blink at a fa ster ra te within 20 seconds ?
Press and hold the
HomeLink button
again. T
raining
complete
YES
NO
HomeLink indicator
�ashes for 2 seconds,
then rem ains on. HomeLink LED
r
emains on.YES
NO
YES
NO
P osition the remote transmitter
1–3 inches (3–8 cm) from the
HomeLink button you want to program.1
Press and hold the desir ed HomeLink
button and the button on the r emote
transmitter .
Does the HomeLink indicat or (LED) blink at a f ast er
rate after about 10 seconds ?
2
a
The remote has a ro lling code. Press
the “learn” button on the
r emote-contr olled device (e.g., garage
door opener).
Pr ess the pr ogrammed HomeLink
button again; the remote-contr olled
device should operate.
Within 30 seconds, pr
ess and hold the
pr ogrammed HomeLink button for 2
seconds.a
Pr ess and hold the programmed
HomeLink button for about a second.
Does the devic e (garage door opener) work?
3
b
4
5
HomeLink
indicator HomeLink
buttons
Climate Control System
The automatic climate control system can maintain your preferred interior
temperature by selecting the proper mix of heated or cooled air and fan speed.
Seat Heaters
Quickly warm the front seats when the vehicle is on. An indicator in the selected
switch appears when the seat heaters are on.
LO button: Press to slowly warm the seat, or to
maintain continuous heating.
HI button: Press to quickly warm the seat. If left in
HI, the heater cycles on and off.
Return the switch to the center to turn the seat
heaters off.
Heat-induced burns are possible when using seat heaters.
Persons with a diminished ability to sense temperature (e.g., persons with diabetes,
lower-limb nerve damage, or paralysis) or with sensitive skin should not use the
seat heaters.
WARNING
AUTO button:
Press, then use the
temperature control dial
to set your preferred
temperature.
ON/OFF
button
Fan speed
buttons Windshield
defroster
button
Passenger’s side
temperature
control dial
SYNC button:
Set the
passenger’s side
temperature to
the same as the
driver’s side.
Rear window
defogger
button
Recirculation
button:
Choose
recirculation or
fresh air.
A/C
button
Vent mode
button: Change
the vent source.
Driver’s side
temperature
control dial
Page 26 of 71
44 || 45
AUDIO AND CONNECTIVITY
VEHICLE CONTROLS
TABLE OF
CONTENTS
VISUAL INDEX
SAFETY
INFORMATION
INSTRUMENT PANEL
VEHICLE
CONTROLS
AUDIO AND
CONNECTIVITY
BLUETOOTH®
HANDSFREELINK®
ACURALINK®
INDEX
VOICE COMMAND INDEX
CLIENT
INFORMATION
SPECIFICATIONS
MAINTENANCE
HANDLING THE UNEXPECTED
DRIVING
NAVIGATION
Basic Audio Operation
Connect audio devices in the front console, and operate buttons and displays for
the audio system.
USB Adapter Cable
Connect a USB flash drive or other audio device, such as an iPod® or iPhone®.
1. Unclip the USB connector and loosen the
adapter cable.
2. Install the flash drive or cable connector to the
USB connector.
Auxiliary Input Jack
Connect standard audio devices with a 1/8-inch (3.5 mm) stereo miniplug.
1. Open the AUX cover.
2. Insert the miniplug attached to the audio
device into the jack. The audio system switches to
AUX mode. Use the device to control the audio.
iPod and iPhone are trademarks of Apple, Inc.
State or local laws may prohibit the operation of handheld electronic devices while operating a vehicle.
AUDIO AND CONNECTIVITY
Learn how to operate the vehicle’s audio system.
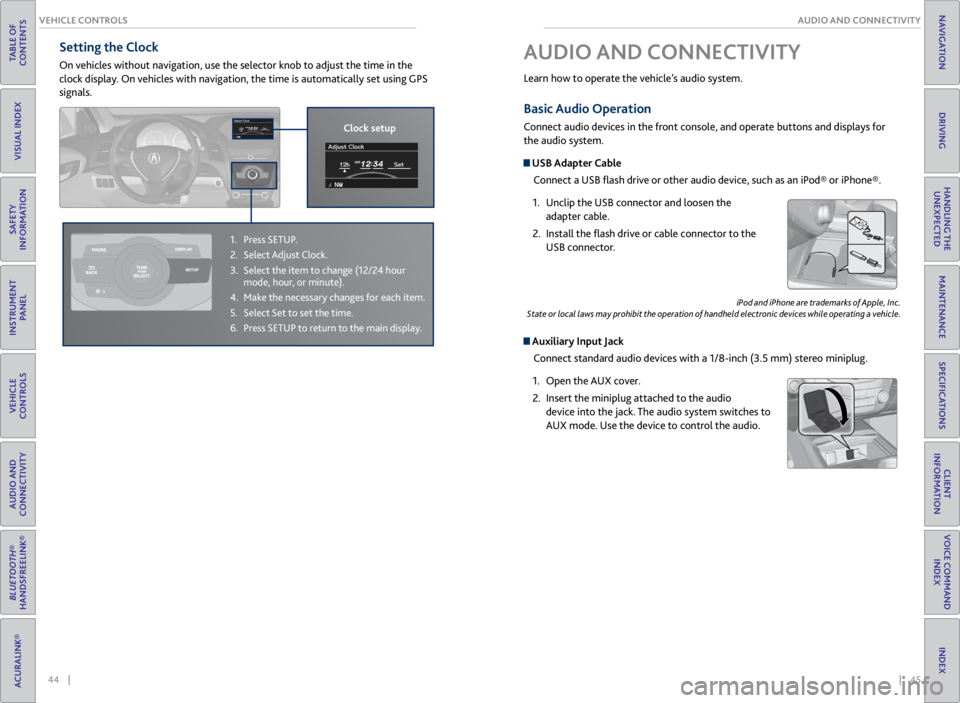
Setting the Clock
On vehicles without navigation, use the selector knob to adjust the time in the
clock display. On vehicles with navigation, the time is automatically set using GPS
signals.
1. Press SETUP.
2. Select Adjust Clock.
3. Select the item to change (12/24 hour
mode, hour, or minute).
4. Make the necessary changes for each item.
5. Select Set to set the time.
6. Press SETUP to return to the main display.
Clock setup
Page 27 of 71
46 || 47
AUDIO AND CONNECTIVITY
AUDIO AND CONNECTIVITY
TABLE OF
CONTENTS
VISUAL INDEX
SAFETY
INFORMATION
INSTRUMENT PANEL
VEHICLE
CONTROLS
AUDIO AND
CONNECTIVITY
BLUETOOTH®
HANDSFREELINK®
ACURALINK®
INDEX
VOICE COMMAND INDEX
CLIENT
INFORMATION
SPECIFICATIONS
MAINTENANCE
HANDLING THE UNEXPECTED
DRIVING
NAVIGATION
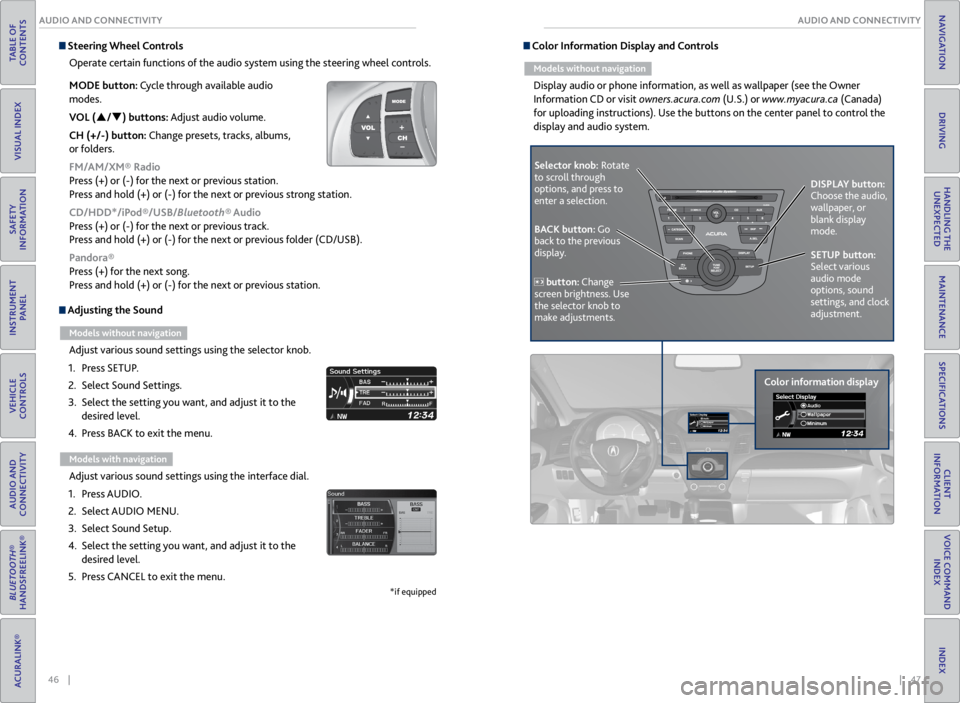
Adjusting the Sound
Models without navigation
Adjust various sound settings using the selector knob.
1. Press SETUP.
2. Select Sound Settings.
3. Select the setting you want, and adjust it to the
desired level.
4. Press BACK to exit the menu.
Models with navigation
Adjust various sound settings using the interface dial.
1. Press AUDIO.
2. Select AUDIO MENU.
3. Select Sound Setup.
4. Select the setting you want, and adjust it to the
desired level.
5. Press CANCEL to exit the menu.
*if equipped
Steering Wheel Controls
Operate certain functions of the audio system using the steering wheel controls.
MODE button: Cycle through available audio
modes.
VOL (p/q) buttons: Adjust audio volume.
CH (+/-) button: Change presets, tracks, albums,
or folders.
FM/AM/XM® Radio
Press (+) or (-) for the next or previous station.
Press and hold (+) or (-) for the next or previous strong station.
CD/HDD*/iPod®/USB/Bluetooth® Audio
Press (+) or (-) for the next or previous track.
Press and hold (+) or (-) for the next or previous folder (CD/USB).
Pandora®
Press (+) for the next song.
Press and hold (+) or (-) for the next or previous station. Color Information Display and Controls
Models without navigation
Display audio or phone information, as well as wallpaper (see the Owner
Information CD or visit owners.acura.com (U.S.) or www.myacura.ca (Canada)
for uploading instructions). Use the buttons on the center panel to control the
display and audio system.
Selector knob: Rotate
to scroll through
options, and press to
enter a selection.
Color information displayDISPLAY button:
Choose the audio,
wallpaper, or
blank display
mode.
SETUP button:
Select various
audio mode
options, sound
settings, and clock
adjustment.
BACK button: Go
back to the previous
display.
button: Change
screen brightness. Use
the selector knob to
make adjustments.
Page 28 of 71
48 || 49
AUDIO AND CONNECTIVITY
AUDIO AND CONNECTIVITY
TABLE OF
CONTENTS
VISUAL INDEX
SAFETY
INFORMATION
INSTRUMENT PANEL
VEHICLE
CONTROLS
AUDIO AND
CONNECTIVITY
BLUETOOTH®
HANDSFREELINK®
ACURALINK®
INDEX
VOICE COMMAND INDEX
CLIENT
INFORMATION
SPECIFICATIONS
MAINTENANCE
HANDLING THE UNEXPECTED
DRIVING
NAVIGATION
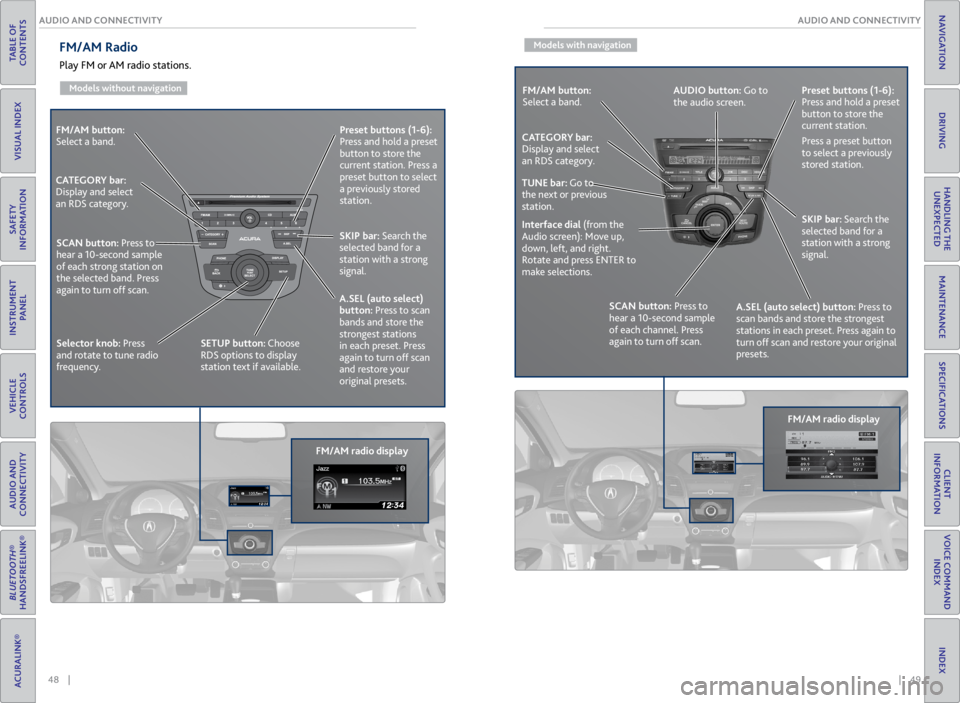
FM/AM button:
Select a band.
FM/AM radio displayPreset
buttons (1-6):
Press and hold a preset
button to store the
current station. Press a
preset button to select
a previously stored
station.
SKIP bar: Search the
selected band for a
station with a strong
signal.
A.SEL (auto select)
button: Press to scan
bands and store the
strongest stations
in each preset. Press
again to turn off scan
and restore your
original presets.
CATEGORY bar:
Display and select
an RDS category.
SCAN button: Press to
hear a 10-second sample
of each strong station on
the selected band. Press
again to turn off scan.
Selector knob: Press
and rotate to tune radio
frequency. SETUP button: Choose
RDS options to display
station text if available.
FM/AM Radio
Play FM or AM radio stations.
Models without navigation
Models with navigation
FM/AM button:
Select a band.
FM/AM radio displayPreset
buttons (1-6):
Press and hold a preset
button to store the
current station.
Press a preset button
to select a previously
stored station.
SKIP bar: Search the
selected band for a
station with a strong
signal.
A.SEL (auto select) button: Press to
scan bands and store the strongest
stations in each preset. Press again to
turn off scan and restore your original
presets.
CATEGORY bar:
Display and select
an RDS category.
SCAN button: Press to
hear a 10-second sample
of each channel. Press
again to turn off scan.
Interface dial
(from the
Audio screen): Move up,
down, left, and right.
Rotate and press ENTER to
make selections. AUDIO button: Go to
the audio screen.
TUNE bar: Go to
the next or previous
station.
Page 29 of 71
50 || 51
AUDIO AND CONNECTIVITY
AUDIO AND CONNECTIVITY
TABLE OF
CONTENTS
VISUAL INDEX
SAFETY
INFORMATION
INSTRUMENT PANEL
VEHICLE
CONTROLS
AUDIO AND
CONNECTIVITY
BLUETOOTH®
HANDSFREELINK®
ACURALINK®
INDEX
VOICE COMMAND INDEX
CLIENT
INFORMATION
SPECIFICATIONS
MAINTENANCE
HANDLING THE UNEXPECTED
DRIVING
NAVIGATION
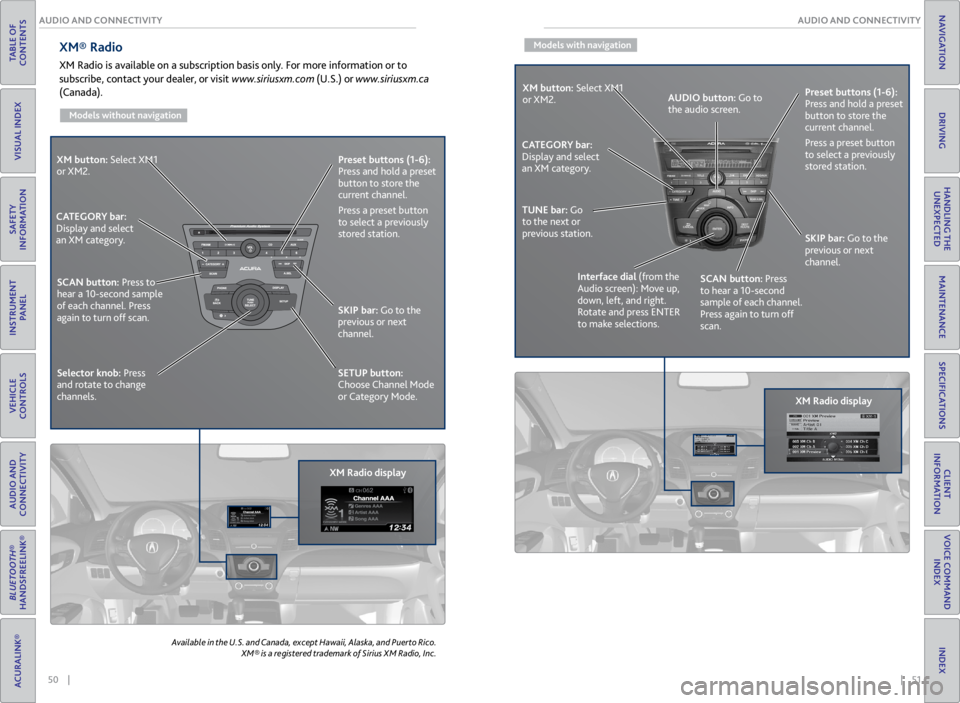
XM® Radio
XM Radio is available on a subscription basis only. For more information or to
subscribe, contact your dealer, or visit www.siriusxm.com (U.S.) or www.siriusxm.ca
(Canada).
Models without navigation
Available in the U.S. and Canada, except Hawaii, Alaska, and Puerto Rico.
XM® is a registered trademark of Sirius XM Radio, Inc.
XM button: Select XM1
or XM2.
XM Radio displayPreset
buttons (1-6):
Press and hold a preset
button to store the
current channel.
Press a preset button
to select a previously
stored station.
SKIP bar: Go to the
previous or next
channel.
SETUP button:
Choose Channel Mode
or Category Mode.
CATEGORY bar:
Display and select
an XM category.
SCAN button: Press to
hear a 10-second sample
of each channel. Press
again to turn off scan.
Selector knob: Press
and rotate to change
channels.
Models with navigation
XM button: Select XM1
or XM2.
XM Radio displayPreset
buttons (1-6):
Press and hold a preset
button to store the
current channel.
Press a preset button
to select a previously
stored station.
SKIP bar: Go to the
previous or next
channel.
CATEGORY bar:
Display and select
an XM category.
TUNE bar: Go
to the next or
previous station.
Interface dial (from the
Audio screen): Move up,
down, left, and right.
Rotate and press ENTER
to make selections.AUDIO button: Go to
the audio screen.
SCAN button: Press
to hear a 10-second
sample of each channel.
Press again to turn off
scan.
Page 57 of 71
106 || 107
MAINTENANCE
MAINTENANCE
TABLE OF
CONTENTS
VISUAL INDEX
SAFETY
INFORMATION
INSTRUMENT PANEL
VEHICLE
CONTROLS
AUDIO AND
CONNECTIVITY
BLUETOOTH®
HANDSFREELINK®
ACURALINK®
INDEX
VOICE COMMAND INDEX
CLIENT
INFORMATION
SPECIFICATIONS
MAINTENANCE
HANDLING THE UNEXPECTED
DRIVING
NAVIGATION
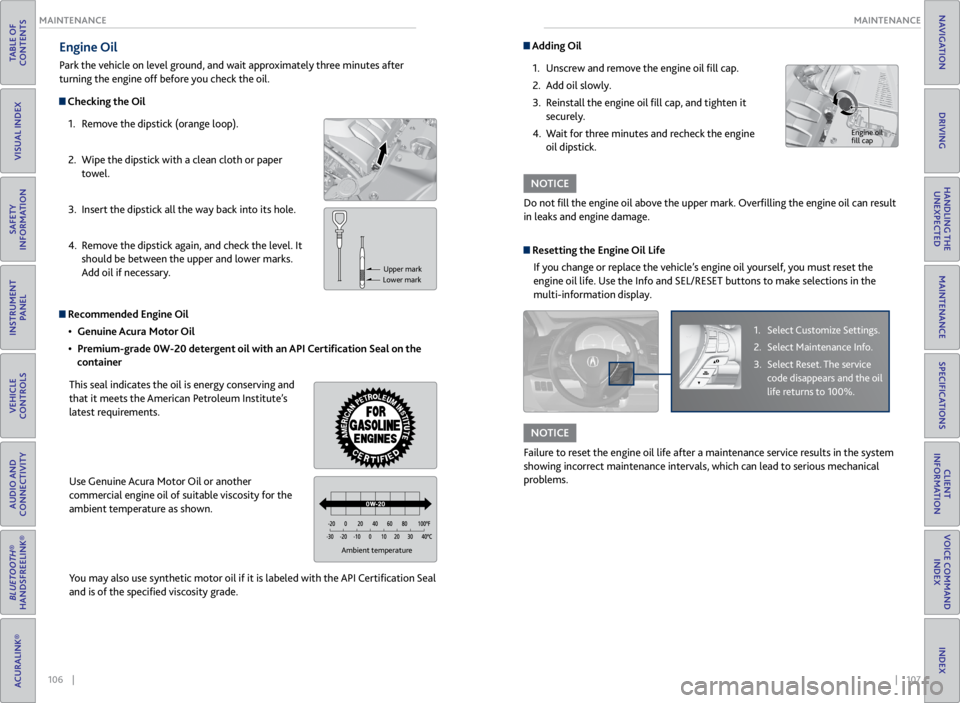
Engine Oil
Park the vehicle on level ground, and wait approximately three minutes after
turning the engine off before you check the oil.
Checking the Oil
1. Remove the dipstick (orange loop).
2. Wipe the dipstick with a clean cloth or paper
towel.
3. Insert the dipstick all the way back into its hole.
4. Remove the dipstick again, and check the level. It
should be between the upper and lower marks.
Add oil if necessary.
Recommended Engine Oil
• Genuine Acura Motor Oil
• Premium-grade 0W-20 detergent oil with an API Certification Seal on the
container
This seal indicates the oil is energy conserving and
that it meets the American Petroleum Institute’s
latest requirements.
Use Genuine Acura Motor Oil or another
commercial engine oil of suitable viscosity for the
ambient temperature as shown.
You may also use synthetic motor oil if it is labeled with the API Certification Seal
and is of the specified viscosity grade.
Upper mark
Lower mark
Ambient temperature
Adding Oil
1. Unscrew and remove the engine oil fill cap.
2. Add oil slowly.
3. Reinstall the engine oil fill cap, and tighten it
securely.
4. Wait for three minutes and recheck the engine
oil dipstick.
Do not fill the engine oil above the upper mark. Overfilling the engine oil can result
in leaks and engine damage.
NOTICE
Engine oil
fill cap
Resetting the Engine Oil Life If you change or replace the vehicle’s engine oil yourself, you must reset the
engine oil life. Use the Info and SEL/RESET buttons to make selections in the
multi-information display.
1. Select Customize Settings.
2. Select Maintenance Info.
3. Select Reset. The service
code disappears and the oil
life returns to 100%.
Failure to reset the engine oil life after a maintenance service results in the system
showing incorrect maintenance intervals, which can lead to serious mechanical
problems.
NOTICE