steering wheel adjustment Acura RDX 2015 Owner's Guide
[x] Cancel search | Manufacturer: ACURA, Model Year: 2015, Model line: RDX, Model: Acura RDX 2015Pages: 71, PDF Size: 18.23 MB
Page 22 of 71

36 || 37
VEHICLE CONTROLS
VEHICLE CONTROLS
TABLE OF
CONTENTS
VISUAL INDEX
SAFETY
INFORMATION
INSTRUMENT PANEL
VEHICLE
CONTROLS
AUDIO AND
CONNECTIVITY
BLUETOOTH®
HANDSFREELINK®
ACURALINK®
INDEX
VOICE COMMAND INDEX
CLIENT
INFORMATION
SPECIFICATIONS
MAINTENANCE
HANDLING THE UNEXPECTED
DRIVING
NAVIGATION
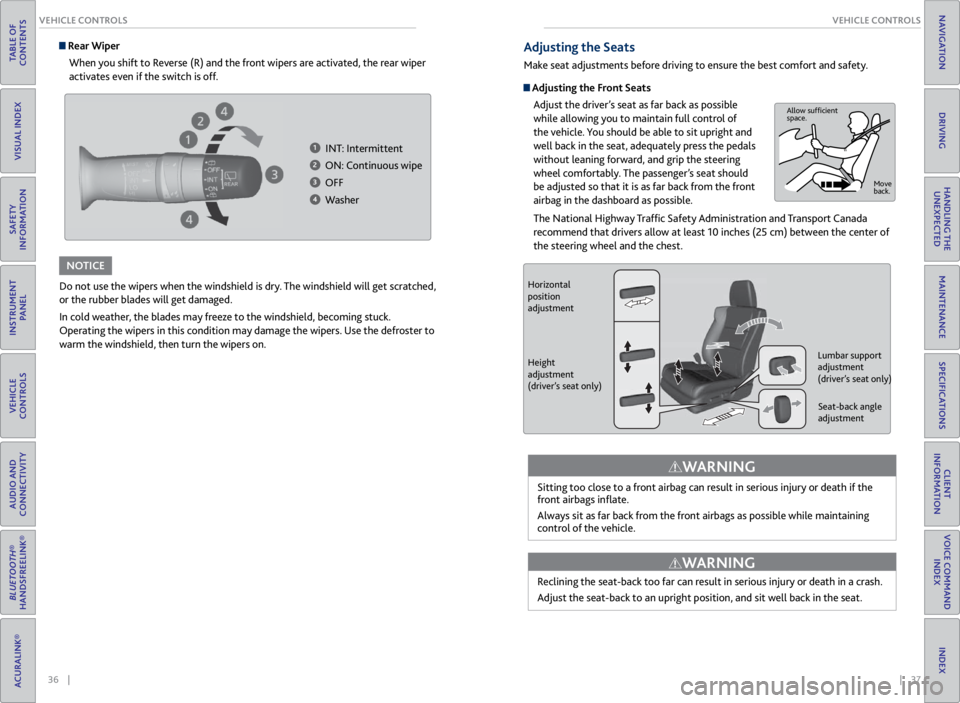
Adjusting the Seats
Make seat adjustments before driving to ensure the best comfort and safety.
Adjusting the Front Seats
Adjust the driver’s seat as far back as possible
while allowing you to maintain full control of
the vehicle. You should be able to sit upright and
well back in the seat, adequately press the pedals
without leaning forward, and grip the steering
wheel comfortably. The passenger’s seat should
be adjusted so that it is as far back from the front
airbag in the dashboard as possible.
The National Highway Traffic Safety Administration and Transport Canada
recommend that drivers allow at least 10 inches (25 cm) between the center of
the steering wheel and the chest.
Sitting too close to a front airbag can result in serious injury or death if the
front airbags inflate.
Always sit as far back from the front airbags as possible while maintaining
control of the vehicle.
WARNING
Allow sufficient
space. Move
back.
Do not use the wipers when the windshield is dry. The windshield will get scratched,
or the rubber blades will get damaged.
In cold weather, the blades may freeze to the windshield, becoming stuck.
Operating the wipers in this condition may damage the wipers. Use the defroster to
warm the windshield, then turn the wipers on.
NOTICE
Rear WiperWhen you shift to Reverse (R) and the front wipers are activated, the rear wiper
activates even if the switch is off.
1 INT: Intermittent
2 ON: Continuous wipe
3 OFF
4 Washer
Horizontal
position
adjustment
Height
adjustment
(driver’s seat only) Seat-back angle
adjustment
Lumbar support
adjustment
(driver’s seat only)
Reclining the seat-back too far can result in serious injury or death in a crash.
Adjust the seat-back to an upright position, and sit well back in the seat.
WARNING
Page 24 of 71

40 || 41
VEHICLE CONTROLS
VEHICLE CONTROLS
TABLE OF
CONTENTS
VISUAL INDEX
SAFETY
INFORMATION
INSTRUMENT PANEL
VEHICLE
CONTROLS
AUDIO AND
CONNECTIVITY
BLUETOOTH®
HANDSFREELINK®
ACURALINK®
INDEX
VOICE COMMAND INDEX
CLIENT
INFORMATION
SPECIFICATIONS
MAINTENANCE
HANDLING THE UNEXPECTED
DRIVING
NAVIGATION
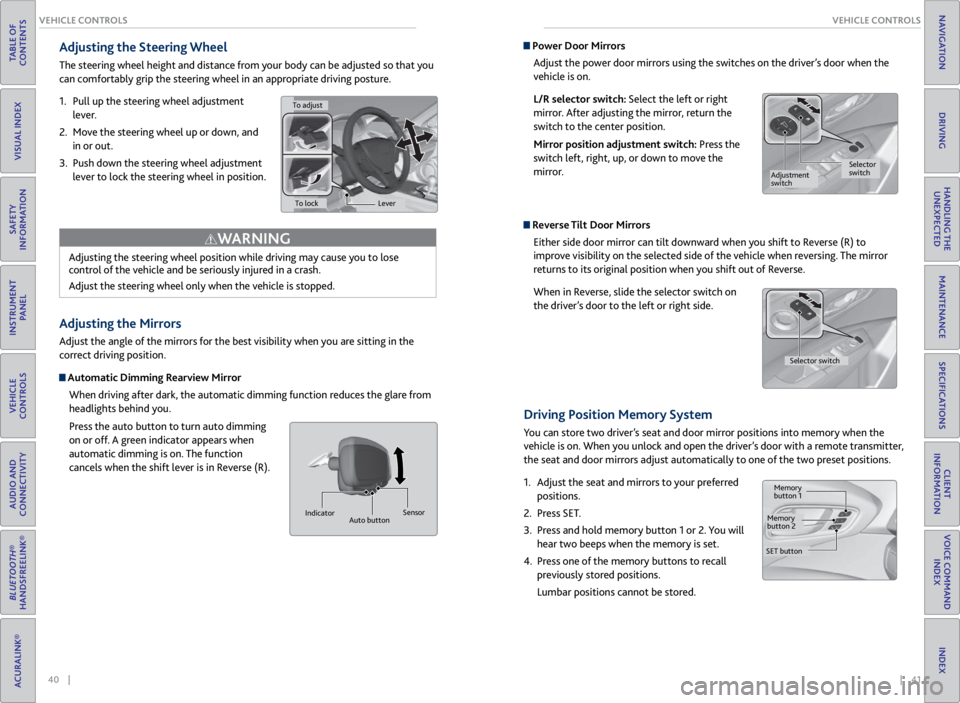
Adjusting the Steering Wheel
The steering wheel height and distance from your body can be adjusted so that you
can comfortably grip the steering wheel in an appropriate driving posture.
1. Pull up the steering wheel adjustment
lever.
2. Move the steering wheel up or down, and
in or out.
3. Push down the steering wheel adjustment
lever to lock the steering wheel in position.
Adjusting the Mirrors
Adjust the angle of the mirrors for the best visibility when you are sitting in the
correct driving position.
Automatic Dimming Rearview Mirror
When driving after dark, the automatic dimming function reduces the glare from
headlights behind you.
Press the auto button to turn auto dimming
on or off. A green indicator appears when
automatic dimming is on. The function
cancels when the shift lever is in Reverse (R).
Adjusting the steering wheel position while driving may cause you to lose
control of the vehicle and be seriously injured in a crash.
Adjust the steering wheel only when the vehicle is stopped.
WARNING
Indicator
Auto button Sensor
Power Door Mirrors
Adjust the power door mirrors using the switches on the driver’s door when the
vehicle is on.
L/R selector switch: Select the left or right
mirror. After adjusting the mirror, return the
switch to the center position.
Mirror position adjustment switch: Press the
switch left, right, up, or down to move the
mirror.
Reverse Tilt Door MirrorsEither side door mirror can tilt downward when you shift to Reverse (R) to
improve visibility on the selected side of the vehicle when reversing. The mirror
returns to its original position when you shift out of Reverse.
When in Reverse, slide the selector switch on
the driver’s door to the left or right side.
Driving Position Memory System
You can store two driver’s seat and door mirror positions into memory when the
vehicle is on. When you unlock and open the driver’s door with a remote transmitter,
the seat and door mirrors adjust automatically to one of the two preset positions.
1. Adjust the seat and mirrors to your preferred
positions.
2. Press SET.
3. Press and hold memory button 1 or 2. You will
hear two beeps when the memory is set.
4. Press one of the memory buttons to recall
previously stored positions.
Lumbar positions cannot be stored.
To adjust
To lock Lever
Selector
switch
Adjustment
switch
Memory
button 1
Memory
button 2
SET button Selector switch
Page 27 of 71

46 || 47
AUDIO AND CONNECTIVITY
AUDIO AND CONNECTIVITY
TABLE OF
CONTENTS
VISUAL INDEX
SAFETY
INFORMATION
INSTRUMENT PANEL
VEHICLE
CONTROLS
AUDIO AND
CONNECTIVITY
BLUETOOTH®
HANDSFREELINK®
ACURALINK®
INDEX
VOICE COMMAND INDEX
CLIENT
INFORMATION
SPECIFICATIONS
MAINTENANCE
HANDLING THE UNEXPECTED
DRIVING
NAVIGATION
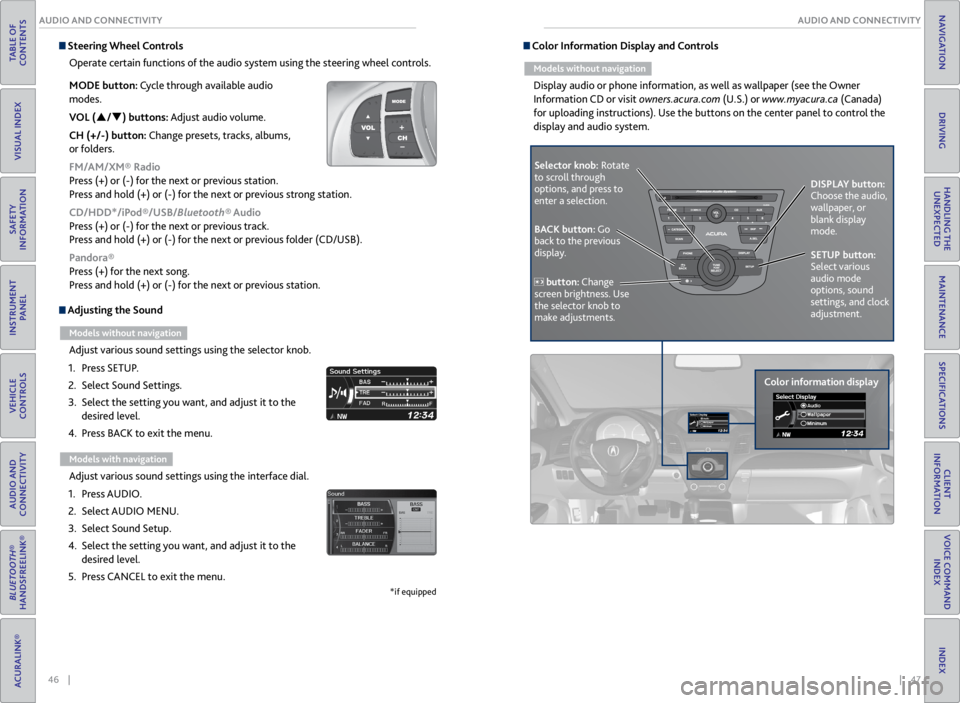
Adjusting the Sound
Models without navigation
Adjust various sound settings using the selector knob.
1. Press SETUP.
2. Select Sound Settings.
3. Select the setting you want, and adjust it to the
desired level.
4. Press BACK to exit the menu.
Models with navigation
Adjust various sound settings using the interface dial.
1. Press AUDIO.
2. Select AUDIO MENU.
3. Select Sound Setup.
4. Select the setting you want, and adjust it to the
desired level.
5. Press CANCEL to exit the menu.
*if equipped
Steering Wheel Controls
Operate certain functions of the audio system using the steering wheel controls.
MODE button: Cycle through available audio
modes.
VOL (p/q) buttons: Adjust audio volume.
CH (+/-) button: Change presets, tracks, albums,
or folders.
FM/AM/XM® Radio
Press (+) or (-) for the next or previous station.
Press and hold (+) or (-) for the next or previous strong station.
CD/HDD*/iPod®/USB/Bluetooth® Audio
Press (+) or (-) for the next or previous track.
Press and hold (+) or (-) for the next or previous folder (CD/USB).
Pandora®
Press (+) for the next song.
Press and hold (+) or (-) for the next or previous station. Color Information Display and Controls
Models without navigation
Display audio or phone information, as well as wallpaper (see the Owner
Information CD or visit owners.acura.com (U.S.) or www.myacura.ca (Canada)
for uploading instructions). Use the buttons on the center panel to control the
display and audio system.
Selector knob: Rotate
to scroll through
options, and press to
enter a selection.
Color information displayDISPLAY button:
Choose the audio,
wallpaper, or
blank display
mode.
SETUP button:
Select various
audio mode
options, sound
settings, and clock
adjustment.
BACK button: Go
back to the previous
display.
button: Change
screen brightness. Use
the selector knob to
make adjustments.
Page 40 of 71

72 || 73
NAVIGATION
NAVIGATION
TABLE OF
CONTENTS
VISUAL INDEX
SAFETY
INFORMATION
INSTRUMENT PANEL
VEHICLE
CONTROLS
AUDIO AND
CONNECTIVITY
BLUETOOTH®
HANDSFREELINK®
ACURALINK®
INDEX
VOICE COMMAND INDEX
CLIENT
INFORMATION
SPECIFICATIONS
MAINTENANCE
HANDLING THE UNEXPECTED
DRIVING
NAVIGATION
Learn how to enter a destination and operate the navigation system.
Basic Navigation Operation
A real-time navigation system uses GPS and a map database to show your current
location and help guide you to a desired destination. You can operate the system
using voice commands or the system controls.
To reduce the potential for driver distraction, certain manual functions may
be inoperable or grayed out while the vehicle is moving. Voice commands are
always available.
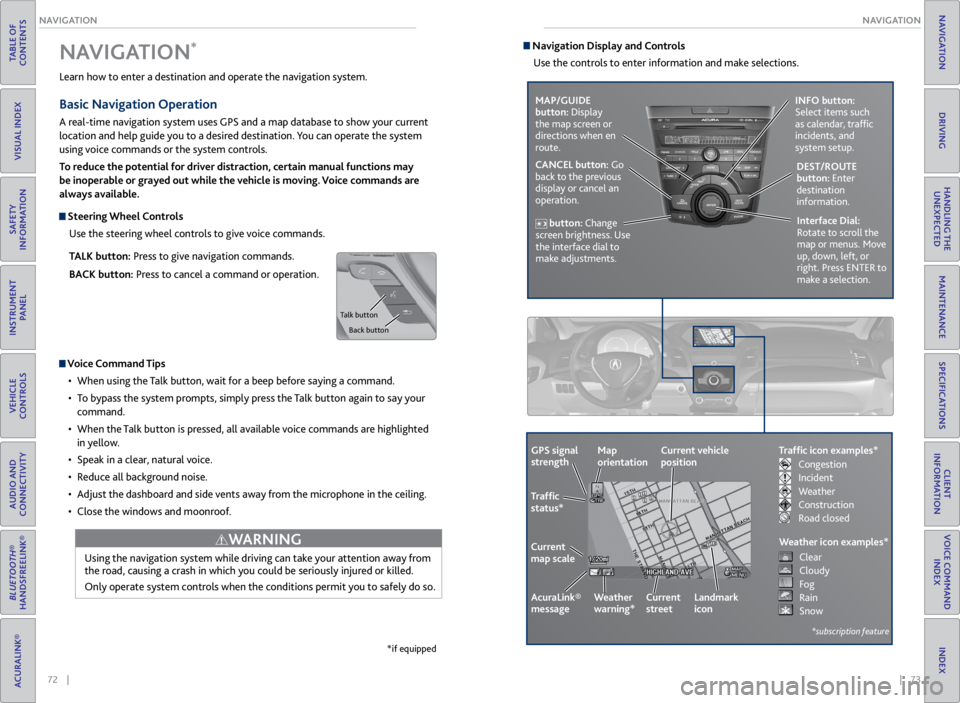
Steering Wheel Controls
Use the steering wheel controls to give voice commands.
TALK button: Press to give navigation commands.
BACK button: Press to cancel a command or operation.
Voice Command Tips
• When using the Talk button, wait for a beep before saying a command.
• To bypass the system prompts, simply press the Talk button again to say your
command.
• When the Talk button is pressed, all available voice commands are highlighted
in yellow.
• Speak in a clear, natural voice.
• Reduce all background noise.
• Adjust the dashboard and side vents away from the microphone in the ceiling.
• Close the windows and moonroof.
Using the navigation system while driving can take your attention away from
the road, causing a crash in which you could be seriously injured or killed.
Only operate system controls when the conditions permit you to safely do so.
WARNING
NAVIGATION*
*if equipped
Talk button
Back button
Navigation Display and ControlsUse the controls to enter information and make selections.
MAP/GUIDE
button: Display
the map screen or
directions when en
route. INFO button:
Select items such
as calendar, traffic
incidents, and
system setup.
CANCEL button: Go
back to the previous
display or cancel an
operation. DEST/ROUTE
button: Enter
destination
information.
button: Change
screen brightness. Use
the interface dial to
make adjustments. Interface Dial:
Rotate to scroll the
map or menus. Move
up, down, left, or
right. Press ENTER to
make a selection.
GPS signal
strength
Traffic
status*
Current
map scale Current vehicle
position
AcuraLink®
message Weather
warning*Map
orientation
Current
streetLandmark
icon
*subscription feature
Traffic icon examples*
Weather icon examples*
Congestion
Incident
Weather
Construction
Road closed Clear
Cloudy
Fog
Rain
Snow