window Acura RDX 2015 Owner's Guide
[x] Cancel search | Manufacturer: ACURA, Model Year: 2015, Model line: RDX, Model: Acura RDX 2015Pages: 71, PDF Size: 18.23 MB
Page 3 of 71
TABLE OF
CONTENTS
VISUAL INDEX
SAFETY
INFORMATION
INSTRUMENT PANEL
VEHICLE
CONTROLS
AUDIO AND
CONNECTIVITY
BLUETOOTH®
HANDSFREELINK®
ACURALINK®
INDEX
VOICE COMMAND INDEX
CLIENT
INFORMATION
SPECIFICATIONS
MAINTENANCE
HANDLING THE UNEXPECTED
DRIVING
NAVIGATION
This Owner’s Guide is intended to help you quickly get acquainted with your 2015
Acura RDX. It provides basic information and instructions on technology and
convenience features, as well as emergency procedures and how to get assistance.
This guide is for vehicles sold in the United States and Canada. It covers all RDX
models, so you may find descriptions of features and equipment that are not in
your vehicle.
Images throughout this guide are from U.S. vehicles and represent features and
equipment that are available on some, but not all, models. Images shown in this
guide should be considered examples and used for demonstration purposes only.
This guide is not intended to be a substitute for the Owner’s Manual. The Owner
Information CD enclosed in your glove box kit includes the Owner’s Manual,
Navigation Manual, Consumer Information Book, and vehicle and tire warranties
in electronic format. This information can be viewed on a computer (PC or Mac
platform) and saved or printed for your reference. In addition, you can visit
owners.acura.com to view the complete and most current information.
If you are the first registered owner of your vehicle, you may request a
complimentary printed copy of the Owner’s Manual, Navigation Manual, Vehicle
Warranty, or Consumer Information Book. To request a copy, visit owners.acura.
com and create or log in to your account. In Canada, please request a copy from
your Acura dealer.
American Honda Motor Company strives to be proactive in protecting our
environment and natural resources. By using electronic delivery for a considerable
portion of the information typically found in a vehicle owner’s manual, we are
further reducing our impact on the environment.
Acura Total Luxury Care Roadside Assistance
Your Acura TLC Roadside Assistance representative is here to help you 24 hours
a day, 7 days a week. Under your 4-year/50,000-mile (80,000 km) warranty, the
following benefits are available:
• Towing services—full cost of towing to the closest Acura dealer
• Roadside assistance—jump starting, fuel delivery, lockout, and flat tire
• Trip planning—detailed trip routing, emergency services, and more
Call (800) 594-8500 (U.S.) or (800) 565-7587 (Canada)
Acura Client Relations Your authorized Acura dealer should be able to answer any questions you have
about your vehicle. However, if you are dissatisfied with the information you
receive, you can call Acura Client Relations (see page 122).
Call (800) 382-2238 (U.S.) or (888) 922-8729 (Canada)
INTRODUCTION TABLE OF CONTENTS
VISUAL INDEX ................................... 1
Steering Wheel and Nearby
Controls ................................................. 1
Dashboard and Ceiling Controls ........ 2
SAFETY INFORMATION .................. 3
Important Safety Information ........... 3
Seat Belts ............................................... 5
Airbags ................................................... 9
Child Safety ......................................... 15
Safety Label Locations ...................... 21
Reporting Safety Defects .................. 22
INSTRUMENT P ANEL .................... 23
Malfunction Indicators ...................... 23
Condition Indicators .......................... 24
On/Off Indicators .............................. 25
Multi-Information Display ...............26
Customized Settings .......................... 27
VEHICLE CONTROLS ..................... 28
Using the Remote Transmitter ....... 28
Keyless Access System ..................... 28
Power Tailgate Operation* ............... 29
Door Operation from Inside the
Vehicle ................................................. 30
Power Window Operation ................ 31
Power Moonroof Operation ............32
Interior and Exterior Lights ............. 33
One-Touch Turn Signal ..................... 34
Wiper Operation ................................ 35
Adjusting the Seats ............................ 37
Adjusting the Steering Wheel ......... 40
Adjusting the Mirrors ........................ 40
Driving Position Memory
System ................................................. 41
HomeLink® Garage Opener ............ 42Climate Control System ..................
43
Seat Heaters ....................................... 43
Setting the Clock ............................... 44
AUDIO AND CONNECTIVITY ...... 45
Basic Audio Operation ...................... 45
FM/AM Radio ..................................... 48
XM® Radio .......................................... 50
Compact Disc (CD) ............................ 52
iPod® ................................................... 54
USB Flash Drive .................................. 56
Bluetooth® Audio .............................. 58
Pandora®* .......................................... 60
Hard Disc Drive (HDD) Audio* ........62
BLUETOOTH® HANDSFREELINK ® 63
Basic HFL Operation ......................... 63
Pairing a Phone ........................... 64, 68
Making a Call ................................ 65, 69
SMS Text Messaging ................... 66, 70
A CURALINK
®* .................................. 71
AcuraLink Messages ........................... 71
NAVIGATION* ............................... 72
Basic Navigation Operation ............. 72
Entering a Destination ...................... 75
Routing ................................................. 76
DRIVING .......................................... 78
Before Driving ..................................... 78
Maximum Load Limit ........................ 80
Towing a Trailer .................................. 82
Starting to Drive ................................ 83
Braking ................................................ 86
Vehicle Stability Assist (VSA®), aka
Electronic Stability Control (ESC)
System ................................................. 87
Cruise Control .................................... 88
*if equipped
Page 4 of 71
| 1
VISUAL INDEX
INDEX
VOICE COMMAND
INDEX
CLIENT
INFORMATION
SPECIFICATIONS
MAINTENANCE
HANDLING THE UNEXPECTED
DRIVING
NAVIGATION
TABLE OF
CONTENTS
VISUAL INDEX
SAFETY
INFORMATION
INSTRUMENT PANEL
VEHICLE
CONTROLS
AUDIO AND
CONNECTIVITY
BLUETOOTH®
HANDSFREELINK®
ACURALINK®
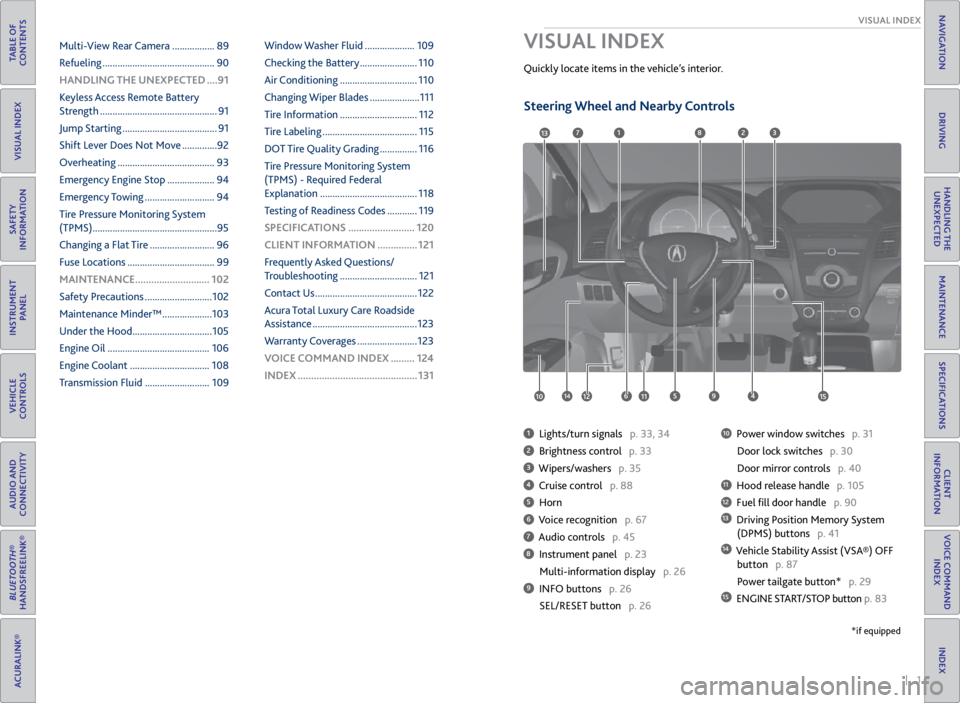
1 Lights/turn signals p. 33, 34
2 Brightness control p. 33
3 Wipers/washers p. 35
4 Cruise control p. 88
5 Horn
6 Voice recognition p. 67
7 Audio controls p. 45
8 Instrument panel p. 23
Multi-information display p. 26
9 INFO buttons p. 26
SEL/RESET button p. 26
10 Power window switches p. 31
Door lock switches p. 30
Door mirror controls p. 40
11 Hood release handle p. 105
12 Fuel fill door handle p. 90
13 Driving Position Memory System
(DPMS) buttons p. 41
14 Vehicle Stability Assist (VSA®) OFF
button p. 87
Power tailgate button* p. 29
15 ENGINE START/STOP button p. 83
VISUAL INDEX
Quickly locate items in the vehicle’s interior.
1
45961012
7283
11
13
1415
*if equipped
Multi-View Rear Camera ................. 89
Refueling ............................................. 90
HANDLING THE UNEXPECTED ....91
Keyless Access Remote Battery
Strength ............................................... 91
Jump Starting ...................................... 91
Shift Lever Does Not Move .............. 92
Overheating ....................................... 93
Emergency Engine Stop ................... 94
Emergency Towing ............................ 94
Tire Pressure Monitoring System
(TPMS) .................................................. 95
Changing a Flat Tire .......................... 96
Fuse Locations ................................... 99
MAINTENANCE ............................ 102
Safety Precautions ........................... 102
Maintenance Minder™ .................... 103
Under the Hood ................................ 105
Engine Oil ......................................... 106
Engine Coolant ................................ 108
Transmission Fluid .......................... 109Window Washer Fluid ....................
109
Checking the Battery ....................... 110
Air Conditioning ............................... 110
Changing Wiper Blades .................... 111
Tire Information ............................... 112
Tire Labeling ...................................... 115
DOT Tire Quality Grading ............... 116
Tire Pressure Monitoring System
(TPMS) - Required Federal
Explanation ....................................... 118
Testing of Readiness Codes ............ 119
SPECIFICATIONS ......................... 120
CLIENT INFORMATION ............... 121
Frequently Asked Questions/
Troubleshooting ............................... 121
Contact Us ......................................... 122
Acura Total Luxury Care Roadside
Assistance .......................................... 123
Warranty Coverages ........................ 123
V OICE COMMAND INDEX ......... 124
INDEX ............................................. 131
Steering Wheel and Nearby Controls
Page 6 of 71
4 || 5
SAFETY
SAFETY
TABLE OF
CONTENTS
VISUAL INDEX
SAFETY
INFORMATION
INSTRUMENT PANEL
VEHICLE
CONTROLS
AUDIO AND
CONNECTIVITY
BLUETOOTH®
HANDSFREELINK®
ACURALINK®
INDEX
VOICE COMMAND INDEX
CLIENT
INFORMATION
SPECIFICATIONS
MAINTENANCE
HANDLING THE UNEXPECTED
DRIVING
NAVIGATION
Safety Messages
When you see the following messages throughout this guide, pay close attention.
You WILL be KILLED or SERIOUSLY HURT if you don’t follow
instructions.
You CAN be KILLED or SERIOUSLY HURT if you don’t
followinstructions.
You CAN be HURT if you don’t follow instructions.
This information is intended to help you avoid damage to your
vehicle, other property, or the environment.
WARNING
CAUTION
NOTICE
DANGER
Carbon Monoxide Gas
The engine exhaust from this vehicle contains carbon monoxide, a colorless,
odorless, and highly toxic gas. As long as you properly maintain your vehicle and
follow the instructions set forth below, you will not accumulate dangerous levels
of carbon monoxide gas in the vehicle interior.
Have the exhaust system inspected for leaks whenever:
• The exhaust system is making an unusual noise.
• The exhaust system may have been damaged.
• The vehicle is raised for an oil change.
When you operate a vehicle with the tailgate open, airflow can pull exhaust gas
into the interior and create a hazardous condition. If you must drive with the
tailgate open, open all the windows and set the climate control system as shown
below.
1. Select the fresh air mode.
2. Select the
mode.
3. Set the fan speed to high.
4. Set the temperature control to a comfortable setting.
Adjust the climate control system in the same manner if you sit in your parked
vehicle with the engine running.
An enclosed area such as a garage can quickly fill up with carbon monoxide gas.
Do not run the engine with the garage door closed. Even when the garage door is
open, drive out of the garage immediately after starting the engine. Carbon monoxide gas is toxic. Breathing it can cause unconsciousness and
even kill you.
Avoid any enclosed areas or activities that expose you to carbon monoxide.
WARNING
Seat Belts
A seat belt is your best protection in all types of collisions. Airbags are designed to
supplement seat belts, not replace them. So even though your vehicle is equipped
with airbags, make sure you and your passengers always wear your seat belts and
wear them properly.
Lap/Shoulder Seat Belts
All five seating positions are equipped with lap/shoulder seat belts with
emergency locking retractors. In normal driving, the retractor lets you move
freely while keeping some tension on the belt. During a collision or sudden stop,
the retractor locks to restrain your body. The rear seat belts also have a lockable
retractor for use with child seats.
The front seats are equipped with automatic seat belt tensioners to enhance
safety. The tensioners automatically tighten the front seat belts during a
moderate to severe frontal collision, sometimes even if the collision is not severe
enough to inflate the front airbags.
Proper Use of Seat Belts
Follow these guidelines for proper use:
• All occupants should sit upright, well back in the seat, and remain in that
position for the duration of the trip. Slouching and leaning reduces the
effectiveness of the belt and can increase the chance of serious injury in a crash.
• Never place the shoulder part of a lap/shoulder seat belt under your arm or
behind your back. This could cause very serious injuries in a crash.
• Two people should never use the same seat belt. If they do, they could be very
seriously injured in a crash.
• Do not put any accessories on the seat belts. Devices intended to improve
comfort or reposition the shoulder part of a seat belt can reduce the protective
capability and increase the chance of serious injury in a crash.
• No one should sit in a seat with an inoperative seat belt or one that does not
appear to be working correctly. Using a seat belt that is not working properly
may not protect the occupant in a crash. Have a dealer check the belt as soon
as possible.
Not wearing a seat belt properly increases the chance of a serious injury or
death in a crash, even though your vehicle has airbags.
Be sure you and your passengers always wear seat belts and wear them
properly.
WARNING
Page 9 of 71
10 || 11
SAFETY
SAFETY
TABLE OF
CONTENTS
VISUAL INDEX
SAFETY
INFORMATION
INSTRUMENT PANEL
VEHICLE
CONTROLS
AUDIO AND
CONNECTIVITY
BLUETOOTH®
HANDSFREELINK®
ACURALINK®
INDEX
VOICE COMMAND INDEX
CLIENT
INFORMATION
SPECIFICATIONS
MAINTENANCE
HANDLING THE UNEXPECTED
DRIVING
NAVIGATION
Side Airbags
The side airbags help protect the upper torso and pelvis of the driver or a front
passenger during a moderate-to-severe side impact. They are housed in the
outside edge of the driver’s and front passenger’s seat-backs. Both are marked
SIDE AIRBAG.
Side Curtain Airbags
Side curtain airbags help protect the head and torso of the driver and passengers in
outer seating positions during a moderate-to-severe side impact. The side curtain
airbags equipped in this vehicle are also designed to help reduce the likelihood
of partial and complete ejection of vehicle occupants through side windows in
crashes, particularly rollover crashes.
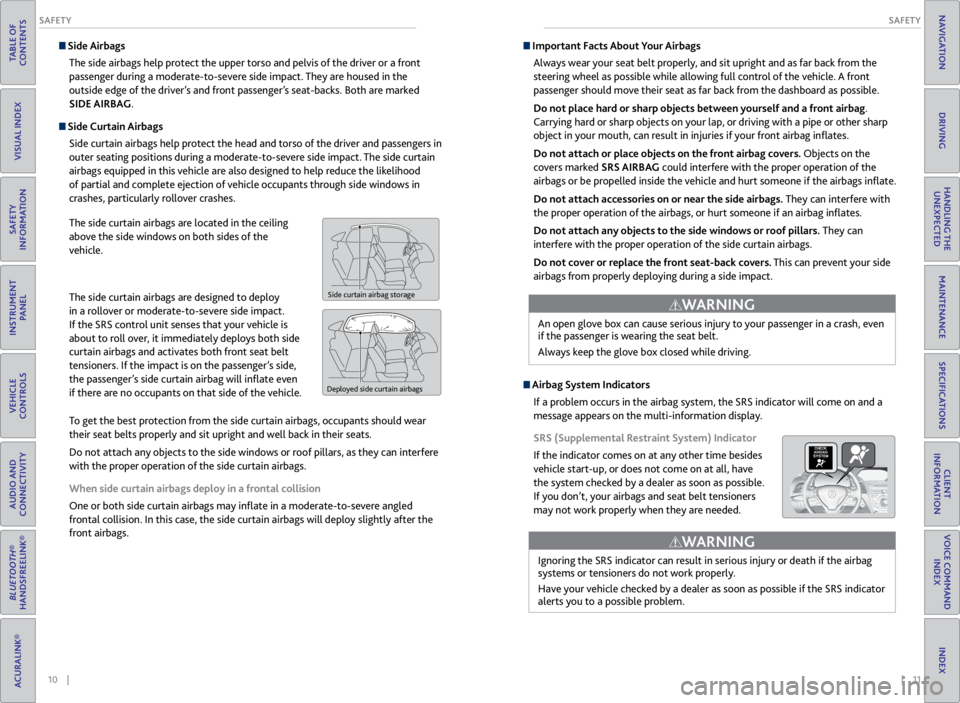
The side curtain airbags are located in the ceiling
above the side windows on both sides of the
vehicle.
The side curtain airbags are designed to deploy
in a rollover or moderate-to-severe side impact.
If the SRS control unit senses that your vehicle is
about to roll over, it immediately deploys both side
curtain airbags and activates both front seat belt
tensioners. If the impact is on the passenger’s side,
the passenger’s side curtain airbag will inflate even
if there are no occupants on that side of the vehicle.
To get the best protection from the side curtain airbags, occupants should wear
their seat belts properly and sit upright and well back in their seats.
Do not attach any objects to the side windows or roof pillars, as they can interfere
with the proper operation of the side curtain airbags.
When side curtain airbags deploy in a frontal collision
One or both side curtain airbags may inflate in a moderate-to-severe angled
frontal collision. In this case, the side curtain airbags will deploy slightly after the
front airbags.
Side curtain airbag storage
Deployed side curtain airbags
Important Facts About Your Airbags
Always wear your seat belt properly, and sit upright and as far back from the
steering wheel as possible while allowing full control of the vehicle. A front
passenger should move their seat as far back from the dashboard as possible.
Do not place hard or sharp objects between yourself and a front airbag.
Carrying hard or sharp objects on your lap, or driving with a pipe or other sharp
object in your mouth, can result in injuries if your front airbag inflates.
Do not attach or place objects on the front airbag covers. Objects on the
covers marked SRS AIRBAG could interfere with the proper operation of the
airbags or be propelled inside the vehicle and hurt someone if the airbags inflate.
Do not attach accessories on or near the side airbags. They can interfere with
the proper operation of the airbags, or hurt someone if an airbag inflates.
Do not attach any objects to the side windows or roof pillars. They can
interfere with the proper operation of the side curtain airbags.
Do not cover or replace the front seat-back covers. This can prevent your side
airbags from properly deploying during a side impact.
Airbag System Indicators
If a problem occurs in the airbag system, the SRS indicator will come on and a
message appears on the multi-information display.
SRS (Supplemental Restraint System) Indicator
If the indicator comes on at any other time besides
vehicle start-up, or does not come on at all, have
the system checked by a dealer as soon as possible.
If you don’t, your airbags and seat belt tensioners
may not work properly when they are needed.
Ignoring the SRS indicator can result in serious injury or death if the airbag
systems or tensioners do not work properly.
Have your vehicle checked by a dealer as soon as possible if the SRS indicator
alerts you to a possible problem.
WARNING
An open glove box can cause serious injury to your passenger in a crash, even
if the passenger is wearing the seat belt.
Always keep the glove box closed while driving.
WARNING
Page 10 of 71
12 || 13
SAFETY
SAFETY
TABLE OF
CONTENTS
VISUAL INDEX
SAFETY
INFORMATION
INSTRUMENT PANEL
VEHICLE
CONTROLS
AUDIO AND
CONNECTIVITY
BLUETOOTH®
HANDSFREELINK®
ACURALINK®
INDEX
VOICE COMMAND INDEX
CLIENT
INFORMATION
SPECIFICATIONS
MAINTENANCE
HANDLING THE UNEXPECTED
DRIVING
NAVIGATION
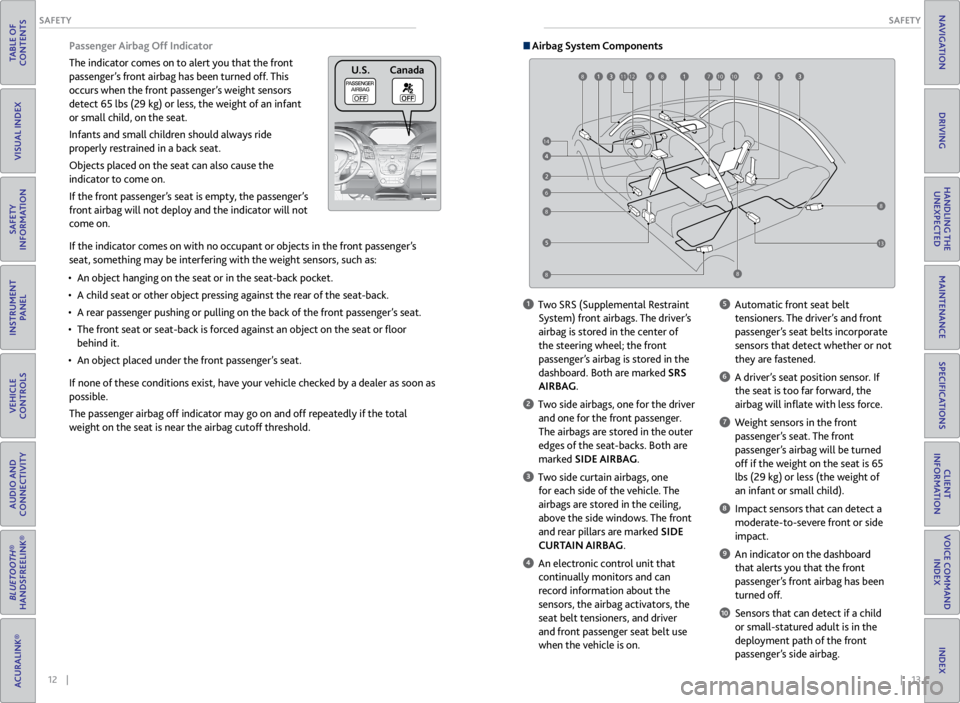
Passenger Airbag Off Indicator
The indicator comes on to alert you that the front
passenger’s front airbag has been turned off. This
occurs when the front passenger’s weight sensors
detect 65 lbs (29 kg) or less, the weight of an infant
or small child, on the seat.
Infants and small children should always ride
properly restrained in a back seat.
Objects placed on the seat can also cause the
indicator to come on.
If the front passenger’s seat is empty, the passenger’s
front airbag will not deploy and the indicator will not
come on.
If the indicator comes on with no occupant or objects in the front passenger’s
seat, something may be interfering with the weight sensors, such as:
• An object hanging on the seat or in the seat-back pocket.
• A child seat or other object pressing against the rear of the seat-back.
• A rear passenger pushing or pulling on the back of the front passenger’s seat.
• The front seat or seat-back is forced against an object on the seat or floor
behind it.
• An object placed under the front passenger’s seat.
If none of these conditions exist, have your vehicle checked by a dealer as soon as
possible.
The passenger airbag off indicator may go on and off repeatedly if the total
weight on the seat is near the airbag cutoff threshold.
U.S .C anada
Airbag System Components
6
789101211108
88
88
14
13
1 Two SRS (Supplemental Restraint
System) front airbags. The driver’s
airbag is stored in the center of
the steering wheel; the front
passenger’s airbag is stored in the
dashboard. Both are marked SRS
AIRBAG.
2 Two side airbags, one for the driver and one for the front passenger.
The airbags are stored in the outer
edges of the seat-backs. Both are
marked SIDE AIRBAG.
3 Two side curtain airbags, one for each side of the vehicle. The
airbags are stored in the ceiling,
above the side windows. The front
and rear pillars are marked SIDE
CURTAIN AIRBAG.
4 An electronic control unit that continually monitors and can
record information about the
sensors, the airbag activators, the
seat belt tensioners, and driver
and front passenger seat belt use
when the vehicle is on.
5 Automatic front seat belt tensioners. The driver’s and front
passenger’s seat belts incorporate
sensors that detect whether or not
they are fastened.
6 A driver’s seat position sensor. If the seat is too far forward, the
airbag will inflate with less force.
7 Weight sensors in the front
passenger’s seat. The front
passenger’s airbag will be turned
off if the weight on the seat is 65
lbs (29 kg) or less (the weight of
an infant or small child).
8 Impact sensors that can detect a moderate-to-severe front or side
impact.
9 An indicator on the dashboard that alerts you that the front
passenger’s front airbag has been
turned off.
10 Sensors that can detect if a child or small-statured adult is in the
deployment path of the front
passenger’s side airbag.
Page 11 of 71

14 || 15
SAFETY
SAFETY
TABLE OF
CONTENTS
VISUAL INDEX
SAFETY
INFORMATION
INSTRUMENT PANEL
VEHICLE
CONTROLS
AUDIO AND
CONNECTIVITY
BLUETOOTH®
HANDSFREELINK®
ACURALINK®
INDEX
VOICE COMMAND INDEX
CLIENT
INFORMATION
SPECIFICATIONS
MAINTENANCE
HANDLING THE UNEXPECTED
DRIVING
NAVIGATION
11 An indicator on the instrument
panel that alerts you to a possible
problem with your airbag system or
seat belt tensioners.
12 An indicator on the instrument panel that alerts you that the front
passenger’s side airbag has been
turned off.
13 Safing sensor
14 A rollover sensor that detects whether the vehicle is about to roll
over.
Airbag Care
You do not need to, and should not, perform any maintenance on or replace
any airbag system components yourself. However, you should have your vehicle
inspected by a dealer in the following situations:
When the airbags have deployed
If an airbag has inflated, the control unit and other related parts must be
replaced. Similarly, once an automatic seat belt tensioner has been activated, it
must be replaced.
When the vehicle has been in a moderate-to-severe collision
Even if the airbags did not inflate, have your dealer inspect the following: the
driver’s seat position sensor, weight sensors in the passenger’s seat, front seat
belt tensioners, and each seat belt that was worn during the crash.
Do not remove or modify a front seat without first consulting a dealer
This would likely disable the driver’s seat position sensor or the weight sensors
in the passenger’s seat. If it is necessary to remove or modify a front seat to
accommodate a person with disabilities, contact an Acura dealer. For U.S.
vehicles, call Acura Client Relations at (800) 382-2238. For Canadian vehicles,
call Acura Client Services at (888) 922-8729.
Child Safety
Each year, many children are injured or killed in vehicle crashes because they are
either unrestrained or not properly restrained. In fact, vehicle collisions are the
number one cause of death of children ages 12 and under.
The National Highway Traffic Safety Administration and Transport Canada
recommend that all children ages 12 and under be properly restrained in a rear seat.
Some states or provinces/territories have laws restricting where children may ride.
To reduce the number of child deaths and injuries, every state, Canadian province
and territory requires that infants and children be properly restrained when they
ride in a vehicle.
Protecting Child Passengers—Important Considerations
• An inflating front or side airbag can injure or kill a child sitting in the front seat.
• A child in the front seat is more likely to interfere with the driver’s ability to
safely control the vehicle.
• Statistics show that children of all sizes and ages are safer when they are
properly restrained in a rear seat.
• Any child who is too small to wear a seat belt correctly must be restrained in an
approved child seat that is properly secured to the vehicle using either the lap
belt portion of the lap/shoulder belt or the lower anchors of the LATCH system.
• Never hold a child on your lap because it is impossible to protect them in the
event of a collision.
• Never put a seat belt over yourself and a child. During a crash, the belt would
likely press deep into the child and cause serious or fatal injuries.
• Never let two children use the same seat belt. Both children could be very
seriously injured in a crash.
• Do not allow children to operate the doors, windows, or seat adjustments.
• Do not leave children in the vehicle unattended, especially in hot weather
when the inside of the vehicle can get hot enough to kill them. They could also
activate vehicle controls, causing it to move unexpectedly.
Children who are unrestrained or improperly restrained can be seriously
injured or killed in a crash.
Any child too small for a seat belt should be properly restrained in a child
seat. A larger child should be properly restrained with a seat belt, using a
booster seat if necessary.
WARNING
Page 19 of 71

30 || 31
VEHICLE CONTROLS
VEHICLE CONTROLS
TABLE OF
CONTENTS
VISUAL INDEX
SAFETY
INFORMATION
INSTRUMENT PANEL
VEHICLE
CONTROLS
AUDIO AND
CONNECTIVITY
BLUETOOTH®
HANDSFREELINK®
ACURALINK®
INDEX
VOICE COMMAND INDEX
CLIENT
INFORMATION
SPECIFICATIONS
MAINTENANCE
HANDLING THE UNEXPECTED
DRIVING
NAVIGATION
Door Operation from Inside the Vehicle
Use several methods to lock or unlock the doors.
Using the Lock Tab
To unlock: When you unlock either front door
using the lock tab, the specific door (driver’s or
passenger’s) unlocks.
To lock: When you lock the door using the lock tab
on the driver’s door, all the other doors and tailgate
lock at the same time. When you lock the door
using the lock tab on the front passenger’s door,
only that door locks.
Using the Master Door Lock Switch
To unlock: Press the unlock side of the switch to
unlock all doors and the tailgate.
To lock: Press the lock side of the switch to lock all
doors and the tailgate.
Using the Front Door Inner Handle Pull the front door inner handle. The door unlocks
and opens in one motion.
Do not pull a front door inner handle while the
vehicle is moving.
Childproof Door Locks
The childproof door locks prevent the rear doors from being opened from the
inside regardless of the position of the lock tab.
Slide the lever in the
rear door to the lock
position, and close the
door.
Open the door using
the outer door handle.Unlock
Lock
Inner
handle
To lock
To unlock Lock tab
To lock
To unlock Master door
lock switch
Power Window Operation
The power windows can be opened and closed when the vehicle is on by using the
switches on the doors. The switches on the driver’s side can be used to open and
close all the windows.
Automatic Operation
To open: Push the switch down firmly.
To close: Pull the switch up firmly.
The window opens or closes completely. To
stop the window at any time, push or pull
the switch again briefly.
Manual OperationTo open: Push the switch down lightly.
To close: Pull the switch up lightly.
Release the switch when the windows reach the desired position.
Power Window LockPush in the power window lock button so
only the driver’s window can be operated.
Closing a power window on someone’s hands or fingers can cause serious
injury.
Make sure your passengers are away from the windows before closing them.
WARNING
Close
Open
ON
OF F
Power window
lock button
Page 25 of 71
42 || 43
VEHICLE CONTROLS
VEHICLE CONTROLS
TABLE OF
CONTENTS
VISUAL INDEX
SAFETY
INFORMATION
INSTRUMENT PANEL
VEHICLE
CONTROLS
AUDIO AND
CONNECTIVITY
BLUETOOTH®
HANDSFREELINK®
ACURALINK®
INDEX
VOICE COMMAND INDEX
CLIENT
INFORMATION
SPECIFICATIONS
MAINTENANCE
HANDLING THE UNEXPECTED
DRIVING
NAVIGATION
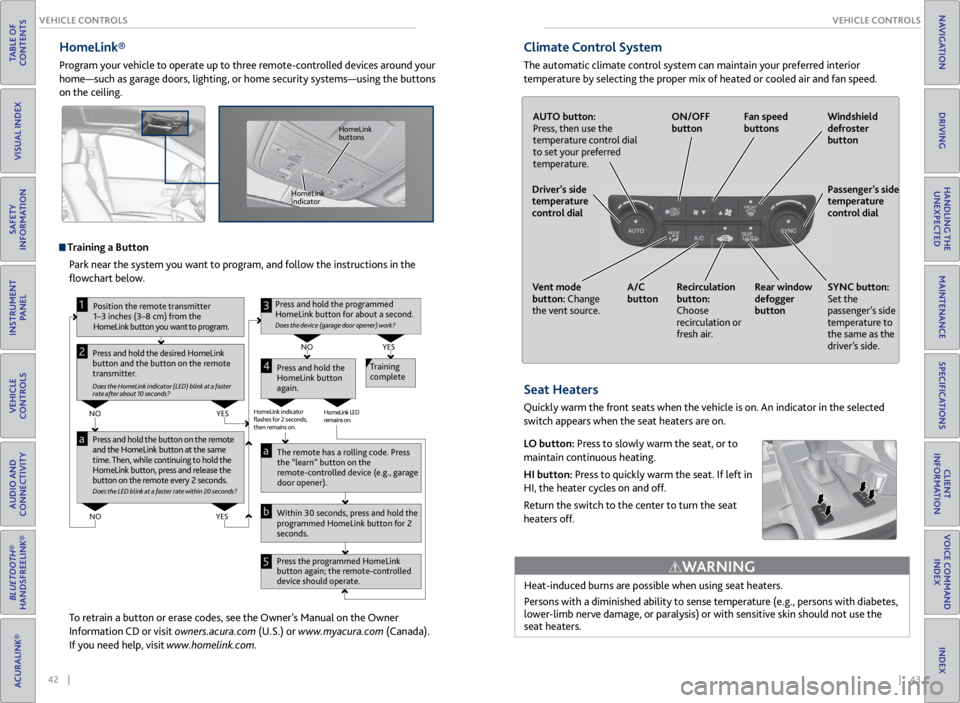
HomeLink®
Program your vehicle to operate up to three remote-controlled devices around your
home—such as garage doors, lighting, or home security systems—using the buttons
on the ceiling.
Training a Button
Park near the system you want to program, and follow the instructions in the
flowchart below.
To retrain a button or erase codes, see the Owner’s Manual on the Owner
Information CD or visit owners.acura.com (U.S.) or www.myacura.com (Canada).
If you need help, visit www.homelink.com.
Press and hold the button on the r emote
and the HomeLink button at the same
time. Then, while continuing to hold the
HomeLink button, pr ess and release the
button on the r emote every 2 seconds.
Does the LED blink at a fa ster ra te within 20 seconds ?
Press and hold the
HomeLink button
again. T
raining
complete
YES
NO
HomeLink indicator
�ashes for 2 seconds,
then rem ains on. HomeLink LED
r
emains on.YES
NO
YES
NO
P osition the remote transmitter
1–3 inches (3–8 cm) from the
HomeLink button you want to program.1
Press and hold the desir ed HomeLink
button and the button on the r emote
transmitter .
Does the HomeLink indicat or (LED) blink at a f ast er
rate after about 10 seconds ?
2
a
The remote has a ro lling code. Press
the “learn” button on the
r emote-contr olled device (e.g., garage
door opener).
Pr ess the pr ogrammed HomeLink
button again; the remote-contr olled
device should operate.
Within 30 seconds, pr
ess and hold the
pr ogrammed HomeLink button for 2
seconds.a
Pr ess and hold the programmed
HomeLink button for about a second.
Does the devic e (garage door opener) work?
3
b
4
5
HomeLink
indicator HomeLink
buttons
Climate Control System
The automatic climate control system can maintain your preferred interior
temperature by selecting the proper mix of heated or cooled air and fan speed.
Seat Heaters
Quickly warm the front seats when the vehicle is on. An indicator in the selected
switch appears when the seat heaters are on.
LO button: Press to slowly warm the seat, or to
maintain continuous heating.
HI button: Press to quickly warm the seat. If left in
HI, the heater cycles on and off.
Return the switch to the center to turn the seat
heaters off.
Heat-induced burns are possible when using seat heaters.
Persons with a diminished ability to sense temperature (e.g., persons with diabetes,
lower-limb nerve damage, or paralysis) or with sensitive skin should not use the
seat heaters.
WARNING
AUTO button:
Press, then use the
temperature control dial
to set your preferred
temperature.
ON/OFF
button
Fan speed
buttons Windshield
defroster
button
Passenger’s side
temperature
control dial
SYNC button:
Set the
passenger’s side
temperature to
the same as the
driver’s side.
Rear window
defogger
button
Recirculation
button:
Choose
recirculation or
fresh air.
A/C
button
Vent mode
button: Change
the vent source.
Driver’s side
temperature
control dial
Page 37 of 71
66 || 67
TABLE OF
CONTENTS
VISUAL INDEX
SAFETY
INFORMATION
INSTRUMENT PANEL
VEHICLE
CONTROLS
AUDIO AND
CONNECTIVITY
BLUETOOTH®
HANDSFREELINK®
ACURALINK®
INDEX
VOICE COMMAND INDEX
CLIENT
INFORMATION
SPECIFICATIONS
MAINTENANCE
HANDLING THE UNEXPECTED
DRIVING
NAVIGATION
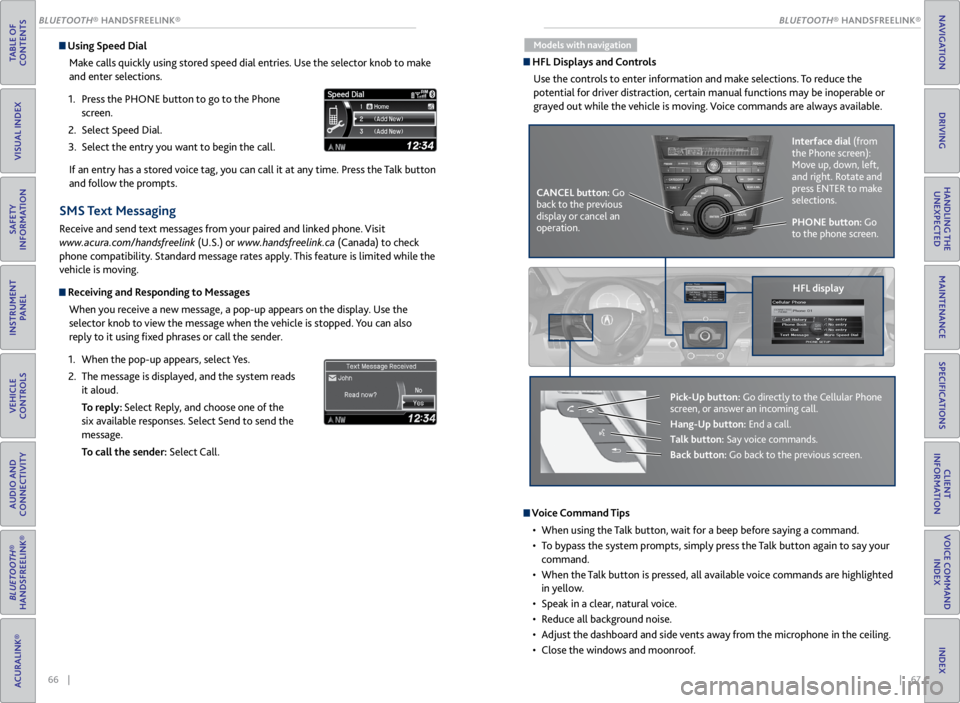
Using Speed Dial
Make calls quickly using stored speed dial entries. Use the selector knob to make
and enter selections.
1. Press the PHONE button to go to the Phone
screen.
2. Select Speed Dial.
3. Select the entry you want to begin the call.
If an entry has a stored voice tag, you can call it at any time. Press the Talk button
and follow the prompts.
SMS Text Messaging
Receive and send text messages from your paired and linked phone. Visit
www.acura.com/handsfreelink (U.S.) or www.handsfreelink.ca (Canada) to check
phone compatibility. Standard message rates apply. This feature is limited while the
vehicle is moving.
Receiving and Responding to Messages
When you receive a new message, a pop-up appears on the display. Use the
selector knob to view the message when the vehicle is stopped. You can also
reply to it using fixed phrases or call the sender.
1. When the pop-up appears, select Yes.
2. The message is displayed, and the system reads
it aloud.
To reply: Select Reply, and choose one of the
six available responses. Select Send to send the
message.
To call the sender: Select Call.
Models with navigation
HFL Displays and Controls
Use the controls to enter information and make selections. To reduce the
potential for driver distraction, certain manual functions may be inoperable or
grayed out while the vehicle is moving. Voice commands are always available.
PHONE button: Go
to the phone screen.
CANCEL button: Go
back to the previous
display or cancel an
operation. Interface dial
(from
the Phone screen):
Move up, down, left,
and right. Rotate and
press ENTER to make
selections.
HFL display
Pick-Up button: Go directly to the Cellular Phone
screen, or answer an incoming call.
Hang-Up button: End a call.
Talk button: Say voice commands.
Back button: Go back to the previous screen.
Voice Command Tips
• When using the Talk button, wait for a beep before saying a command.
• To bypass the system prompts, simply press the Talk button again to say your
command.
• When the Talk button is pressed, all available voice commands are highlighted
in yellow.
• Speak in a clear, natural voice.
• Reduce all background noise.
• Adjust the dashboard and side vents away from the microphone in the ceiling.
• Close the windows and moonroof.
BLUETOOTH® HANDSFREELINK®
BLUETOOTH® HANDSFREELINK®
Page 40 of 71
72 || 73
NAVIGATION
NAVIGATION
TABLE OF
CONTENTS
VISUAL INDEX
SAFETY
INFORMATION
INSTRUMENT PANEL
VEHICLE
CONTROLS
AUDIO AND
CONNECTIVITY
BLUETOOTH®
HANDSFREELINK®
ACURALINK®
INDEX
VOICE COMMAND INDEX
CLIENT
INFORMATION
SPECIFICATIONS
MAINTENANCE
HANDLING THE UNEXPECTED
DRIVING
NAVIGATION
Learn how to enter a destination and operate the navigation system.
Basic Navigation Operation
A real-time navigation system uses GPS and a map database to show your current
location and help guide you to a desired destination. You can operate the system
using voice commands or the system controls.
To reduce the potential for driver distraction, certain manual functions may
be inoperable or grayed out while the vehicle is moving. Voice commands are
always available.
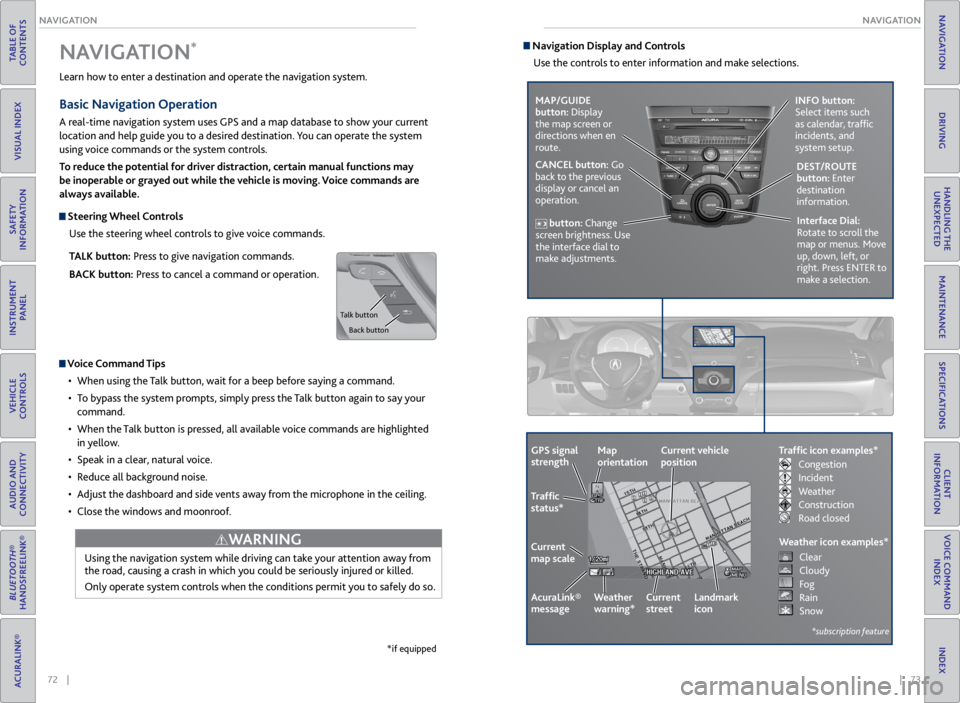
Steering Wheel Controls
Use the steering wheel controls to give voice commands.
TALK button: Press to give navigation commands.
BACK button: Press to cancel a command or operation.
Voice Command Tips
• When using the Talk button, wait for a beep before saying a command.
• To bypass the system prompts, simply press the Talk button again to say your
command.
• When the Talk button is pressed, all available voice commands are highlighted
in yellow.
• Speak in a clear, natural voice.
• Reduce all background noise.
• Adjust the dashboard and side vents away from the microphone in the ceiling.
• Close the windows and moonroof.
Using the navigation system while driving can take your attention away from
the road, causing a crash in which you could be seriously injured or killed.
Only operate system controls when the conditions permit you to safely do so.
WARNING
NAVIGATION*
*if equipped
Talk button
Back button
Navigation Display and ControlsUse the controls to enter information and make selections.
MAP/GUIDE
button: Display
the map screen or
directions when en
route. INFO button:
Select items such
as calendar, traffic
incidents, and
system setup.
CANCEL button: Go
back to the previous
display or cancel an
operation. DEST/ROUTE
button: Enter
destination
information.
button: Change
screen brightness. Use
the interface dial to
make adjustments. Interface Dial:
Rotate to scroll the
map or menus. Move
up, down, left, or
right. Press ENTER to
make a selection.
GPS signal
strength
Traffic
status*
Current
map scale Current vehicle
position
AcuraLink®
message Weather
warning*Map
orientation
Current
streetLandmark
icon
*subscription feature
Traffic icon examples*
Weather icon examples*
Congestion
Incident
Weather
Construction
Road closed Clear
Cloudy
Fog
Rain
Snow