stop start Acura RDX 2015 Owner's Guide
[x] Cancel search | Manufacturer: ACURA, Model Year: 2015, Model line: RDX, Model: Acura RDX 2015Pages: 365, PDF Size: 12.56 MB
Page 253 of 365
uuWhen Driving uVSA ® (Vehicle Stability Assist), aka ESC (Electronic Stability Control), System
252
Driving
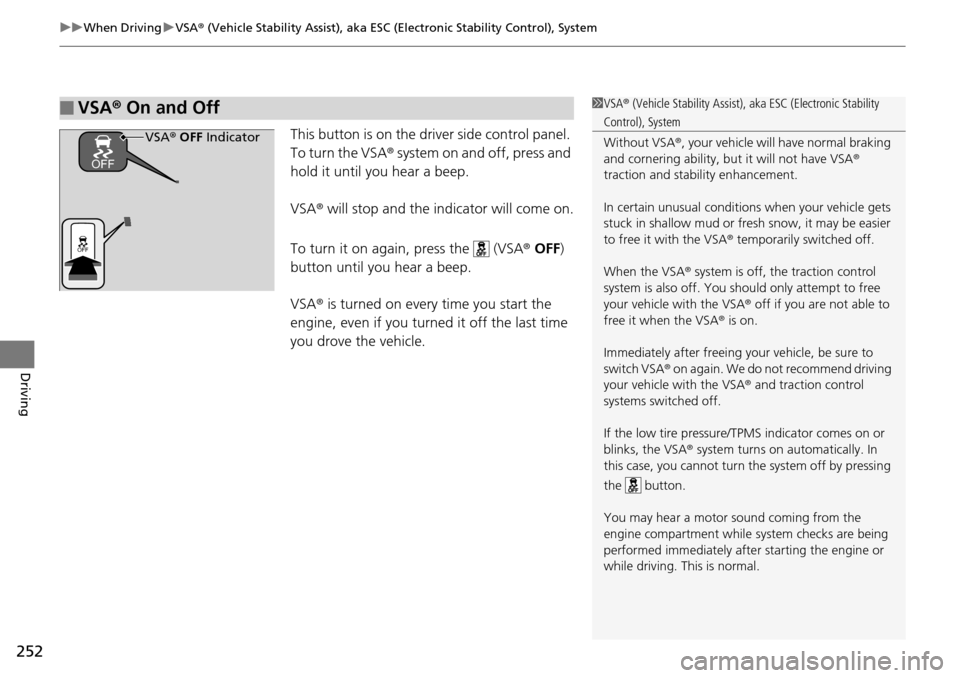
This button is on the driver side control panel.
To turn the VSA® system on and off, press and
hold it until you hear a beep.
VSA ® will stop and the indicator will come on.
To turn it on again, press the (VSA ® OFF )
button until you hear a beep.
VSA ® is turned on every time you start the
engine, even if you turned it off the last time
you drove the vehicle.
■VSA ® On and Off1 VSA ® (Vehicle Stability Assist), aka ESC (Electronic Stability
Control), System
Without VSA®, your vehicle will have normal braking
and cornering ability, bu t it will not have VSA®
traction and stability enhancement.
In certain unusual conditions when your vehicle gets
stuck in shallow mud or fr esh snow, it may be easier
to free it with the VSA ® temporarily switched off.
When the VSA ® system is off, the traction control
system is also off. You should only atte mpt to free
your vehicle with the VSA ® off if you ar e not able to
free it when the VSA ® is on.
Immediately after freeing your vehicle, be sure to
switch VSA ® on again. We do not recommend driving
your vehicle with the VSA ® and traction control
systems switched off.
If the low tire pressure/TPMS indicator comes on or
blinks, the VSA® system turns on automatically. In
this case, you cannot turn the system off by pressing
the button.
You may hear a motor sound coming from the
engine compartment while system checks are being
performed immediately after starting the engine or
while driving. This is normal.VSA ® OFF Indicator
Page 260 of 365
259
uuBraking uABS (Anti-lock Brake System)
Driving
ABS (Anti-lock Brake System)
Helps prevent the wheels from locking up, and helps you retain steering control by
pumping the brakes rapidly, much faster than you.
The electronic brake distribu tion (EBD) system, which is part of the ABS, also
balances the front-to-rear braking distribution according to vehicle loading.
You should never pump the brake pedal. Let the ABS work for you by always
keeping firm, steady pressure on the brake pe dal. This is sometimes referred to as
“stomp and steer.”
■ABS operation
The brake pedal may pulsate slightly when the ABS is working. Keep holding the
pedal firmly down. On dry pavement, you will need to press on the brake pedal very
hard before the ABS activates. However, you may feel the ABS activate immediately
if you are trying to stop on snow or ice.
When the vehicle speed goes under 6 mph (10 km/h), the ABS stops.
■ABS1ABS (Anti-lock Brake System)
NOTICE
The ABS may not function correctly if you use an
incorrect tire type and size.
When the ABS indicator comes on while driving,
there may be a problem with the system.
While normal braking is not affected, there is a
possibility of the ABS not operating. Have the vehicle
checked by a dealer immediately.
The ABS does not reduce the ti me or distance it takes
to stop the vehicle. It only helps with steering control
during hard braking.
In the following cases, yo ur vehicle may need more
stopping distance than a vehicle without the ABS:
•When driving on rough road surfaces, including
when driving on uneven surf aces, such as gravel or
snow.
•When tire chains are installed.
You may hear a motor sound coming from the
engine compartment while system checks are being
performed immediately after starting the engine or
while driving. This is normal.
Page 282 of 365
281
uuMaintenance Under the Hood uChanging the Engine Oil and Oil Filter
Maintenance
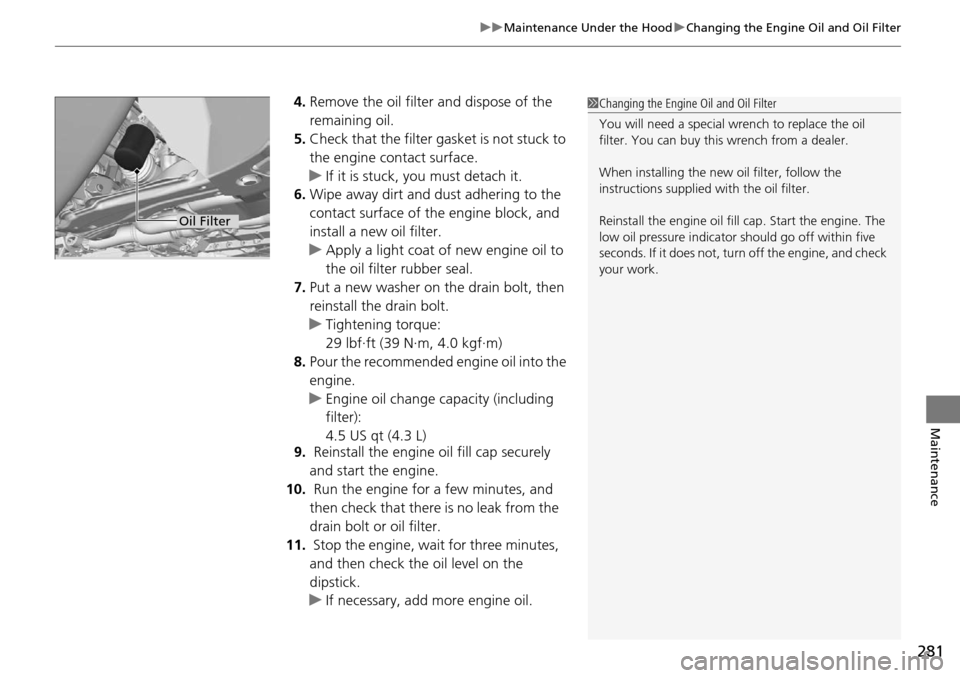
4. Remove the oil filter and dispose of the
remaining oil.
5. Check that the filter gasket is not stuck to
the engine contact surface.
u If it is stuck, you must detach it.
6. Wipe away dirt and dust adhering to the
contact surface of the engine block, and
install a new oil filter.
u Apply a light coat of new engine oil to
the oil filter rubber seal.
7. Put a new washer on the drain bolt, then
reinstall the drain bolt.
u Tightening torque:
29 lbf∙ft (39 N∙m, 4.0 kgf∙m)
8. Pour the recommended engine oil into the
engine.
u Engine oil change capacity (including
filter):
4.5 US qt (4.3 L)
9. Reinstall the engine oil fill cap securely
and start the engine.
10. Run the engine for a few minutes, and
then check that there is no leak from the
drain bolt or oil filter.
11. Stop the engine, wait for three minutes,
and then check the oil level on the
dipstick.
u If necessary, add more engine oil.1Changing the Engine Oil and Oil Filter
You will need a special wrench to replace the oil
filter. You can buy this wrench from a dealer.
When installing the new oil filter, follow the
instructions supplied with the oil filter.
Reinstall the engine oil fill cap. Start the engine. The
low oil pressure indicator should go off within five
seconds. If it does not, turn off the engine, and check
your work.
Oil Filter
Page 320 of 365
319
Handling the Unexpected
This chapter explains how to handle unexpected troubles.
ToolsTypes of Tools .................................. 320
If a Tire Goes Flat Changing a Flat Tire ......................... 321
Engine Does Not Start Checking the Engine ........................ 327
If the Keyless Access Remote Battery is Weak ............................................. 328
Emergency Engine Stop ................... 329
Jump Starting .................................... 330
Shift Lever Does Not Move .............. 332Overheating
How to Handle Overheating............. 333
Indicator, Coming On/Blinking
If the Low Oil Pressure Indicator Comes On ............................................. 335
If the Charging System Indicator Comes
On ................................................. 335
If the Malfunction Indicator Lamp Comes On or Blinks ................................... 336
If the Brake System Indicator (Red) Comes On .................................................... 337
If the Electric Power Steering (EPS) System
Indicator Comes On ............................... 337
If the Low Tire Pressure/TPMS Indicator Comes On or Blinks ....................... 338
Fuses Fuse Locations ................................. 339
Inspecting and Changing Fuses ........ 341
Emergency Towing ........................... 342
When You Cannot Open the Tailgate..... 343
Page 328 of 365
327
Handling the Unexpected
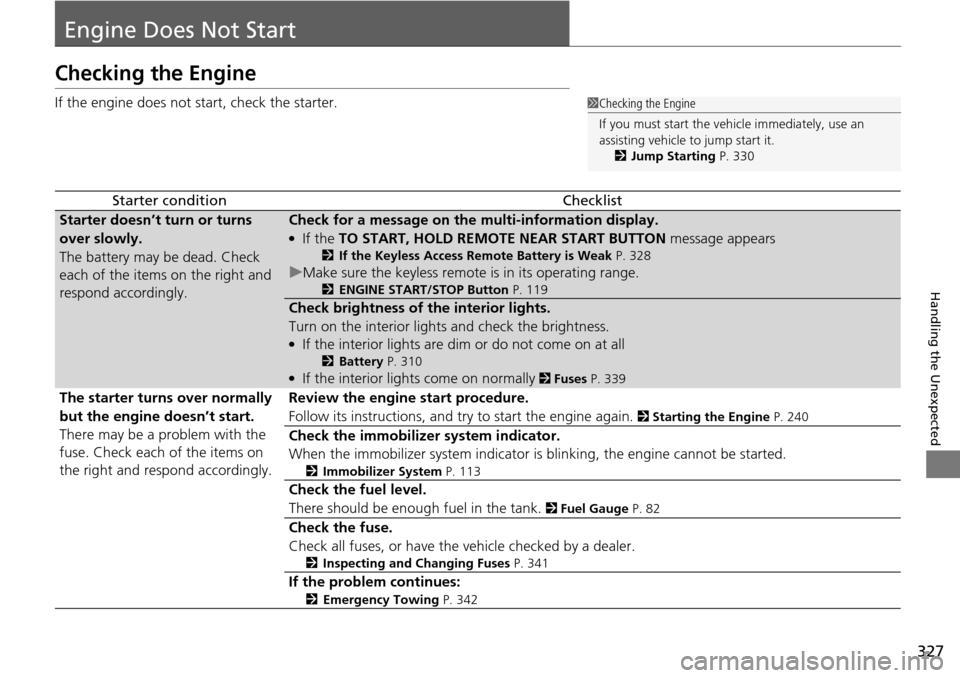
Engine Does Not Start
Checking the Engine
If the engine does not start, check the starter.
Starter conditionChecklist
Starter doesn’t turn or turns
over slowly.
The battery may be dead. Check
each of the items on the right and
respond accordingly.Check for a message on the multi-information display.
●If the TO START, HOLD REMOTE NEAR START BUTTON message appears
2If the Keyless Access Remote Battery is Weak P. 328
uMake sure the keyless remote is in its operating range.
2ENGINE START/STOP Button P. 119
Check brightness of the interior lights.
Turn on the interior lights and check the brightness.
●If the interior lights are dim or do not come on at all
2Battery P. 310●If the interior lights come on normally 2 Fuses P. 339
The starter turns over normally
but the engine doesn’t start.
There may be a problem with the
fuse. Check each of the items on
the right and respond accordingly. Review the engine start procedure.
Follow its instructions, and try
to start the engine again.
2 Starting the Engine P. 240
Check the immobilize r system indicator.
When the immobilizer system indicator is blinking, the engine cannot be started.
2 Immobilizer System P. 113
Check the fuel level.
There should be enough fuel in the tank.
2 Fuel Gauge P. 82
Check the fuse.
Check all fuses, or have the vehicle checked by a dealer.
2 Inspecting and Changing Fuses P. 341
If the problem continues:
2Emergency Towing P. 342
1Checking the Engine
If you must start the vehi cle immediately, use an
assisting vehicle to jump start it.
2 Jump Starting P. 330
Page 329 of 365

328
uuEngine Does Not Start uIf the Keyless Access Remote Battery is Weak
Handling the Unexpected
If the Keyless Access Re mote Battery is Weak
If the beeper sounds, the TO START, HOLD REMO TE NEAR START BUTTON
message appears on the multi-informa tion display, the indicator on the ENGINE
START/STOP button flashes, and the engine wo n’t start, start the engine as
follows. 1.Touch the center of the ENGINE START/
STOP button with the A logo on the keyless
access remote while the indicator on the
ENGINE START/STOP button is flashing.
The buttons on the keyle ss access remote
should be facing you.
u The indicator flashes for about 30
seconds.
2. Depress the brake pedal and press the
ENGINE START/STOP button within 10
seconds after the beeper sounds and the
indicator changes from flashing to on.
u If you don’t depress the pedal, the mode
will change to ACCESSORY.
HOLD
Page 330 of 365
329
uuEngine Does Not Start uEmergency Engine Stop
Handling the Unexpected
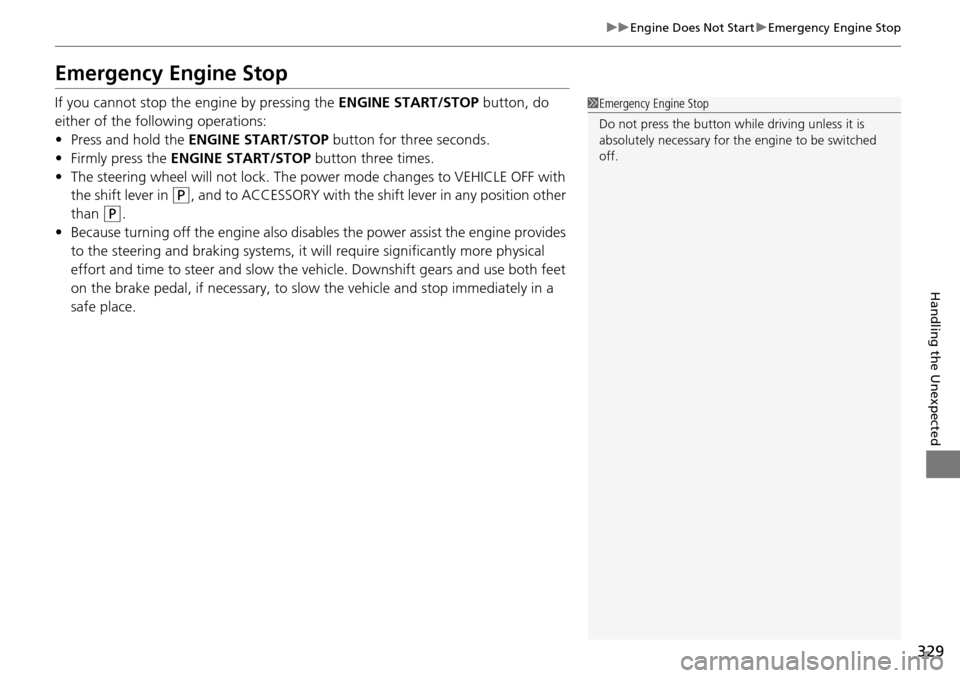
Emergency Engine Stop
If you cannot stop the engine by pressing the ENGINE START/STOP button, do
either of the following operations:
• Press and hold the ENGINE START/STOP button for three seconds.
• Firmly press the ENGINE START/STOP button three times.
• The steering wheel will not lock. The po wer mode changes to VEHICLE OFF with
the shift lever in
(P, and to ACCESSORY with the shift lever in any position other
than
(P.
• Because turning off the engine also disables the power assist the engine provides
to the steering and braking systems, it w ill require significantly more physical
effort and time to steer and slow the ve hicle. Downshift gears and use both feet
on the brake pedal, if necessary, to slow the vehicle and stop immediately in a
safe place.
1 Emergency Engine Stop
Do not press the button while driving unless it is
absolutely necessary for th e engine to be switched
off.
Page 335 of 365

uuOverheating uHow to Handle Overheating
334
Handling the Unexpected
■Next thing to do
1.Check that the cooling fan is operating and
stop the engine once the temperature
gauge needle comes down.
u If the cooling fan is not operating,
immediately stop the engine.
2. Once the engine has cooled down, inspect
the coolant level an d check the cooling
system components for leaks.
u If the coolant level in the reserve tank is
low, add coolant until it reaches the
MAX mark.
u If there is no coolan t in the reserve tank,
check that the radiator is cool. Cover the
radiator cap with a heavy cloth and open
the cap. If necessary, add coolant up to
the base of the filler neck, and put the
cap back on.
■Last thing to do
Once the engine has cooled sufficiently, re start it and check the temperature gauge.
If the temperature needle has gone down, re sume driving. If it has not gone down,
contact a dealer for repairs.
1 How to Handle Overheating
If the coolant is leaking, contact a dealer for repairs.
Use water as an emergency/temporary measure only.
Have a dealer flush the system with proper antifreeze
as soon as possible.
3WARNING
Removing the radiator cap while the
engine is hot can cause the coolant to spray
out, seriously scalding you.
Always let the engine and radiator cool
down before removing the radiator cap.
Reserve Tank
MAXMIN
Page 336 of 365
335
Handling the Unexpected
Indicator, Coming On/Blinking
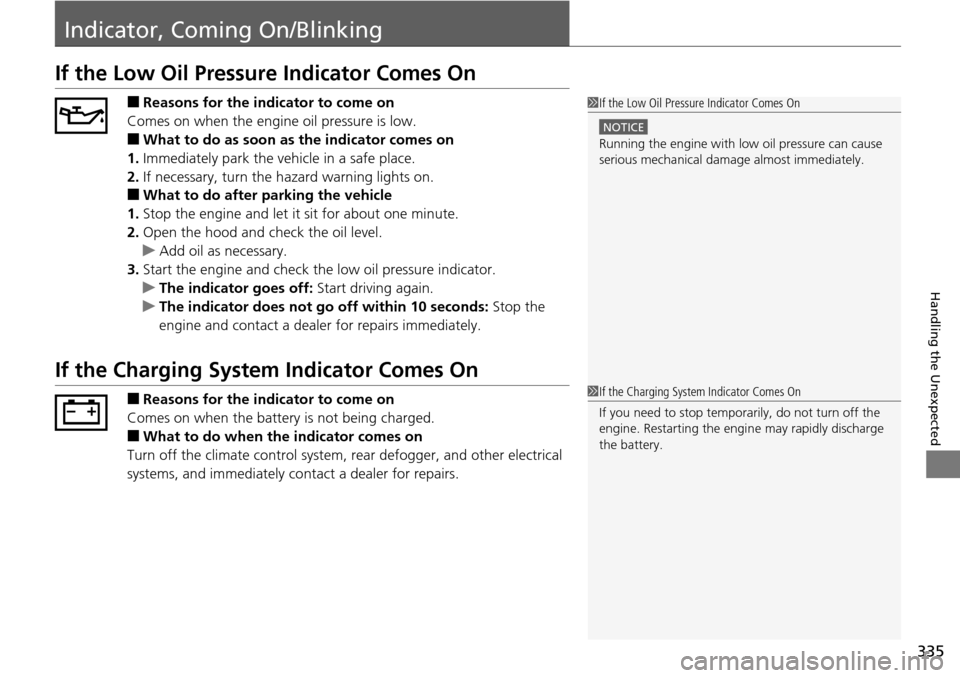
If the Low Oil Pressure Indicator Comes On
■Reasons for the indicator to come on
Comes on when the engine oil pressure is low.
■What to do as soon as the indicator comes on
1. Immediately park the vehicle in a safe place.
2. If necessary, turn the hazard warning lights on.
■What to do after parking the vehicle
1. Stop the engine and let it sit for about one minute.
2. Open the hood and check the oil level.
u Add oil as necessary.
3. Start the engine and check th e low oil pressure indicator.
u The indicator goes off: Start driving again.
u The indicator does not go off within 10 seconds: Stop the
engine and contact a dealer for repairs immediately.
If the Charging System Indicator Comes On
■Reasons for the indicator to come on
Comes on when the battery is not being charged.
■What to do when th e indicator comes on
Turn off the climate control system, rear defogger, and other electrical
systems, and immediately co ntact a dealer for repairs.
1If the Low Oil Pressure Indicator Comes On
NOTICE
Running the engine with low oil pressure can cause
serious mechanical damage almost immediately.
1If the Charging System Indicator Comes On
If you need to stop temporarily, do not turn off the
engine. Restarting the engi ne may rapidly discharge
the battery.
Page 337 of 365
336
uuIndicator, Coming On/Blinking uIf the Malfunction Indicato r Lamp Comes On or Blinks
Handling the Unexpected
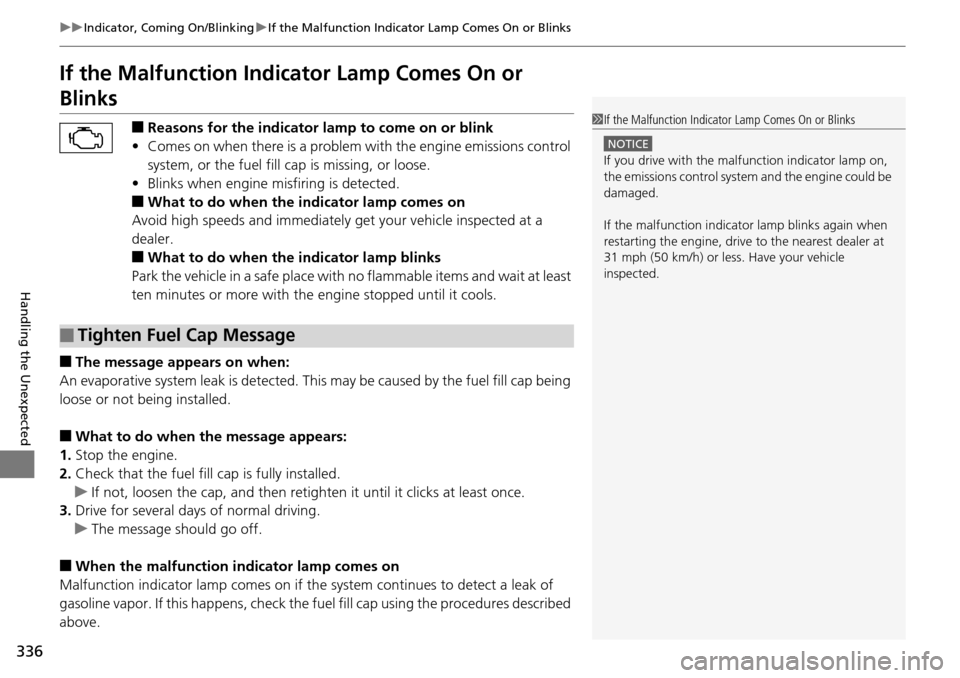
If the Malfunction Indicator Lamp Comes On or
Blinks
■Reasons for the indicator la mp to come on or blink
• Comes on when there is a problem with the engine emissions control
system, or the fuel fill cap is missing, or loose.
• Blinks when engine misfiring is detected.
■What to do when the indicator lamp comes on
Avoid high speeds and immediately get your vehicle inspected at a
dealer.
■What to do when the indicator lamp blinks
Park the vehicle in a safe place with no flammable items and wait at least
ten minutes or more with the engine stopped until it cools.
■The message appears on when:
An evaporative system leak is detected. This may be caused by the fuel fill cap being
loose or not being installed.
■What to do when the message appears:
1. Stop the engine.
2. Check that the fuel fill cap is fully installed.
u If not, loosen the cap, and then reti ghten it until it clicks at least once.
3. Drive for several days of normal driving.
u The message should go off.
■When the malfunction indicator lamp comes on
Malfunction indicator lamp comes on if the system continues to detect a leak of
gasoline vapor. If this happens, check the fuel fill cap using the procedures described
above.
■Tighten Fuel Cap Message
1 If the Malfunction Indicato r Lamp Comes On or Blinks
NOTICE
If you drive with the malf unction indicator lamp on,
the emissions control system and the engine could be
damaged.
If the malfunction indicator lamp blinks again when
restarting the engine, drive to the nearest dealer at
31 mph (50 km/h) or less. Have your vehicle
inspected.