fuse Acura RDX 2015 Owner's Manual
[x] Cancel search | Manufacturer: ACURA, Model Year: 2015, Model line: RDX, Model: Acura RDX 2015Pages: 365, PDF Size: 12.56 MB
Page 4 of 365
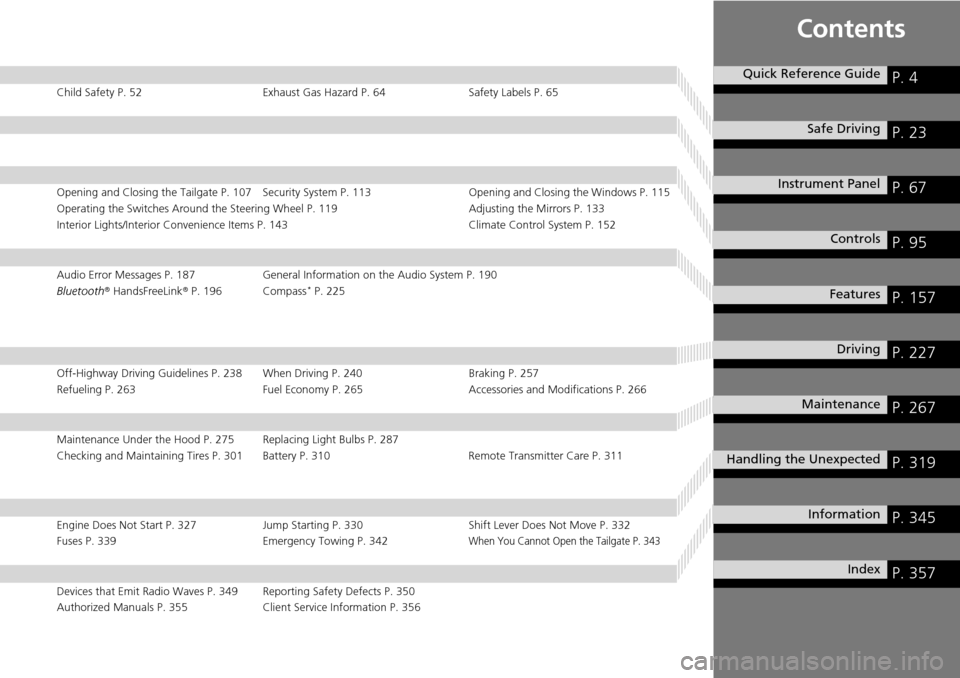
Contents
Child Safety P. 52Exhaust Gas Hazard P. 64Safety Labels P. 65
Opening and Closing the Tailgate P. 107 Security System P. 113 Opening and Closing the Windows P. 115
Operating the Switches Around the Steering Wheel P. 119 Adjusting the Mirrors P. 133
Interior Lights/Interior Convenience Items P. 143 Climate Control System P. 152
Audio Error Messages P. 187General Information on the Audio System P. 190
Bluetooth ® HandsFreeLink ® P. 196 Compass* P. 225
Off-Highway Driving Guidelines P. 238 When Driving P. 240 Braking P. 257
Refueling P. 263 Fuel Economy P. 265Accessories and Modifications P. 266
Maintenance Under the Hood P. 275 Replacing Light Bulbs P. 287
Checking and Maintaining Tires P. 301 Battery P. 310 Remote Transmitter Care P. 311
Engine Does Not Start P. 327 Jump Starting P. 330 Shift Lever Does Not Move P. 332
Fuses P. 339 Emergency Towing P. 342When You Cannot Open the Tailgate P. 343
Devices that Emit Radio Waves P. 349 Reporting Safety Defects P. 350
Authorized Manuals P. 355 Client Service Information P. 356
Quick Reference GuideP. 4
Safe DrivingP. 23
Instrument PanelP. 67
ControlsP. 95
FeaturesP. 157
DrivingP. 227
MaintenanceP. 267
Handling the UnexpectedP. 319
InformationP. 345
IndexP. 357
Page 7 of 365
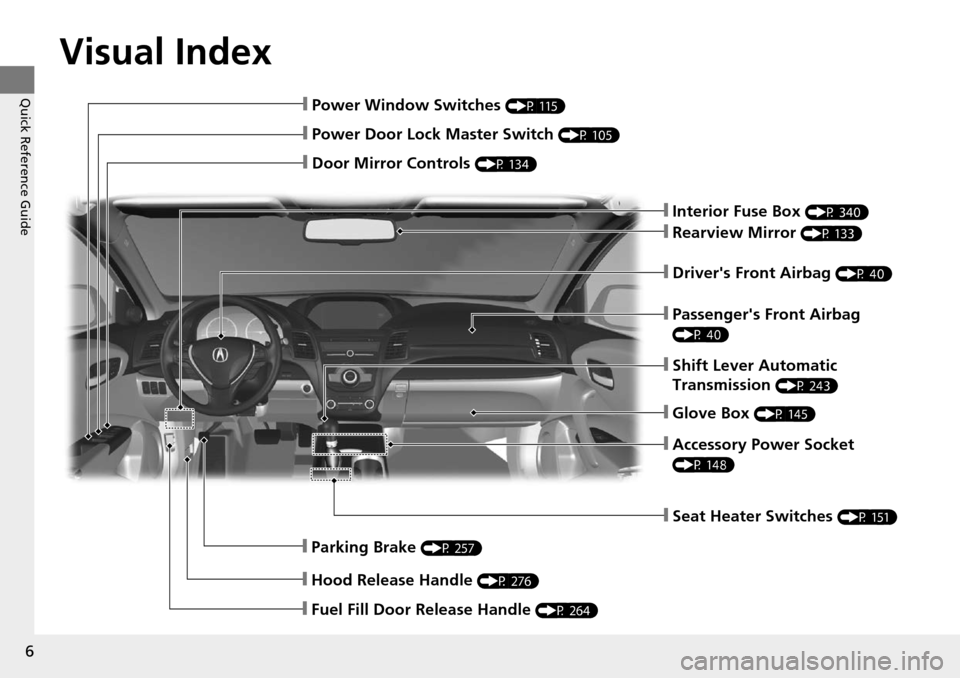
Visual Index
6
Quick Reference Guide
❙Power Door Lock Master Switch (P 105)
❙Power Window Switches (P 115)
❙Rearview Mirror (P 133)
❙Parking Brake (P 257)
❙Hood Release Handle (P 276)
❙Shift Lever Automatic
Transmission
(P 243)
❙Driver's Front Airbag (P 40)
❙Door Mirror Controls (P 134)
❙Passenger's Front Airbag
(P 40)
❙Fuel Fill Door Release Handle (P 264)
❙Glove Box (P 145)
❙Accessory Power Socket
(P 148)
❙Seat Heater Switches (P 151)
❙Interior Fuse Box (P 340)
Page 20 of 365
Quick Reference Guide
19
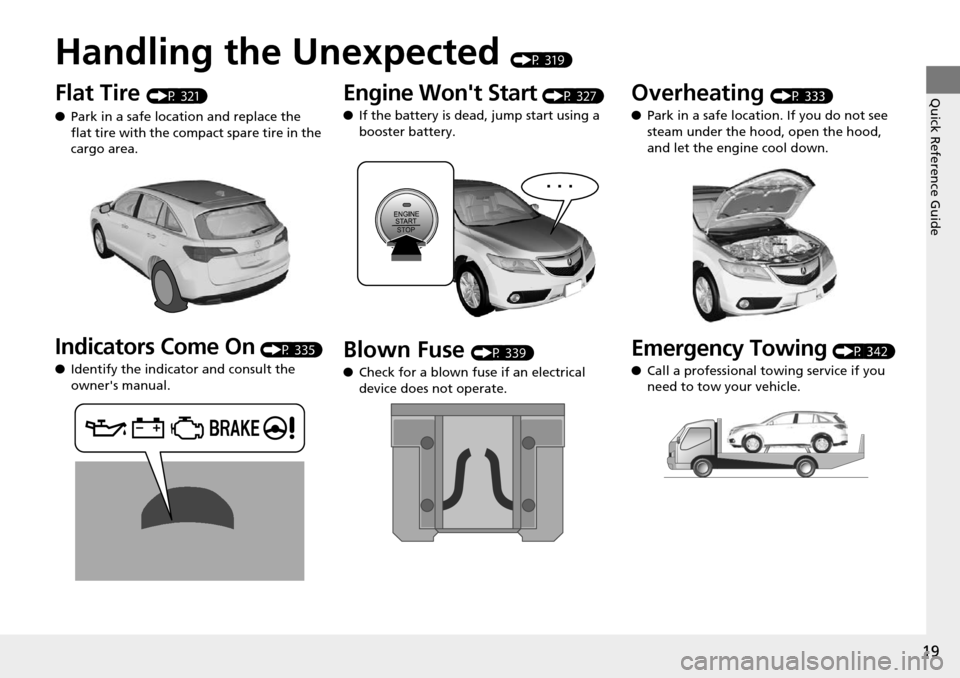
Handling the Unexpected (P 319)
Flat Tire (P 321)
● Park in a safe location and replace the
flat tire with the comp act spare tire in the
cargo area.
Indicators Come On (P 335)
● Identify the indica tor and consult the
owner's manual.
Engine Won't Start (P 327)
● If the battery is dead, jump start using a
booster battery.
Blown Fuse (P 339)
● Check for a blown fuse if an electrical
device does not operate.
Overheating (P 333)
● Park in a safe location. If you do not see
steam under the hood, open the hood,
and let the engine cool down.
Emergency Towing (P 342)
● Call a professional towing service if you
need to tow your vehicle.
Page 110 of 365
109
uuOpening and Closing the Tailgate uOpening/Closing the Power Tailgate*
Continued
Controls
Opening/Closing the Power Tailgate*
The power tailgate can be operated by pr essing the power tailgate button on the
remote transmitter, pressing the power ta ilgate switch on the dashboard, or
pressing the button on the tailgate.
■The power tailgate can be opened when:
• The tailgate is fully closed.
• The shift lever is in
(P.
• Press and hold the tailgate button on the remote transmitter for about one
second.
u If you have changed the POWER TAILGATE KEYLESS OPEN MODE setting to
WHEN UNLOCKED , you need to unlock the tailgate before you press the
tailgate button to open it.
2 Customized Features P. 87
■The power tailgate ca n be closed when:
• The tailgate is fully open.
• The shift lever is in
(P.
• Press and hold the tailgate button on the remote transmitter for about one
second.
1Opening/Closing the Power Tailgate*
The power tailgate may not open or close under the
following conditions:
•The vehicle is park ed on a steep hill.•The vehicle is swayed in a strong wind.•The tailgate or the roof is covered with snow or ice.
If you close the power tail gate when all the doors are
locked, the power tailgate locks automatically.
If you replace the battery or the power tailgate fuse
while the tailgate is open, the power tailgate may be
disabled. The power tail gate resumes once you
manually close the tailgate.
Installing aftermarket com ponents other than Acura
genuine accessories on the power tailgate may
prevent it from fully opening or closing.
Make sure the power tailgate is fully open before you
get your luggage in and out.
Make sure the power tailgate is fully closed before
you start the vehicle.
3WARNING
Closing a power tailga te while anyone is
in the path of the tailgate can cause
serious injury.
Make sure everyone is clear before
closing the power tailgate.
* Not available on all models
Page 267 of 365

266
Driving
Accessories and Modifications
Accessories
When installing accessories, check the following:
• Do not install accessories on the windshield. They can obstruct your view and
delay your reaction to driving conditions.
• Do not install any accessorie s over areas marked SRS Airbag, on the sides or backs
of the front seats, on front or side pillars, or near the side windows.
Accessories installed in these areas may interfere with proper operation of the
vehicle’s airbags or may be propelled into you or another occupant if the airbags
deploy.
• Be sure electronic accessories do not over load electrical circuits or interfere with
proper operation of your vehicle.
2 Fuses P. 339
•Before installing any electron ic accessory, have the installer contact a dealer for
assistance. If possible, have a d ealer inspect the final installation.
Modifications
Do not modify your vehicle or use non-Acura components that can affect its
handling, stability, and reliability.
Overall vehicle performance can be affect ed. Always make sure all equipment is
properly installed and maintained, and th at it meets federal, state, province,
territory, and local regulations.
1 Accessories and Modifications
Acura Genuine accessori es are recommended to
ensure proper operati on on your vehicle.
3WARNING
Improper accessories or modifications can
affect your vehicle's handling, stability, and
performance, and cause a crash in which
you can be seriously hurt or killed.
Follow all instruction s in this owner's
manual regarding accessories and
modifications.
Page 320 of 365
319
Handling the Unexpected
This chapter explains how to handle unexpected troubles.
ToolsTypes of Tools .................................. 320
If a Tire Goes Flat Changing a Flat Tire ......................... 321
Engine Does Not Start Checking the Engine ........................ 327
If the Keyless Access Remote Battery is Weak ............................................. 328
Emergency Engine Stop ................... 329
Jump Starting .................................... 330
Shift Lever Does Not Move .............. 332Overheating
How to Handle Overheating............. 333
Indicator, Coming On/Blinking
If the Low Oil Pressure Indicator Comes On ............................................. 335
If the Charging System Indicator Comes
On ................................................. 335
If the Malfunction Indicator Lamp Comes On or Blinks ................................... 336
If the Brake System Indicator (Red) Comes On .................................................... 337
If the Electric Power Steering (EPS) System
Indicator Comes On ............................... 337
If the Low Tire Pressure/TPMS Indicator Comes On or Blinks ....................... 338
Fuses Fuse Locations ................................. 339
Inspecting and Changing Fuses ........ 341
Emergency Towing ........................... 342
When You Cannot Open the Tailgate..... 343
Page 328 of 365
327
Handling the Unexpected
Engine Does Not Start
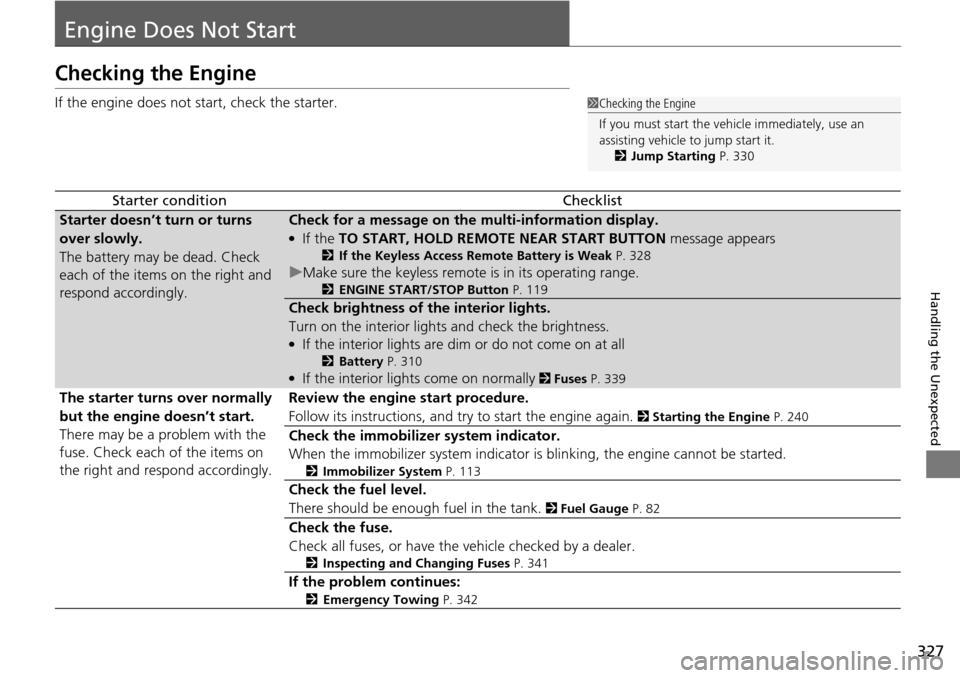
Checking the Engine
If the engine does not start, check the starter.
Starter conditionChecklist
Starter doesn’t turn or turns
over slowly.
The battery may be dead. Check
each of the items on the right and
respond accordingly.Check for a message on the multi-information display.
●If the TO START, HOLD REMOTE NEAR START BUTTON message appears
2If the Keyless Access Remote Battery is Weak P. 328
uMake sure the keyless remote is in its operating range.
2ENGINE START/STOP Button P. 119
Check brightness of the interior lights.
Turn on the interior lights and check the brightness.
●If the interior lights are dim or do not come on at all
2Battery P. 310●If the interior lights come on normally 2 Fuses P. 339
The starter turns over normally
but the engine doesn’t start.
There may be a problem with the
fuse. Check each of the items on
the right and respond accordingly. Review the engine start procedure.
Follow its instructions, and try
to start the engine again.
2 Starting the Engine P. 240
Check the immobilize r system indicator.
When the immobilizer system indicator is blinking, the engine cannot be started.
2 Immobilizer System P. 113
Check the fuel level.
There should be enough fuel in the tank.
2 Fuel Gauge P. 82
Check the fuse.
Check all fuses, or have the vehicle checked by a dealer.
2 Inspecting and Changing Fuses P. 341
If the problem continues:
2Emergency Towing P. 342
1Checking the Engine
If you must start the vehi cle immediately, use an
assisting vehicle to jump start it.
2 Jump Starting P. 330
Page 340 of 365
339Continued
Handling the Unexpected
Fuses
Fuse Locations
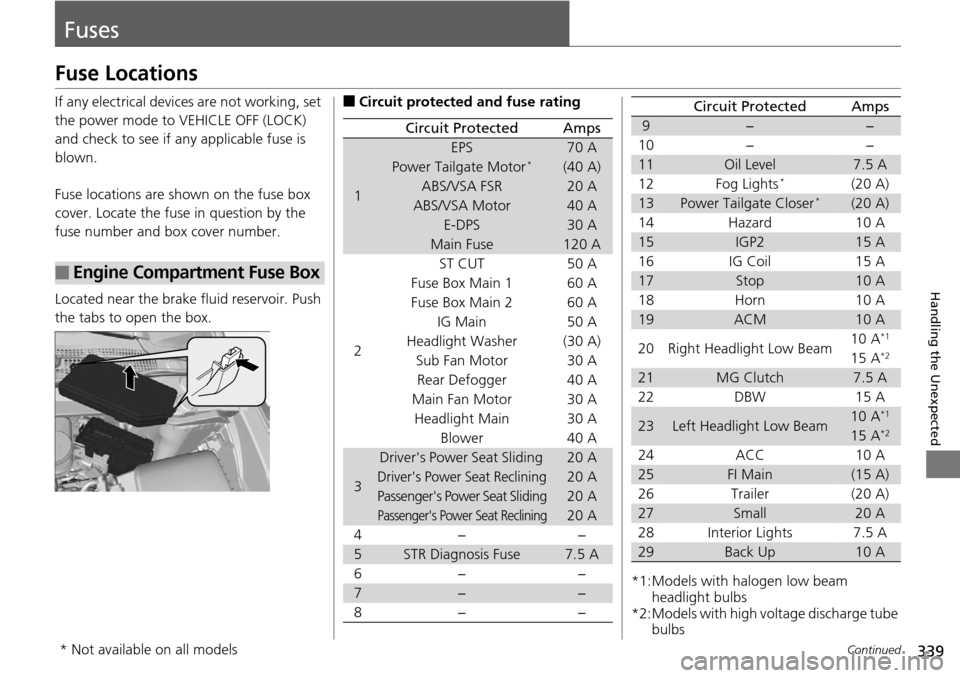
If any electrical devices are not working, set
the power mode to VEHICLE OFF (LOCK)
and check to see if any applicable fuse is
blown.
Fuse locations are shown on the fuse box
cover. Locate the fuse in question by the
fuse number and box cover number.
Located near the brake fluid reservoir. Push
the tabs to open the box.
■Engine Compartment Fuse Box
■Circuit protected and fuse rating
Circuit ProtectedAmps
1
EPS70 A
Power Tailgate Motor*(40 A)
ABS/VSA FSR20 A
ABS/VSA Motor40 A
E-DPS30 A
Main Fuse120 A
2
ST CUT50 A
Fuse Box Main 1 60 A
Fuse Box Main 260 A
IG Main 50 A
Headlight Washer(30 A)
Sub Fan Motor 30 A Rear Defogger 40 A
Main Fan Motor 30 A Headlight Main 30 A Blower 40 A
3
Driver's Power Seat Sliding 20 A
Driver's Power Seat Reclining20 A
Passenger's Power Seat Sliding20 A
Passenger's Power Seat Reclining20 A
4− −
5STR Diagnosis Fuse7.5 A
6− −
7−−
8− −*1:Models with halogen low beam headlight bulbs
*2:Models with high voltage discharge tube bulbs
9−−
10 − −
11Oil Level7.5 A
12 Fog Lights*(20 A)
13Power Tailgate Closer*(20 A)
14 Hazard 10 A
15IGP215 A
16 IG Coil 15 A
17Stop10 A
18 Horn 10 A
19ACM10 A
20 Right Headlight Low Beam 10 A*1
15 A*2
21MG Clutch7.5 A
22 DBW 15 A
23Left Headlight Low Beam10 A*1
15 A*2
24 ACC 10 A
25FI Main(15 A)
26 Trailer (20 A)
27Small20 A
28 Interior Lights 7.5 A
29Back Up10 A
Circuit ProtectedAmps
* Not available on all models
Page 341 of 365
340
uuFuses uFuse Locations
Handling the Unexpected
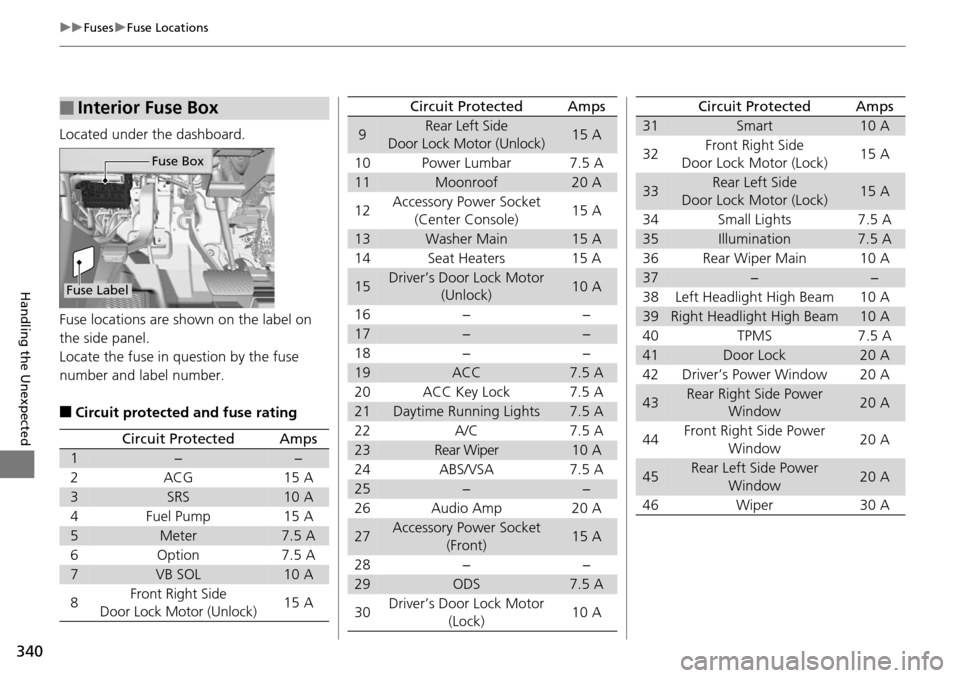
Located under the dashboard.
Fuse locations are shown on the label on
the side panel.
Locate the fuse in question by the fuse
number and label number.
■Circuit protected and fuse rating
■Interior Fuse Box
Fuse Label
Fuse Box
Circuit ProtectedAmps
1−−
2ACG15 A
3SRS10 A
4Fuel Pump15 A
5Meter7.5 A
6Option7.5 A
7VB SOL10 A
8Front Right Side
Door Lock Motor (Unlock)15 A
9Rear Left Side
Door Lock Motor (Unlock)15 A
10 Power Lumbar 7.5 A
11Moonroof20 A
12 Accessory Power Socket
(Center Console) 15 A
13Washer Main15 A
14 Seat Heaters 15 A
15Driver’s Door Lock Motor (Unlock)10 A
16 − −
17−−
18 − −
19ACC7.5 A
20 ACC Key Lock 7.5 A
21Daytime Running Lights7.5 A
22 A/C 7.5 A
23Rear Wiper10 A
24 ABS/VSA 7.5 A
25−−
26 Audio Amp 20 A
27Accessory Power Socket (Front)15 A
28 − −
29ODS7.5 A
30 Driver’s Door Lock Motor
(Lock) 10 A
Circuit ProtectedAmps
31Smart10 A
32 Front Right Side
Door Lock Motor (Lock) 15 A
33Rear Left Side
Door Lock Motor (Lock)15 A
34 Small Lights 7.5 A
35Illumination7.5 A
36 Rear Wiper Main 10 A
37−−
38 Left Headlight High Beam 10 A
39Right Headlight High Beam10 A
40 TPMS 7.5 A
41Door Lock20 A
42 Driver’s Power Window 20 A
43Rear Right Side Power Window20 A
44 Front Right Side Power
Window 20 A
45Rear Left Side Power
Window20 A
46 Wiper 30 A
Circuit ProtectedAmps
Page 342 of 365
341
uuFuses uInspecting and Changing Fuses
Handling the Unexpected
Inspecting and Changing Fuses
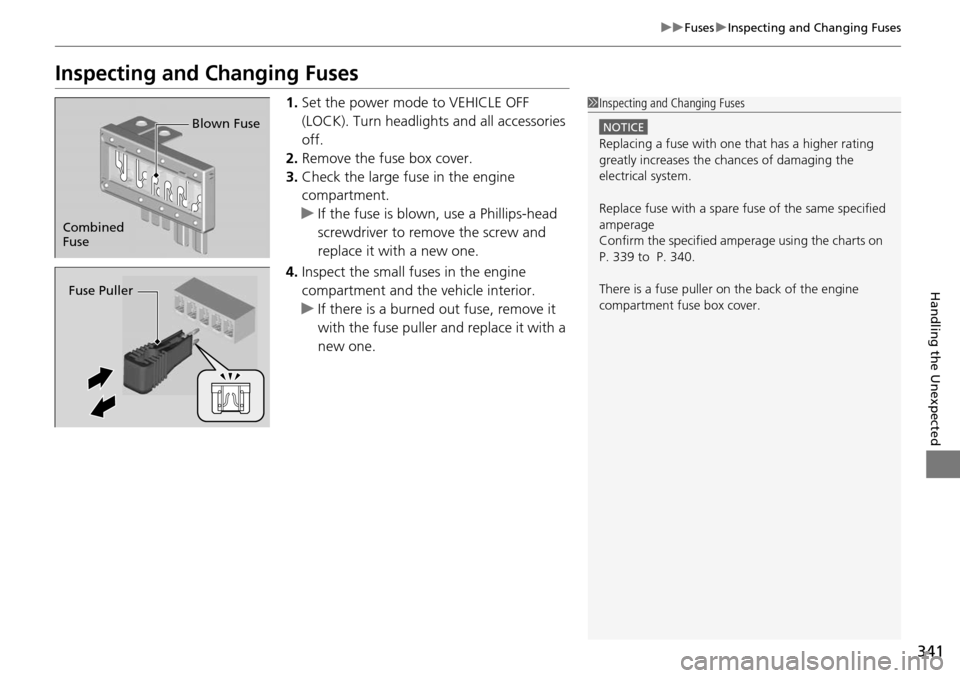
1. Set the power mode to VEHICLE OFF
(LOCK). Turn headlights and all accessories
off.
2. Remove the fuse box cover.
3. Check the large fuse in the engine
compartment.
u If the fuse is blown, use a Phillips-head
screwdriver to remove the screw and
replace it with a new one.
4. Inspect the small fu ses in the engine
compartment and the vehicle interior.
u If there is a burned out fuse, remove it
with the fuse puller and replace it with a
new one.1Inspecting and Changing Fuses
NOTICE
Replacing a fuse with on e that has a higher rating
greatly increases the chances of damaging the
electrical system.
Replace fuse with a spare fuse of the same specified
amperage
Confirm the specified amperage using the charts on
P. 339 to P. 340.
There is a fuse puller on the back of the engine
compartment fuse box cover.
Combined
Fuse Blown Fuse
Fuse Puller