key Acura RDX 2015 Owner's Manual
[x] Cancel search | Manufacturer: ACURA, Model Year: 2015, Model line: RDX, Model: Acura RDX 2015Pages: 365, PDF Size: 12.56 MB
Page 11 of 365
10
Quick Reference Guide
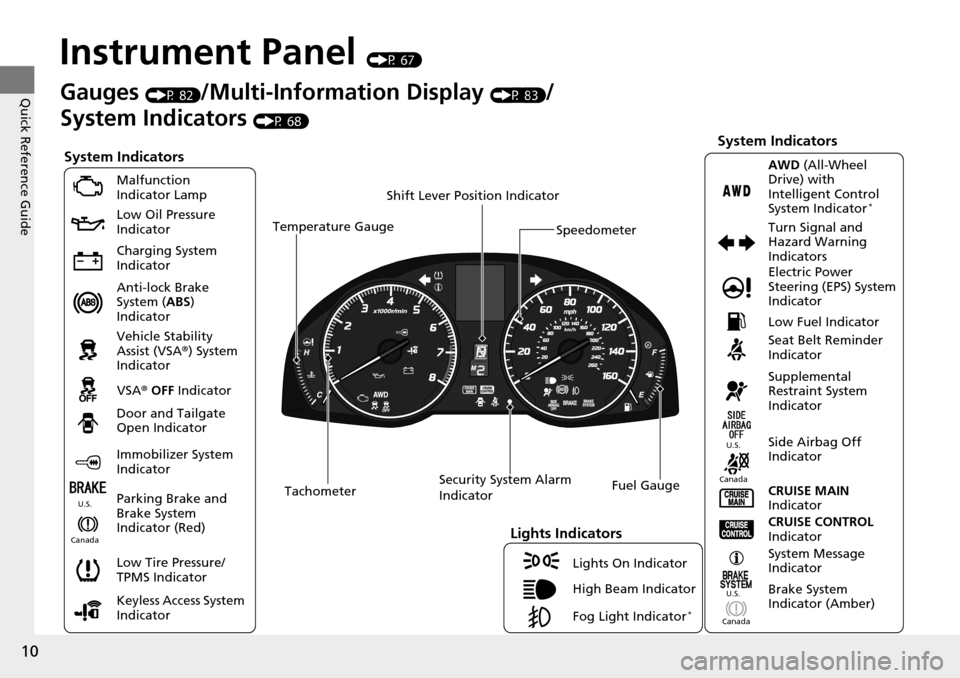
Instrument Panel (P 67)
System Indicators
Malfunction
Indicator Lamp
Low Oil Pressure
Indicator
Charging System
Indicator
Anti-lock Brake
System (ABS)
Indicator
Vehicle Stability
Assist (VSA ®) System
Indicator
VSA ® OFF Indicator
Low Tire Pressure/
TPMS Indicator
Lights Indicators
Lights On Indicator
High Beam Indicator
Fog Light Indicator
*
Immobilizer System
Indicator Seat Belt Reminder
Indicator
System Indicators
CRUISE CONTROL
Indicator
Parking Brake and
Brake System
Indicator (Red) Supplemental
Restraint System
Indicator
Side Airbag Off
Indicator
Door and Tailgate
Open Indicator
CRUISE MAIN
Indicator
Tachometer Speedometer
Fuel Gauge
Security System Alarm
Indicator
Shift Lever Position Indicator
Low Fuel Indicator
Gauges (P 82)/Multi-Information Display (P 83)/
System Indicators
(P 68)
System Message
Indicator
Brake System
Indicator (Amber)
Temperature Gauge
Electric Power
Steering (EPS) System
Indicator Turn Signal and
Hazard Warning
Indicators
AWD
(All-Wheel
Drive) with
Intelligent Control
System Indicator
*
Canada U.S.
Canada
U.S.
Canada
U.S.
Keyless Access System
Indicator
Page 57 of 365

uuChild Safety uSafety of Infants and Small Children
56
Safe DrivingMost child seats are LATCH-compatible (L ower Anchors and Tethers for CHildren).
Some have a rigid-type connector, while ot hers have a flexible-type connector. Both
are equally easy to use. Some existing and previously owned child seats can only be
installed using the seat belt. Whichever type you choose, follow the child seat
manufacturer's use and care instructions as well as the instructions in this manual.
Proper installation is key to ma ximizing your child's safety.
In seating positions and vehicles not equipped with LATCH, a LATCH compatible
child seat can be installed using the seat belt and a top tether for added security.
This is because all child seats are required to be designed so that they can be secured
with a lap belt or the lap part of a lap/sh oulder belt. In addition, the child seat
manufacturer may advise that a seat belt be used to attach a LATCH-compatible seat
once a child reaches a specified weight. Please read the child seat owner’s manual
for proper installation instructions.
■Important consideration wh en selecting a child seat
Make sure the child seat meets th e following three requirements:
• The child seat is the correct type and size for the child.
• The child seat is the correct type for the seating position.
• The child seat is compliant with Federa l Motor Vehicle Safety Standard 213 or
Canadian Motor Vehicle Safety Standard 213.
■Selecting a Child Seat1 Selecting a Child Seat
Installation of a LATCH-compatible child seat is
simple.
LATCH-compatible child s eats have been developed
to simplify the installati on process and reduce the
likelihood of injuries caused by incorrect installation.
Page 76 of 365
75
uuIndicators u
Continued
Instrument Panel
IndicatorNameOn/BlinkingExplanationMessage
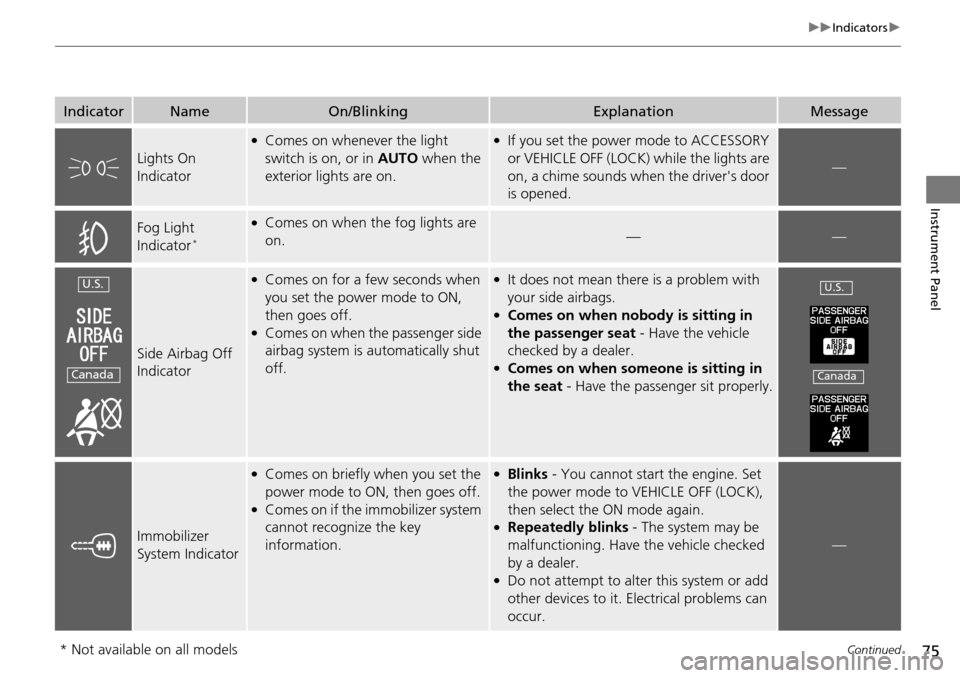
Lights On
Indicator
●Comes on whenever the light
switch is on, or in AUTO when the
exterior lights are on.●If you set the power mode to ACCESSORY
or VEHICLE OFF (LOCK) while the lights are
on, a chime sounds when the driver's door
is opened.
—
Fog Light
Indicator*
●Comes on when the fog lights are
on.——
Side Airbag Off
Indicator
●Comes on for a few seconds when
you set the power mode to ON,
then goes off.
●Comes on when the passenger side
airbag system is automatically shut
off.
●It does not mean there is a problem with
your side airbags.
●Comes on when nobody is sitting in
the passenger seat - Have the vehicle
checked by a dealer.
●Comes on when someon e is sitting in
the seat - Have the passenger sit properly.
Immobilizer
System Indicator
●Comes on briefly when you set the
power mode to ON, then goes off.
●Comes on if the immobilizer system
cannot recognize the key
information.
●Blinks - You cannot start the engine. Set
the power mode to VEHICLE OFF (LOCK),
then select the ON mode again.
●Repeatedly blinks - The system may be
malfunctioning. Have the vehicle checked
by a dealer.
●Do not attempt to alter this system or add
other devices to it. Electrical problems can
occur.
—
U.S.
Canada
U.S.
Canada
* Not available on all models
Page 78 of 365
77
uuIndicators u
Instrument Panel
IndicatorNameOn/BlinkingExplanationMessage
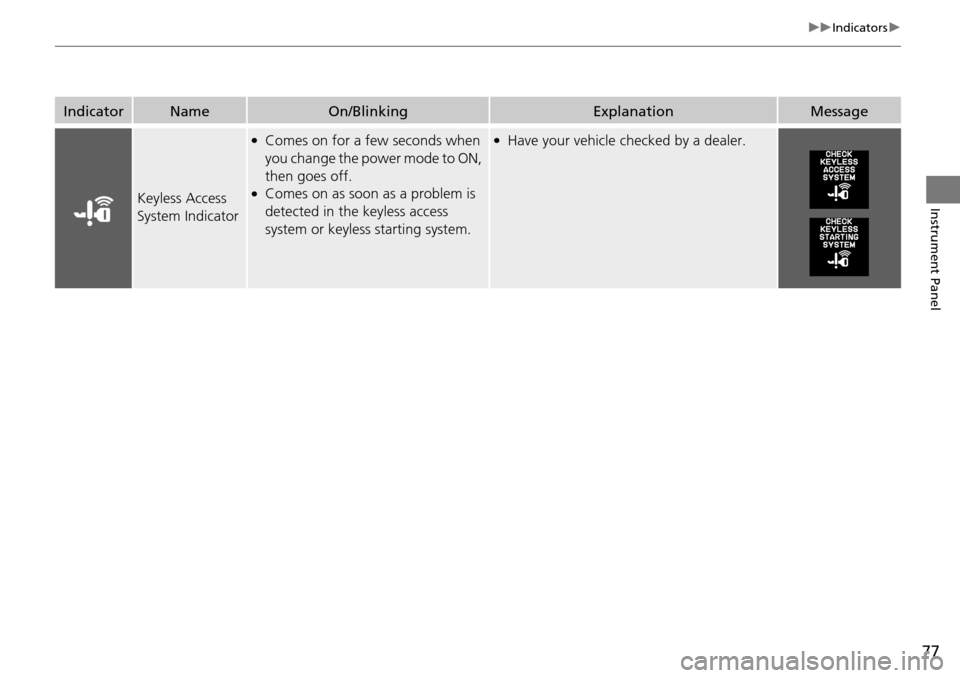
Keyless Access
System Indicator
●Comes on for a few seconds when
you change the power mode to ON,
then goes off.
●Comes on as soon as a problem is
detected in the keyless access
system or keyless starting system.
●Have your vehicle checked by a dealer.
Page 82 of 365
81
uuIndicators uMulti-Information Display Warning and Information Messages
Instrument Panel
MessageConditionExplanation
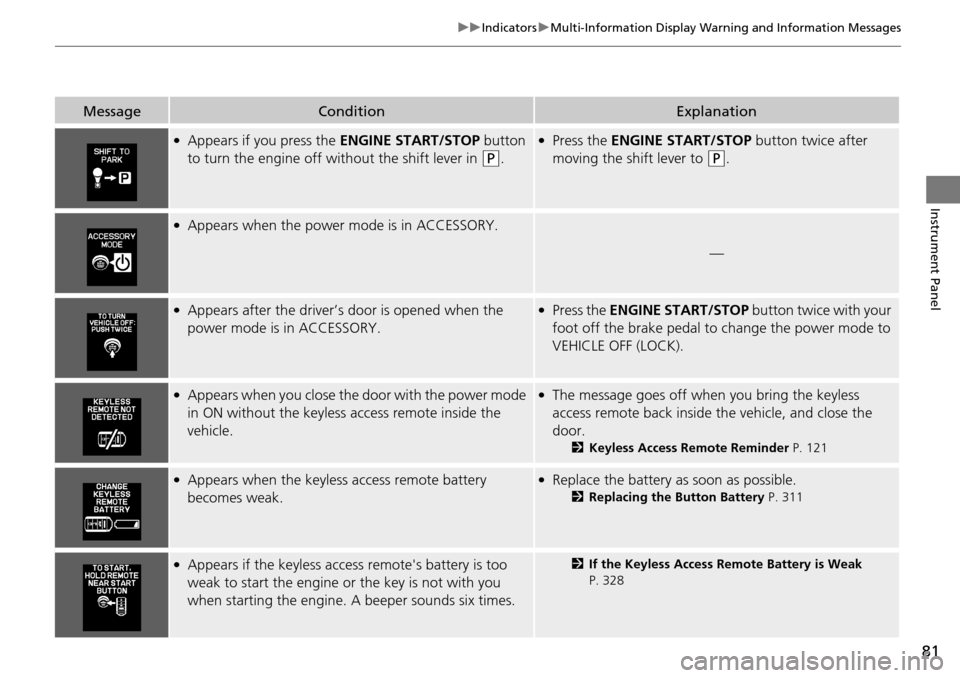
●Appears if you press the ENGINE START/STOP button
to turn the engine off wi thout the shift lever in
(P.
●Press the ENGINE START/STOP button twice after
moving the shift lever to
(P.
●Appears when the power mode is in ACCESSORY.
—
●Appears after the driver’s door is opened when the
power mode is in ACCESSORY.●Press the ENGINE START/STOP button twice with your
foot off the brake pedal to change the power mode to
VEHICLE OFF (LOCK).
●Appears when you close the door with the power mode
in ON without the keyless access remote inside the
vehicle.●The message goes off when you bring the keyless
access remote back inside the vehicle, and close the
door.
2 Keyless Access Remote Reminder P. 121
●Appears when the keyless access remote battery
becomes weak.●Replace the battery as soon as possible.
2 Replacing the Button Battery P. 311
●Appears if the keyless access remote's battery is too
weak to start the engine or the key is not with you
when starting the engine. A beeper sounds six times.2If the Keyless Access Remote Battery is Weak
P. 328
Page 89 of 365
88
uuGauges and Multi-Information Display uMulti-Information Display
Instrument Panel
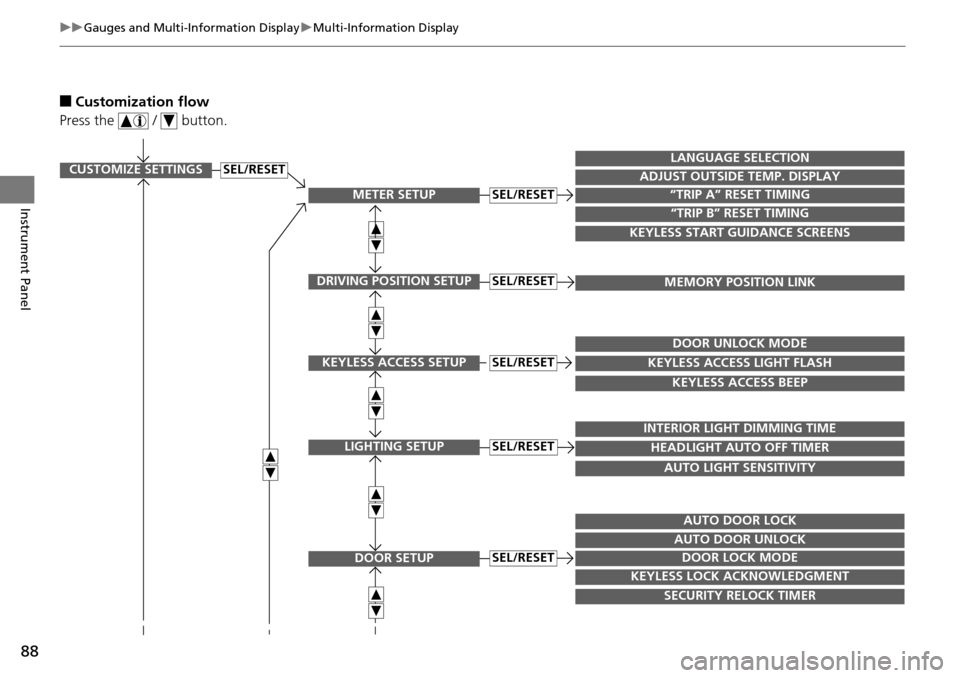
■Customization flow
Press the / button.
CUSTOMIZE SETTINGS
METER SETUP
DRIVING POSITION SETUP
KEYLESS ACCESS SETUP
LIGHTING SETUP
DOOR SETUP
“TRIP A” RESET TIMING
ADJUST OUTSIDE TEMP. DISPLAY
LANGUAGE SELECTION
“TRIP B” RESET TIMING
KEYLESS START GUIDANCE SCREENS
MEMORY POSITION LINK
KEYLESS ACCESS LIGHT FLASH
DOOR UNLOCK MODE
KEYLESS ACCESS BEEP
HEADLIGHT AUTO OFF TIMER
INTERIOR LIGHT DIMMING TIME
AUTO LIGHT SENSITIVITY
DOOR LOCK MODE
AUTO DOOR UNLOCK
AUTO DOOR LOCK
KEYLESS LOCK ACKNOWLEDGMENT
SECURITY RELOCK TIMER
SEL/RESET
SEL/RESET
SEL/RESET
SEL/RESET
SEL/RESET
SEL/RESET
Page 90 of 365
89
uuGauges and Multi-Information Display uMulti-Information Display
Continued
Instrument Panel
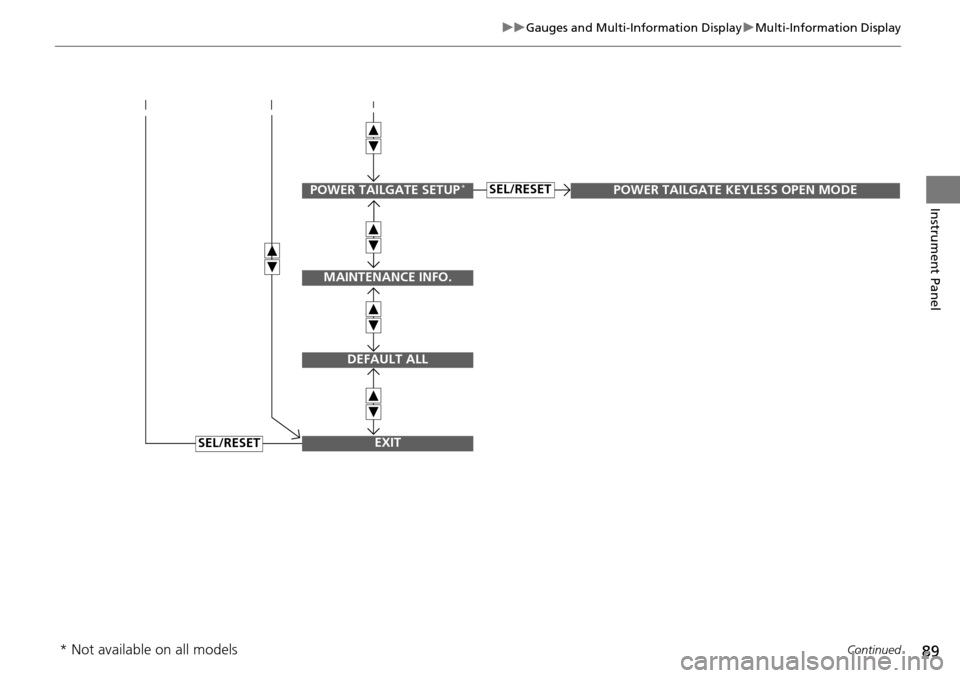
SEL/RESET
SEL/RESETPOWER TAILGATE SETUP*
MAINTENANCE INFO.
DEFAULT ALL
EXIT
POWER TAILGATE KEYLESS OPEN MODE
* Not available on all models
Page 91 of 365
90
uuGauges and Multi-Information Display uMulti-Information Display
Instrument Panel
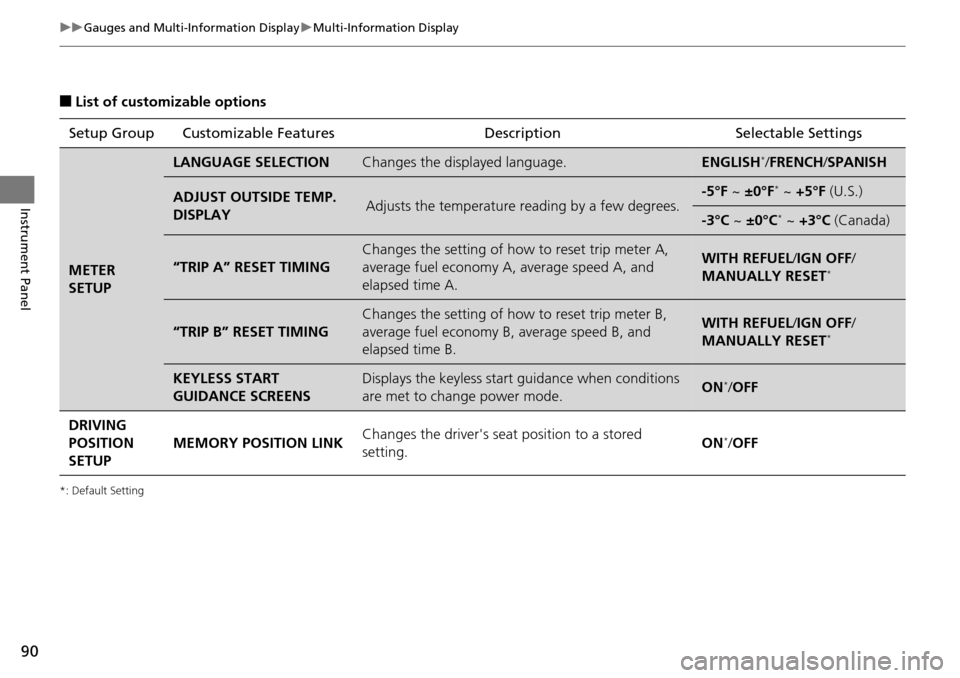
■List of customizable options
*: Default Setting
Setup Group Customizable Features DescriptionSelectable Settings
METER
SETUP
LANGUAGE SELECTIONChanges the displayed language.ENGLISH*/FRENCH /SPANISH
ADJUST OUTSIDE TEMP.
DISPLAYAdjusts the temperature reading by a few degrees.-5°F ~ ±0°F* ~ +5°F (U.S.)
-3°C ~ ±0°C* ~ +3°C (Canada)
“TRIP A” RESET TIMING
Changes the setting of how to reset trip meter A,
average fuel economy A, average speed A, and
elapsed time A.WITH REFUEL/ IGN OFF/
MANUALLY RESET*
“TRIP B” RESET TIMING
Changes the setting of how to reset trip meter B,
average fuel economy B, average speed B, and
elapsed time B.WITH REFUEL/ IGN OFF/
MANUALLY RESET*
KEYLESS START
GUIDANCE SCREENSDisplays the keyless start guidance when conditions
are met to change power mode.ON*/ OFF
DRIVING
POSITION
SETUP MEMORY POSITION LINK
Changes the driver's seat position to a stored
setting. ON
*/
OFF
Page 92 of 365
91
uuGauges and Multi-Information Display uMulti-Information Display
Continued
Instrument Panel
*: Default Setting
Setup Group Customizable Features Description Selectable Settings
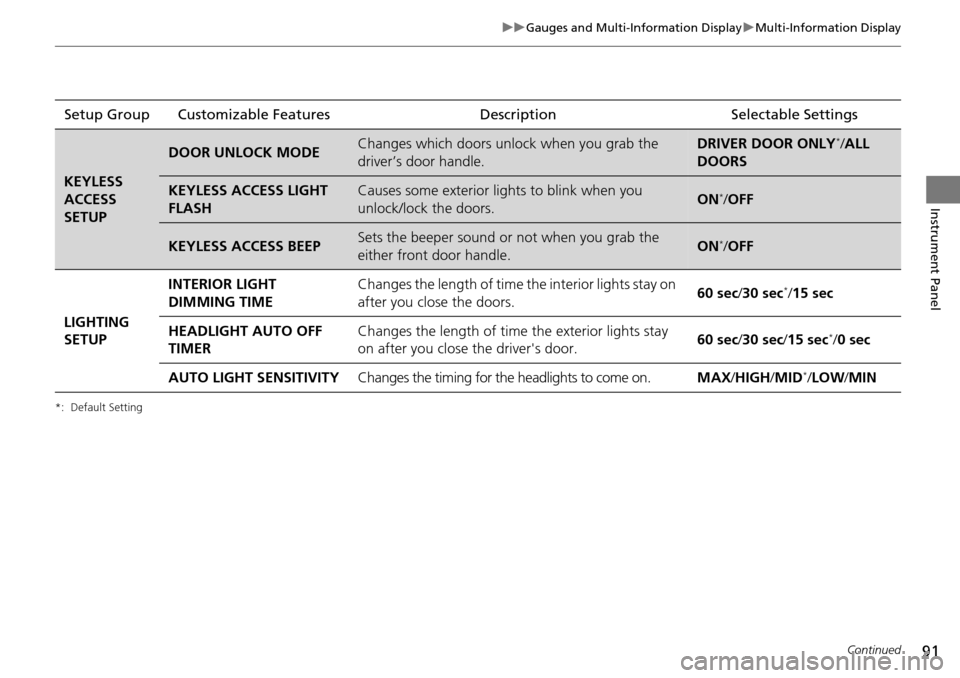
KEYLESS
ACCESS
SETUP
DOOR UNLOCK MODEChanges which doors unlock when you grab the
driver’s door handle.DRIVER DOOR ONLY*/ALL
DOORS
KEYLESS ACCESS LIGHT
FLASHCauses some exterior lights to blink when you
unlock/lock the doors.ON*/ OFF
KEYLESS ACCESS BEEPSets the beeper sound or not when you grab the
either front door handle.ON*/OFF
LIGHTING
SETUP INTERIOR LIGHT
DIMMING TIME
Changes the length of time the interior lights stay on
after you close the doors.
60 sec
/30 sec
*/15 sec
HEADLIGHT AUTO OFF
TIMER Changes the length of time
the exterior lights stay
on after you close the driver's door. 60 sec
/30 sec/ 15 sec
*/0 sec
AUTO LIGHT SENSITIVITY Changes the timing for the headlights to come on. MAX/HIGH /MID
*/LOW /MIN
Page 93 of 365
92
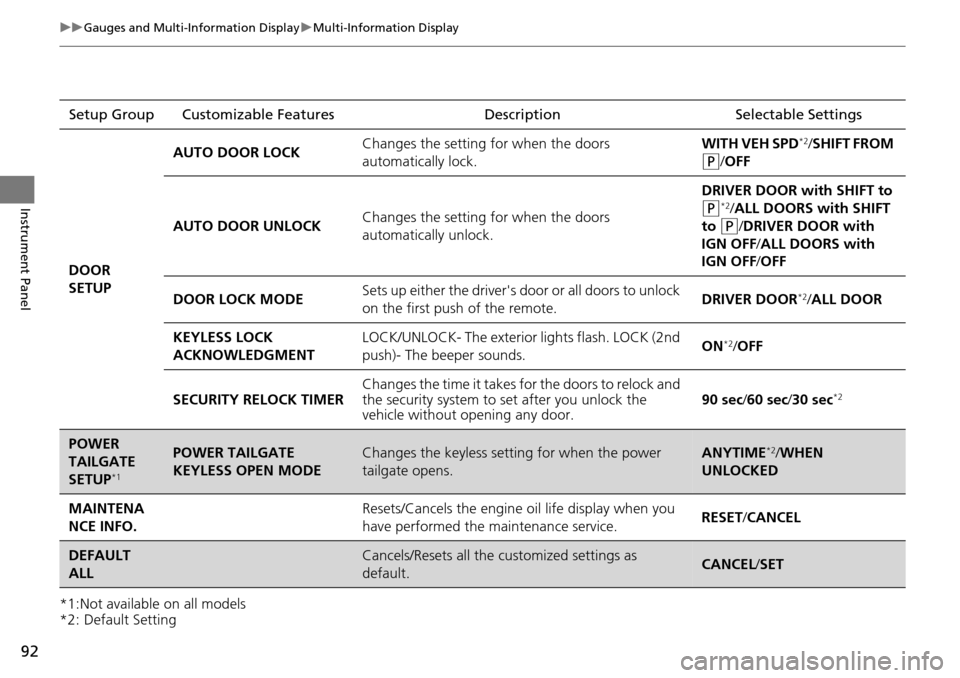
uuGauges and Multi-Information Display uMulti-Information Display
Instrument Panel
*1:Not available on all models
*2: Default SettingSetup Group Customizable Features Description Selectable Settings
DOOR
SETUP AUTO DOOR LOCK
Changes the setting for when the doors
automatically lock. WITH VEH SPD
*2/
SHIFT FROM
(P/ OFF
AUTO DOOR UNLOCK Changes the setting for when the doors
automatically unlock. DRIVER DOOR with SHIFT to
(P*2/ ALL DOORS with SHIFT
to
(P/DRIVER DOOR with
IGN OFF /ALL DOORS with
IGN OFF /OFF
DOOR LOCK MODE Sets up either the driver's door or all doors to unlock
on the first push
of the remote. DRIVER DOOR
*2/
ALL DOOR
KEYLESS LOCK
ACKNOWLEDGMENT LOCK/UNLOCK- The exterior
lights flash. LOCK (2nd
push)- The beeper sounds. ON
*2/
OFF
SECURITY RELOCK TIMER Changes the time it takes for the doors to relock and
the security system to set after you unlock the
vehicle without opening any door. 90 sec/
60 sec/30 sec
*2
POWER
TAILGATE
SETUP
*1
POWER TAILGATE
KEYLESS OPEN MODEChanges the keyless setting for when the power
tailgate opens.ANYTIME*2/WHEN
UNLOCKED
MAINTENA
NCE INFO.Resets/Cancels the engine oil life display when you
have performed the maintenance service. RESET /CANCEL
DEFAULT
ALLCancels/Resets all the customized settings as
default.CANCEL /SET