warning Acura RDX 2016 User Guide
[x] Cancel search | Manufacturer: ACURA, Model Year: 2016, Model line: RDX, Model: Acura RDX 2016Pages: 81, PDF Size: 17.94 MB
Page 16 of 81
24 || 25
INSTRUMENT P
ANEL
INSTRUMENT P ANEL
TABLE OF
CONTENTS
INDEX
VISUAL INDEX
VOICE COMMAND INDEX
SAFETY
INFORMATION
CLIENT
INFORMATION
INSTRUMENT PANEL
SPECIFICATIONS
VEHICLE
CONTROLS
MAINTENANCE
AUDIO AND
CONNECTIVITY
HANDLING THE UNEXPECTED
BLUETOOTH®
HANDSFREELINK®
DRIVING
ACURALINK®
NAVIGATION
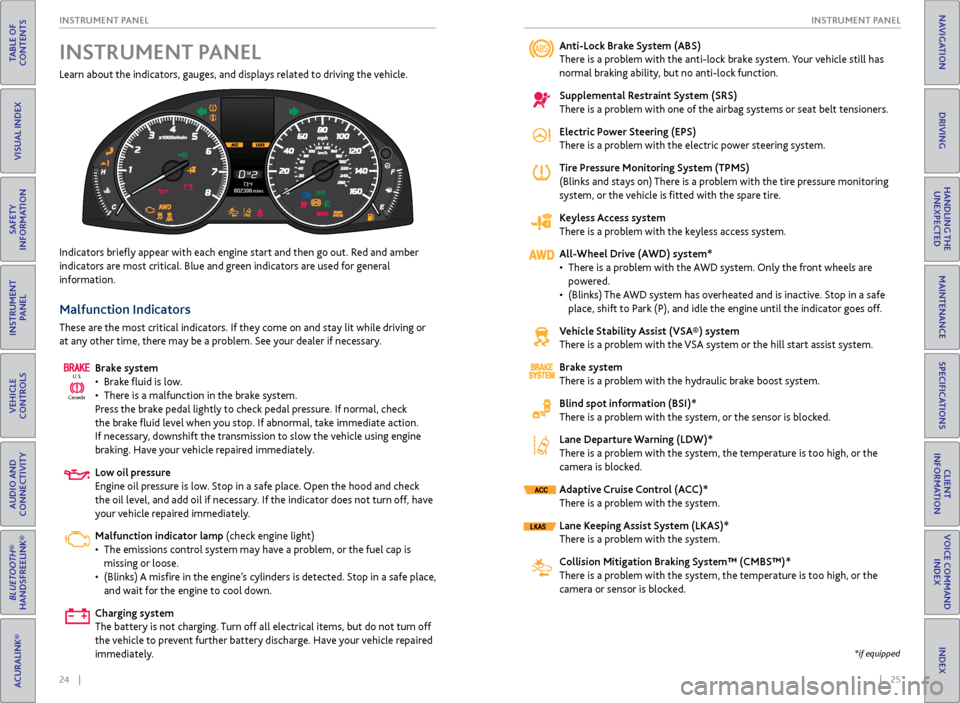
Learn about the indicators, gauges, and displays related to driving the vehicle.
Indicators briefly appear with each engine start and then go out. Red and amber
indicators are most critical. Blue and green indicators are used for general
information.
Malfunction Indicators
These are the most critical indicators. If they come on and stay lit while driving or
at any other time, there may be a problem. See your dealer if necessary.
Brake system
• Brake fluid is low.
• There is a malfunction in the brake system.
Press the brake pedal lightly to check pedal pressure. If normal, check
the brake fluid level when you stop. If abnormal, take immediate action.
If necessary, downshift the transmission to slow the vehicle using engine
braking. Have your vehicle repaired immediately.
Low oil pressure
Engine oil pressure is low. Stop in a safe place. Open the hood and check
the oil level, and add oil if necessary. If the indicator does not turn off, have
your vehicle repaired immediately.
Malfunction indicator lamp (check engine light)
• The emissions control system may have a problem, or the fuel cap is
missing or loose.
• (Blinks) A misfire in the engine’s cylinders is detected. Stop in a safe place,
and wait for the engine to cool down.
Charging system
The battery is not charging. Turn off all electrical items, but do not turn off
the vehicle to prevent further battery discharge. Have your vehicle repaired
immediately.
Canada U.S.
INSTRUMENT P
ANELAnti-Lock Brake System (ABS)
There is a problem with the anti-lock brake system. Your vehicle still has
normal braking ability, but no anti-lock function.
Supplemental Restraint System (SRS)
There is a problem with one of the airbag systems or seat belt tensioners.
Electric Power Steering (EPS)
There is a problem with the electric power steering system.
Tire Pressure Monitoring System (TPMS)
(Blinks and stays on) There is a problem with the tire pressure monitoring
system, or the vehicle is fitted with the spare tire.
Keyless Access system
There is a problem with the keyless access system.
All-Wheel Drive (AWD) system*
• There is a problem with the AWD system. Only the front wheels are
powered.
• (Blinks) The AWD system has overheated and is inactive. Stop in a safe
place, shift to Park (P), and idle the engine until the indicator goes off.
Vehicle Stability Assist (VSA®) system
There is a problem with the VSA system or the hill start assist system.
Brake system
There is a problem with the hydraulic brake boost system.
Blind spot information (BSI)*
There is a problem with the system, or the sensor is blocked.
Lane Departure Warning (LDW)*
There is a problem with the system, the temperature is too high, or the
camera is blocked.
Adaptive Cruise Control (ACC)*
There is a problem with the system.
Lane Keeping Assist System (LKAS)*
There is a problem with the system.
Collision Mitigation Braking System™ (CMBS™)*
There is a problem with the system, the temperature is too high, or the
camera or sensor is blocked.
*if equipped
Page 20 of 81
32 || 33
VEHICLE CONTROLS
VEHICLE CONTROLS
TABLE OF
CONTENTS
INDEX
VISUAL INDEX
VOICE COMMAND INDEX
SAFETY
INFORMATION
CLIENT
INFORMATION
INSTRUMENT PANEL
SPECIFICATIONS
VEHICLE
CONTROLS
MAINTENANCE
AUDIO AND
CONNECTIVITY
HANDLING THE UNEXPECTED
BLUETOOTH®
HANDSFREELINK®
DRIVING
ACURALINK®
NAVIGATION
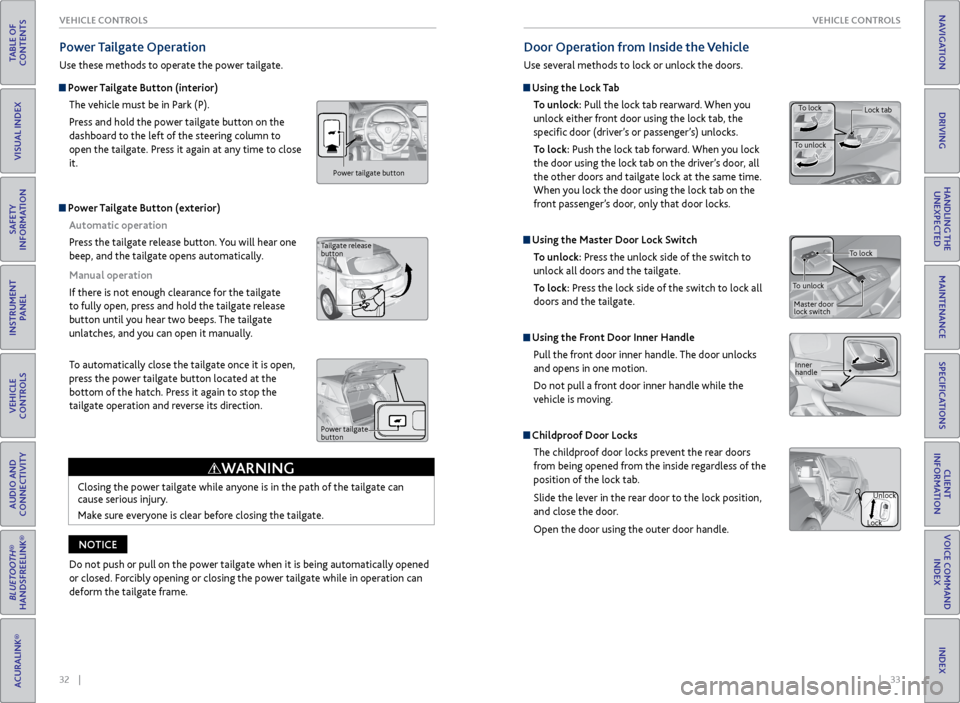
Power Tailgate Operation
Use these methods to operate the power tailgate.
Power Tailgate Button (interior)
The vehicle must be in Park (P).
Press and hold the power tailgate button on the
dashboard to the left of the steering column to
open the tailgate. Press it again at any time to close
it.
Power Tailgate Button (exterior)Automatic operation
Press the tailgate release button. You will hear one
beep, and the tailgate opens automatically.
Manual operation
If there is not enough clearance for the tailgate
to fully open, press and hold the tailgate release
button until you hear two beeps. The tailgate
unlatches, and you can open it manually.
To automatically close the tailgate once it is open,
press the power tailgate button located at the
bottom of the hatch. Press it again to stop the
tailgate operation and reverse its direction.
Closing the power tailgate while anyone is in the path of the tailgate can
cause serious injury.
Make sure everyone is clear before closing the tailgate.
WARNING
Power tailgate button
Power tailgate
button
Door Operation from Inside the Vehicle
Use several methods to lock or unlock the doors.
Using the Lock Tab
To unlock: Pull the lock tab rearward. When you
unlock either front door using the lock tab, the
specific door (driver’s or passenger’s) unlocks.
To lock: Push the lock tab forward. When you lock
the door using the lock tab on the driver’s door, all
the other doors and tailgate lock at the same time.
When you lock the door using the lock tab on the
front passenger’s door, only that door locks.
Using the Master Door Lock Switch
To unlock: Press the unlock side of the switch to
unlock all doors and the tailgate.
To lock: Press the lock side of the switch to lock all
doors and the tailgate.
Using the Front Door Inner Handle
Pull the front door inner handle. The door unlocks
and opens in one motion.
Do not pull a front door inner handle while the
vehicle is moving.
Childproof Door Locks
The childproof door locks prevent the rear doors
from being opened from the inside regardless of the
position of the lock tab.
Slide the lever in the rear door to the lock position,
and close the door.
Open the door using the outer door handle.
Unlock
Lock
Inner
handle
To lock
To unlock Lock tab
To lock
To unlock Master door
lock switch
Do not push or pull on the power tailgate when it is being automatically opened
or closed. Forcibly opening or closing the power tailgate while in operation can
deform the tailgate frame.
NOTICE
Tailgate release
button
Page 21 of 81
34 || 35
VEHICLE CONTROLS
VEHICLE CONTROLS
TABLE OF
CONTENTS
INDEX
VISUAL INDEX
VOICE COMMAND INDEX
SAFETY
INFORMATION
CLIENT
INFORMATION
INSTRUMENT PANEL
SPECIFICATIONS
VEHICLE
CONTROLS
MAINTENANCE
AUDIO AND
CONNECTIVITY
HANDLING THE UNEXPECTED
BLUETOOTH®
HANDSFREELINK®
DRIVING
ACURALINK®
NAVIGATION
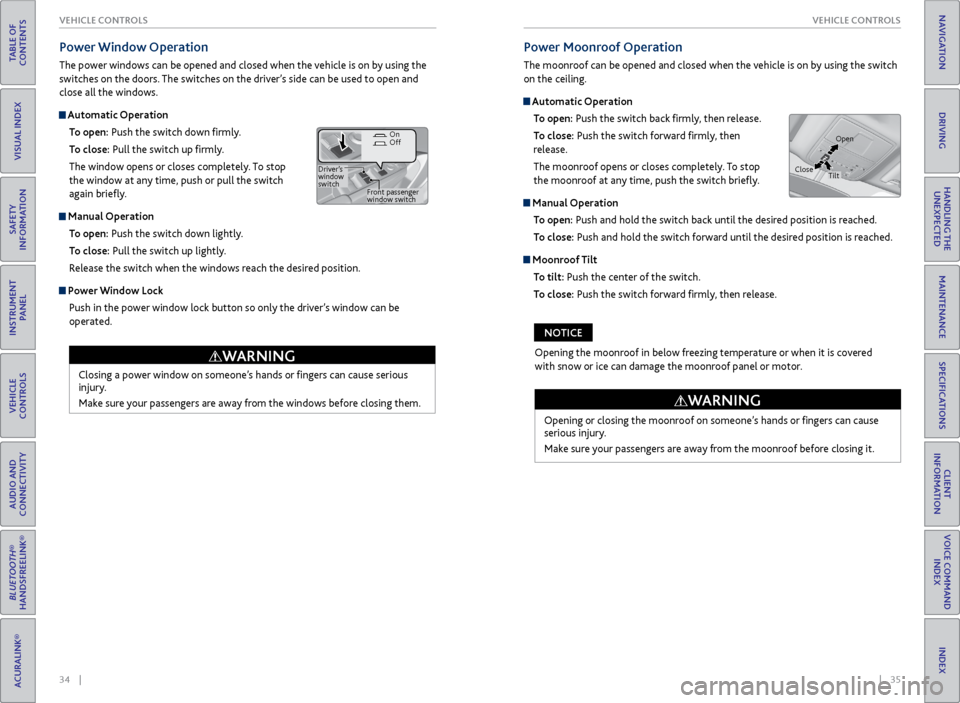
Power Window Operation
The power windows can be opened and closed when the vehicle is on by using the
switches on the doors. The switches on the driver’s side can be used to open and
close all the windows.
Automatic Operation
To open: Push the switch down firmly.
To close: Pull the switch up firmly.
The window opens or closes completely. To stop
the window at any time, push or pull the switch
again briefly.
Manual OperationTo open: Push the switch down lightly.
To close: Pull the switch up lightly.
Release the switch when the windows reach the desired position.
Power Window LockPush in the power window lock button so only the driver’s window can be
operated.
Closing a power window on someone’s hands or fingers can cause serious
injury.
Make sure your passengers are away from the windows before closing them.
WARNING
Power window
lock button
Front passenger
window switch
Driver’s
window
switch On
Off
Power Moonroof Operation
The moonroof can be opened and closed when the vehicle is on by using the switch
on the ceiling.
Automatic Operation
To open: Push the switch back firmly, then release.
To close: Push the switch forward firmly, then
release.
The moonroof opens or closes completely. To stop
the moonroof at any time, push the switch briefly.
Manual Operation
To open: Push and hold the switch back until the desired position is reached.
To close: Push and hold the switch forward until the desired position is reached.
Moonroof TiltTo tilt: Push the center of the switch.
To close: Push the switch forward firmly, then release.
Opening or closing the moonroof on someone’s hands or fingers can cause
serious injury.
Make sure your passengers are away from the moonroof before closing it.
WARNING
Open
Close Tilt
Opening the moonroof in below freezing temperature or when it is covered
with snow or ice can damage the moonroof panel or motor.
NOTICE
Page 24 of 81
40 || 41
VEHICLE CONTROLS
VEHICLE CONTROLS
TABLE OF
CONTENTS
INDEX
VISUAL INDEX
VOICE COMMAND INDEX
SAFETY
INFORMATION
CLIENT
INFORMATION
INSTRUMENT PANEL
SPECIFICATIONS
VEHICLE
CONTROLS
MAINTENANCE
AUDIO AND
CONNECTIVITY
HANDLING THE UNEXPECTED
BLUETOOTH®
HANDSFREELINK®
DRIVING
ACURALINK®
NAVIGATION
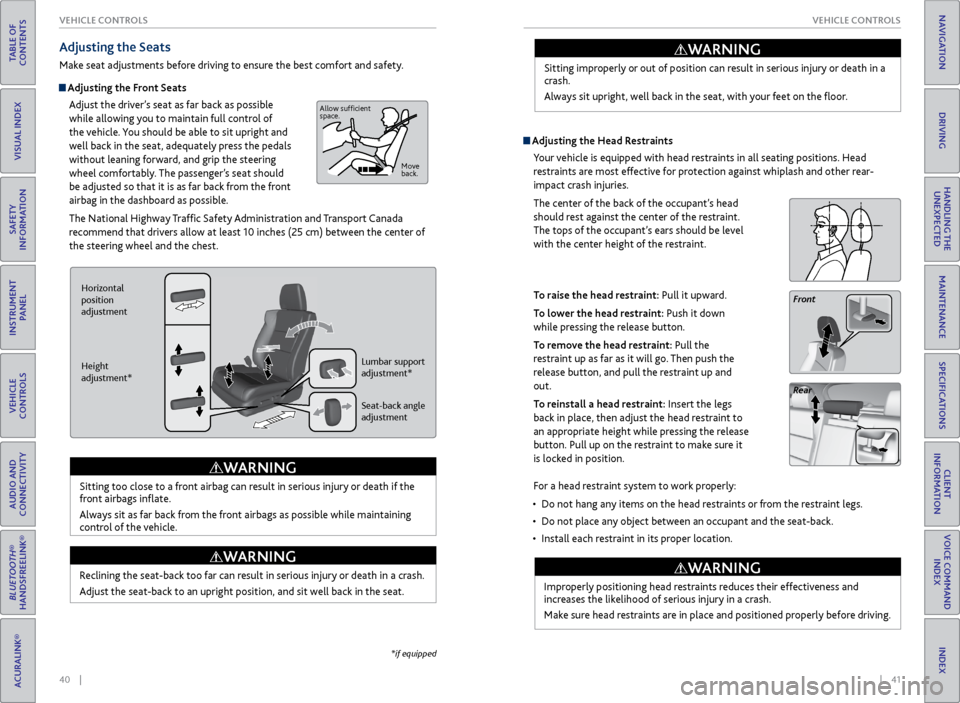
Adjusting the Seats
Make seat adjustments before driving to ensure the best comfort and safety.
Adjusting the Front Seats
Adjust the driver’s seat as far back as possible
while allowing you to maintain full control of
the vehicle. You should be able to sit upright and
well back in the seat, adequately press the pedals
without leaning forward, and grip the steering
wheel comfortably. The passenger’s seat should
be adjusted so that it is as far back from the front
airbag in the dashboard as possible.
The National Highway Traffic Safety Administration and Transport Canada
recommend that drivers allow at least 10 inches (25 cm) between the center of
the steering wheel and the chest.
Sitting too close to a front airbag can result in serious injury or death if the
front airbags inflate.
Always sit as far back from the front airbags as possible while maintaining
control of the vehicle.
WARNING
Horizontal
position
adjustment
Height
adjustment* Seat-back angle
adjustment Lumbar support
adjustment*
Reclining the seat-back too far can result in serious injury or death in a crash.
Adjust the seat-back to an upright position, and sit well back in the seat.
WARNING
Allow sufficient
space.
Move
back.
Sitting improperly or out of position can result in serious injury or death in a
crash.
Always sit upright, well back in the seat, with your feet on the floor.
WARNING
Adjusting the Head Restraints
Your vehicle is equipped with head restraints in all seating positions. Head
restraints are most effective for protection against whiplash and other rear-
impact crash injuries.
The center of the back of the occupant’s head
should rest against the center of the restraint.
The tops of the occupant’s ears should be level
with the center height of the restraint.
To raise the head restraint: Pull it upward.
To lower the head restraint: Push it down
while pressing the release button.
To remove the head restraint: Pull the
restraint up as far as it will go. Then push the
release button, and pull the restraint up and
out.
To reinstall a head restraint: Insert the legs
back in place, then adjust the head restraint to
an appropriate height while pressing the release
button. Pull up on the restraint to make sure it
is locked in position.
Front
Rear
For a head restraint system to work properly:
• Do not hang any items on the head restraints or from the restraint legs.
• Do not place any object between an occupant and the seat-back.
• Install each restraint in its proper location.
Improperly positioning head restraints reduces their effectiveness and
increases the likelihood of serious injury in a crash.
Make sure head restraints are in place and positioned properly before driving.
WARNING
*if equipped
Page 25 of 81
42 || 43
VEHICLE CONTROLS
VEHICLE CONTROLS
TABLE OF
CONTENTS
INDEX
VISUAL INDEX
VOICE COMMAND INDEX
SAFETY
INFORMATION
CLIENT
INFORMATION
INSTRUMENT PANEL
SPECIFICATIONS
VEHICLE
CONTROLS
MAINTENANCE
AUDIO AND
CONNECTIVITY
HANDLING THE UNEXPECTED
BLUETOOTH®
HANDSFREELINK®
DRIVING
ACURALINK®
NAVIGATION
Failure to reinstall, or correctly reinstall, the head restraints can result in
severe injury during a crash.
Always replace the head restraints before driving.
WARNING
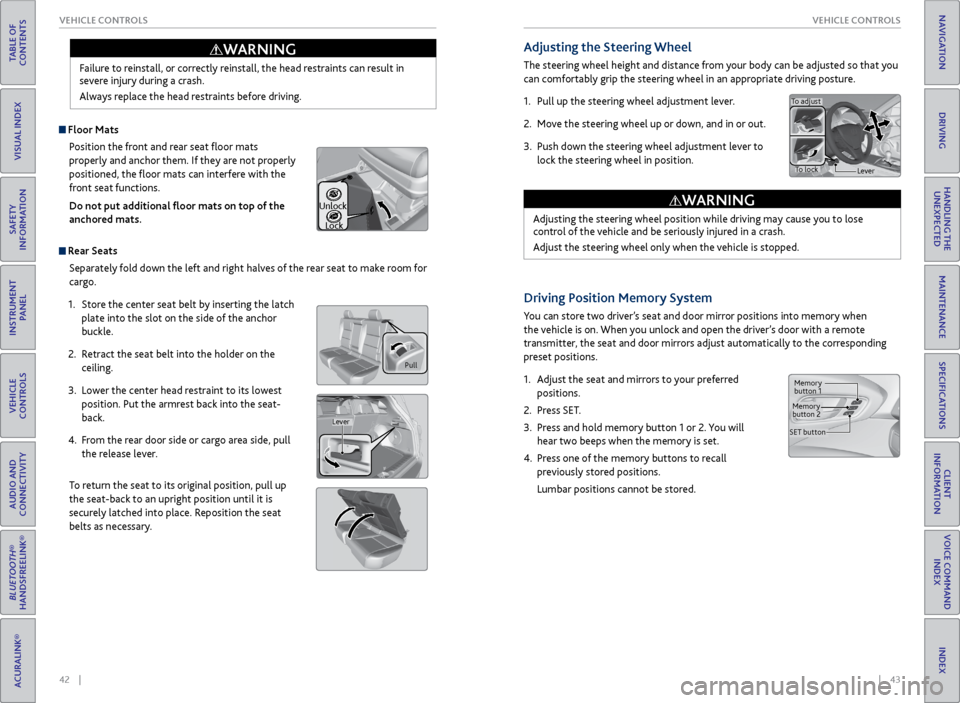
Pull
Lever
Unlock
Lock
Adjusting the Steering Wheel
The steering wheel height and distance from your body can be adjusted so that you
can comfortably grip the steering wheel in an appropriate driving posture.
1. Pull up the steering wheel adjustment lever.
2. Move the steering wheel up or down, and in or out.
3. Push down the steering wheel adjustment lever to
lock the steering wheel in position.
Adjusting the steering wheel position while driving may cause you to lose
control of the vehicle and be seriously injured in a crash.
Adjust the steering wheel only when the vehicle is stopped.
WARNING
To adjust
To lock Lever
Driving Position Memory System
You can store two driver’s seat and door mirror positions into memory when
the vehicle is on. When you unlock and open the driver’s door with a remote
transmitter, the seat and door mirrors adjust automatically to the corresponding
preset positions.
1. Adjust the seat and mirrors to your preferred
positions.
2. Press SET.
3. Press and hold memory button 1 or 2. You will
hear two beeps when the memory is set.
4. Press one of the memory buttons to recall
previously stored positions.
Lumbar positions cannot be stored.
Memory
button 1
Memory
button 2
SET button
Floor Mats Position the front and rear seat floor mats
properly and anchor them. If they are not properly
positioned, the floor mats can interfere with the
front seat functions.
Do not put additional floor mats on top of the
anchored mats.
Rear Seats
Separately fold down the left and right halves of the rear seat to make room for
cargo.
1. Store the center seat belt by inserting the latch
plate into the slot on the side of the anchor
buckle.
2. Retract the seat belt into the holder on the
ceiling.
3. Lower the center head restraint to its lowest
position. Put the armrest back into the seat-
back.
4. From the rear door side or cargo area side, pull
the release lever.
To return the seat to its original position, pull up
the seat-back to an upright position until it is
securely latched into place. Reposition the seat
belts as necessary.
Page 27 of 81
46 || 47
VEHICLE CONTROLS
VEHICLE CONTROLS
TABLE OF
CONTENTS
INDEX
VISUAL INDEX
VOICE COMMAND INDEX
SAFETY
INFORMATION
CLIENT
INFORMATION
INSTRUMENT PANEL
SPECIFICATIONS
VEHICLE
CONTROLS
MAINTENANCE
AUDIO AND
CONNECTIVITY
HANDLING THE UNEXPECTED
BLUETOOTH®
HANDSFREELINK®
DRIVING
ACURALINK®
NAVIGATION
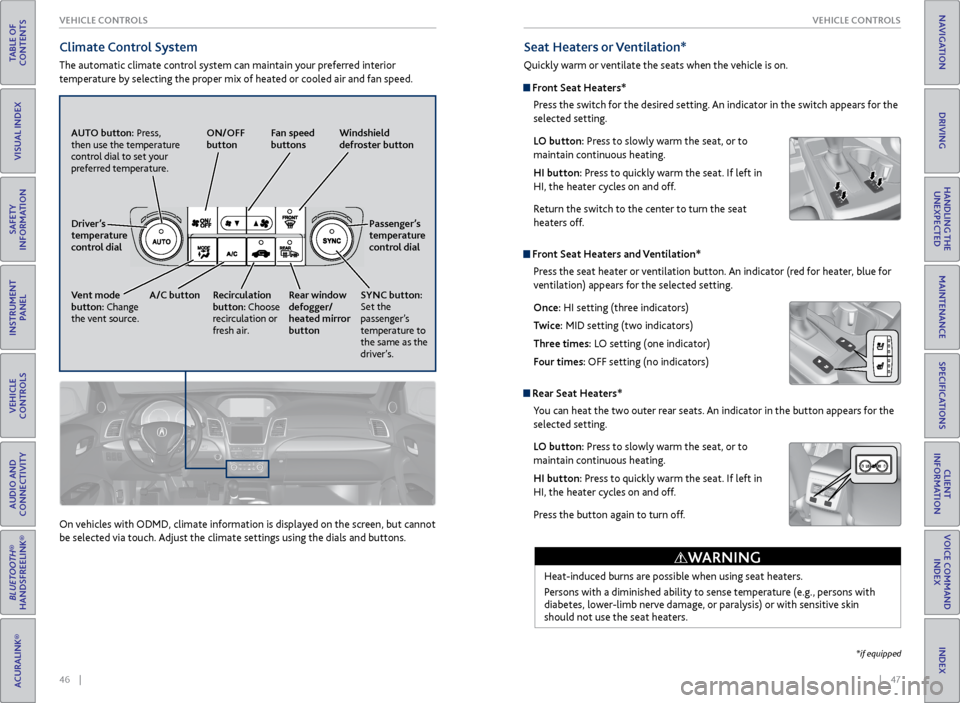
Climate Control System
The automatic climate control system can maintain your preferred interior
temperature by selecting the proper mix of heated or cooled air and fan speed.
AUTO button: Press,
then use the temperature
control dial to set your
preferred temperature. ON/OFF
button
Fan speed
buttons Windshield
defroster button
Passenger’s
temperature
control dial
SYNC button:
Set the
passenger’s
temperature to
the same as the
driver’s.
Rear window
defogger/
heated mirror
button
Recirculation
button: Choose
recirculation or
fresh air.
A/C button
Vent mode
button: Change
the vent source. Driver’s
temperature
control dial
On vehicles with ODMD, climate information is displayed on the screen, but cannot
be selected via touch. Adjust the climate settings using the dials and buttons.
Seat Heaters or Ventilation*
Quickly warm or ventilate the seats when the vehicle is on.
Front Seat Heaters*
Press the switch for the desired setting. An indicator in the switch appears for the
selected setting.
LO button: Press to slowly warm the seat, or to
maintain continuous heating.
HI button: Press to quickly warm the seat. If left in
HI, the heater cycles on and off.
Return the switch to the center to turn the seat
heaters off.
Front Seat Heaters and Ventilation*Press the seat heater or ventilation button. An indicator (red for heater, blue for
ventilation) appears for the selected setting.
Once: HI setting (three indicators)
Twice: MID setting (two indicators)
Three times: LO setting (one indicator)
Four times: OFF setting (no indicators)
Rear Seat Heaters*You can heat the two outer rear seats. An indicator in the button appears for the
selected setting.
LO button: Press to slowly warm the seat, or to
maintain continuous heating.
HI button: Press to quickly warm the seat. If left in
HI, the heater cycles on and off.
Press the button again to turn off.
Heat-induced burns are possible when using seat heaters.
Persons with a diminished ability to sense temperature (e.g., persons with
diabetes, lower-limb nerve damage, or paralysis) or with sensitive skin
should not use the seat heaters.
WARNING
*if equipped
Page 45 of 81
| 83
NAVIGATION
INDEX
VOICE COMMAND
INDEX
CLIENT
INFORMATION
SPECIFICATIONS
MAINTENANCE
HANDLING THE UNEXPECTED
DRIVING
NAVIGATION
82 |
TABLE OF
CONTENTS
VISUAL INDEX
SAFETY
INFORMATION
INSTRUMENT PANEL
VEHICLE
CONTROLS
AUDIO AND
CONNECTIVITY
BLUETOOTH®
HANDSFREELINK®
ACURALINK®
Learn how to enter a destination and operate the navigation system.
Basic Navigation Operation
A real-time navigation system uses GPS and a map database to show your current
location and help guide you to a desired destination. You can operate the system
using voice commands or the system controls.
To reduce the potential for driver distraction, certain manual functions may
be inoperable or grayed out while the vehicle is moving. Voice commands are
always available.
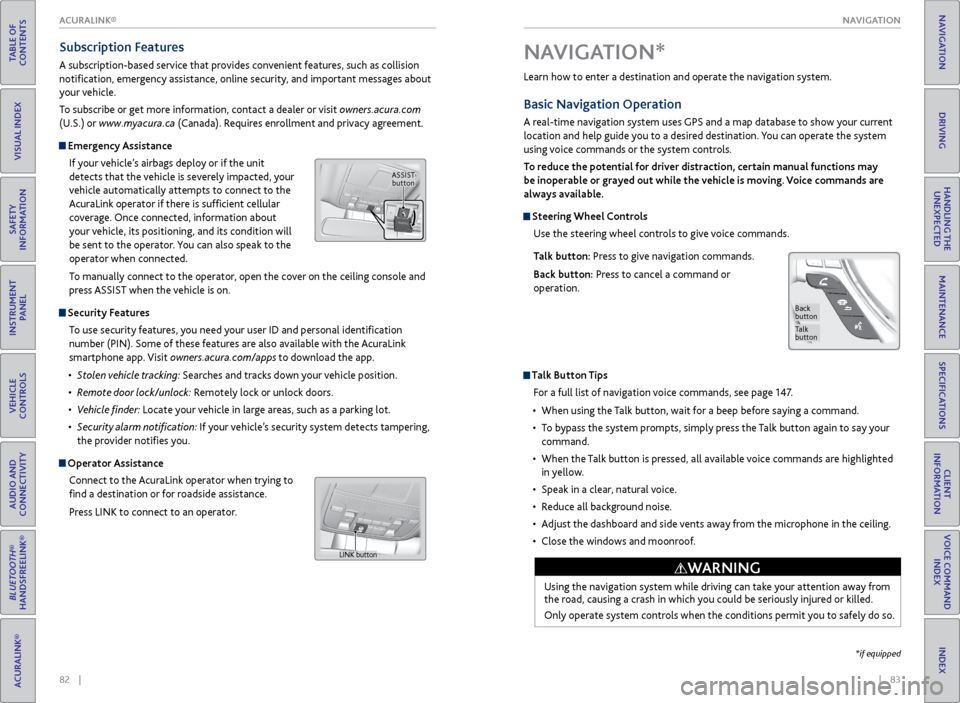
Steering Wheel Controls
Use the steering wheel controls to give voice commands.
Talk button: Press to give navigation commands.
Back button: Press to cancel a command or
operation.
Talk Button Tips
For a full list of navigation voice commands, see page 147.
• When using the Talk button, wait for a beep before saying a command.
• To bypass the system prompts, simply press the Talk button again to say your
command.
• When the Talk button is pressed, all available voice commands are highlighted
in yellow.
• Speak in a clear, natural voice.
• Reduce all background noise.
• Adjust the dashboard and side vents away from the microphone in the ceiling.
• Close the windows and moonroof.
Using the navigation system while driving can take your attention away from
the road, causing a crash in which you could be seriously injured or killed.
Only operate system controls when the conditions permit you to safely do so.
WARNING
NAVIGATION*
Talk
button
Back
button
*if equipped
Subscription Features
A subscription-based service that provides convenient features, such as collision
notification, emergency assistance, online security, and important messages about
your vehicle.
To subscribe or get more information, contact a dealer or visit owners.acura.com
(U.S.) or www.myacura.ca (Canada). Requires enrollment and privacy agreement.
Emergency Assistance
If your vehicle’s airbags deploy or if the unit
detects that the vehicle is severely impacted, your
vehicle automatically attempts to connect to the
AcuraLink operator if there is sufficient cellular
coverage. Once connected, information about
your vehicle, its positioning, and its condition will
be sent to the operator. You can also speak to the
operator when connected.
To manually connect to the operator, open the cover on the ceiling console and
press ASSIST when the vehicle is on.
Security Features
To use security features, you need your user ID and personal identification
number (PIN). Some of these features are also available with the AcuraLink
smartphone app. Visit owners.acura.com/apps to download the app.
• Stolen vehicle tracking: Searches and tracks down your vehicle position.
• Remote door lock/unlock: Remotely lock or unlock doors.
• Vehicle finder: Locate your vehicle in large areas, such as a parking lot.
• Security alarm notification: If your vehicle’s security system detects tampering,
the provider notifies you.
Operator Assistance
Connect to the AcuraLink operator when trying to
find a destination or for roadside assistance.
Press LINK to connect to an operator.
ASSIST button
LINK button
ACURALINK®
Page 49 of 81
90 || 91
DRIVING
DRIVING
TABLE OF
CONTENTS
INDEX
VISUAL INDEX
VOICE COMMAND INDEX
SAFETY
INFORMATION
CLIENT
INFORMATION
INSTRUMENT PANEL
SPECIFICATIONS
VEHICLE
CONTROLS
MAINTENANCE
AUDIO AND
CONNECTIVITY
HANDLING THE UNEXPECTED
BLUETOOTH®
HANDSFREELINK®
DRIVING
ACURALINK®
NAVIGATION
Learn about preparation for driving and other features.
Before Driving
Check the following items before you begin driving.
Exterior Checks
• Make sure there are no obstructions on the windows, door mirrors, exterior
lights, or other parts of the vehicle.
• Remove any frost, snow, or ice.
• Make sure the hood is securely closed.
• Heat from the engine and exhaust can ignite flammable materials left under
the hood, causing a fire. If you’ve parked your vehicle for an extended period,
inspect and remove any debris that may have collected, such as dried grass
and leaves that have fallen or have been carried in for use as a nest by a small
animal. Also check under the hood for leftover flammable materials after you
or someone else has performed maintenance on your vehicle.
• Make sure the tires are in good condition.
• Make sure there are no people or objects behind or around the vehicle.
DRIVING
Interior Checks
• Store or secure all items on board properly.
• Do not pile items higher than the seat height.
• Do not place anything in the front seat footwells. Make sure to secure the floor
mats.
• If you have any animals on board, do not let them move freely in the vehicle.
• Securely close and lock all doors and the tailgate.
• Adjust your seating position, mirrors, and steering wheel properly.
• Be sure items placed on the floor behind the front seats cannot roll under the
seats.
• Everyone in the vehicle must fasten their seat belt.
Make sure that the indicators in the instrument panel come on when you start the
vehicle, and go off soon after. If the doors are frozen shut, use warm water around the door edges to melt any
ice. Do not try to force them open, as this can damage the rubber trim around
the doors. When done, wipe dry to avoid further freezing.
NOTICE
Driving Guidelines for Your Utility Vehicle
Utility vehicles have a significantly higher rollover rate than other types of
vehicles. To prevent rollovers or loss of control:
• Take corners at slower speeds than you would with a passenger vehicle.
• Avoid sharp turns and abrupt maneuvers whenever possible.
• Do not modify your vehicle in any way that raises its center of gravity.
• Never carry more than 165 lbs (75 kg) of cargo on the roof rack (Acura
accessory).
In addition:
• During the first 600 miles (1,000 km) of operation, avoid sudden acceleration
or full throttle operation so as not to damage the engine or powertrain.
• Avoid hard braking for the first 200 miles (300 km). You should also follow this
when the brake pads are replaced.
Improperly operating this vehicle on or off pavement can cause a crash or
rollover in which you and your passengers can be seriously injured or killed.
Follow all instructions and guidelines in this guide.
Keep your speed low, and don’t drive faster than conditions permit.
WARNING
Improper accessories or modifications can affect your vehicle’s handling,
stability, and performance, and cause a crash in which you can be seriously
hurt or killed.
Follow all instructions in the vehicle owner’s manual regarding accessories
and modifications.
WARNING
AWD (All-Wheel Drive) with Intelligent Control System*
When the AWD system senses a loss of front wheel traction, it automatically
transfers some power to the rear wheels. This allows you to utilize all available
traction and may increase mobility.
You still need to exercise the same care when accelerating, steering, and braking
that you would in a two-wheel drive vehicle.
If you excessively spin all four wheels and overheat the system, only the front
wheels receive power. Stop until the system cools down.
Do not continuously spin the front tires of your vehicle. Continuously spinning
the front tires can cause transmission or rear differential damage.
NOTICE
*if equipped
Page 50 of 81
92 || 93
DRIVING
DRIVING
TABLE OF
CONTENTS
INDEX
VISUAL INDEX
VOICE COMMAND INDEX
SAFETY
INFORMATION
CLIENT
INFORMATION
INSTRUMENT PANEL
SPECIFICATIONS
VEHICLE
CONTROLS
MAINTENANCE
AUDIO AND
CONNECTIVITY
HANDLING THE UNEXPECTED
BLUETOOTH®
HANDSFREELINK®
DRIVING
ACURALINK®
NAVIGATION
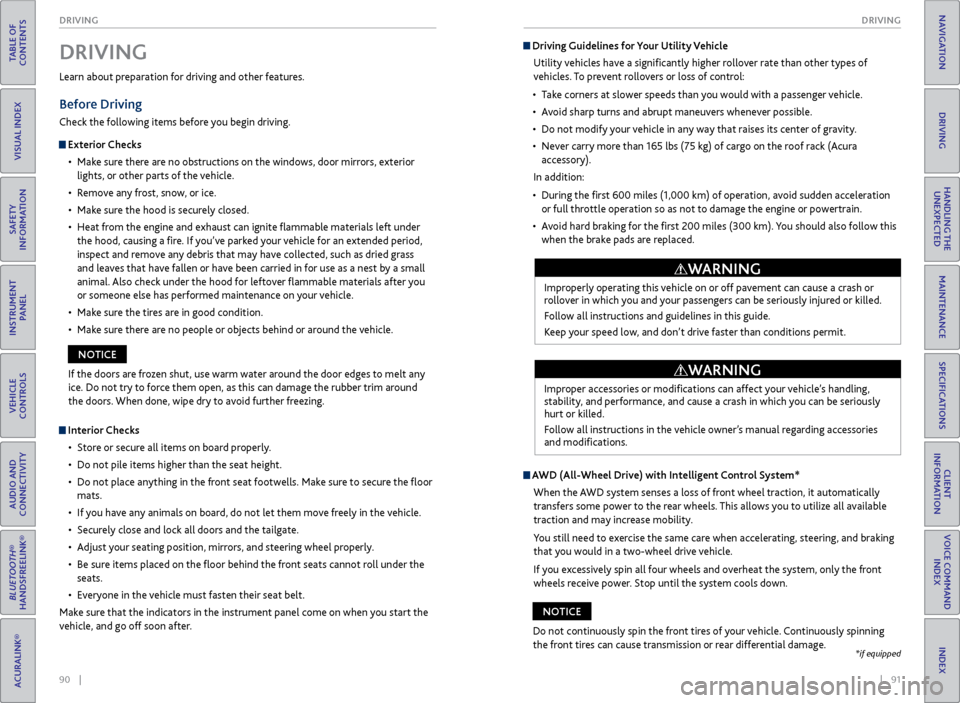
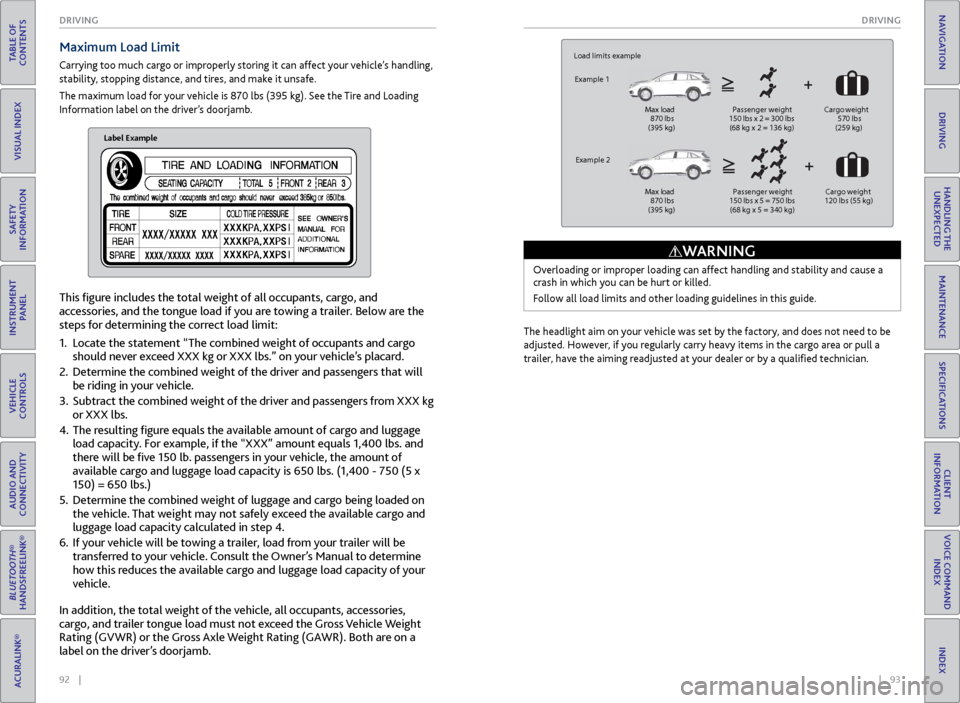
This figure includes the total weight of all occupants, cargo, and
accessories, and the tongue load if you are towing a trailer. Below are the
steps for determining the correct load limit:
1. Locate the statement “The combined weight of occupants and cargo
should never exceed XXX kg or XXX lbs.” on your vehicle’s placard.
2. Determine the combined weight of the driver and passengers that will
be riding in your vehicle.
3. Subtract the combined weight of the driver and passengers from XXX kg
or XXX lbs.
4. The resulting figure equals the available amount of cargo and luggage
load capacity. For example, if the “XXX” amount equals 1,400 lbs. and
there will be five 150 lb. passengers in your vehicle, the amount of
available cargo and luggage load capacity is 650 lbs. (1,400 - 750 (5 x
150) = 650 lbs.)
5. Determine the combined weight of luggage and cargo being loaded on
the vehicle. That weight may not safely exceed the available cargo and
luggage load capacity calculated in step 4.
6. If your vehicle will be towing a trailer, load from your trailer will be
transferred to your vehicle. Consult the Owner’s Manual to determine
how this reduces the available cargo and luggage load capacity of your
vehicle.
Maximum Load Limit
Carrying too much cargo or improperly storing it can affect your vehicle’s handling,
stability, stopping distance, and tires, and make it unsafe.
The maximum load for your vehicle is 870 lbs (395 kg). See the Tire and Loading
Information label on the driver’s doorjamb.
Label Example
Load limits example
Example 1
Max load
870 lbs
(395 kg ) Passenger weight
150 lbs x 2 = 300 lbs
(68 kg x 2 = 136 kg) Cargo
weight
570 lbs
(259 kg)
Example 2
Max load
870 lbs
(395 kg ) Passenger weight
150 lbs x 5 = 750 lbs
(68 kg x 5 = 340 kg) Ca
rgo weight
120 lbs (55 kg )
Overloading or improper loading can affect handling and stability and cause a
crash in which you can be hurt or killed.
Follow all load limits and other loading guidelines in this guide.
WARNING
The headlight aim on your vehicle was set by the factory, and does not need to be
adjusted. However, if you regularly carry heavy items in the cargo area or pull a
trailer, have the aiming readjusted at your dealer or by a qualified technician.
In addition, the total weight of the vehicle, all occupants, accessories,
cargo, and trailer tongue load must not exceed the Gross Vehicle Weight
Rating (GVWR) or the Gross Axle Weight Rating (GAWR). Both are on a
label on the driver’s doorjamb.
Page 51 of 81
94 || 95
DRIVING
DRIVING
TABLE OF
CONTENTS
INDEX
VISUAL INDEX
VOICE COMMAND INDEX
SAFETY
INFORMATION
CLIENT
INFORMATION
INSTRUMENT PANEL
SPECIFICATIONS
VEHICLE
CONTROLS
MAINTENANCE
AUDIO AND
CONNECTIVITY
HANDLING THE UNEXPECTED
BLUETOOTH®
HANDSFREELINK®
DRIVING
ACURALINK®
NAVIGATION
Pre-tow checklist
When preparing to tow, and before driving away, be sure to check the following:
• Avoid towing a trailer during your vehicle’s first 600 miles (1,000 km).
• The vehicle has been properly serviced, and the suspension and the cooling
system are in good operating condition.
• The trailer has been properly serviced and is in good condition.
• All weights and loads are within limits. Never exceed the gross weight ratings.
• Check if all loads are within limits at a public scale. If a public scale is not
available, add the estimated weight of your cargo load to the weight of your
trailer (as quoted by the manufacturer) and the tongue load.
• The hitch, safety chains, and any other attachments are secure.
• All items in or on the trailer are properly secured and cannot shift while you
drive.Towing a Trailer
Your vehicle can tow a trailer if you carefully observe the load limits, use the
proper equipment, and follow the towing guidelines. See the Owner’s Manual on
the Owner Information CD or visit owners.acura.com (U.S.) or www.myacura.ca
(Canada) for more information.
Towing Load Limits
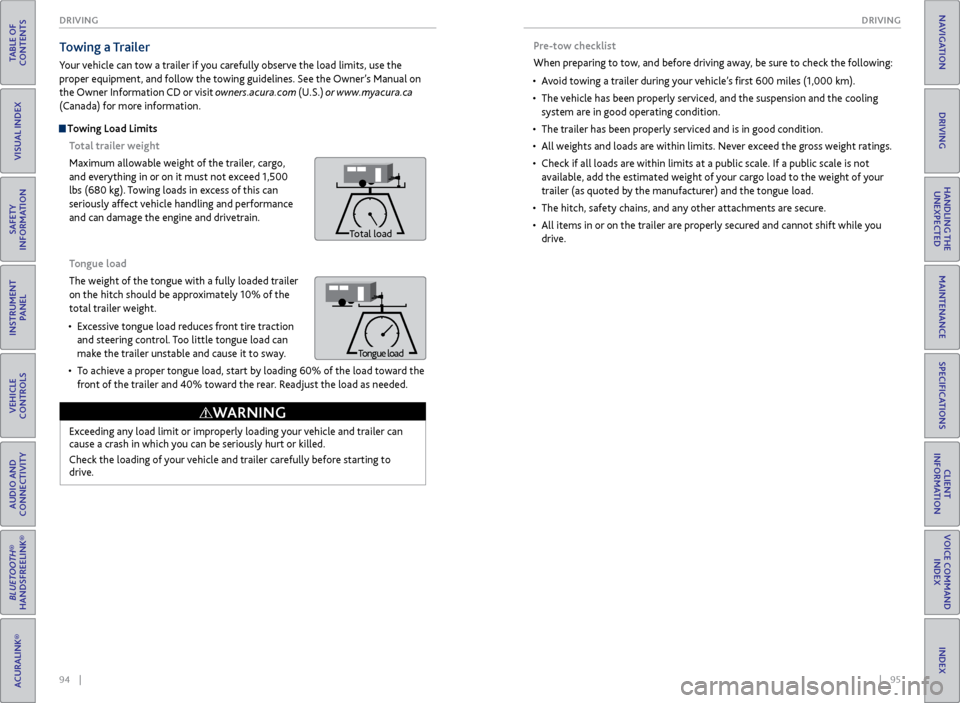
Total trailer weight
Maximum allowable weight of the trailer, cargo,
and everything in or on it must not exceed 1,500
lbs (680 kg). Towing loads in excess of this can
seriously affect vehicle handling and performance
and can damage the engine and drivetrain.
Total load
Tongue load
The weight of the tongue with a fully loaded trailer
on the hitch should be approximately 10% of the
total trailer weight.
• Excessive tongue load reduces front tire traction
and steering control. Too little tongue load can
make the trailer unstable and cause it to sway.
• To achieve a proper tongue load, start by loading 60% of the load toward the
front of the trailer and 40% toward the rear. Readjust the load as needed.
Exceeding any load limit or improperly loading your vehicle and trailer can
cause a crash in which you can be seriously hurt or killed.
Check the loading of your vehicle and trailer carefully before starting to
drive.
WARNING
T ongue LoadTongue load