warning light Acura RDX 2016 User Guide
[x] Cancel search | Manufacturer: ACURA, Model Year: 2016, Model line: RDX, Model: Acura RDX 2016Pages: 81, PDF Size: 17.94 MB
Page 56 of 81
104 || 105
DRIVING
DRIVING
TABLE OF
CONTENTS
INDEX
VISUAL INDEX
VOICE COMMAND INDEX
SAFETY
INFORMATION
CLIENT
INFORMATION
INSTRUMENT PANEL
SPECIFICATIONS
VEHICLE
CONTROLS
MAINTENANCE
AUDIO AND
CONNECTIVITY
HANDLING THE UNEXPECTED
BLUETOOTH®
HANDSFREELINK®
DRIVING
ACURALINK®
NAVIGATION
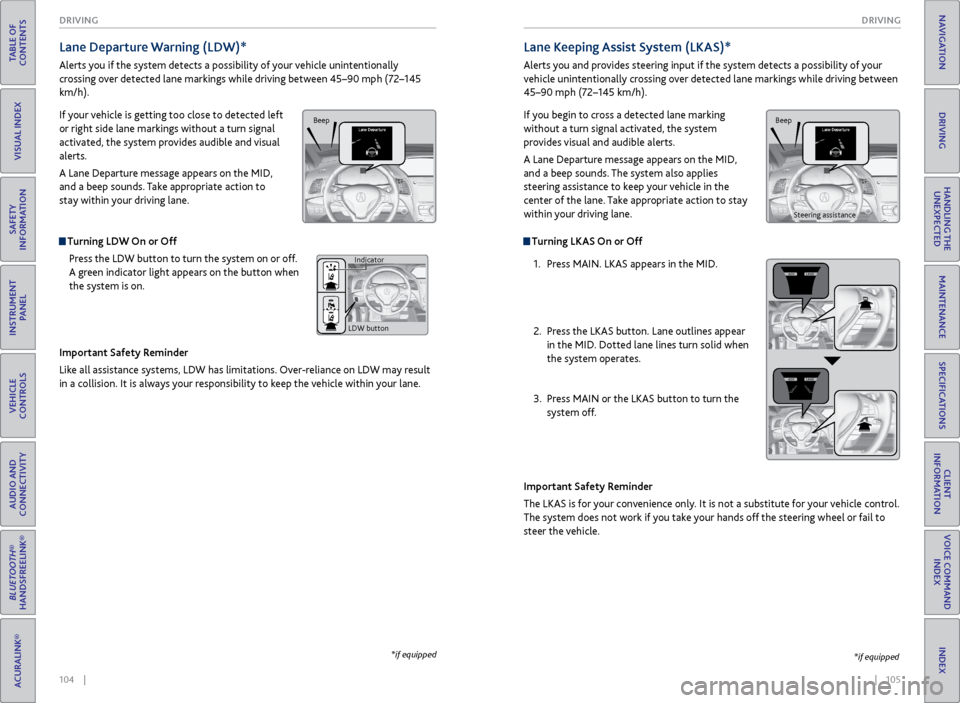
Turning LKAS On or Off
1. Press MAIN. LKAS appears in the MID.
2. Press the LKAS button. Lane outlines appear
in the MID. Dotted lane lines turn solid when
the system operates.
3. Press MAIN or the LKAS button to turn the
system off.
Lane Keeping Assist System (LKAS)*
Alerts you and provides steering input if the system detects a possibility of your
vehicle unintentionally crossing over detected lane markings while driving between
45–90 mph (72–145 km/h).
If you begin to cross a detected lane marking
without a turn signal activated, the system
provides visual and audible alerts.
A Lane Departure message appears on the MID,
and a beep sounds. The system also applies
steering assistance to keep your vehicle in the
center of the lane. Take appropriate action to stay
within your driving lane.
Important Safety Reminder
The LKAS is for your convenience only. It is not a substitute for your vehicle control.
The system does not work if you take your hands off the steering wheel or fail to
steer the vehicle.
*if equipped
Lane Departure Warning (LDW)*
Alerts you if the system detects a possibility of your vehicle unintentionally
crossing over detected lane markings while driving between 45–90 mph (72–145
km/h).
If your vehicle is getting too close to detected left
or right side lane markings without a turn signal
activated, the system provides audible and visual
alerts.
A Lane Departure message appears on the MID,
and a beep sounds. Take appropriate action to
stay within your driving lane.
Turning LDW On or Off
Press the LDW button to turn the system on or off.
A green indicator light appears on the button when
the system is on.
Important Safety Reminder
Like all assistance systems, LDW has limitations. Over-reliance on LDW may result
in a collision. It is always your responsibility to keep the vehicle within your lane.
*if equipped
Beep
Indicator
LDW button
Beep
Steering assistance
Page 57 of 81
106 || 107
DRIVING
DRIVING
TABLE OF
CONTENTS
INDEX
VISUAL INDEX
VOICE COMMAND INDEX
SAFETY
INFORMATION
CLIENT
INFORMATION
INSTRUMENT PANEL
SPECIFICATIONS
VEHICLE
CONTROLS
MAINTENANCE
AUDIO AND
CONNECTIVITY
HANDLING THE UNEXPECTED
BLUETOOTH®
HANDSFREELINK®
DRIVING
ACURALINK®
NAVIGATION
Blind Spot Information (BSI)*
Alerts you to a detected vehicle in your left or right blind spot while driving 20 mph
(32 km/h) or higher.
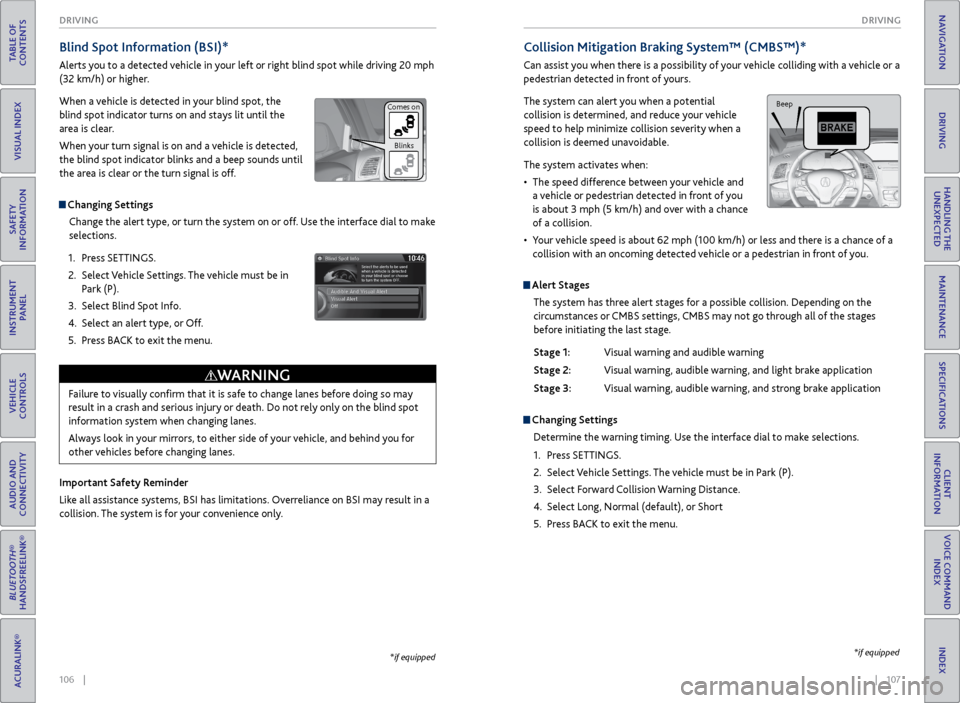
When a vehicle is detected in your blind spot, the
blind spot indicator turns on and stays lit until the
area is clear.
When your turn signal is on and a vehicle is detected,
the blind spot indicator blinks and a beep sounds until
the area is clear or the turn signal is off.
Changing Settings
Change the alert type, or turn the system on or off. Use the interface dial to make
selections.
1. Press SETTINGS.
2. Select Vehicle Settings. The vehicle must be in
Park (P).
3. Select Blind Spot Info.
4. Select an alert type, or Off.
5. Press BACK to exit the menu.
Important Safety Reminder
Like all assistance systems, BSI has limitations. Overreliance on BSI may result in a
collision. The system is for your convenience only.
Failure to visually confirm that it is safe to change lanes before doing so may
result in a crash and serious injury or death. Do not rely only on the blind spot
information system when changing lanes.
Always look in your mirrors, to either side of your vehicle, and behind you for
other vehicles before changing lanes.
WARNING
*if equipped
Comes on Blinks
Collision Mitigation Braking System™ (CMBS™)*
Can assist you when there is a possibility of your vehicle colliding with a vehicle or a
pedestrian detected in front of yours.
The system can alert you when a potential
collision is determined, and reduce your vehicle
speed to help minimize collision severity when a
collision is deemed unavoidable.
The system activates when:
• The speed difference between your vehicle and
a vehicle or pedestrian detected in front of you
is about 3 mph (5 km/h) and over with a chance
of a collision.
• Your vehicle speed is about 62 mph (100 km/h) or less and there is a chance of a
collision with an oncoming detected vehicle or a pedestrian in front of you.
Alert Stages
The system has three alert stages for a possible collision. Depending on the
circumstances or CMBS settings, CMBS may not go through all of the stages
before initiating the last stage.
Stage 1: Visual warning and audible warning
Stage 2: Visual warning, audible warning, and light brake application
Stage 3: Visual warning, audible warning, and strong brake application
Changing Settings
Determine the warning timing. Use the interface dial to make selections.
1. Press SETTINGS.
2. Select Vehicle Settings. The vehicle must be in Park (P).
3. Select Forward Collision Warning Distance.
4. Select Long, Normal (default), or Short
5. Press BACK to exit the menu.
Beep
*if equipped
Page 61 of 81
114 || 115
HANDLING THE UNEXPECTED
HANDLING THE UNEXPECTED
TABLE OF
CONTENTS
INDEX
VISUAL INDEX
VOICE COMMAND INDEX
SAFETY
INFORMATION
CLIENT
INFORMATION
INSTRUMENT PANEL
SPECIFICATIONS
VEHICLE
CONTROLS
MAINTENANCE
AUDIO AND
CONNECTIVITY
HANDLING THE UNEXPECTED
BLUETOOTH®
HANDSFREELINK®
DRIVING
ACURALINK®
NAVIGATION
Jump Starting
Turn off the power to electric devices, such as audio and lights. Turn off the engine,
then open the hood.
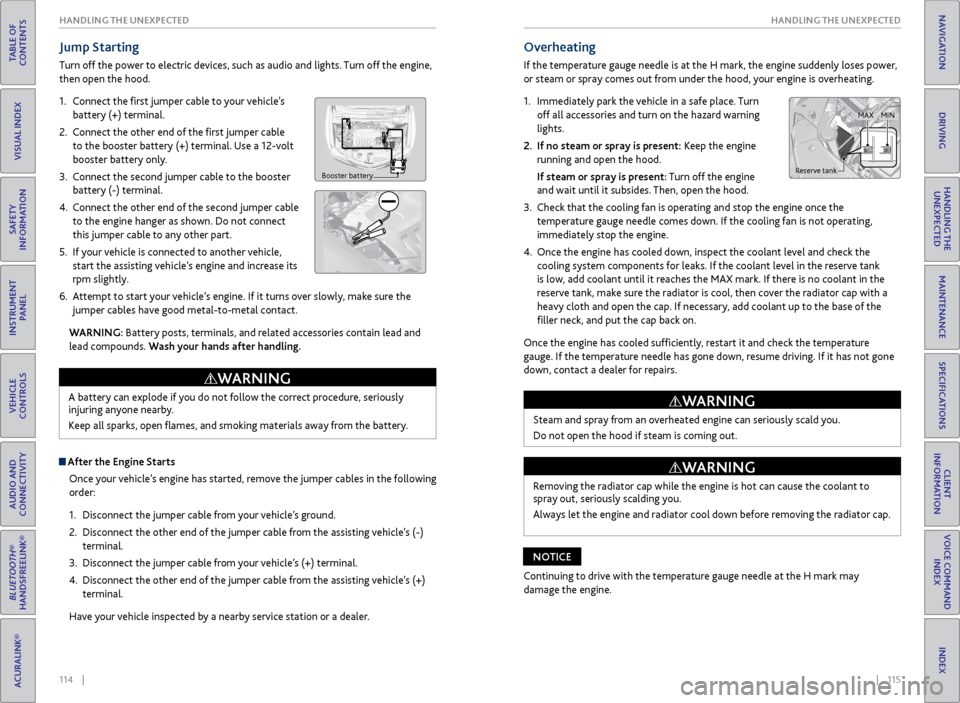
1. Connect the first jumper cable to your vehicle’s
battery (+) terminal.
2. Connect the other end of the first jumper cable
to the booster battery (+) terminal. Use a 12-volt
booster battery only.
3. Connect the second jumper cable to the booster
battery (-) terminal.
4. Connect the other end of the second jumper cable
to the engine hanger as shown. Do not connect
this jumper cable to any other part.
5. If your vehicle is connected to another vehicle,
start the assisting vehicle’s engine and increase its
rpm slightly.
6. Attempt to start your vehicle’s engine. If it turns over slowly, make sure the
jumper cables have good metal-to-metal contact.
WARNING: Battery posts, terminals, and related accessories contain lead and
lead compounds. Wash your hands after handling.
Booster battery
A battery can explode if you do not follow the correct procedure, seriously
injuring anyone nearby.
Keep all sparks, open flames, and smoking materials away from the battery.
WARNING
After the Engine Starts
Once your vehicle’s engine has started, remove the jumper cables in the following
order:
1. Disconnect the jumper cable from your vehicle’s ground.
2. Disconnect the other end of the jumper cable from the assisting vehicle’s (-)
terminal.
3. Disconnect the jumper cable from your vehicle’s (+) terminal.
4. Disconnect the other end of the jumper cable from the assisting vehicle’s (+)
terminal.
Have your vehicle inspected by a nearby service station or a dealer.
Overheating
If the temperature gauge needle is at the H mark, the engine suddenly loses power,
or steam or spray comes out from under the hood, your engine is overheating.
1. Immediately park the vehicle in a safe place. Turn
off all accessories and turn on the hazard warning
lights.
2. If no steam or spray is present: Keep the engine
running and open the hood.
If steam or spray is present: Turn off the engine
and wait until it subsides. Then, open the hood.
3. Check that the cooling fan is operating and stop the engine once the
temperature gauge needle comes down. If the cooling fan is not operating,
immediately stop the engine.
4. Once the engine has cooled down, inspect the coolant level and check the
cooling system components for leaks. If the coolant level in the reserve tank
is low, add coolant until it reaches the MAX mark. If there is no coolant in the
reserve tank, make sure the radiator is cool, then cover the radiator cap with a
heavy cloth and open the cap. If necessary, add coolant up to the base of the
filler neck, and put the cap back on.
Once the engine has cooled sufficiently, restart it and check the temperature
gauge. If the temperature needle has gone down, resume driving. If it has not gone
down, contact a dealer for repairs.
Steam and spray from an overheated engine can seriously scald you.
Do not open the hood if steam is coming out.
WARNING
Removing the radiator cap while the engine is hot can cause the coolant to
spray out, seriously scalding you.
Always let the engine and radiator cool down before removing the radiator cap.
WARNING
Continuing to drive with the temperature gauge needle at the H mark may
damage the engine.
NOTICE
Reserve tank MAX
MIN
Page 63 of 81

118 || 119
HANDLING THE UNEXPECTED
HANDLING THE UNEXPECTED
TABLE OF
CONTENTS
INDEX
VISUAL INDEX
VOICE COMMAND INDEX
SAFETY
INFORMATION
CLIENT
INFORMATION
INSTRUMENT PANEL
SPECIFICATIONS
VEHICLE
CONTROLS
MAINTENANCE
AUDIO AND
CONNECTIVITY
HANDLING THE UNEXPECTED
BLUETOOTH®
HANDSFREELINK®
DRIVING
ACURALINK®
NAVIGATION
Tire Pressure Monitoring System (TPMS) - Required Federal
Explanation
Each tire, including the spare (if provided), should be checked monthly
when cold and inflated to the inflation pressure recommended by the
vehicle manufacturer on the vehicle placard or tire inflation pressure
label.
(If your vehicle has tires of a different size than the size indicated on the
vehicle placard or tire inflation pressure label, you should determine the
proper tire inflation pressure for those tires.)
As an added safety feature, your vehicle has been equipped with a tire
pressure monitoring system (TPMS) that illuminates a low tire
pressure telltale when one or more of your tires is significantly
under-inflated.
Accordingly, when the low tire pressure telltale illuminates, you should
stop and check your tires as soon as possible, and inflate them to the
proper pressure.
Driving on a significantly under-inflated tire causes the tire to overheat
and can lead to tire failure. Under-inflation also reduces fuel efficiency
and tire tread life, and may affect the vehicle’s handling and stopping
ability.
Please note that the TPMS is not a substitute for proper tire
maintenance, and it is the driver’s responsibility to maintain correct
tire pressure, even if under-inflation has not reached the level to trigger
illumination of the TPMS low tire pressure telltale.
Your vehicle has also been equipped with a TPMS malfunction indicator
to indicate when the system is not operating properly. The TPMS
malfunction indicator is combined with the low tire pressure telltale.
When the system detects a malfunction, the telltale will flash for
approximately one minute and then remain continuously illuminated.
This sequence will continue upon subsequent vehicle start-ups as long as
the malfunction exists.
When the malfunction indicator is illuminated, the system may not be
able to detect or signal low tire pressure as intended.
TPMS malfunctions may occur for a variety of reasons, including the
installation of replacement or alternate tires or wheels on the vehicle
that prevent the TPMS from functioning properly.
Always check the TPMS malfunction telltale after replacing one or
more tires or wheels on your vehicle to ensure that the replacement
or alternate tires and wheels allow the TPMS to continue to function
properly.Tire Repair Kit*
If a tire has a small puncture, you can use the tire repair kit to temporarily repair it.
The puncture must be smaller than 3/16-inch (4 mm) and not in the tire sidewall.
Go to a dealer to have the full-size tire permanently repaired or replaced.
Before Repairing the Tire
1. Park the vehicle on firm, level, non-slippery surface.
2. Make sure the vehicle is in Park (P), and apply the parking brake.
3. Turn on the hazard warning lights, and turn the vehicle off.
Getting Ready to Repair the Tire
1. Open the cargo area floor lid.
2. Take the kit out of the tool box.
3. Place the kit face up on flat ground near the
punctured tire and away from traffic. Do not
place the kit on its side.
4. Follow the instructions in the kit to repair the
tire.
Do not use an unapproved puncture-repairing agent other than the one provided
in the kit that came with your vehicle. If a different agent is used, you may
permanently damage the tire pressure sensor.
NOTICE
Floor lid
Tire repair kit
*if equipped
Page 64 of 81

120 || 121
HANDLING THE UNEXPECTED
HANDLING THE UNEXPECTED
TABLE OF
CONTENTS
INDEX
VISUAL INDEX
VOICE COMMAND INDEX
SAFETY
INFORMATION
CLIENT
INFORMATION
INSTRUMENT PANEL
SPECIFICATIONS
VEHICLE
CONTROLS
MAINTENANCE
AUDIO AND
CONNECTIVITY
HANDLING THE UNEXPECTED
BLUETOOTH®
HANDSFREELINK®
DRIVING
ACURALINK®
NAVIGATION
Changing a Flat Tire
If a tire goes flat while driving, grasp the steering wheel firmly, and brake gradually
to reduce speed. Stop in a safe place. Replace the flat tire with the compact
spare tire*. Go to a dealer as soon as possible to have the full-size tire repaired or
replaced.
Getting Ready to Change the Tire
Park the vehicle on a firm, level, non-slippery surface. Move the shift lever to Park
(P), and apply the parking brake. Turn the hazard warning lights on and turn the
vehicle off.
1. Open the tailgate. Turn on the cargo lights on
the inside of the tailgate, if necessary (see page
34). Open the cargo area floor lid.
2. Take the wheel nut wrench and jack handle bar
out of the cargo area.
3. Unscrew the wing bolt, and remove the spacer
cone. Then, remove the spare tire.
4. Take the jack out of the spare tire area.
5. Loosen each wheel nut about one turn using the
wheel nut wrench.
Spare tire
*if equipped
Setting Up the Jack
1. Place the jack under the jacking point closest to
the tire to be changed.
2. Turn the end bracket (as shown in the image)
clockwise until the top of the jack contacts the
jacking point. Make sure that the jacking point
tab is resting in the jack notch.
3. Raise the vehicle, using the jack handle bar and
the jack handle, until the tire is off the ground.
The following instructions must be followed to use the jack safely:
• Do not use the jack with people or luggage in the vehicle.
• Use the jack provided in your vehicle. Other jacks may not support the weight
(“load”) or fit the jacking point.
• Do not use while the engine is running.
• Use only where the ground is firm and level.
• Use only at the jacking points.
• Do not get in the vehicle while using the jack.
• Do not put anything on top of or underneath the jack.
The vehicle can easily roll off the jack, seriously injuring anyone underneath.
Follow the directions for changing a tire exactly, and never get under the
vehicle when it is supported only by the jack.
WARNING
Jack
handle
bar
Wheel nut wrench as jack handle
Page 65 of 81
122 || 123
HANDLING THE UNEXPECTED
HANDLING THE UNEXPECTED
TABLE OF
CONTENTS
INDEX
VISUAL INDEX
VOICE COMMAND INDEX
SAFETY
INFORMATION
CLIENT
INFORMATION
INSTRUMENT PANEL
SPECIFICATIONS
VEHICLE
CONTROLS
MAINTENANCE
AUDIO AND
CONNECTIVITY
HANDLING THE UNEXPECTED
BLUETOOTH®
HANDSFREELINK®
DRIVING
ACURALINK®
NAVIGATION
Replacing the Flat Tire
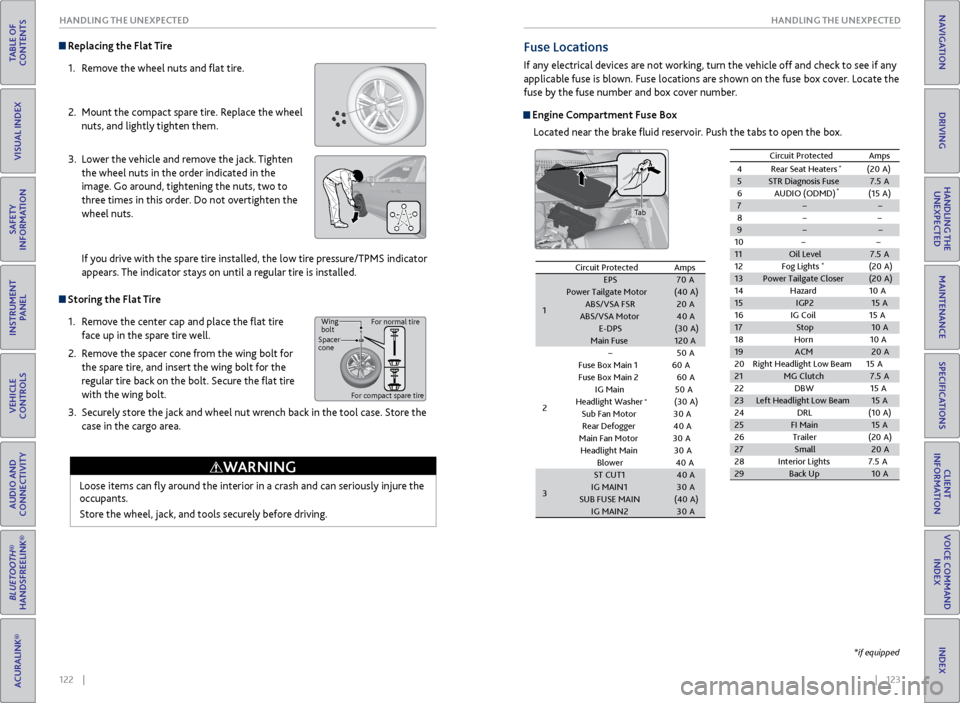
1. Remove the wheel nuts and flat tire.
2. Mount the compact spare tire. Replace the wheel
nuts, and lightly tighten them.
3. Lower the vehicle and remove the jack. Tighten
the wheel nuts in the order indicated in the
image. Go around, tightening the nuts, two to
three times in this order. Do not overtighten the
wheel nuts.
If you drive with the spare tire installed, the low tire pressure/TPMS indicator
appears. The indicator stays on until a regular tire is installed.
Storing the Flat Tire
1. Remove the center cap and place the flat tire
face up in the spare tire well.
2. Remove the spacer cone from the wing bolt for
the spare tire, and insert the wing bolt for the
regular tire back on the bolt. Secure the flat tire
with the wing bolt.
3. Securely store the jack and wheel nut wrench back in the tool case. Store the
case in the cargo area.
Loose items can fly around the interior in a crash and can seriously injure the
occupants.
Store the wheel, jack, and tools securely before driving.
WARNING
Wing
bolt
Spacer
cone For normal tire
For compact spare tire
Fuse Locations
If any electrical devices are not working, turn the vehicle off and check to see if any
applicable fuse is blown. Fuse locations are shown on the fuse box cover. Locate the
fuse by the fuse number and box cover number.
Engine Compartment Fuse Box Located near the brake fluid reservoir. Push the tabs to open the box.
Circuit ProtectedAmps
1
EPS70APower Tailgate Motor(40 A)ABS/VSA FS R20AABS/VSA Moto r40AE-DPS(30A )Main Fuse120A
2
�50 A
Fuse Box Main 160AFuse Box Main 260A
IG Main 50A
Headlight Washer(30 A)
Sub Fan Motor30A
Rear Defogger 40A
Main Fan Moto
r30A
Headlight Main 30A
Blowe
r40A
3
ST CUT140 AIG MAIN130ASUB FUSE MAIN(40 A)IG MAIN230A
4R ear Seat Heaters (20A )
5 STR Diagnosis Fus e7.5A
6A UDIO (ODMD) (15A)
7 � �
8� �
9� �
10 ��
11 Oil Level 7.5A
12 Fog Lights
*(20A )
13 Power Tailgate Closer (20A )
14 Hazard 10A
15 IGP2 15A
16 IG Coil 15A
17 Stop 10A
18 Horn1 0A
19 ACM 20A
20 Right Headlight Low Bea m15A
21 MG Clutch 7.5A
22 DBW1 5A
23 Left Headlight Low Beam 15A
24 DRL (10A )
25 FI Main 15A
26 Trailer (20A )
27 Small 20A
28 Interior Lights 7.5A
29 Back Up 10A
Circuit Protecte
dAmps
*
*
*
Circuit Protected Amps
1 EPS
70A
Power Tailgate Motor (40A)
ABS/VSA FS R 20A
ABS/VSA Moto r40A
E-DPS (30A)
Main Fuse 120A
2 �
50A
Fuse Box Main 160A
Fuse Box Main 260A
IG Main 50A
Headlight Washer (30A)
Sub Fan Moto r30A
Rear Defogger 40A
Main Fan Moto r30A
Headlight Main 30A
Blowe r4 0A
3 ST CUT1
40A
IG MAIN1 30A
SUB FUSE MAIN (40A)
IG MAIN2 30A
4R ear Seat Heaters (20A )5STR Diagnosis Fus e7.5A
6A UDIO (ODMD) (15A)
7��
8� �
9��
10��11Oil Level7.5A
12 Fog Lights*(20A )13Power Tailgate Closer(20A )
14 Hazard 10A
15IGP215A
16 IG Coil 15A
17Stop10 A
18 Horn10A19ACM20A
20 Right Headlight Low Bea m15A
21MG Clutch7.5A
22 DBW15A23Left Headlight Low Beam15A
24 DRL (10A )
25FI Main15A
26 Trailer (20A )
27Small20A
28 Interior Lights 7.5A
29Back Up10A
Circuit Protecte dAmps
*
*
*
*if equipped
Tab
Page 81 of 81
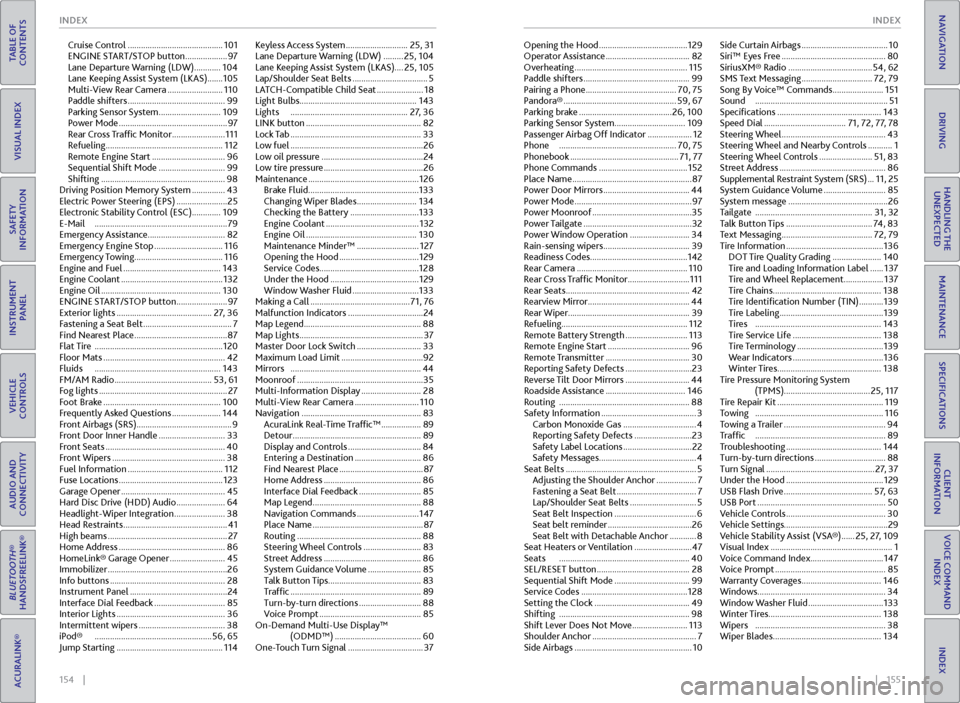
154 || 155
INDEX
INDEX
TABLE OF
CONTENTS
INDEX
VISUAL INDEX
VOICE COMMAND INDEX
SAFETY
INFORMATION
CLIENT
INFORMATION
INSTRUMENT PANEL
SPECIFICATIONS
VEHICLE
CONTROLS
MAINTENANCE
AUDIO AND
CONNECTIVITY
HANDLING THE UNEXPECTED
BLUETOOTH®
HANDSFREELINK®
DRIVING
ACURALINK®
NAVIGATION
Cruise Control ........................................... 101
ENGINE START/STOP button ................... 97
Lane Departure Warning (LDW) ............ 104
Lane Keeping Assist System (LKAS) ....... 105
Multi-View Rear Camera ......................... 110
Paddle shifters ............................................ 99
Parking Sensor System ............................ 109
Power Mode ................................................. 97
Rear Cross Traffic Monitor ........................ 111
Refueling ..................................................... 112
Remote Engine Start ................................. 96
Sequential Shift Mode .............................. 99
Shifting ........................................................ 98
Driving Position Memory System ............... 43
Electric Power Steering (EPS) ....................... 25
Electronic Stability Control (ESC)............. 109
E-Mail ............................................................ 79
Emergency Assistance ...................................82
Emergency Engine Stop ............................... 116
Emergency Towing ........................................ 116
Engine and Fuel ............................................ 143
Engine Coolant .............................................. 132
Engine Oil ...................................................... 130
ENGINE START/STOP button ....................... 97
Exterior lights ........................................... 27, 36
Fastening a Seat Belt ........................................ 7
Find Nearest Place .......................................... 87
Flat Tire .......................................................... 120
Floor Mats ....................................................... 42
Fluids ......................................................... 143
FM/AM Radio ............................................ 53, 61
Fog lights .......................................................... 27
Foot Brake ..................................................... 100
Frequently Asked Questions ...................... 144
Front Airbags (SRS) ........................................... 9
Front Door Inner Handle .............................. 33
Front Seats ...................................................... 40
Front Wipers ................................................... 38
Fuel Information ........................................... 112
Fuse Locations ............................................... 123
Garage Opener ............................................... 45
Hard Disc Drive (HDD) Audio ...................... 64
Headlight-Wiper Integration ....................... 38
Head Restraints ............................................... 41
High beams ...................................................... 27
Home Address ................................................ 86
HomeLink® Garage Opener ......................... 45
Immobilizer ...................................................... 26
Info buttons .................................................... 28
Instrument Panel ............................................ 24
Interface Dial Feedback ................................ 85
Interior Lights ................................................. 36
Intermittent wipers ....................................... 38
iPod® ..................................................... 56, 65
Jump Starting ................................................ 114Keyless Access System ............................
25, 31
Lane Departure Warning (LDW) ......... 25, 104
Lane Keeping Assist System (LKAS) ....25, 105
Lap/Shoulder Seat Belts .................................. 5
LATCH-Compatible Child Seat ..................... 18
Light Bulbs ..................................................... 143
Lights ..................................................... 27, 36
LINK button .................................................... 82
Lock Tab ........................................................... 33
Low fuel ............................................................ 26
Low oil pressure .............................................. 24
Low tire pressure ............................................. 26
Maintenance .................................................. 126
Brake Fluid .................................................. 133
Changing Wiper Blades ........................... 134
Checking the Battery ............................... 133
Engine Coolant .......................................... 132
Engine Oil .................................................. 130
Maintenance Minder™ ............................ 127
Opening the Hood .................................... 129
Service Codes ............................................. 128
Under the Hood ........................................ 129
Window Washer Fluid .............................. 133
Making a Call ............................................. 71, 76
Malfunction Indicators .................................. 24
Map Legend ..................................................... 88
Map Lights ........................................................ 37
Master Door Lock Switch ............................. 33
Maximum Load Limit ..................................... 92
Mirrors ........................................................... 44
Moonroof ......................................................... 35
Multi-Information Display ........................... 28
Multi-View Rear Camera ............................. 110
Navigation ...................................................... 83
AcuraLink Real-Time Traffic™ .................. 89
Detour .......................................................... 89
Display and Controls ................................. 84
Entering a Destination .............................. 86
Find Nearest Place ...................................... 87
Home Address ............................................ 86
Interface Dial Feedback ............................ 85
Map Legend ................................................. 88
Navigation Commands ............................ 147
Place Name .................................................. 87
Routing ........................................................ 88
Steering Wheel Controls .......................... 83
Street Address ............................................ 86
System Guidance Volume ........................ 85
Talk Button Tips .......................................... 83
Traffic ........................................................... 89
Turn-by-turn directions ............................ 88
Voice Prompt .............................................. 85
On-Demand Multi-Use Display™ (ODMD™) ....................................... 60
One-Touch Turn Signal .................................. 37Opening the Hood ........................................
129
Operator Assistance ...................................... 82
Overheating ................................................... 115
Paddle shifters ................................................ 99
Pairing a Phone ......................................... 70, 75
Pandora® ................................................... 59, 67
Parking brake .......................................... 26, 100
Parking Sensor System ................................ 109
Passenger Airbag Off Indicator .................... 12
Phone ..................................................... 70, 75
Phonebook ................................................. 71, 77
Phone Commands ........................................ 152
Place Name ...................................................... 87
Power Door Mirrors ....................................... 44
Power Mode ..................................................... 97
Power Moonroof ............................................. 35
Power Tailgate ................................................. 32
Power Window Operation ........................... 34
Rain-sensing wipers ....................................... 39
Readiness Codes ............................................ 142
Rear Camera .................................................. 110
Rear Cross Traffic Monitor ............................ 111
Rear Seats ........................................................ 42
Rearview Mirror ..............................................
44
Rear Wiper ....................................................... 39
Refueling ......................................................... 112
Remote Battery Strength ............................ 113
Remote Engine Start ..................................... 96
Remote Transmitter ...................................... 30
Reporting Safety Defects .............................. 23
Reverse Tilt Door Mirrors ............................. 44
Roadside Assistance .................................... 146
Routing ........................................................... 88
Safety Information ........................................... 3
Carbon Monoxide Gas ................................. 4
Reporting Safety Defects .......................... 23
Safety Label Locations ............................... 22
Safety Messages ............................................ 4
Seat Belts ........................................................... 5
Adjusting the Shoulder Anchor .................. 7
Fastening a Seat Belt .................................... 7
Lap/Shoulder Seat Belts .............................. 5
Seat Belt Inspection ..................................... 6
Seat belt reminder ...................................... 26
Seat Belt with Detachable Anchor ............ 8
Seat Heaters or Ventilation .......................... 47
Seats ........................................................... 40
SEL/RESET button .......................................... 28
Sequential Shift Mode .................................. 99
Service Codes ................................................ 128
Setting the Clock ........................................... 49
Shifting ........................................................... 98
Shift Lever Does Not Move ......................... 113
Shoulder Anchor ............................................... 7
Side Airbags ..................................................... 10Side Curtain Airbags .......................................
10
Siri™ Eyes Free ............................................... 80
SiriusXM® Radio ...................................... 54, 62
SMS Text Messaging ................................ 72, 79
Song By Voice™ Commands ....................... 151
Sound ............................................................ 51
Specifications ............................................... 143
Speed Dial ..................................... 71, 72, 77, 78
Steering Wheel ............................................... 43
Steering Wheel and Nearby Controls ........... 1
Steering Wheel Controls ........................ 51, 83
Street Address ................................................ 86
Supplemental Restraint System (SRS) ... 11, 25
System Guidance Volume ............................ 85
System message ............................................. 26
Tailgate ..................................................... 31, 32
Talk Button Tips ....................................... 74, 83
Text Messaging ......................................... 72, 79
Tire Information ............................................ 136
DOT Tire Quality Grading ...................... 140
Tire and Loading Information Label ...... 137
Tire and Wheel Replacement.................. 137
Tire Chains ................................................. 138
Tire Identification Number (TIN) ........... 139
Tire Labeling ............................................... 139
Tires ......................................................... 143
Tire Service Life ........................................ 138
Tire Terminology ....................................... 139
Wear Indicators ......................................... 136
Winter Tires ............................................... 138
Tire Pressure Monitoring System (TPMS)....................................... 25, 117
Tire Repair Kit ................................................ 119
Towing .......................................................... 116
Towing a Trailer .............................................. 94
Traffic ........................................................... 89
Troubleshooting ........................................... 144
Turn-by-turn directions ................................ 88
Turn Signal ................................................. 27, 37
Under the Hood ............................................ 129
USB Flash Drive ........................................ 57, 63
USB Port .......................................................... 50
Vehicle Controls ............................................. 30
Vehicle Settings ............................................... 29
Vehicle Stability Assist (VSA®) ...... 25, 27, 109
Visual Index ....................................................... 1
Voice Command Index ................................. 147
Voice Prompt .................................................. 85
Warranty Coverages .................................... 146
Windows .......................................................... 34
Window Washer Fluid .................................. 133
Winter Tires ................................................... 138
Wipers ........................................................... 38
Wiper Blades ................................................. 134