timing Acura RDX 2016 Owner's Guide
[x] Cancel search | Manufacturer: ACURA, Model Year: 2016, Model line: RDX, Model: Acura RDX 2016Pages: 81, PDF Size: 17.94 MB
Page 18 of 81

28 || 29
INSTRUMENT P
ANEL
INSTRUMENT P ANEL
TABLE OF
CONTENTS
INDEX
VISUAL INDEX
VOICE COMMAND INDEX
SAFETY
INFORMATION
CLIENT
INFORMATION
INSTRUMENT PANEL
SPECIFICATIONS
VEHICLE
CONTROLS
MAINTENANCE
AUDIO AND
CONNECTIVITY
HANDLING THE UNEXPECTED
BLUETOOTH®
HANDSFREELINK®
DRIVING
ACURALINK®
NAVIGATION
Multi-Information Display
Consists of several displays that provide you with useful information.
Main Displays
Odometer,
Outside temperature Trip A,
Outside temperature Trip B,
Outside temperature
Lower Displays
Models with black-and-white display
Main Displays
Odometer,
Outside temperature Trip A,
Outside temperature Trip B,
Outside temperature
Lower Displays
Models with color display
Main display
Vehicle settings Average/instant
fuel economy
Tire pressure for each tire Range
Engine oil lifeElapsed time Turn-by-turn directions*Average speed
Compass*
Main display
Vehicle settings Average/instant
fuel economy
Engine oil life Range
Tire pressure for each tire Elapsed time
Average speed
SEL/RESET button: Scroll
through lower displays. Info (p/q) buttons:
Scroll through upper
displays.
Vehicle Settings
Use the MID to customize certain vehicle features when the vehicle is in Park (P).
You can also use the SETTINGS button* (see page 48).
An example of how to change the Trip A reset timing setting is below. Use the
Info and SEL/RESET buttons to make and enter selections.
1. Scroll to the Vehicle Settings menu and select it.
2. Scroll to Meter Setup and select it.
3. Scroll to “Trip A” Reset Timing and select it.
4. Scroll through the options, and select the one you want.
5. Scroll to Exit, and select it to exit the menus.
*if equipped
Page 57 of 81

106 || 107
DRIVING
DRIVING
TABLE OF
CONTENTS
INDEX
VISUAL INDEX
VOICE COMMAND INDEX
SAFETY
INFORMATION
CLIENT
INFORMATION
INSTRUMENT PANEL
SPECIFICATIONS
VEHICLE
CONTROLS
MAINTENANCE
AUDIO AND
CONNECTIVITY
HANDLING THE UNEXPECTED
BLUETOOTH®
HANDSFREELINK®
DRIVING
ACURALINK®
NAVIGATION
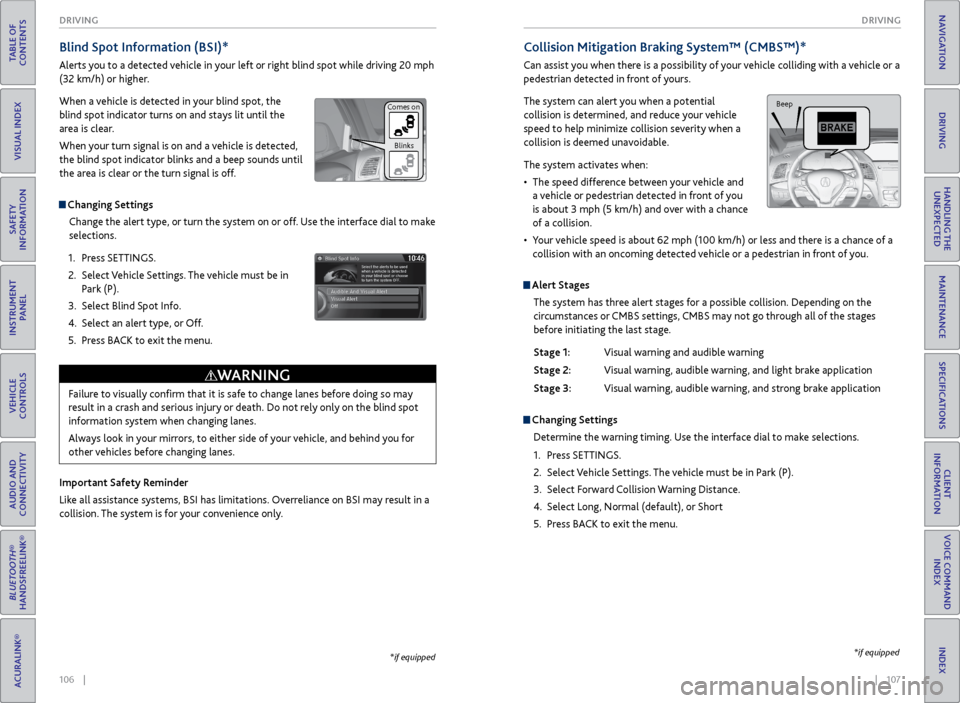
Blind Spot Information (BSI)*
Alerts you to a detected vehicle in your left or right blind spot while driving 20 mph
(32 km/h) or higher.
When a vehicle is detected in your blind spot, the
blind spot indicator turns on and stays lit until the
area is clear.
When your turn signal is on and a vehicle is detected,
the blind spot indicator blinks and a beep sounds until
the area is clear or the turn signal is off.
Changing Settings
Change the alert type, or turn the system on or off. Use the interface dial to make
selections.
1. Press SETTINGS.
2. Select Vehicle Settings. The vehicle must be in
Park (P).
3. Select Blind Spot Info.
4. Select an alert type, or Off.
5. Press BACK to exit the menu.
Important Safety Reminder
Like all assistance systems, BSI has limitations. Overreliance on BSI may result in a
collision. The system is for your convenience only.
Failure to visually confirm that it is safe to change lanes before doing so may
result in a crash and serious injury or death. Do not rely only on the blind spot
information system when changing lanes.
Always look in your mirrors, to either side of your vehicle, and behind you for
other vehicles before changing lanes.
WARNING
*if equipped
Comes on Blinks
Collision Mitigation Braking System™ (CMBS™)*
Can assist you when there is a possibility of your vehicle colliding with a vehicle or a
pedestrian detected in front of yours.
The system can alert you when a potential
collision is determined, and reduce your vehicle
speed to help minimize collision severity when a
collision is deemed unavoidable.
The system activates when:
• The speed difference between your vehicle and
a vehicle or pedestrian detected in front of you
is about 3 mph (5 km/h) and over with a chance
of a collision.
• Your vehicle speed is about 62 mph (100 km/h) or less and there is a chance of a
collision with an oncoming detected vehicle or a pedestrian in front of you.
Alert Stages
The system has three alert stages for a possible collision. Depending on the
circumstances or CMBS settings, CMBS may not go through all of the stages
before initiating the last stage.
Stage 1: Visual warning and audible warning
Stage 2: Visual warning, audible warning, and light brake application
Stage 3: Visual warning, audible warning, and strong brake application
Changing Settings
Determine the warning timing. Use the interface dial to make selections.
1. Press SETTINGS.
2. Select Vehicle Settings. The vehicle must be in Park (P).
3. Select Forward Collision Warning Distance.
4. Select Long, Normal (default), or Short
5. Press BACK to exit the menu.
Beep
*if equipped
Page 68 of 81

128 || 129
MAINTENANCE
MAINTENANCE
TABLE OF
CONTENTS
INDEX
VISUAL INDEX
VOICE COMMAND INDEX
SAFETY
INFORMATION
CLIENT
INFORMATION
INSTRUMENT PANEL
SPECIFICATIONS
VEHICLE
CONTROLS
MAINTENANCE
AUDIO AND
CONNECTIVITY
HANDLING THE UNEXPECTED
BLUETOOTH®
HANDSFREELINK®
DRIVING
ACURALINK®
NAVIGATION
Maintenance Minder Service Codes
These codes indicate what services are due on your vehicle.
*1:If the message SERVICE DUE NOW does not appear more than 12 months after the display
is reset, change the engine oil every year.
#:See information on maintenance and emissions warranty.
*2:If you drive in dusty conditions, replace the air cleaner element every \
15,000 miles (24,000 km).
COD EMaintenance Main Items
A
�Replace engine oil*1
B�Replace engine oil*1 and oil �lter
�Inspect front and rear brakes
�Check parking brake ad justment
�Check expiration date for temporary tire repair kit bottle
�Inspect tie rod ends, steering gearbox, and boots
�Inspect suspension component s
�Inspect driveshaft boots
�Inspect brake hoses and lines (including ABS/VSA)
�Inspect all �uid levels and condition of �uids
�Inspect exhaust system#
�Inspect fuel lines and connections#
*3:If you drive primarily in urban areas that have high concentrations of s\
oot in the air from industryand diesel-powered vehicles, replace the dust and pollen �lter every \
15,000 miles (24,000 km).*4:Driving in mountainous areas at very low vehicle speeds or trailer towin\
g results in higher
transmission and transfer temperatures. This requires transmission and t\
ransfer �uid changes more
frequently than recommended by the Maintenance Minder. If you regularly drive your vehicle under
these conditions, have the transmission �uid changed at 60,000 miles \
(100,000 km), then ever y
30,000 miles (48,000 km).
*5: If you drive regularly in very high temperatures (over 110 °F/43 °C), in very low temperatures
(under -20 °F/-29 °C), or tow a trailer, replace every 60,000 mi\
les (100,000 km).
CODEMaintenance Sub Item s
1
�Rotate tire s
2�Replace air cleaner elemen t*2
�Replace dust and pollen �lte r*3
�Inspect drive belt
3
�Replace transmission �uid*4
4�Replace spark plugs
�Replace timing belt and inspect water pump*5
�Inspect valve clearance
5
�Replace engine coolant
6�Replace rear differential �uid*
(if equipped )
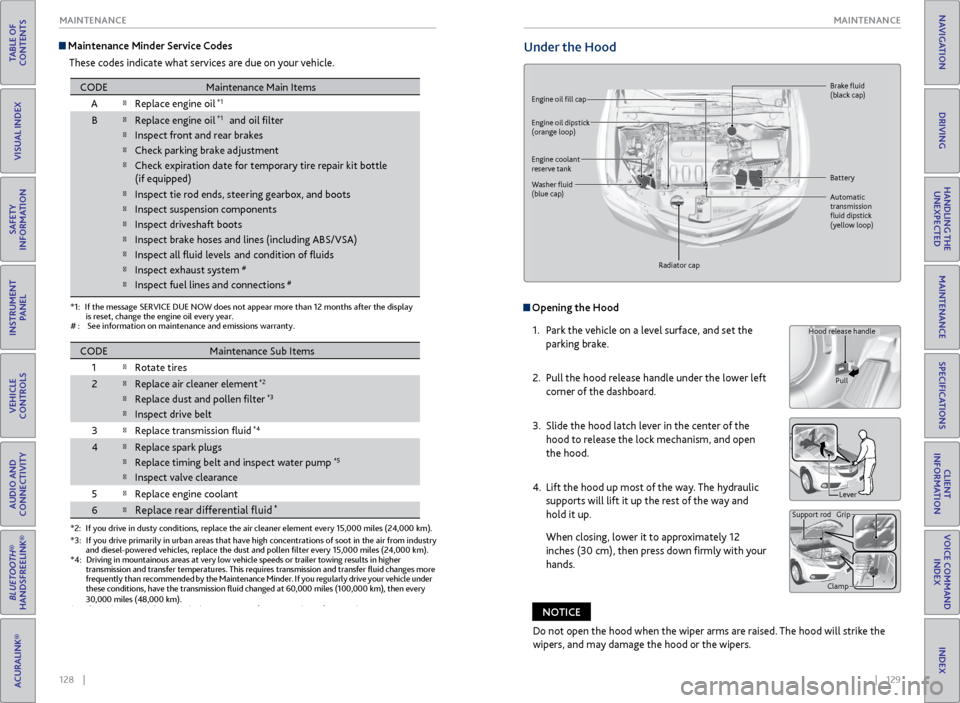
Under the Hood
Opening the Hood
1. Park the vehicle on a level surface, and set the
parking brake.
2. Pull the hood release handle under the lower left
corner of the dashboard.
3. Slide the hood latch lever in the center of the
hood to release the lock mechanism, and open
the hood.
4. Lift the hood up most of the way. The hydraulic
supports will lift it up the rest of the way and
hold it up.
When closing, lower it to approximately 12
inches (30 cm), then press down firmly with your
hands.
Hood release handle
Pull
Lever
Support rod Grip
Clamp
Engine oil fill cap Brake
fluid
(black cap)
Automatic
transmission
fluid dipstick
(yellow loop)
Washer
fluid
(blue cap) Battery
Engine coolant
reserve tank
Radiator cap
Engine oil dipstick
(orange loop)
Do not open the hood when the wiper arms are raised. The hood will strike the
wipers, and may damage the hood or the wipers.
NOTICE