climate control Acura RDX 2016 User Guide
[x] Cancel search | Manufacturer: ACURA, Model Year: 2016, Model line: RDX, Model: Acura RDX 2016Pages: 445, PDF Size: 15.25 MB
Page 181 of 445
180
Controls
Climate Control System
Using Automatic Climate Control
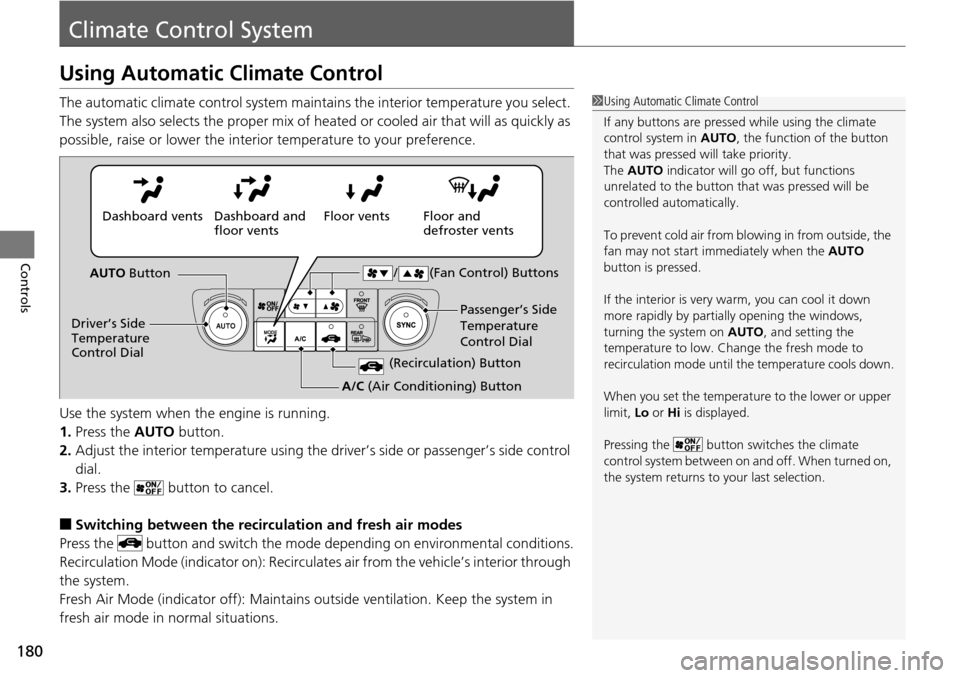
The automatic climate control system maintains the interior temperature you select.
The system also selects the proper mix of heated or cooled air that will as quickly as
possible, raise or lower the interior temperature to your preference.
Use the system when the engine is running.
1. Press the AUTO button.
2. Adjust the interior temperature using the dr iver’s side or passenger’s side control
dial.
3. Press the button to cancel.
■Switching between the recirculation and fresh air modes
Press the button and switch the mode depending on environmental conditions.
Recirculation Mode (indicator on): Recirculates air from the vehicle’s interior through
the system.
Fresh Air Mode (indicator off): Maintains outside ventilation. Keep the system in
fresh air mode in normal situations.
1 Using Automatic Climate Control
If any buttons are presse d while using the climate
control system in AUTO, the function of the button
that was pressed will take priority.
The AUTO indicator will go off, but functions
unrelated to the button th at was pressed will be
controlled automatically.
To prevent cold air from bl owing in from outside, the
fan may not start i mmediately when the AUTO
button is pressed.
If the interior is very warm, you can cool it down
more rapidly by partial ly opening the windows,
turning the system on AUTO, and setting the
temperature to low. Change the fresh mode to
recirculation mode until the temperature cools down.
When you set the temperature to the lower or upper
limit, Lo or Hi is displayed.
Pressing the button switches the climate
control system between on and off. When turned on,
the system returns to your last selection.
Floor and
defroster vents
Floor vents
Dashboard and
floor vents
Dashboard vents
AUTO Button
Driver’s Side
Temperature
Control Dial Passenger’s Side
Temperature
Control Dial
/ (Fan Control) Buttons
(Recirculation) Button
A/C
(Air Conditioning) Button
Page 182 of 445
181
uuClimate Control System uUsing Automatic Climate Control
Controls
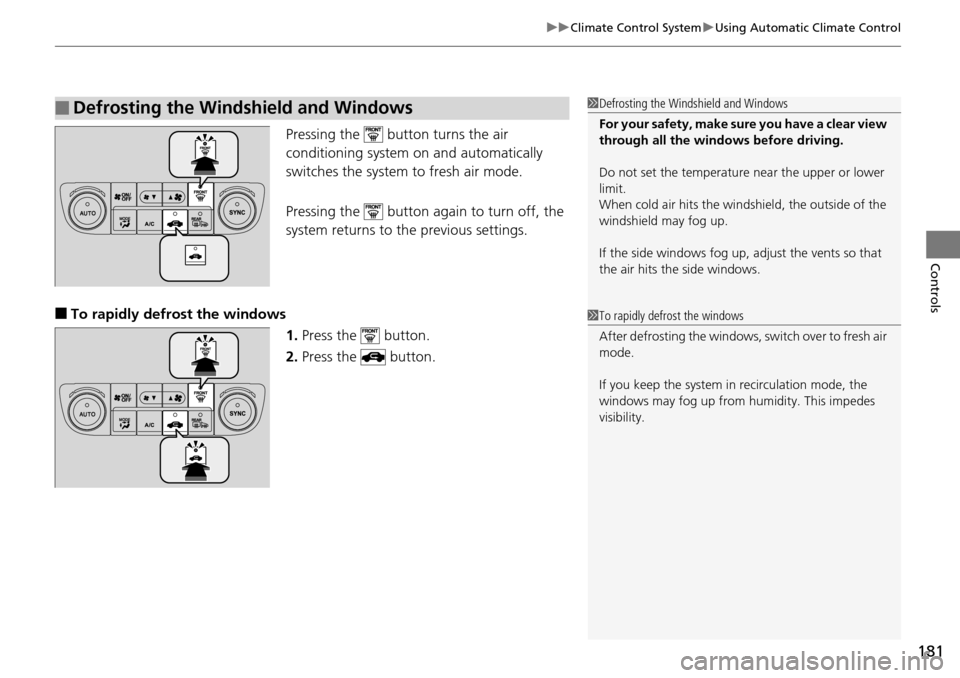
Pressing the button turns the air
conditioning system on and automatically
switches the system to fresh air mode.
Pressing the button again to turn off, the
system returns to the previous settings.
■To rapidly defrost the windows
1.Press the button.
2. Press the button.
■Defrosting the Windshield and Windows1Defrosting the Windshield and Windows
For your safety, make sure you have a clear view
through all the windows before driving.
Do not set the temperatur e near the upper or lower
limit.
When cold air hits the windshield, the outside of the
windshield may fog up.
If the side windows fog up, adjust the vents so that
the air hits th e side windows.
1To rapidly defrost the windows
After defrosting the windows, switch over to fresh air
mode.
If you keep the system in recirculation mode, the
windows may fog up from humidity. This impedes
visibility.
Page 183 of 445

182
uuClimate Control System uSynchronized Mode
Controls
Synchronized Mode
You can set the temperature synchronously for the driver side and the passenger
side in synchronized mode.
1. Press the SYNC button.
u The system will switch to synchronized mode.
2. Adjust the temperature using driver ’s side temperature control dial.
Press the SYNC button to return to dual mode.
1Synchronized Mode
When you press the button, the system changes
to synchronized mode.
When the system is in dua l mode, the driver side
temperature and the passenger side temperature can
be set separately.
In AUTO mode, the system adjusts each temperature
based on the information of the sunlight sensor and
the sun position updated by the navigation system’s
GPS.
Models with navigation system
Page 184 of 445
183
uuClimate Control System uAutomatic Climate Control Sensors
Controls
Automatic Climate Control Sensors
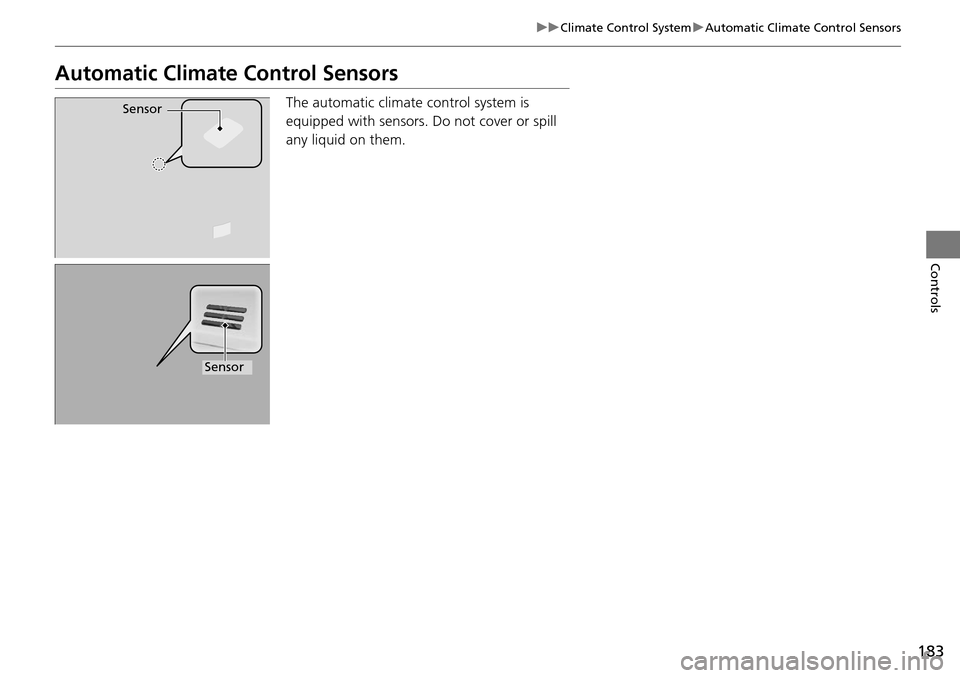
The automatic climate control system is
equipped with sensors. Do not cover or spill
any liquid on them.Sensor
Sensor
Page 265 of 445
264
uuTowing a Trailer uDriving Safely with a Trailer
Driving
Driving Safely with a Trailer
• Have the trailer properly serviced and keep it in good condition.
• Make sure that all the weights and load in the vehicle and trailer are within limits.
2Towing Load Limits P. 261
•Securely attach the hitch, safety chains, and other necessary parts to the trailer.
• Securely store all the items in and on the tr ailer so that they do not shift while
driving.
• Check if the lights and brakes on the trailer are working properly.
• Check the pressures of the traile r tires, including the spare.
• Drive slower than normal.
• Obey posted speed limits for vehicles with trailers.
• Use the
(D position when towing a trailer on level roads.
• Turn more slowly and with a wider turning arc than normal.
• Allow more time and distance for braking.
• Do not brake or turn suddenly.
• Monitor your temperature gauge. If it nears the red (Hot) mark, turn off the
climate control system and reduce speed. Pull to the side of the road safely to cool
down the engine if necessary.
• Shift to the
(S position if the transmission shifts frequently.
■Things You Need To Know Before Towing a Trailer
■Towing Speeds and Gears
■Turning and Braking
■Driving in Hilly Terrain
1Driving Safely with a Trailer
Operating speed when towing a trailer is restricted
up to 100km/h.
Parking
In addition to the normal precautions, place wheel
chocks at each of the trailer’s tires.
Page 269 of 445
268
Driving
When Driving
Starting the Engine
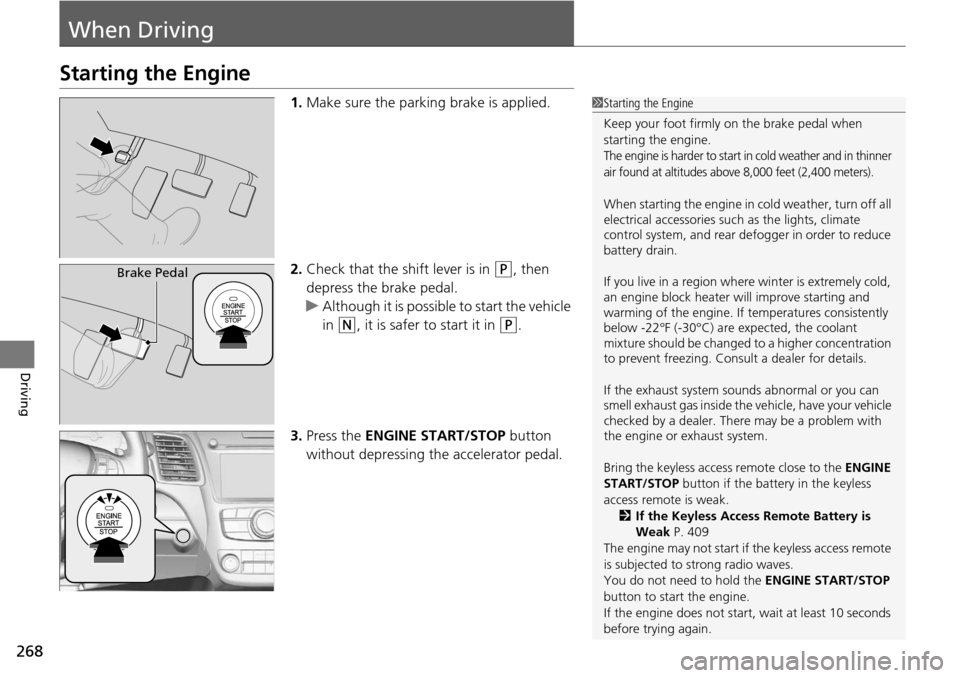
1.Make sure the parking brake is applied.
2. Check that the shift lever is in
(P, then
depress the brake pedal.
u Although it is possible to start the vehicle
in
(N, it is safer to start it in (P.
3. Press the ENGINE START/STOP button
without depressing the accelerator pedal.
1 Starting the Engine
Keep your foot firmly on the brake pedal when
starting the engine.
The engine is harder to start in cold weather and in thinner
air found at altitudes above 8,000 feet (2,400 meters).
When starting the engine in cold weather, turn off all
electrical accessories such as the lights, climate
control system, and rear de fogger in order to reduce
battery drain.
If you live in a region where winter is extremely cold,
an engine block heater will improve starting and
warming of the engine. If temperatures consistently
below -22°F (-30°C) are expected, the coolant
mixture should be changed to a higher concentration
to prevent freezing. Cons ult a dealer for details.
If the exhaust system sounds abnormal or you can
smell exhaust gas inside the vehicle, have your vehicle
checked by a dealer. There may be a problem with
the engine or exhaust system.
Bring the keyless access remote close to the ENGINE
START/STOP button if the batte ry in the keyless
access remote is weak. 2 If the Keyless Access Remote Battery is
Weak P. 409
The engine may not start if the keyless access remote
is subjected to strong radio waves.
You do not need to hold the ENGINE START/STOP
button to start the engine.
If the engine does not start, wait at least 10 seconds
before trying again.
Brake Pedal
Page 283 of 445

282
uuWhen Driving uFront Sensor Camera*
Driving
Front Sensor Camera*
The camera, used in systems su ch as LDW, LKAS, ACC, and CMBSTM, is designed to
detect an object that triggers any of the systems to operate its functions.
This camera is located behind the rearview
mirror.
To help reduce the likelihood that high interior
temperatures will cause the camera’s sensing
system to shut off, when parking, find a shady
area or face the front of the vehicle away from
the sun. If you use a re flective sun shade, do
not allow it to cover the camera housing.
Covering the camera can concentrate heat on
it.
■Camera Location and Handling Tips
1 Front Sensor Camera*
Never apply a film or attach any objects to
windshield, the hood, or the front grill that could
obstruct the camera’s fiel d of vision and cause the
system to operate abnormally.
Scratches, nicks, and othe r damage to the windshield
within the camera’s fiel d of vision can cause the
system to operate abnormall y. If this occurs, we
recommend that you replac e the windshield with a
genuine Acura replacement windshield. Making even
minor repairs within the ca mera’s field of vision or
installing an aftermarke t replacement windshield
may also cause the system to operate abnormally.
After replacing the winds hield, have a dealer
recalibrate the camera. Pr oper calibration of the
camera is necessary for the system to operate
properly.
Do not place an object on the top of the instrument
panel. It may reflect onto the windshield and prevent
the system from detecting lane lines properly.
If the Some Driver Assist Systems Cannot
Operate: Camera Temperature Too High message
appears:
•Use the climate control system to cool down the
interior and, if necessary, also use defroster mode
with the air flow directed towards the camera.
•Start driving the vehicle to lower the windshield
temperature, which cool s down the area around
the camera.
Front Sensor Camera
* Not available on all models
Page 340 of 445
339
Maintenance
This chapter discusses basic maintenance.
Before Performing MaintenanceInspection and Maintenance ............ 340
Safety When Performing Maintenance..... 341Parts and Fluids Used in Maintenance Service ........................................... 342
Maintenance Minder
TM..................... 343
Maintenance Under the Hood
Maintenance Items Under the Hood ..... 347Opening the Hood ........................... 348
Recommended Engine Oil ................ 349
Oil Check ......................................... 350
Adding Engine Oil ............................ 351
Changing the Engine Oil and Oil Filter ..... 352
Engine Coolant ................................ 354
Transmission Fluid ............................ 356
Brake Fluid ....................................... 357
Refilling Window Washer Fluid......... 358
Replacing Light Bulbs ....................... 359
Checking and Maintaining Wiper Blades.... 366Checking and Maintaining Tires
Checking Tires ................................. 370
Tire and Loading Information Label ...... 371Tire Labeling .................................... 371DOT Tire Quality Grading (U.S. Vehicles)....... 373Wear Indicators................................ 375
Tire Service Life ................................ 375 Tire and Wheel Replacement ........... 376
Tire Rotation .................................... 377
Winter Tires ..................................... 378
Battery ............................................... 379
Remote Transmitter Care Replacing the Button Battery ........... 380
Climate Control System Maintenance..... 382Cleaning
Interior Care .................................... 383
Exterior Care.................................... 385
Page 374 of 445
373
uuChecking and Maintaining Tires uDOT Tire Quality Grading (U.S. Vehicles)
Continued
Maintenance
DOT Tire Quality Grading (U.S. Vehicles)
The tires on your vehicle m eet all U.S. Federal Safety
Requirements. All tires are also graded for treadwear, traction,
and temperature performance according to Department of
Transportation (DOT) standards. The following explains these
gradings.
Quality grades can be found where applicable on th e tire sidewall
between tread shoulder and maximum section width.
The treadwear grade is a comparative rating based on the wear
rate of the tire when tested un der controlled conditions on a
specified government test course. For example, a tire graded 150
would wear one and one-half (1 1/2) times as well on the
government course as a tire graded 100. The relative performance
of tires depends upon the actual co nditions of their use, however,
and may depart significantly from the norm due to variations in
driving habits, service practi ces and differences in road
characteristics and climate.
■Uniform Tire Quality Grading
■Treadwear
1 Uniform Tire Quality Grading
For example:
Treadwear 200
Traction AA
Temperature A
All passenger car tires must conform
to Federal Safety Requirements in
addition to these grades.
Page 383 of 445
382
Maintenance
Climate Control System Maintenance
Dust and Pollen Filter
The climate control system is equipped wi th a dust and pollen filter that collects
pollen, dust, and other debris in the air. The Maintenance MinderTM messages will let
you know when to replace the filter.
We recommend that you replace the dust and pollen filter sooner when using your
vehicle in areas with high concentrations of dust.
1Dust and Pollen Filter
If the airflow from the climate control system
deteriorates noticeably, and the windows fog up
easily, the filter may need to be replaced. Please
contact a dealer for replacement.