ECO mode Acura RDX 2016 Workshop Manual
[x] Cancel search | Manufacturer: ACURA, Model Year: 2016, Model line: RDX, Model: Acura RDX 2016Pages: 445, PDF Size: 15.25 MB
Page 222 of 445
221
uuGeneral Information on the Audio System*uCompatible iPod, iPhone, and USB Flash Drives
Features
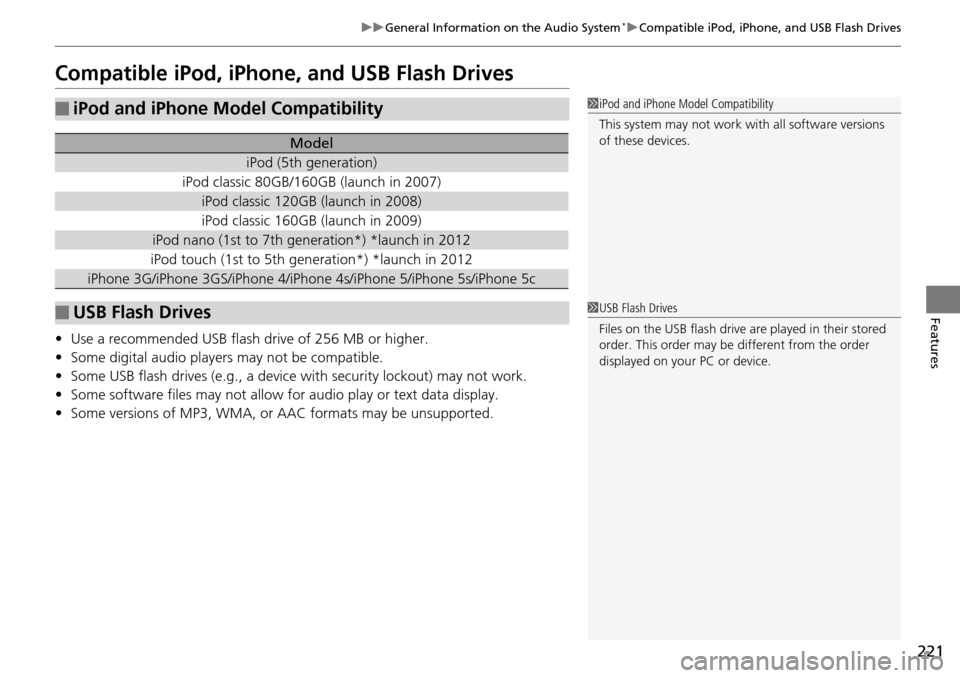
Compatible iPod, iPhone , and USB Flash Drives
•Use a recommended USB flash drive of 256 MB or higher.
• Some digital audio players may not be compatible.
• Some USB flash drives (e.g., a device with security lockout) may not work.
• Some software files may not allow for audio play or text data display.
• Some versions of MP3, WMA, or AAC formats may be unsupported.
■iPod and iPhone Model Compatibility
Model
iPod (5th generation)
iPod classic 80GB/160GB (launch in 2007)
iPod classic 120GB (launch in 2008)
iPod classic 160GB (launch in 2009)
iPod nano (1st to 7th generation*) *launch in 2012
iPod touch (1st to 5th generation*) *launch in 2012
iPhone 3G/iPhone 3GS/iPhone 4/iPho ne 4s/iPhone 5/iPhone 5s/iPhone 5c
■USB Flash Drives
1iPod and iPhone Model Compatibility
This system may not work with all software versions
of these devices.
1USB Flash Drives
Files on the USB flash drive are played in their stored
order. This order may be different from the order
displayed on your PC or device.
Page 256 of 445
255
Driving
This chapter discusses driving, refueling, and information on items such as accessories.
Before Driving................................... 256
Towing a Trailer ................................ 261
Off-Highway Driving Guidelines ..... 266
When Driving Starting the Engine .......................... 268
Precautions While Driving................. 273
Automatic Transmission ................... 274
Shifting ............................................ 275
Cruise Control
*................................ 279
Front Sensor Camera*...................... 282
Adaptive Cruise Control (ACC)*....... 284
Lane Departure Warning (LDW)*...... 293Lane Keeping Assist System (LKAS)*..... 297 Vehicle Stability Assist (VSA
®), aka Electronic
Stability Control (ESC), System ........... 305
Blind spot information (BSI) System
*.... 307All-Wheel Drive (AWD) with Intelligent Control System*..................................................... 310Tire Pressure Monitoring System (TPMS) ... 310Tire Pressure Monitoring System (TPMS) - Required Federal Explanation ......... 312
Braking Brake System ................................... 314
Anti-lock Brake System (ABS) ........... 316
Brake Assist System.......................... 317 Collision Mitigation Braking System
TM
(CMBSTM)*..................................... 318
Parking Your Vehicle When Stopped ................................ 326
Parking Sensor System
*................... 327
Cross Traffic Monitor*..................... 331
Multi-View Rear Camera .................. 334
Refueling Fuel Information .............................. 335
How to Refuel ................................. 336
Fuel Economy .................................... 337
Accessories and Modifications ........ 338
* Not available on all models
Page 272 of 445
Continued271
uuWhen Driving uStarting the Engine
Driving
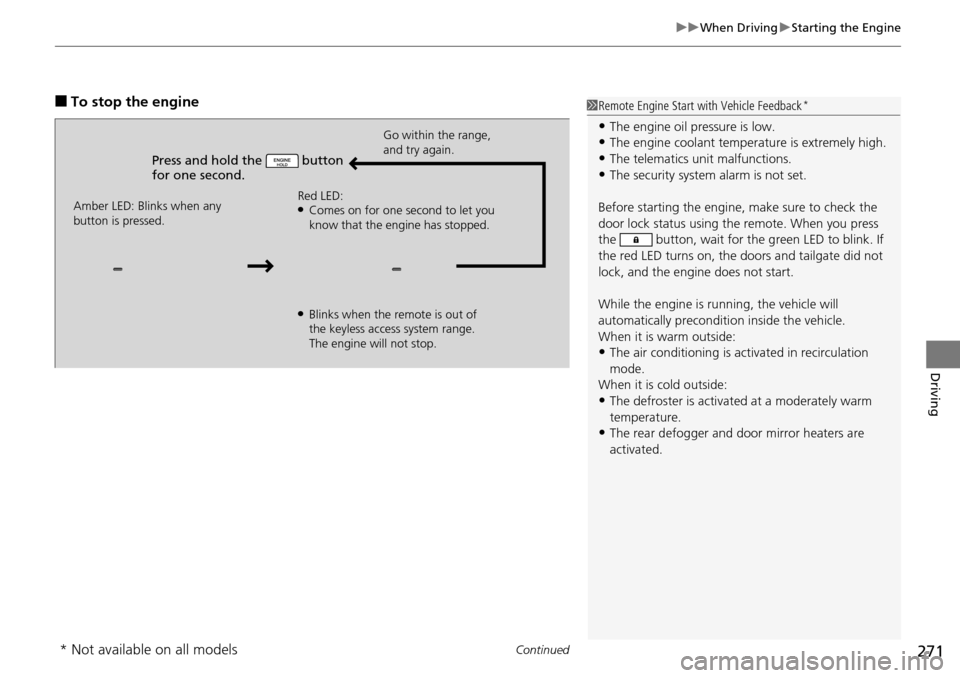
■To stop the engine
Press and hold the button
for one second.
Go within the range,
and try again.
Amber LED: Blinks when any
button is pressed. Red LED:
●Comes on for one second to let you
know that the engine has stopped.
●Blinks when the remote is out of
the keyless access system range.
The engine will not stop.
1
Remote Engine Start with Vehicle Feedback*
•The engine oil pressure is low.•The engine coolant temper ature is extremely high.
•The telematics unit malfunctions.
•The security system alarm is not set.
Before starting the engine, make sure to check the
door lock status using the remote. When you press
the button, wait for the green LED to blink. If
the red LED turns on, the doors and tailgate did not
lock, and the engine does not start.
While the engine is running, the vehicle will
automatically preconditi on inside the vehicle.
When it is warm outside:
•The air conditioning is acti vated in recirculation
mode.
When it is cold outside:
•The defroster is activated at a moderately warm
temperature.
•The rear defogger and door mirror heaters are
activated.
* Not available on all models
Page 274 of 445
273
uuWhen Driving uPrecautions While Driving
Driving
Precautions While Driving
Utility vehicles have a significantly higher rollover rate than other types of vehicles.
To prevent rollovers or loss of control:
• Take corners at slower speeds than yo u would with a passenger vehicle.
• Avoid sharp turns and abrupt maneuvers whenever possible.
• Do not modify your vehicle in any way th at you would raise the center of gravity.
• Never carry more than 165 lbs (75 kg) of ca rgo on the roof rack (Acura accessory).
Avoid driving in deep water and on flooded roads. This can damage the engine,
driveline, or cause electrical component failure.
If there is a strong impact with something un der the vehicle, stop in a safe location.
Check the underside of the vehicle for damage or any fluid leaks.
■Driving Guidelines for Your Utility Vehicle
■In Rain
■Other Precautions
1 Driving Guidelines for Your Utility Vehicle
Failure to operate your vehicle correctly might result
in a crash or a rollover. 2 Important Handling Information P. 26
1Precautions While Driving
NOTICE
Do not operate the shift lever while pressing the
accelerator pedal. You could damage the transmission.
NOTICE
If you repeatedly turn the steering wheel at an
extremely low speed, or hold the steering wheel on the
full left or right position for a while, the electric power
steering (EPS) system heats up . The system goes into a
protective mode, and limits its performance. The
steering wheel becomes harder and harder to operate.
Once the system cools down, the EPS system is restored.
Repeated operation under these conditions can
eventually damage the system.
If the power mode is set to ACCESSORY while
driving, the engine will shut down and all steering
and brake power assist functi ons will stop, making it
difficult to control the vehicle.
Do not put the shift lever in
( N, as you will lose
engine braking (and acce leration) performance.
During the first 600 miles (1,000 km) of operation,
avoid sudden acceleration or full throttle operation so
as not to damage the engine or powertrain.
Avoid hard braking for the first 200 miles (300 km). You
should also follow this when the brake pads are replaced.
Page 278 of 445
277
uuWhen Driving uShifting
Continued
Driving
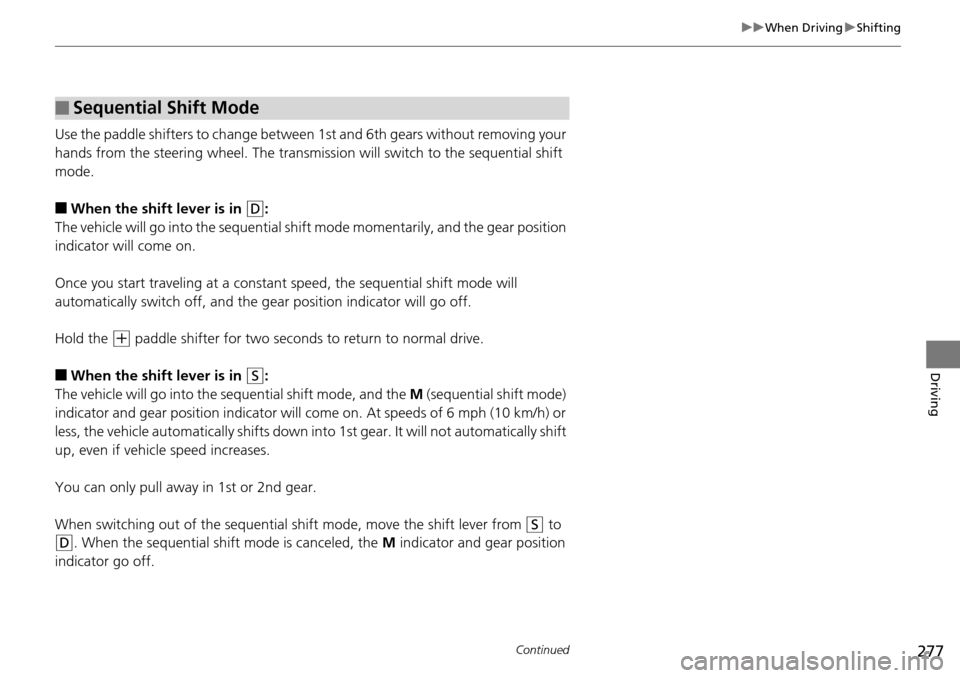
Use the paddle shifters to change between 1st and 6th gears without removing your
hands from the steering wheel. The transmiss ion will switch to the sequential shift
mode.
■When the shift lever is in (D:
The vehicle will go into the sequential shi ft mode momentarily, and the gear position
indicator will come on.
Once you start traveling at a constant speed, the sequential shift mode will
automatically switch off, and the g ear position indicator will go off.
Hold the
(+ paddle shifter for two seconds to return to normal drive.
■When the shift lever is in (S:
The vehicle will go into the se quential shift mode, and the M (sequential shift mode)
indicator and gear position indicator will come on. At speeds of 6 mph (10 km/h) or
less, the vehicle automatically shifts down in to 1st gear. It will not automatically shift
up, even if vehicle speed increases.
You can only pull away in 1st or 2nd gear.
When switching out of the sequential shift mode, move the shift lever from
(S to
(D. When the sequential shift mode is canceled, the M indicator and gear position
indicator go off.
■Sequential Shift Mode
Page 279 of 445
uuWhen Driving uShifting
278
Driving
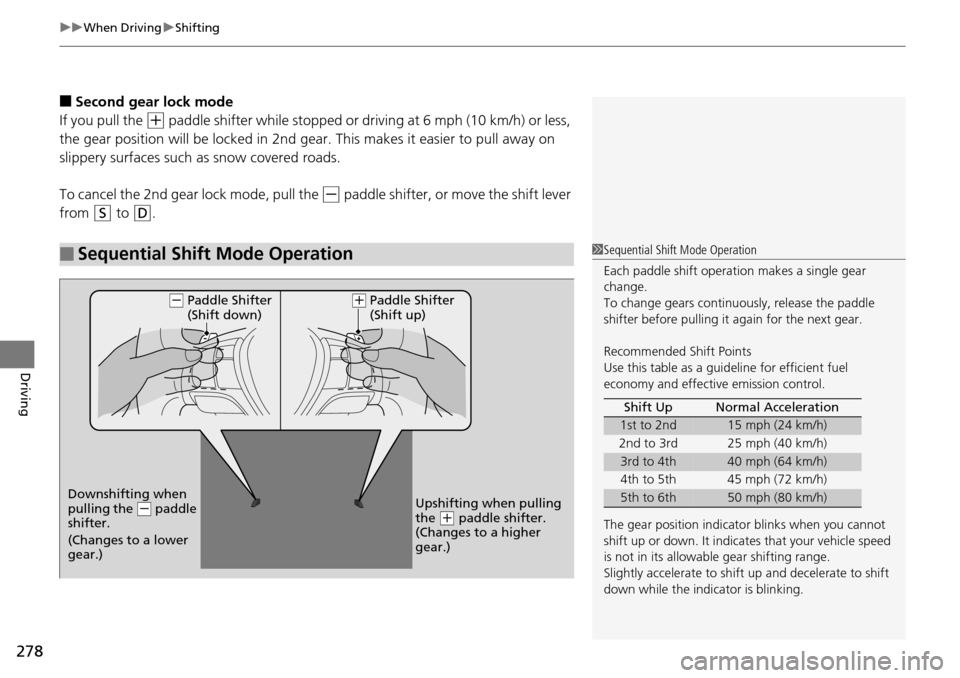
■Second gear lock mode
If you pull the
(+ paddle shifter while stopped or dr iving at 6 mph (10 km/h) or less,
the gear position will be lock ed in 2nd gear. This makes it easier to pull away on
slippery surfaces such as snow covered roads.
To cancel the 2nd gear lock mode, pull the
(- paddle shifter, or move the shift lever
from
(S to (D.
■Sequential Shift Mode Operation1 Sequential Shift Mode Operation
Each paddle shift operation makes a single gear
change.
To change gears continuously, release the paddle
shifter before pulling it again for the next gear.
Recommended Shift Points
Use this table as a guideline for efficient fuel
economy and effectiv e emission control.
The gear position indicato r blinks when you cannot
shift up or down. It indicate s that your vehicle speed
is not in its allowabl e gear shifting range.
Slightly accelerate to shift up and decelerate to shift
down while the indi cator is blinking.
Shift Up Normal Acceleration
1st to 2nd15 mph (24 km/h)
2nd to 3rd 25 mph (40 km/h)
3rd to 4th40 mph (64 km/h)
4th to 5th 45 mph (72 km/h)
5th to 6th50 mph (80 km/h)
Paddle Shifter
(Shift down)
Downshifting when
pulling the
( - paddle
shifter.
(Changes to a lower
gear.) Upshifting when pulling
the (
+ paddle shifter.
(Changes to a higher
gear.)
( -
(+Paddle Shifter
(Shift up)
Page 283 of 445

282
uuWhen Driving uFront Sensor Camera*
Driving
Front Sensor Camera*
The camera, used in systems su ch as LDW, LKAS, ACC, and CMBSTM, is designed to
detect an object that triggers any of the systems to operate its functions.
This camera is located behind the rearview
mirror.
To help reduce the likelihood that high interior
temperatures will cause the camera’s sensing
system to shut off, when parking, find a shady
area or face the front of the vehicle away from
the sun. If you use a re flective sun shade, do
not allow it to cover the camera housing.
Covering the camera can concentrate heat on
it.
■Camera Location and Handling Tips
1 Front Sensor Camera*
Never apply a film or attach any objects to
windshield, the hood, or the front grill that could
obstruct the camera’s fiel d of vision and cause the
system to operate abnormally.
Scratches, nicks, and othe r damage to the windshield
within the camera’s fiel d of vision can cause the
system to operate abnormall y. If this occurs, we
recommend that you replac e the windshield with a
genuine Acura replacement windshield. Making even
minor repairs within the ca mera’s field of vision or
installing an aftermarke t replacement windshield
may also cause the system to operate abnormally.
After replacing the winds hield, have a dealer
recalibrate the camera. Pr oper calibration of the
camera is necessary for the system to operate
properly.
Do not place an object on the top of the instrument
panel. It may reflect onto the windshield and prevent
the system from detecting lane lines properly.
If the Some Driver Assist Systems Cannot
Operate: Camera Temperature Too High message
appears:
•Use the climate control system to cool down the
interior and, if necessary, also use defroster mode
with the air flow directed towards the camera.
•Start driving the vehicle to lower the windshield
temperature, which cool s down the area around
the camera.
Front Sensor Camera
* Not available on all models
Page 293 of 445
uuWhen Driving uAdaptive Cruise Control (ACC)*
292
Driving
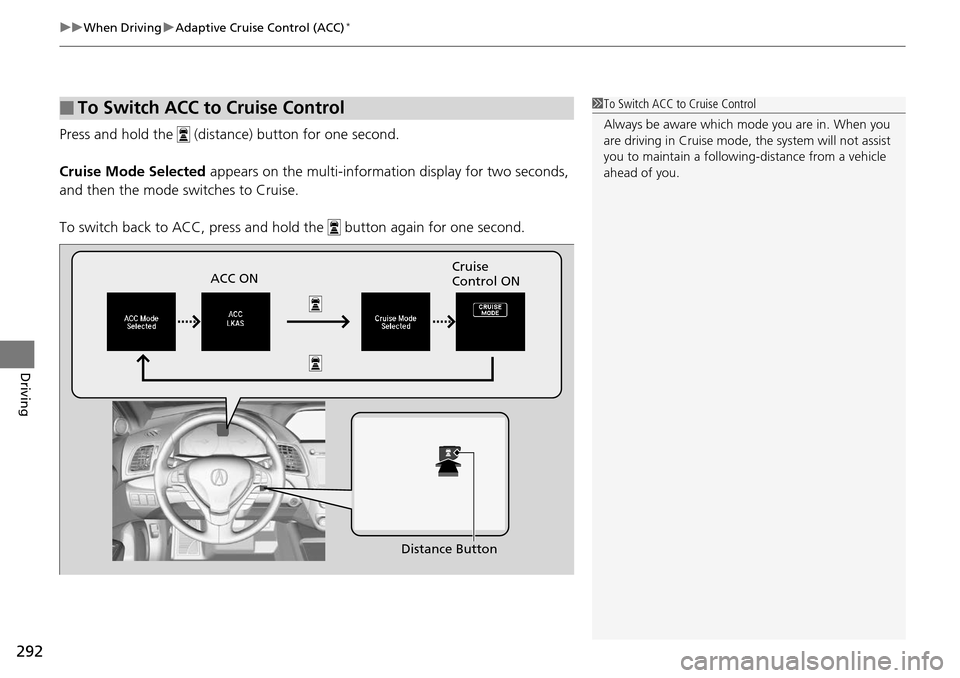
Press and hold the (dista nce) button for one second.
Cruise Mode Selected appears on the multi-information display for two seconds,
and then the mode switches to Cruise.
To switch back to ACC, press and hold the butt on again for one second.
■To Switch ACC to Cruise Control1To Switch ACC to Cruise Control
Always be aware which mode you are in. When you
are driving in Cruise mode, the system will not assist
you to maintain a followi ng-distance from a vehicle
ahead of you.
ACC ON Cruise
Control ON
Distance Button
Page 297 of 445
296
uuWhen Driving uLane Departure Warning (LDW)*
Driving
• When objects on the road (curb, guard rail, pylons, etc.) are recognized as white
lines (or yellow lines).
• When driving on roads with double lines.
■Vehicle conditions
• Headlight lenses are dirty or the h eadlights are not properly adjusted.
• The outside of the windshield is streake d or blocked by dirt, mud, leaves, wet
snow, etc.
• The inside of the windshield is fogged.
• The camera temperature gets too hot.
• An abnormal tire or wheel condition (wro ng sized, varied size or construction,
improperly inflated, compact spare tire
*, etc.).
• The vehicle is tilted due to a heav y load or suspension modifications.
* Not available on all models
Page 299 of 445
uuWhen Driving uLane Keeping Assist System (LKAS)*
298
Driving
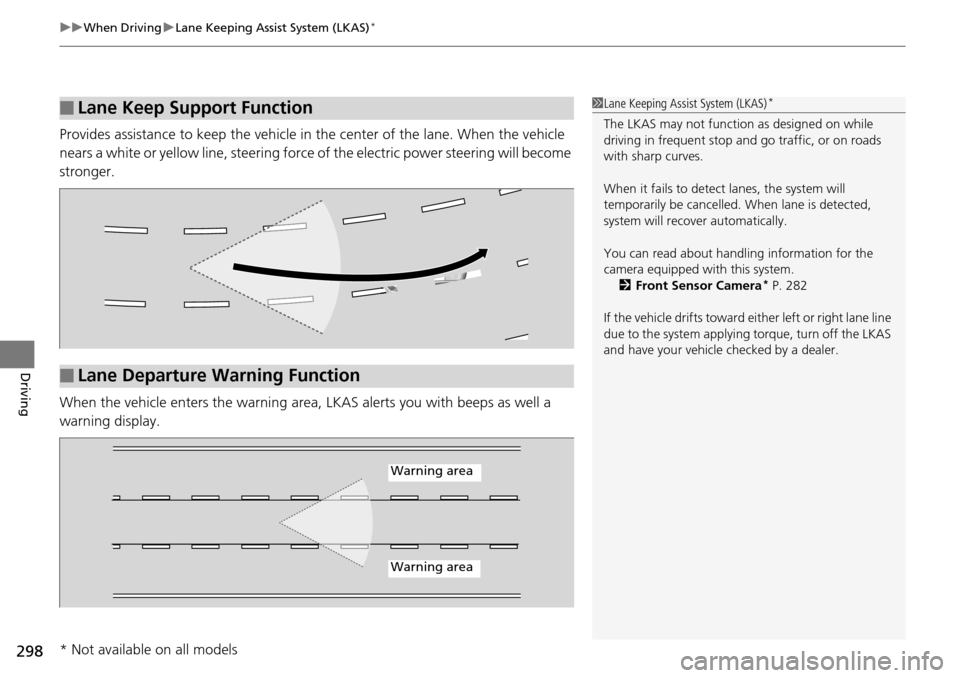
Provides assistance to keep the vehicle in the center of the lane. When the vehicle
nears a white or yellow line, steering force of the electric power steering will become
stronger.
When the vehicle enters th e warning area, LKAS alerts you with beeps as well a
warning display.
■Lane Keep Support Function1 Lane Keeping Assist System (LKAS)*
The LKAS may not functi on as designed on while
driving in frequent stop and go traffic, or on roads
with sharp curves.
When it fails to detect lanes, the system will
temporarily be cancelled. When lane is detected,
system will recover automatically.
You can read about handling information for the
camera equipped with this system. 2 Front Sensor Camera
* P. 282
If the vehicle drifts toward ei ther left or right lane line
due to the system applying torque, turn off the LKAS
and have your vehicle checked by a dealer.
■Lane Departure Warning Function
Warning area
Warning area
* Not available on all models