anti Acura RDX 2016 Owner's Manual
[x] Cancel search | Manufacturer: ACURA, Model Year: 2016, Model line: RDX, Model: Acura RDX 2016Pages: 445, PDF Size: 15.25 MB
Page 11 of 445
10
Quick Reference Guide
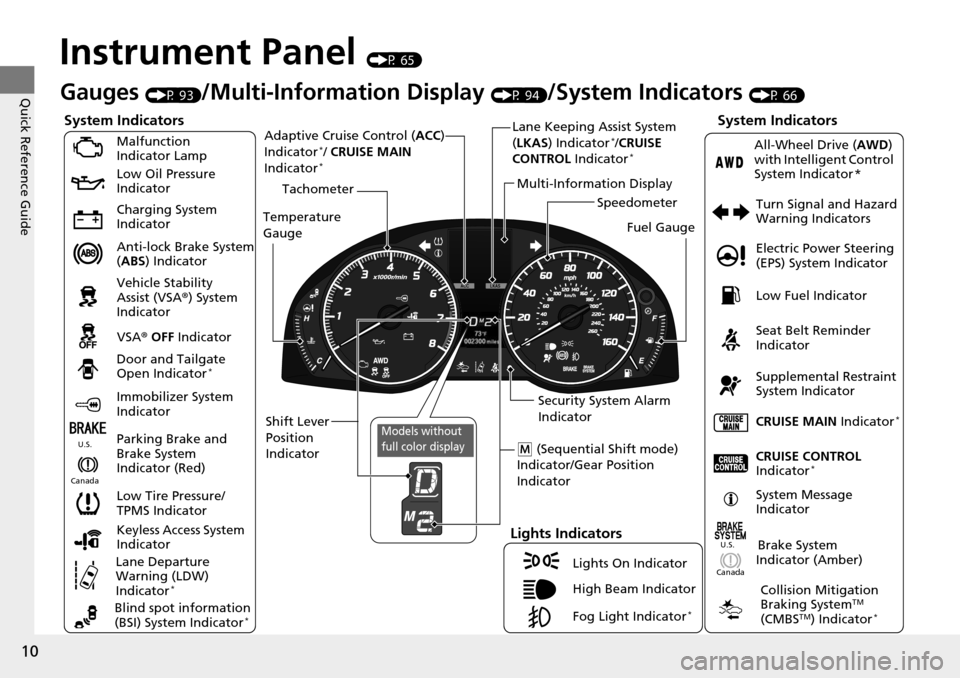
Instrument Panel (P 65)
CanadaU.S.
Turn Signal and Hazard
Warning Indicators
All-Wheel Drive (
AWD)
with Intelligent Control
System Indicator *
System Indicators
Malfunction
Indicator Lamp
Low Oil Pressure
Indicator
Charging System
Indicator
Anti-lock Brake System
( ABS ) Indicator
Vehicle Stability
Assist (VSA ®) System
Indicator
VSA ® OFF Indicator
Low Tire Pressure/
TPMS Indicator
Lights Indicators
Lights On Indicator
High Beam Indicator
Fog Light Indicator
*
Immobilizer System
Indicator Seat Belt Reminder
Indicator
System Indicators
CRUISE CONTROL
Indicator*
Parking Brake and
Brake System
Indicator (Red) Supplemental Restraint
System Indicator
Door and Tailgate
Open Indicator
*
CRUISE MAIN
Indicator*
Tachometer
Speedometer
Fuel Gauge
Security System Alarm
Indicator
Shift Lever
Position
Indicator Low Fuel Indicator
Gauges (P 93)/Multi-Informa
tion Display (P 94)/System Indicators (P 66)
System Message
IndicatorBrake System
Indicator (Amber)
Temperature
Gauge
Electric Power Steering
(EPS) System Indicator
Canada
U.S.
Keyless Access System
Indicator
Lane Departure
Warning (LDW)
Indicator
*
Blind spot information
(BSI) System Indicator*
Collision Mitigation
Braking SystemTM
(CMBSTM) Indicator*
Lane Keeping Assist System
( LKAS ) Indicator*/CRUISE
CONTROL Indicator*
Multi-Information Display
(M (Sequential Shift mode)
Indicator/Gear Position
Indicator
Models without
full color display
Adaptive Cruise Control ( ACC)
Indicator*/ CRUISE MAIN
Indicator*
Page 27 of 445
26
uuFor Safe Driving uImportant Handling Information
Safe Driving
Important Handling Information
Your vehicle has higher ground clearance than a passenger vehicle designed for use
only on pavement. Higher ground clearance has many advantages for off-highway
driving. It allows you to travel over bum ps, obstacles, and rough terrain. It also
provides good visibility so you can anticipate problems earlier.
These advantages come at some cost. Beca use your vehicle is taller and rides higher
off the ground, it has a higher center gravity making it more susceptible to tripping
or roll over if you make abrupt turns. Ut ility vehicles have a significantly higher
rollover rate than other types of vehicles. In a rollover crash, an unbelted person is
significantly more likely to die than a pe rson wearing a seat belt. As a reminder,
make sure you and your passeng ers always wear seat belts.1Important Handling Information
For information on how to reduce the risk of rollover,
read:
2 Driving Guidelines for Your Utility Vehicle
P. 273
2 Off-Highway Driving Guidelines P. 266
Failure to operate your vehi cle correctly might result
in a crash or a rollover.
Page 70 of 445
69
uuIndicators u
Continued
Instrument Panel
*1:On the left: Models wi thout full color display
On the right: Models with full color display
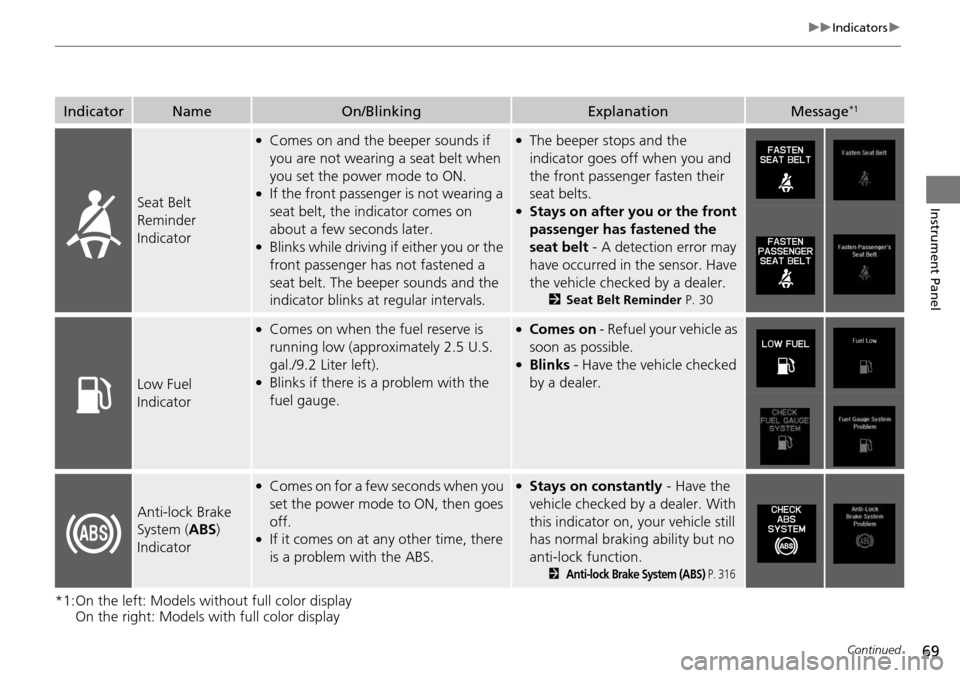
IndicatorNameOn/BlinkingExplanationMessage*1
Seat Belt
Reminder
Indicator
●Comes on and the beeper sounds if
you are not wearing a seat belt when
you set the power mode to ON.
●If the front passenger is not wearing a
seat belt, the indicator comes on
about a few seconds later.
●Blinks while driving if either you or the
front passenger has not fastened a
seat belt. The beeper sounds and the
indicator blinks at regular intervals.
●The beeper stops and the
indicator goes off when you and
the front passenger fasten their
seat belts.
●Stays on after you or the front
passenger has fastened the
seat belt - A detection error may
have occurred in the sensor. Have
the vehicle checked by a dealer.
2 Seat Belt Reminder P. 30
Low Fuel
Indicator
●Comes on when the fuel reserve is
running low (approximately 2.5 U.S.
gal./9.2 Liter left).
●Blinks if there is a problem with the
fuel gauge.
●Comes on - Refuel your vehicle as
soon as possible.
●Blinks - Have the vehicle checked
by a dealer.
Anti-lock Brake
System ( ABS)
Indicator
●Comes on for a few seconds when you
set the power mode to ON, then goes
off.
●If it comes on at any other time, there
is a problem with the ABS.
●Stays on constantly - Have the
vehicle checked by a dealer. With
this indicator on, your vehicle still
has normal braking ability but no
anti-lock function.
2Anti-lock Brake System (ABS) P. 316
Page 256 of 445
255
Driving
This chapter discusses driving, refueling, and information on items such as accessories.
Before Driving................................... 256
Towing a Trailer ................................ 261
Off-Highway Driving Guidelines ..... 266
When Driving Starting the Engine .......................... 268
Precautions While Driving................. 273
Automatic Transmission ................... 274
Shifting ............................................ 275
Cruise Control
*................................ 279
Front Sensor Camera*...................... 282
Adaptive Cruise Control (ACC)*....... 284
Lane Departure Warning (LDW)*...... 293Lane Keeping Assist System (LKAS)*..... 297 Vehicle Stability Assist (VSA
®), aka Electronic
Stability Control (ESC), System ........... 305
Blind spot information (BSI) System
*.... 307All-Wheel Drive (AWD) with Intelligent Control System*..................................................... 310Tire Pressure Monitoring System (TPMS) ... 310Tire Pressure Monitoring System (TPMS) - Required Federal Explanation ......... 312
Braking Brake System ................................... 314
Anti-lock Brake System (ABS) ........... 316
Brake Assist System.......................... 317 Collision Mitigation Braking System
TM
(CMBSTM)*..................................... 318
Parking Your Vehicle When Stopped ................................ 326
Parking Sensor System
*................... 327
Cross Traffic Monitor*..................... 331
Multi-View Rear Camera .................. 334
Refueling Fuel Information .............................. 335
How to Refuel ................................. 336
Fuel Economy .................................... 337
Accessories and Modifications ........ 338
* Not available on all models
Page 316 of 445
315
uuBraking uBrake System
Driving
Your vehicle is equipped with disc brakes at all four wheels. A vacuum power assist
helps reduce the effort needed on the brake pedal. The brake assist system increases
the stopping force when you depress the brake pedal hard in an emergency
situation. The anti-lock brake system (ABS) helps you retain steering control when
braking very hard.
2 Brake Assist System P. 317
2 Anti-lock Brake System (ABS) P. 316
■Foot Brake1Foot Brake
Check the brakes after driving through deep water,
or if there is a buildup of road surface water. If
necessary, dry the brakes by lightly depressing the
pedal several times.
If you hear a continuous me tallic friction sound when
applying the brakes, the brake pads need to be
replaced. Have the vehicle checked by a dealer.
Constantly using the brak e pedal while going down a
long hill builds up heat, which reduces the brake
effectiveness. Apply engine braking by taking your
foot off the accelerator pe dal and downshifting to a
lower gear.
Do not rest your foot on the brake pedal while
driving, as it will lightly apply the brakes and cause
them to lose effectiveness over time and reduce pad
life. It will also conf use drivers behind you.
Your vehicle is equipped with a hydraulic brake
booster that, under certain conditions, such as
braking at high altitudes, supplements the vacuum
power assist. When the hydraulic brake booster
activates, you may hear a motor sound and a slight
vibration in the pedal. This is normal.
Page 317 of 445
316
uuBraking uAnti-lock Brake System (ABS)
Driving
Anti-lock Brake System (ABS)
Helps prevent the wheels from locking up, and helps you retain steering control by
pumping the brakes rapidly, much faster than you.
The electronic brake distribution (EBD) system, which is part of the ABS, also
balances the front-to-rear braking distri bution according to vehicle loading.
You should never pump the brake pedal. Let the ABS work for you by always
keeping firm, steady pressure on the brake pe dal. This is sometimes referred to as
“stomp and steer.”
■ABS operation
The brake pedal may pulsate slightly when the ABS is working. Keep holding the
pedal firmly down. On dry pavement, you w ill need to press on the brake pedal very
hard before the ABS activates. However, you may feel the ABS activate immediately
if you are trying to stop on snow or ice.
When the vehicle speed goes unde r 6 mph (10 km/h), the ABS stops.
■ABS1Anti-lock Brake System (ABS)
NOTICE
The ABS may not function correctly if you use an
incorrect tire type and size.
When the ABS indicator comes on while driving,
there may be a problem with the system.
While normal braking is not affected, there is a
possibility of the ABS not operating. Have the vehicle
checked by a dealer immediately.
The ABS does not reduce the ti me or distance it takes
to stop the vehicle. It only helps with steering control
during hard braking.
In the following cases, yo ur vehicle may need more
stopping distance than a vehicle without the ABS:
•When driving on rough road surfaces, including
when driving on uneven surf aces, such as gravel or
snow.
•When tire chains are installed.
You may hear a motor sound coming from the
engine compartment while system checks are being
performed immediately after starting the engine or
while driving. This is normal.
Page 341 of 445
340
Maintenance
Before Performing Maintenance
Inspection and Maintenance
For your safety, perform all listed inspections and maintenance to keep your vehicle
in good condition. If you become aware of any abnormality (noise, smell, insufficient
brake fluid, oil residue on the ground, etc.), have your vehicle inspected by a dealer.
(Note, however, that service at a dealer is not mandatory to keep your warranties in
effect.) Refer to the separate maintena nce booklet for detailed maintenance and
inspection information.
■Daily inspections
Perform inspections before long distance trips, when washing the vehicle, or when
refueling.
■Periodic inspections
• Check the automatic transmission fluid level monthly.
2 Automatic Transmission Fluid P. 356
•Check the brake fluid level monthly.
2 Checking the Brake Fluid P. 357
•Check the tire pressure monthly. Examin e the tread for wear and foreign objects.
2Checking and Maintaining Tires P. 370
•Check the operation of the exterior lights monthly.
2Replacing Light Bulbs P. 359
•Check the condition of the wiper bl ades at least every six months.
2Checking and Maintaining Wiper Blades P. 366
■Types of Inspection and Maintenance
1Inspection and Maintenance
Maintenance, replacement, or repair of
emissions control devices and systems may be
done by any automotive repair establishment or
individuals using parts that are “certified” to
EPA standards.
According to state and fede ral regulations, failure to
perform maintenance on the maintenance main
items marked with # will not void your emissions
warranties. However, all ma intenance services should
be performed in accordan ce with the intervals
indicated by the mult i-information display.
2 Maintenance Service Items P. 345
If you want to perform complex maintenance tasks
that require more skills a nd tools, you can purchase a
subscription to the Service Express website at
www.techinfo.honda.com .
2 Authorized Manuals P. 435
If you want to perform ma intenance yourself, make
sure that you have the necessary tools and skills first.
After performing ma intenance, update the records in
the separate maintenance booklet.
U.S. models
Page 355 of 445
354
uuMaintenance Under the Hood uEngine Coolant
Maintenance
Engine Coolant
This coolant is premixed with 50% antifreeze and 50% water. Do not add any
straight antifreeze or water.
We recommend you check the engine coolant level every time you refuel. Check the
reserve tank first. If it is completely empty, also check the coolant level in the
radiator. Add the engine coolant accordingly.
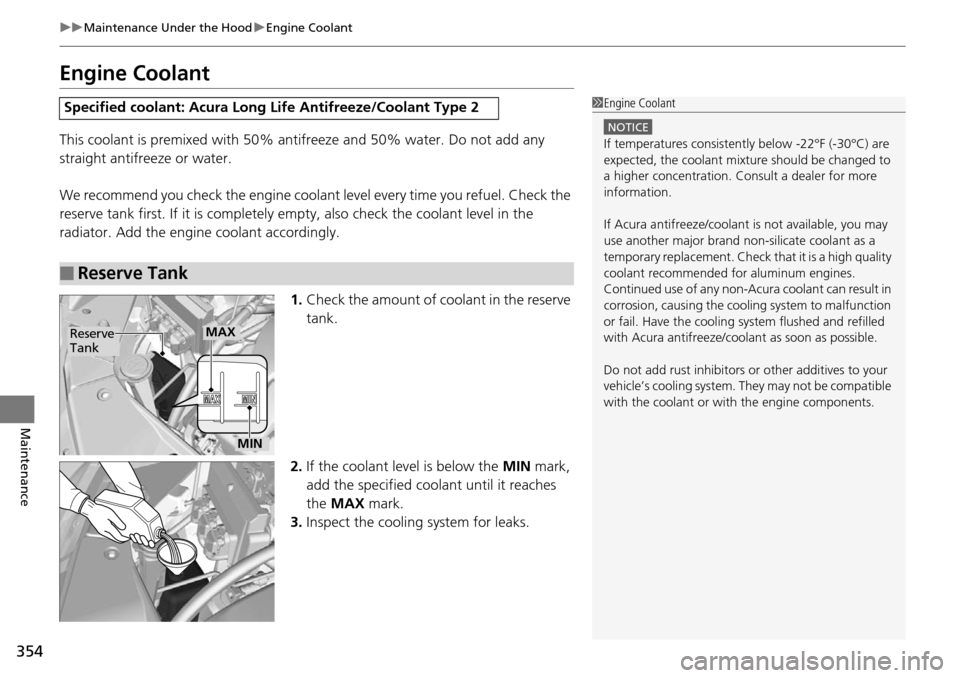
1.Check the amount of coolant in the reserve
tank.
2. If the coolant level is below the MIN mark,
add the specified coolant until it reaches
the MAX mark.
3. Inspect the cooling system for leaks.
Specified coolant: Acura Long Life Antifreeze/Coolant Type 2
■Reserve Tank
1Engine Coolant
NOTICE
If temperatures consistent ly below -22°F (-30°C) are
expected, the coolant mixture should be changed to
a higher concentration. Cons ult a dealer for more
information.
If Acura antifreeze/coolant is not available, you may
use another major brand non- silicate coolant as a
temporary replacement. Check that it is a high quality
coolant recommended for aluminum engines.
Continued use of any non-Acur a coolant can result in
corrosion, causing the coo ling system to malfunction
or fail. Have the cooling system flushed and refilled
with Acura antifreeze/cool ant as soon as possible.
Do not add rust inhibitors or other additives to your
vehicle’s cooling system. They may not be compatible
with the coolant or with the engine components.
Reserve
TankMAX
MIN
Page 359 of 445
358
uuMaintenance Under the Hood uRefilling Window Washer Fluid
Maintenance
Refilling Window Washer Fluid
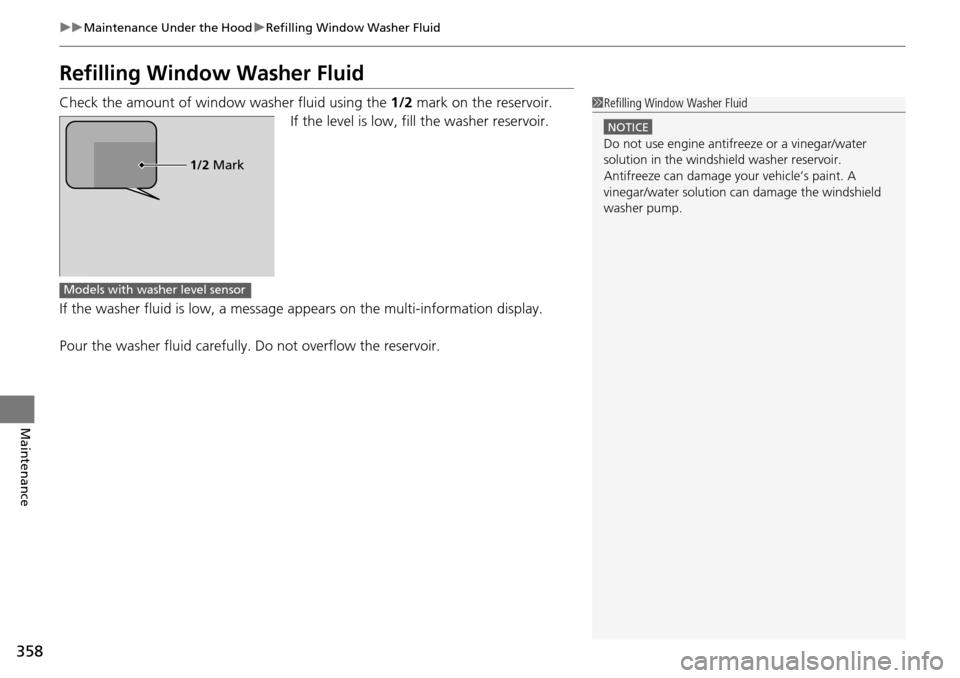
Check the amount of window washer fluid using the 1/2 mark on the reservoir.
If the level is low, fill the washer reservoir.
If the washer fluid is low, a message appears on the multi-information display.
Pour the washer fluid carefully. Do not overflow the reservoir.1Refilling Window Washer Fluid
NOTICE
Do not use engine antifreeze or a vinegar/water
solution in the windshield washer reservoir.
Antifreeze can damage y our vehicle’s paint. A
vinegar/water solution ca n damage the windshield
washer pump.
1/2 Mark
Models with washer level sensor
Page 416 of 445
415
uuOverheating uHow to Handle Overheating
Handling the Unexpected
■Next thing to do
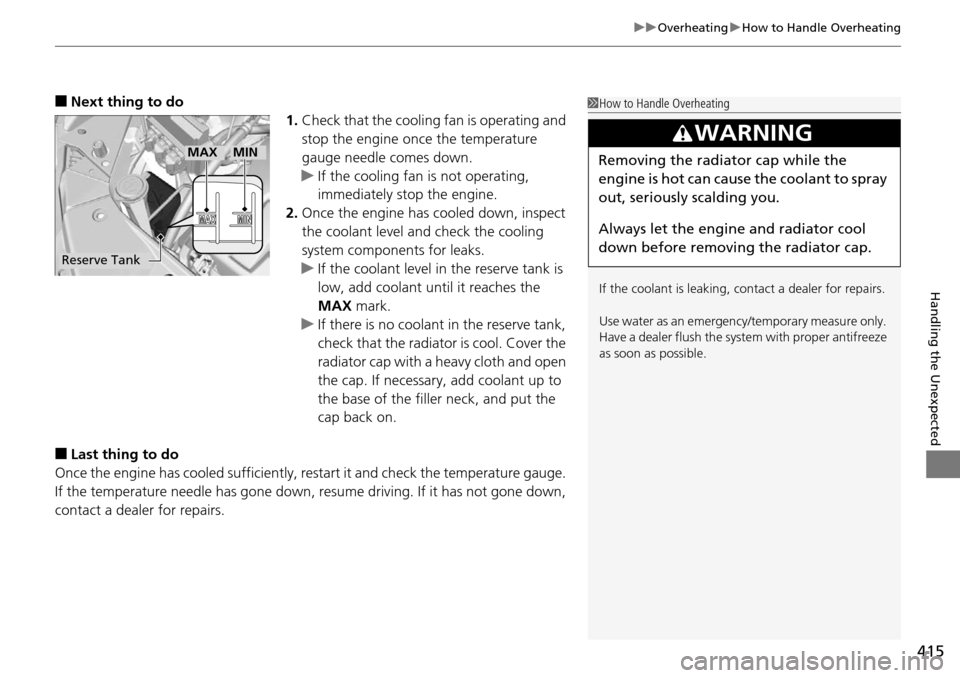
1.Check that the cooling fan is operating and
stop the engine once the temperature
gauge needle comes down.
u If the cooling fan is not operating,
immediately stop the engine.
2. Once the engine has cooled down, inspect
the coolant level and check the cooling
system components for leaks.
u If the coolant level in the reserve tank is
low, add coolant until it reaches the
MAX mark.
u If there is no coolant in the reserve tank,
check that the radiator is cool. Cover the
radiator cap with a heavy cloth and open
the cap. If necessary, add coolant up to
the base of the filler neck, and put the
cap back on.
■Last thing to do
Once the engine has cooled sufficiently, re start it and check the temperature gauge.
If the temperature needle has gone down, resume driving. If it has not gone down,
contact a dealer for repairs.
1 How to Handle Overheating
If the coolant is leaking, contact a dealer for repairs.
Use water as an emergen cy/temporary measure only.
Have a dealer flush the system with proper antifreeze
as soon as possible.
3WARNING
Removing the radiator cap while the
engine is hot can cause the coolant to spray
out, seriously scalding you.
Always let the engine and radiator cool
down before removing the radiator cap.
Reserve Tank
MAXMIN