open hood Acura RDX 2016 Owner's Manual
[x] Cancel search | Manufacturer: ACURA, Model Year: 2016, Model line: RDX, Model: Acura RDX 2016Pages: 445, PDF Size: 15.25 MB
Page 4 of 445
Contents
Child Safety P. 50Exhaust Gas Hazard P. 62Safety Labels P. 63
Opening and Closing the Tailgate P. 131 Security System P. 137 Opening and Closing the Windows P. 140
Operating the Switches Around the Steering Wheel P. 144 Adjusting the Mirrors P. 159
Interior Lights/Interior Convenience It ems P. 169 Climate Control System P. 180
Audio Error Messages* P. 215General Information on the Audio System* P. 218
Bluetooth ® HandsFreeLink ®* P. 224 Compass* P. 253
Off-Highway Driving Guidelines P. 266 When Driving P. 268 Braking P. 314
Refueling P. 335 Fuel Economy P. 337Accessories and Modifications P. 338
Maintenance Under the Hood P. 347 Replacing Light Bulbs P. 359
Checking and Maintaining Tires P. 370 Battery P. 379 Remote Transmitter Care P. 380
Engine Does Not Start P. 408 Jump Starting P. 411 Shift Lever Does Not Move P. 413
Fuses P. 420 Emergency Towing P. 423When You Cannot Open the Tailgate P. 424
Devices that Emit Radio Waves P. 429 Reporting Safety Defects P. 430
Authorized Manuals P. 435 Client Service Information P. 436
Quick Reference GuideP. 4
Safe DrivingP. 23
Instrument PanelP. 65
ControlsP. 117
FeaturesP. 185
DrivingP. 255
MaintenanceP. 339
Handling the UnexpectedP. 389
InformationP. 425
IndexP. 437
Page 9 of 445
Visual Index
8
Quick Reference Guide
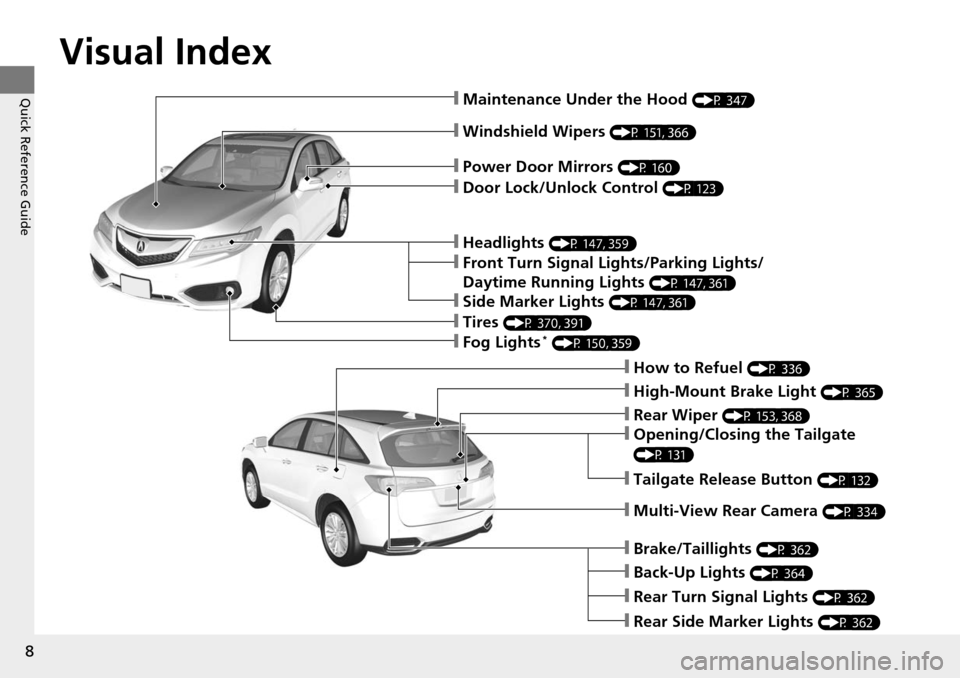
❙Windshield Wipers (P 151, 366)
❙How to Refuel (P 336)
❙High-Mount Brake Light (P 365)
❙Opening/Closing the Tailgate
(P 131)
❙Rear Wiper (P 153, 368)
❙Back-Up Lights (P 364)
❙Brake/Taillights (P 362)
❙Rear Turn Signal Lights (P 362)
❙Rear Side Marker Lights (P 362)
❙Power Door Mirrors (P 160)
❙Maintenance Under the Hood (P 347)
❙Fog Lights* (P 150, 359)
❙Multi-View Rear Camera (P 334)
❙Tailgate Release Button (P 132)
❙Headlights (P 147, 359)
❙Front Turn Signal Lights/Parking Lights/
Daytime Running Lights
(P 147, 361)
❙Side Marker Lights (P 147, 361)
❙Tires (P 370, 391)
❙Door Lock/Unlock Control (P 123)
Page 20 of 445
Quick Reference Guide
19
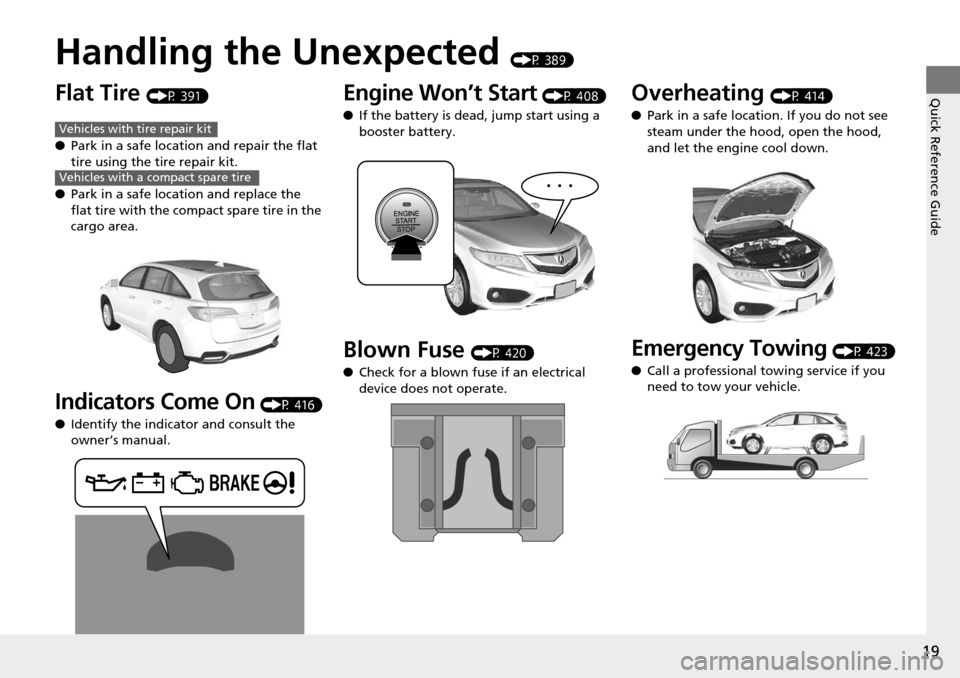
Handling the Unexpected (P 389)
Flat Tire (P 391)
● Park in a safe location and repair the flat
tire using the tire repair kit.
● Park in a safe location and replace the
flat tire with the comp act spare tire in the
cargo area.
Indicators Come On (P 416)
● Identify the indica tor and consult the
owner’s manual.
Vehicles with tire repair kit
Vehicles with a compact spare tire
Engine Won’t Start (P 408)
● If the battery is dead, jump start using a
booster battery.
Blown Fuse (P 420)
● Check for a blown fuse if an electrical
device does not operate.
Overheating (P 414)
● Park in a safe location. If you do not see
steam under the hood, open the hood,
and let the engine cool down.
Emergency Towing (P 423)
● Call a professional towing service if you
need to tow your vehicle.
Page 138 of 445

137Continued
Controls
Security System
Immobilizer System
The immobilizer system prevents a key that has not been pre-registered from
starting the engine. Each key contains electronic transmitters that use electronic
signals to verify the key.
Pay attention to the following when selecting the ACCESSORY mode with the
ENGINE START/STOP button:
• Do not allow objects that emit strong radio waves near the ENGINE START/
STOP button.
• Make sure the key is not covered by or touching a metal object.
• Do not bring a key from another vehicle’s immobilizer system with the keyless
access remote.
Security System Alarm
The security system alarm activates when the doors, tailgate, or hood are opened
without the key, remote transmitt er or keyless access system.
However, the alarm goes off when a door is opened with the key, then the shift
lever is moved out of
( P or the hood is opened before the power mode is set to ON.
■When the security system alarm activates
The horn sounds intermittently, an d all of the exterior lights flash.
■To deactivate the security system alarm
Unlock the vehicle using the remote tra nsmitter, or keyless access system. The
system, along with the horn and flashing lights, is deactivated.
1 Immobilizer System
NOTICE
Leaving the keyless access re mote in the vehicle can
result in theft or accidental movement of the vehicle.
Always take the key with you whenever you leave the
vehicle unattended.
Do not alter the system or add other devices to it.
Doing so may damage the system and make your
vehicle inoperable.
1 Security System Alarm
The security alarm continues for a maximum of two
minutes until the security system alarm deactivates.
Page 139 of 445
uuSecurity System uSecurity System Alarm
138
Controls
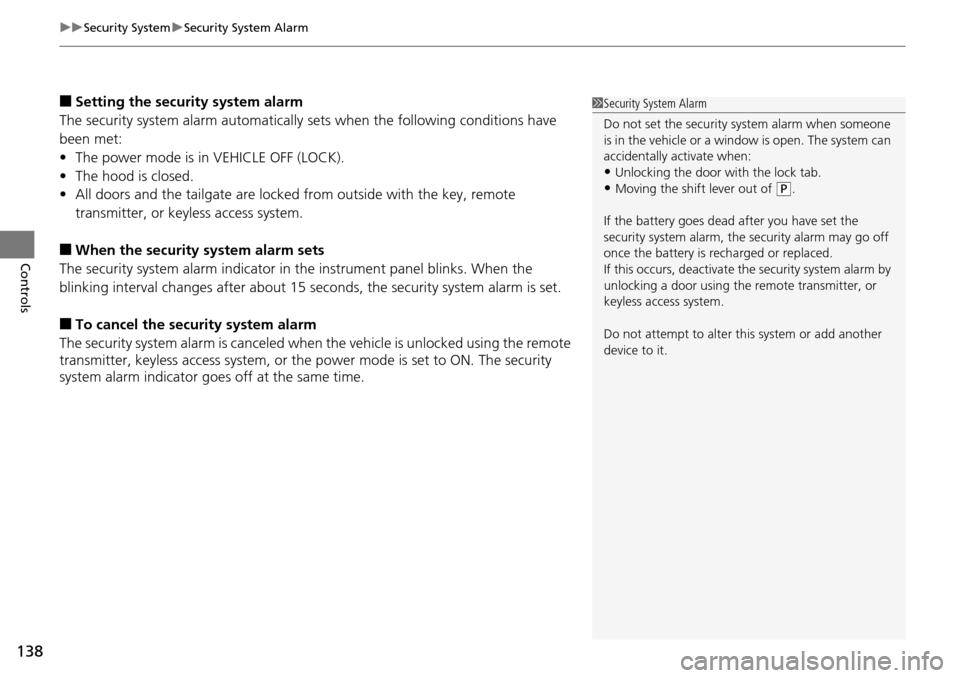
■Setting the security system alarm
The security system alarm automatically sets when the following conditions have
been met:
• The power mode is in VEHICLE OFF (LOCK).
• The hood is closed.
• All doors and the tailgate are locked from outside with the key, remote
transmitter, or keyless access system.
■When the security system alarm sets
The security system alarm indicator in the instrument panel blinks. When the
blinking interval changes after about 15 se conds, the security system alarm is set.
■To cancel the security system alarm
The security system alarm is canceled when the vehicle is unlocked using the remote
transmitter, keyless ac cess system, or the power mode is set to ON. The security
system alarm indicator goe s off at the same time.
1Security System Alarm
Do not set the security system alarm when someone
is in the vehicle or a window is open. The system can
accidentally activate when:
•Unlocking the door with the lock tab.•Moving the shift lever out of ( P.
If the battery goes dead after you have set the
security system alarm, the security alarm may go off
once the battery is re charged or replaced.
If this occurs, deactivate the security system alarm by
unlocking a door using the remote transmitter, or
keyless access system.
Do not attempt to alter th is system or add another
device to it.
Page 257 of 445
256
Driving
Before Driving
Driving Preparation
Check the following items before you start driving.
• Make sure there are no obstructions on the windows, door mirrors, exterior
lights, or other parts of the vehicle.
u Remove any frost, snow, or ice.
u Remove any snow on the roof, as this can slip down and obstruct your field of
vision while driving. If frozen solid , remove ice once it has softened.
u When removing ice from around the wheel s, be sure not to damage the wheel
or wheel components.
• Make sure the hood is securely closed.
u If the hood opens while driving, your front view will be blocked.
• Make sure the tires are in good condition.
u Check air pressures, and check for damage and excessive wear.
2Checking and Maintaining Tires P. 370
•Make sure there are no people or objects behind or around the vehicle.
u There are blind spots from the inside.
■Exterior Checks1Exterior Checks
NOTICE
When doors are frozen s hut, use warm water around
the door edges to melt any ice. Do not try to force
them open, as this can damage the rubber trim
around the doors. When done, wipe dry to avoid
further freezing.
Do not pour warm water into the key cylinder.
You will be unable to insert the key if the water
freezes in the hole.
Heat from the engine and exhaust can ignite
flammable material s left under the hood, causing a
fire. If you’ve parked y our vehicle for an extended
period, inspect and remove any debris that may have
collected, such as dried grass and leaves that have
fallen or have been carried in for use as a nest by a
small animal.
Also check under the hood fo r leftover flammable
materials after you or so meone else has performed
maintenance on your vehicle.
Page 271 of 445
uuWhen Driving uStarting the Engine
270
Driving
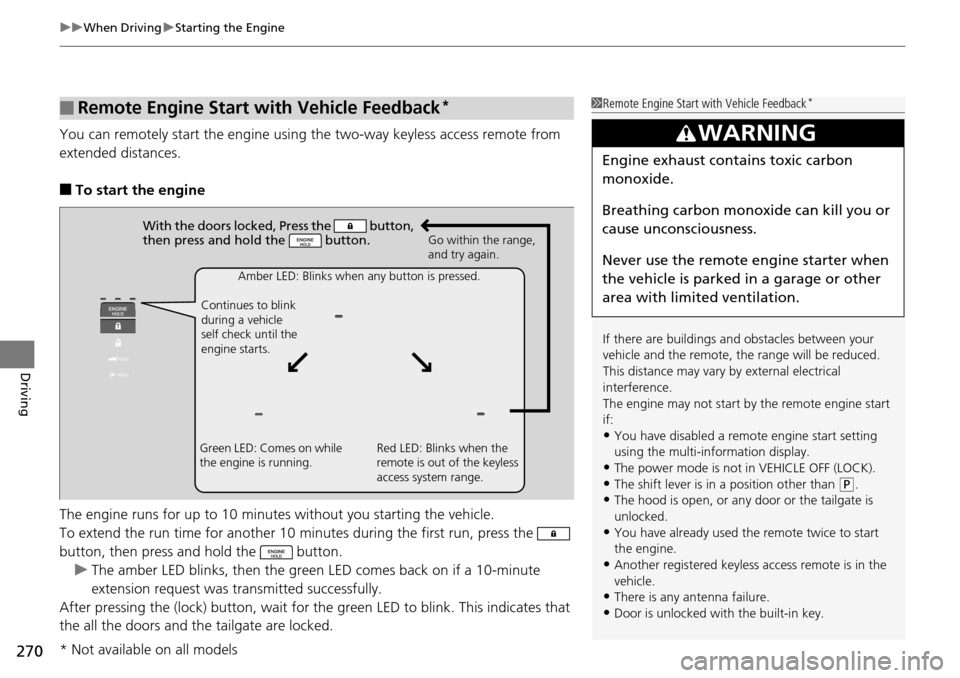
You can remotely start the engine using the two-way keyless access remote from
extended distances.
■To start the engine
The engine runs for up to 10 minutes without you starting the vehicle.
To extend the run time for another 10 minutes during the first run, press the
button, then press and hold the button. u The amber LED blinks, then the green LED comes back on if a 10-minute
extension request was transmitted successfully.
After pressing the (lock) button, wait for th e green LED to blink. This indicates that
the all the doors and the tailgate are locked.
■Remote Engine Start with Vehicle Feedback*1 Remote Engine Start with Vehicle Feedback*
If there are buildings an d obstacles between your
vehicle and the remote, th e range will be reduced.
This distance may vary by external electrical
interference.
The engine may not start by the remote engine start
if:
•You have disabled a remo te engine start setting
using the multi-information display.
•The power mode is not in VEHICLE OFF (LOCK).
•The shift lever is in a position other than ( P.
•The hood is open, or any door or the tailgate is
unlocked.
•You have already used the remote twice to start
the engine.
•Another registered keyless access remote is in the
vehicle.
•There is any antenna failure.•Door is unlocked with the built-in key.
3WARNING
Engine exhaust contains toxic carbon
monoxide.
Breathing carbon monoxide can kill you or
cause unconsciousness.
Never use the remote engine starter when
the vehicle is parked in a garage or other
area with limited ventilation.
With the doors locked, Press the button,
then press and hold the button.
Amber LED: Blinks when any button is pressed.
Continues to blink
during a vehicle
self check until the
engine starts. Go within the range,
and try again.
Green LED: Comes on while
the engine is running. Red LED: Blinks when the
remote is out of the keyless
access system range.
* Not available on all models
Page 340 of 445
339
Maintenance
This chapter discusses basic maintenance.
Before Performing MaintenanceInspection and Maintenance ............ 340
Safety When Performing Maintenance..... 341Parts and Fluids Used in Maintenance Service ........................................... 342
Maintenance Minder
TM..................... 343
Maintenance Under the Hood
Maintenance Items Under the Hood ..... 347Opening the Hood ........................... 348
Recommended Engine Oil ................ 349
Oil Check ......................................... 350
Adding Engine Oil ............................ 351
Changing the Engine Oil and Oil Filter ..... 352
Engine Coolant ................................ 354
Transmission Fluid ............................ 356
Brake Fluid ....................................... 357
Refilling Window Washer Fluid......... 358
Replacing Light Bulbs ....................... 359
Checking and Maintaining Wiper Blades.... 366Checking and Maintaining Tires
Checking Tires ................................. 370
Tire and Loading Information Label ...... 371Tire Labeling .................................... 371DOT Tire Quality Grading (U.S. Vehicles)....... 373Wear Indicators................................ 375
Tire Service Life ................................ 375 Tire and Wheel Replacement ........... 376
Tire Rotation .................................... 377
Winter Tires ..................................... 378
Battery ............................................... 379
Remote Transmitter Care Replacing the Button Battery ........... 380
Climate Control System Maintenance..... 382Cleaning
Interior Care .................................... 383
Exterior Care.................................... 385
Page 349 of 445
348
uuMaintenance Under the Hood uOpening the Hood
Maintenance
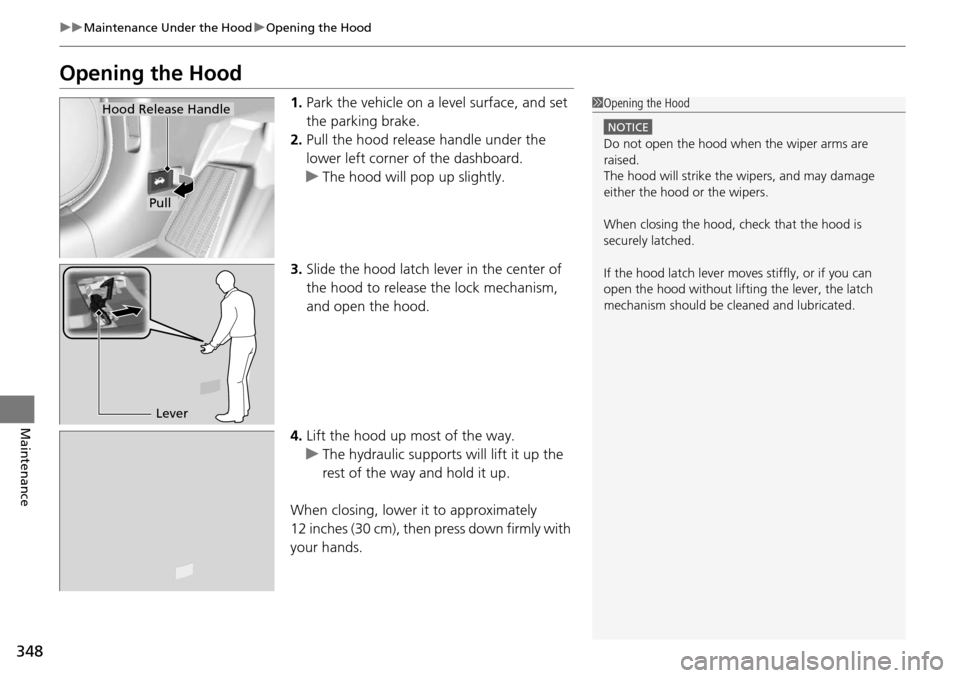
Opening the Hood
1. Park the vehicle on a level surface, and set
the parking brake.
2. Pull the hood release handle under the
lower left corner of the dashboard.
u The hood will pop up slightly.
3. Slide the hood latch lever in the center of
the hood to release the lock mechanism,
and open the hood.
4. Lift the hood up most of the way.
u The hydraulic supports will lift it up the
rest of the way and hold it up.
When closing, lower it to approximately
12 inches (30 cm), then press down firmly with
your hands.1 Opening the Hood
NOTICE
Do not open the hood when the wiper arms are
raised.
The hood will strike the wipers, and may damage
either the hood or the wipers.
When closing the hood, check that the hood is
securely latched.
If the hood latch lever moves stiffly, or if you can
open the hood without lifti ng the lever, the latch
mechanism should be cl eaned and lubricated.
Hood Release Handle
Pull
Lever
Page 353 of 445

352
uuMaintenance Under the Hood uChanging the Engine Oil and Oil Filter
Maintenance
Changing the Engine Oil and Oil Filter
You must change the engine oil and oil filter regularly in order to maintain the
engine’s lubrication. The engine may be damaged if they are not changed regularly.
Change the oil and filter in accordance with the maintenance message on the multi-
information display. 1.Run the engine until it reaches normal
operating temperature, and then turn the
engine off.
2. Open the hood and remove the engine oil
fill cap.
3. Remove the drain bolt and washer from
the bottom of the engine, and drain the
oil into a suitable container.1Changing the Engine Oil and Oil Filter
NOTICE
You may damage the environment if you do not
dispose of the oil in a suitable way. If you are
changing the oil by yourself , appropriately dispose of
the used oil. Put the oil in a sealed container and take
it to a recycling center. Do not throw the oil away
into a garbage can or onto the ground.
Drain Bolt
Washer