lock Acura RDX 2017 Owner's Manual
[x] Cancel search | Manufacturer: ACURA, Model Year: 2017, Model line: RDX, Model: Acura RDX 2017Pages: 449, PDF Size: 10.88 MB
Page 398 of 449

397
uuIf a Tire Goes Flat uChanging a Flat Tire*
Continued
Handling the Unexpected
5. Place a wheel block or rock in front and rear
of the wheel diagonal to the flat tire.
6. Place the compact spare tire (wheel side up)
under the vehicle body, near the tire that
needs to be replaced.
7. Loosen each wheel nut about one turn
using the wheel nut wrench.
Wheel
Blocks
The tire to be replaced.
Page 399 of 449
uuIf a Tire Goes Flat uChanging a Flat Tire*
398
Handling the Unexpected
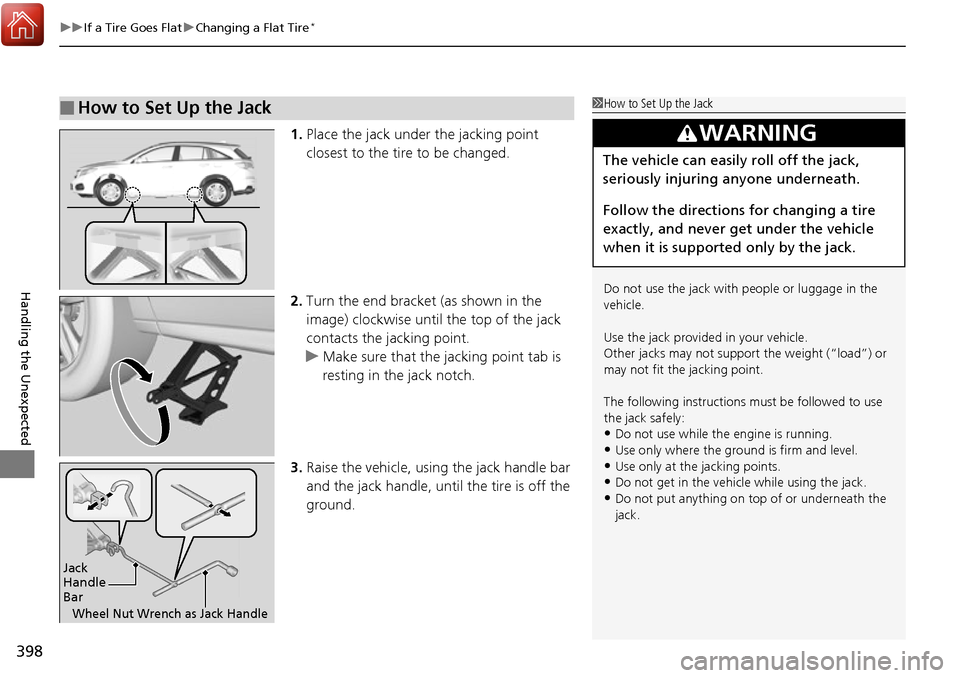
1. Place the jack under the jacking point
closest to the tire to be changed.
2. Turn the end bracket (as shown in the
image) clockwise until the top of the jack
contacts the jacking point.
u Make sure that the jacking point tab is
resting in the jack notch.
3. Raise the vehicle, using the jack handle bar
and the jack handle, until the tire is off the
ground.
■How to Set Up the Jack1How to Set Up the Jack
Do not use the jack with people or luggage in the
vehicle.
Use the jack provided in your vehicle.
Other jacks may not support the weight (“load”) or
may not fit the jacking point.
The following instructions must be followed to use
the jack safely:
•Do not use while the engine is running.
•Use only where the ground is firm and level.
•Use only at the jacking points.•Do not get in the vehicl e while using the jack.
•Do not put anything on top of or underneath the
jack.
3WARNING
The vehicle can easily roll off the jack,
seriously injuring anyone underneath.
Follow the directions for changing a tire
exactly, and never get under the vehicle
when it is supported only by the jack.
Jack
Handle
Bar
Wheel Nut Wrench as Jack Handle
Page 401 of 449
uuIf a Tire Goes Flat uChanging a Flat Tire*
400
Handling the Unexpected
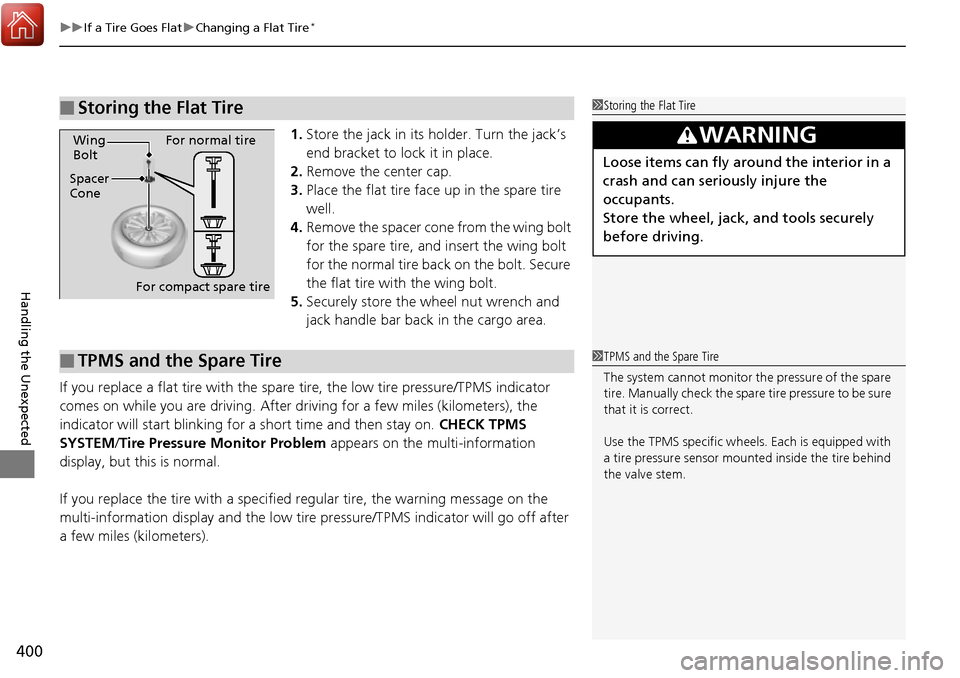
1. Store the jack in its holder. Turn the jack’s
end bracket to lock it in place.
2. Remove the center cap.
3. Place the flat tire face up in the spare tire
well.
4. Remove the spacer cone from the wing bolt
for the spare tire, and insert the wing bolt
for the normal tire back on the bolt. Secure
the flat tire with the wing bolt.
5. Securely store the wheel nut wrench and
jack handle bar back in the cargo area.
If you replace a flat tire with the spare tire, the low tire pressure/TPMS indicator
comes on while you are driving. After driving for a few miles (kilometers), the
indicator will start blinking for a short time and then stay on. CHECK TPMS
SYSTEM/ Tire Pressure Monitor Problem appears on the multi-information
display, but this is normal.
If you replace the tire with a specified regular tire, the warning message on the
multi-information display and the low tire pressure/TPMS indicator will go off after
a few miles (kilometers).
■Storing the Flat Tire1 Storing the Flat Tire
3WARNING
Loose items can fly around the interior in a
crash and can seriously injure the
occupants.
Store the wheel, jack, and tools securely
before driving.Spacer
ConeWing
Bolt
For compact spare tireFor normal tire
■TPMS and the Spare Tire1
TPMS and the Spare Tire
The system cannot monitor th e pressure of the spare
tire. Manually check the spare tire pressure to be sure
that it is correct.
Use the TPMS specific wheels. Each is equipped with
a tire pressure sensor mount ed inside the tire behind
the valve stem.
Page 402 of 449
401
uuIf a Tire Goes Flat uTemporarily Repairing a Flat Tire*
Continued
Handling the Unexpected
Temporarily Repairing a Flat Tire*
If the tire has a large cut or is otherwise severely damaged, you will need to have the
vehicle towed. If the tire only has a small puncture, from a nail for instance, you can
use the temporary tire repair kit so that you can drive to the nearest service station
for a more permanent repair.
If a tire goes flat while driving, grasp the steering wheel firmly, and brake gradually
to reduce speed. Then stop in a safe place.
1. Park the vehicle on a firm, level, and n on-slippery surface and apply the parking
brake.
2. Move the shift lever to
(P.
3. Turn on the hazard warning lights and set the power mode to VEHICLE OFF
(LOCK).
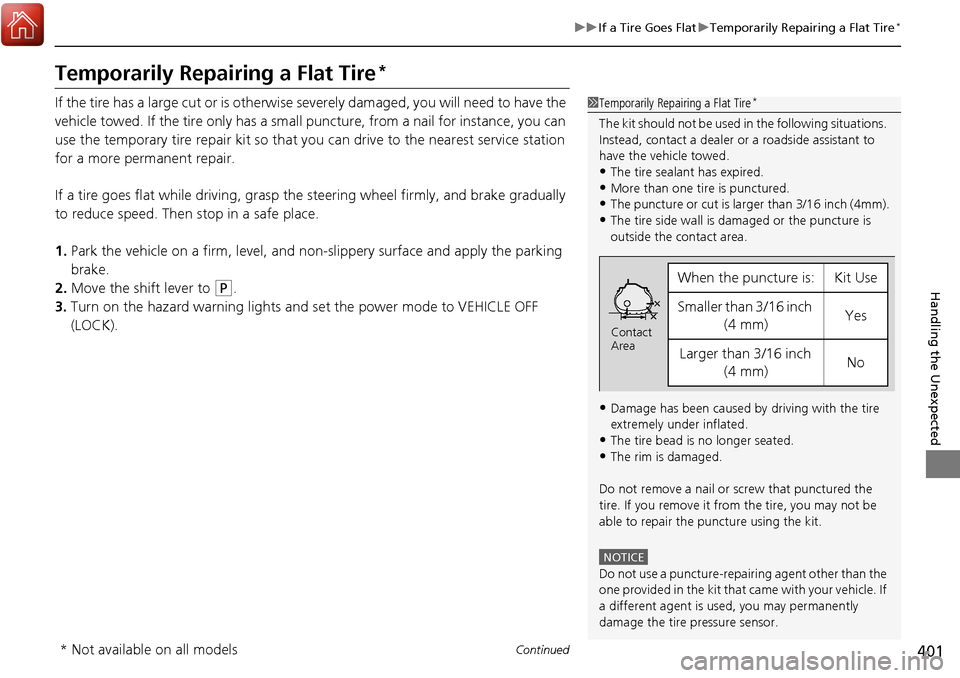
1Temporarily Repairing a Flat Tire*
The kit should not be used in the following situations.
Instead, contact a dealer or a roadside assistant to
have the vehicle towed.
•The tire sealant has expired.
•More than one tire is punctured.•The puncture or cut is larger than 3/16 inch (4mm).
•The tire side wall is da maged or the puncture is
outside the contact area.
•Damage has been caused by driving with the tire
extremely under inflated.
•The tire bead is no longer seated.
•The rim is damaged.
Do not remove a nail or screw that punctured the
tire. If you remove it from the tire, you may not be
able to repair the puncture using the kit.
NOTICE
Do not use a puncture-repairing agent other than the
one provided in the kit that came with your vehicle. If
a different agent is used, you may permanently
damage the tire pressure sensor.
When the puncture is:Kit Use
Smaller than 3/16 inch (4 mm)Yes
Larger than 3/16 inch (4 mm)No
Contact
Area
* Not available on all models
Page 415 of 449

414
uuEngine Does Not Start uEmergency Engine Stop
Handling the Unexpected
Emergency Engine Stop
The ENGINE START/STOP button may be used to stop the engine due to an
emergency situation even while driving. If you must stop the engine, do either of the
following operations:
• Press and hold the ENGINE START/STOP button for two seconds.
• Firmly press the ENGINE START/STOP button twice.
The steering wheel will not lock. However, because turning off the engine disables
the power assist the engine provides to the steering and braking systems, it will
require significantly more physical effort an d time to steer and slow the vehicle. Use
both feet on the brake pedal to slow down the vehicle and stop immediately in a
safe place.
The power mode is in ACCESSORY when the engine is stopped.
To change the mode to VEHICLE OF F, change the gear position to
(P after the
vehicle comes to a complete stop. Then press the ENGINE START/STOP button
twice without depressing the brake pedal.
1 Emergency Engine Stop
Do not press the button while driving unless it is
absolutely necessary for th e engine to be switched
off.
Page 418 of 449
417
Handling the Unexpected
Shift Lever Does Not Move
Follow the procedure below if you cannot move the shift lever out of the (P
position.
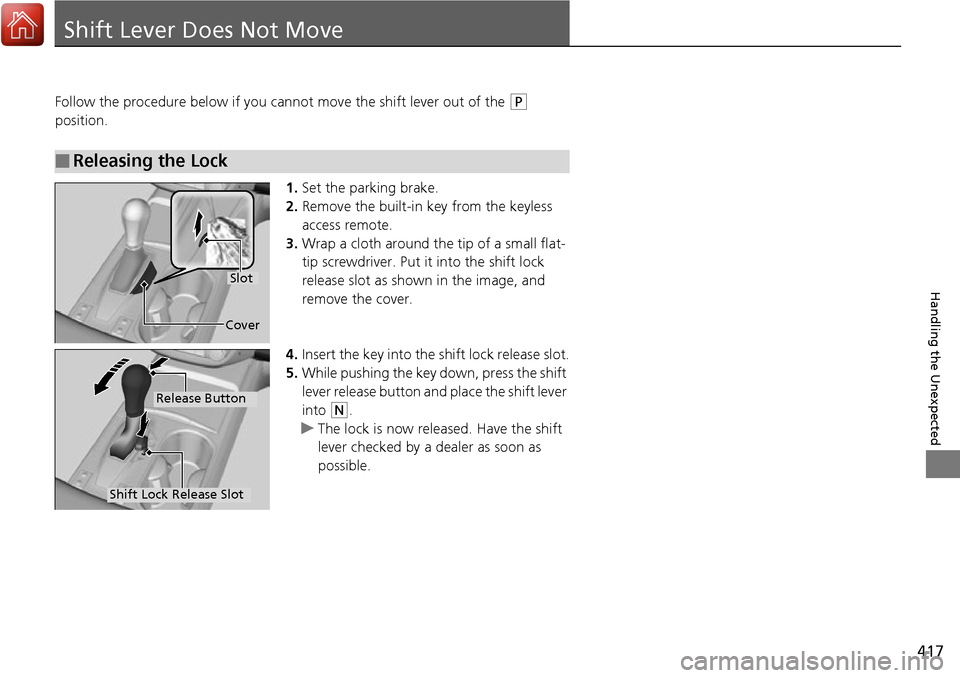
1.Set the parking brake.
2. Remove the built-in key from the keyless
access remote.
3. Wrap a cloth around the tip of a small flat-
tip screwdriver. Put it into the shift lock
release slot as shown in the image, and
remove the cover.
4. Insert the key into the shift lock release slot.
5. While pushing the key down, press the shift
lever release button and place the shift lever
into
(N.
u The lock is now released. Have the shift
lever checked by a de aler as soon as
possible.
■Releasing the Lock
Slot
Cover
Release Button
Shift Lock Release Slot
Page 425 of 449
424
Handling the Unexpected
Fuses
Fuse Locations
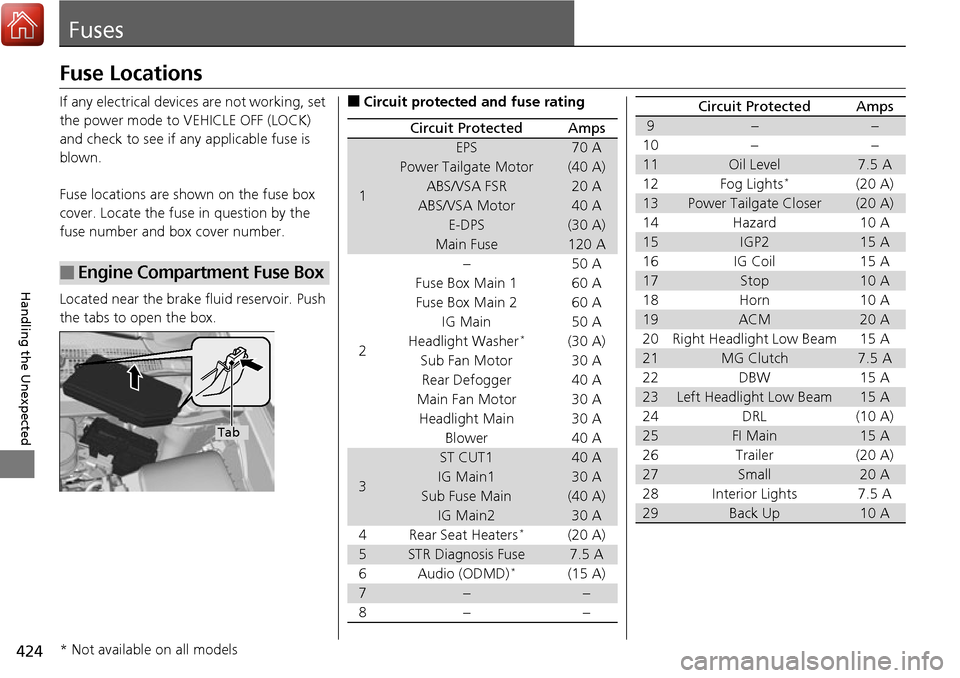
If any electrical devices are not working, set
the power mode to VEHICLE OFF (LOCK)
and check to see if any applicable fuse is
blown.
Fuse locations are shown on the fuse box
cover. Locate the fuse in question by the
fuse number and box cover number.
Located near the brake fluid reservoir. Push
the tabs to open the box.
■Engine Compartment Fuse Box
Tab
■Circuit protected and fuse rating
Circuit ProtectedAmps
1
EPS70 A
Power Tailgate Motor(40 A)
ABS/VSA FSR20 A
ABS/VSA Motor40 A
E-DPS(30 A)
Main Fuse120 A
2
−50 A
Fuse Box Main 1 60 A
Fuse Box Main 260 A
IG Main 50 A
Headlight Washer*(30 A)
Sub Fan Motor 30 A Rear Defogger 40 A
Main Fan Motor 30 A Headlight Main 30 A Blower 40 A
3
ST CUT140 A
IG Main130 A
Sub Fuse Main(40 A)
IG Main230 A
4 Rear Seat Heaters*(20 A)
5STR Diagnosis Fuse7.5 A
6Audio (ODMD)*(15 A)
7−−
8− −
9−−
10 − −
11Oil Level7.5 A
12 Fog Lights*(20 A)
13Power Tailgate Closer(20 A)
14 Hazard 10 A
15IGP215 A
16 IG Coil 15 A
17Stop10 A
18 Horn 10 A
19ACM20 A
20 Right Headlight Low Beam 15 A
21MG Clutch7.5 A
22 DBW 15 A
23Left Headlight Low Beam15 A
24 DRL (10 A)
25FI Main15 A
26 Trailer (20 A)
27Small20 A
28 Interior Lights 7.5 A
29Back Up10 A
Circuit ProtectedAmps
* Not available on all models
Page 426 of 449
425
uuFuses uFuse Locations
Handling the Unexpected
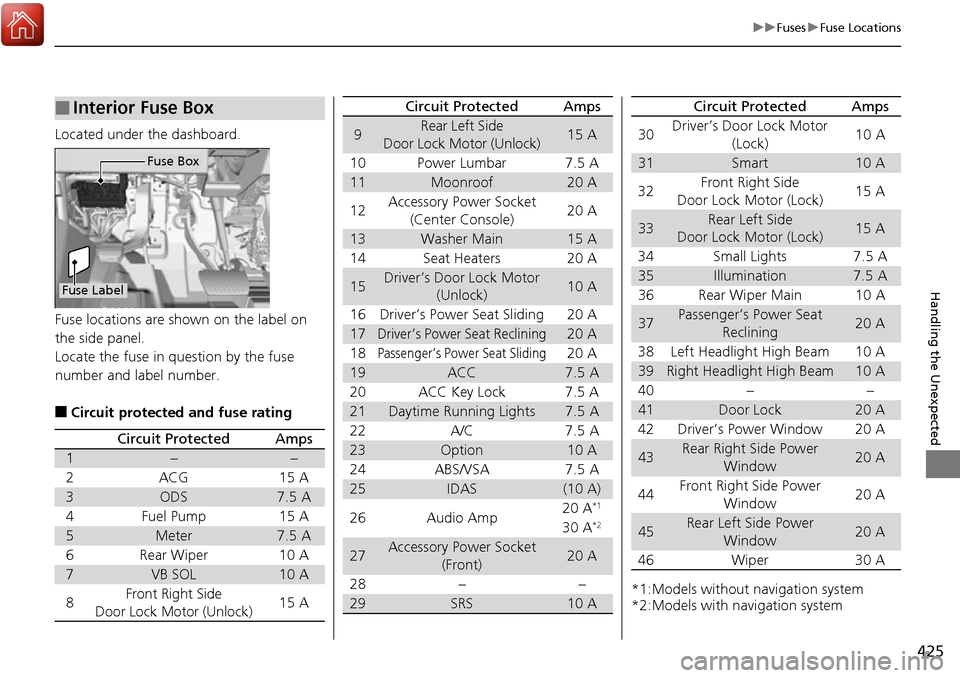
Located under the dashboard.
Fuse locations are shown on the label on
the side panel.
Locate the fuse in question by the fuse
number and label number.
■Circuit protected and fuse rating
■Interior Fuse Box
Fuse Label
Fuse Box
Circuit ProtectedAmps
1−−
2ACG15 A
3ODS7.5 A
4Fuel Pump15 A
5Meter7.5 A
6Rear Wiper10 A
7VB SOL10 A
8Front Right Side
Door Lock Motor (Unlock)15 A
9Rear Left Side
Door Lock Motor (Unlock)15 A
10 Power Lumbar 7.5 A
11Moonroof20 A
12 Accessory Power Socket
(Center Console) 20 A
13Washer Main15 A
14 Seat Heaters 20 A
15Driver’s Door Lock Motor (Unlock)10 A
16 Driver’s Power Seat Sliding 20 A
17Driver’s Power Seat Reclining20 A
18
Passenger’s Power Seat Sliding20 A
19ACC7.5 A
20 ACC Key Lock 7.5 A
21Daytime Running Lights7.5 A
22 A/C 7.5 A
23Option10 A
24 ABS/VSA 7.5 A
25IDAS(10 A)
26 Audio Amp 20 A*1
30 A*2
27Accessory Power Socket
(Front)20 A
28 − −
29SRS10 A
Circuit ProtectedAmps
*1:Models without navigation system
*2:Models with navigation system30
Driver’s Door Lock Motor
(Lock) 10 A
31Smart10 A
32 Front Right Side
Door Lock Motor (Lock) 15 A
33Rear Left Side
Door Lock Motor (Lock)15 A
34 Small Lights 7.5 A
35Illumination7.5 A
36 Rear Wiper Main 10 A
37Passenger’s Power Seat Reclining20 A
38 Left Headlight High Beam 10 A
39Right Headlight High Beam10 A
40 − −
41Door Lock20 A
42 Driver’s Power Window 20 A
43Rear Right Side Power Window20 A
44 Front Right Side Power
Window 20 A
45Rear Left Side Power
Window20 A
46 Wiper 30 A
Circuit ProtectedAmps
Page 427 of 449

426
uuFuses uInspecting and Changing Fuses
Handling the Unexpected
Inspecting and Changing Fuses
1. Set the power mode to VEHICLE OFF
(LOCK). Turn headlight s and all accessories
off.
2. Remove the fuse box cover.
3. Check the large fuse in the engine
compartment.
u If the fuse is blown, use a Phillips-head
screwdriver to remo ve the screw and
replace it with a new one.
4. Inspect the small fuses in the engine
compartment and the vehicle interior.
u If there is a burned out fuse, remove it
with the fuse puller and replace it with a
new one.1Inspecting and Changing Fuses
NOTICE
Replacing a fuse with on e that has a higher rating
greatly increases the chances of damaging the
electrical system.
Replace fuse with a spare fuse of the same specified
amperage
Confirm the specified amperage using the charts on
P. 424 to P. 425.
There is a fuse puller on the back of the engine
compartment fuse box cover.
Combined
Fuse Blown Fuse
Fuse Puller
Page 442 of 449
Index
441
Index
Index
A
ABS (Anti-lock Brake System).................. 320
Accessories and Modifications ................ 342
Accessory Power Sockets ......................... 174
Adaptive Cruise Control (ACC) .......... 79, 284
Additives Coolant .................................................. 358
Engine Oil ............................................... 353
Washer ................................................... 362
Additives, Engine Oil ............................... 353
Adjusting
Armrest .................................................. 168
Front Seats.............................................. 162
Head Restraints ....................................... 164
Mirrors.................................................... 159
Rear Seats ............................................... 167
Steering Wheel ....................................... 158
Temperature ............................................. 98
Air Conditioning System
(Climate Control System) ....................... 180
Changing the Mode................................ 180
Defrosting the Windshield and
Windows .............................................. 181
Dust and Pollen Filter .............................. 386
Recirculation/Fresh Air Mode................... 180
Sensors ................................................... 183
Synchronized Mode ................................ 182
Using Automatic Climate Control............ 180
Air Pressure ...................................... 375, 431 Airbags
........................................................ 37
Advanced Airbags ..................................... 43
After a Collision ......................................... 40
Airbag Care ............................................... 49
Front Airbags (SRS) .................................... 40
Indicator .............................................. 47, 70
Passenger Airbag Off Indicator .................. 48
Sensors ...................................................... 37
Side Airbags .............................................. 44
Side Curtain Airbags .................................. 46
All-Wheel Drive (AWD) with Intelligent
Control System ........................................ 314
AM/FM Radio ............................................ 198
Anti-lock Brake System (ABS) .................. 320
Indicator .................................................... 69
Armrest ..................................................... 168
Audio Remote Controls ............................ 189
Audio System ............................................ 186
Adjusting the Sound ................................ 197
Auxiliary Input Jack .................................. 187
Error Messages ........................................ 215
General Information ................................ 218
iPod ®....................................................... 205
MP3/WMA/AAC ...................................... 210
Pandora ®................................................. 208
Reactivating ............................................. 188
Recommended CDs ................................. 219
Recommended Devices ............................ 221
Remote Controls ..................................... 189
Security Code .......................................... 188
Theft Protection ....................................... 188 USB Flash Drives ...................................... 221
USB Port.................................................. 187
Audio/Information Screen ....................... 191
Authorized Manuals ................................ 439
Auto Door Locking/Unlocking ................. 130
Customize ....................................... 105, 112
Automatic Intermittent Wipers ............... 152
Automatic Lighting .................................. 148
Automatic Transmission ........................... 274
Creeping ................................................. 274
Fluid ........................................................ 360
Kickdown ................................................ 274
Operating the Shift Lever................... 16, 276
Sequential Shift Mode ............................. 277
Shift Lever Does Not Move ...................... 417
Shifting ................................................... 275
Auxiliary Input Jack .................................. 187
Average Fuel Economy .............................. 98
Average Speed ........................................... 99
AWD .......................................................... 314
B
Battery ...................................................... 383
Charging System Indicator................. 68, 420
Jump Starting .......................................... 415
Maintenance (Checki ng the Battery) ........ 383
Belts (Seat) .................................................. 29
Beverage Holders ..................................... 173
Blind spot information (BSI) System ........ 311
Bluetooth ® Audio ..................................... 213