minder Acura RDX 2017 User Guide
[x] Cancel search | Manufacturer: ACURA, Model Year: 2017, Model line: RDX, Model: Acura RDX 2017Pages: 449, PDF Size: 10.88 MB
Page 150 of 449
149
uuOperating the Switches Around the Steering Wheel uLight Switches
Controls
The headlights automatically come on when the wipers are used several times within
certain number of intervals while the headlight switch is in
#Y. The headlights
automatically go off a few minutes after the wipers are stopped.
The headlights, all other exterior lights, a nd the instrument panel lights turn off 15
seconds after you set the po wer mode to VEHICLE OFF (LOCK), take the remote with
you, and close the driver’s door.
If you set the power mode to VEHICLE OFF (LOCK) with the headlight switch on, but
do not open the door, the lights turn off after 10 minutes (three minutes, if the
switch is in the
#Y position).
The lights turn on again when you unlock or open the driver’s door. If you unlock
the door, but do not open it within 15 seconds, the lights go off. If you open the
driver’s door, you will hear a lights on reminder chime.
■Headlight Integration with Wiper*
■Automatic Lighting Off Feature
1 Headlight Integration with Wiper*
This feature activates while the headlights are in
#Y. The instrument pane l brightness does not
change when the headlights come on.
If the ambient light is da rk, the automatic lighting
control overrides this feat ure, and the headlights
come on whether or not the wipers cycle several
times.
1 Automatic Lighting Off Feature
You can change the headlight auto off timer setting.
2 Customized Features P. 100, 106
* Not available on all models
Page 285 of 449
284
uuWhen Driving uAdaptive Cruise Control (ACC)*
Driving
Adaptive Cruise Control (ACC)*
Helps maintain a constant vehicle speed and a set following-distance behind a
vehicle detected ahead of yours, without you having to keep your foot on the brake
or the accelerator.
When ACC slows your vehicle by applying the brakes, your vehicle’s brake lights will
illuminate.1 Adaptive Cruise Control (ACC)*
Important Reminder
As with any system, there are limits to ACC. Use the
brake pedal whenever necessary, and always keep a
safe distance between your vehicle and other vehicles.
3WARNING
Improper use of ACC can lead to a crash.
Use ACC only when travelling on open
highways in good weather.
3WARNING
ACC has limited braking capability.
When your vehicle speed drops below
22 mph (35 km/h), ACC will
automatically cancel and no longer will
apply your vehicle’s brakes.
Always be prepared to apply the brake
pedal when conditions require.
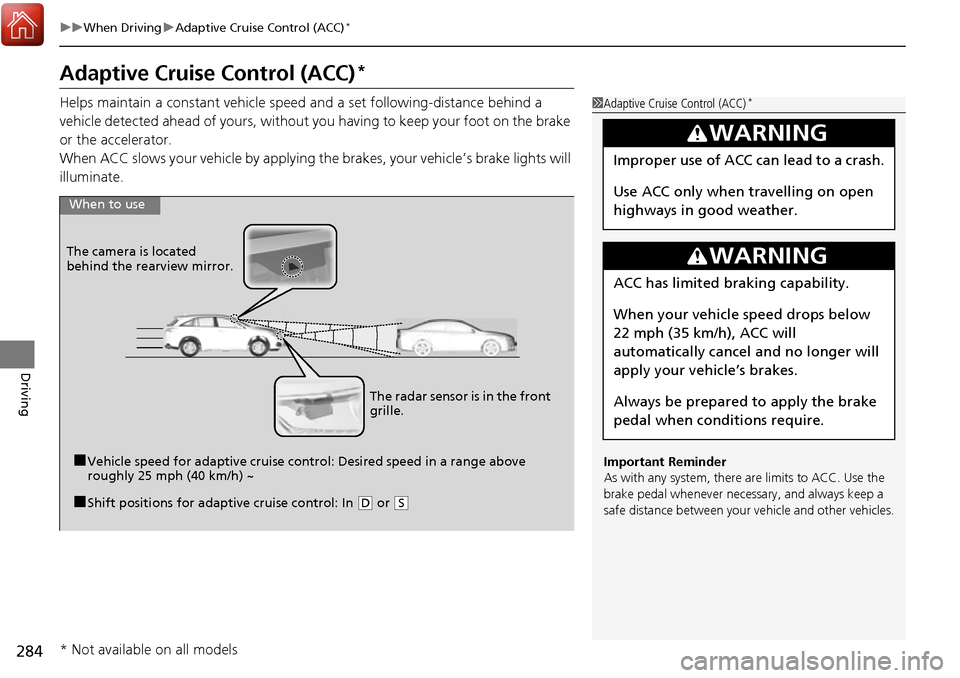
When to use
■Vehicle speed for adaptive cruise control: Desired speed in a range above
roughly 25 mph (40 km/h) ~
The camera is located
behind the rearview mirror.
■Shift positions for adaptive cruise control: In (
D or (S
The radar sensor is in the front
grille.
* Not available on all models
Page 298 of 449
297
uuWhen Driving uLane Departure Warning (LDW)*
Continued
Driving
Lane Departure Warning (LDW)*
Alerts you when the system determines a possibility of your vehicle unintentionally
crossing over detected lane markings.
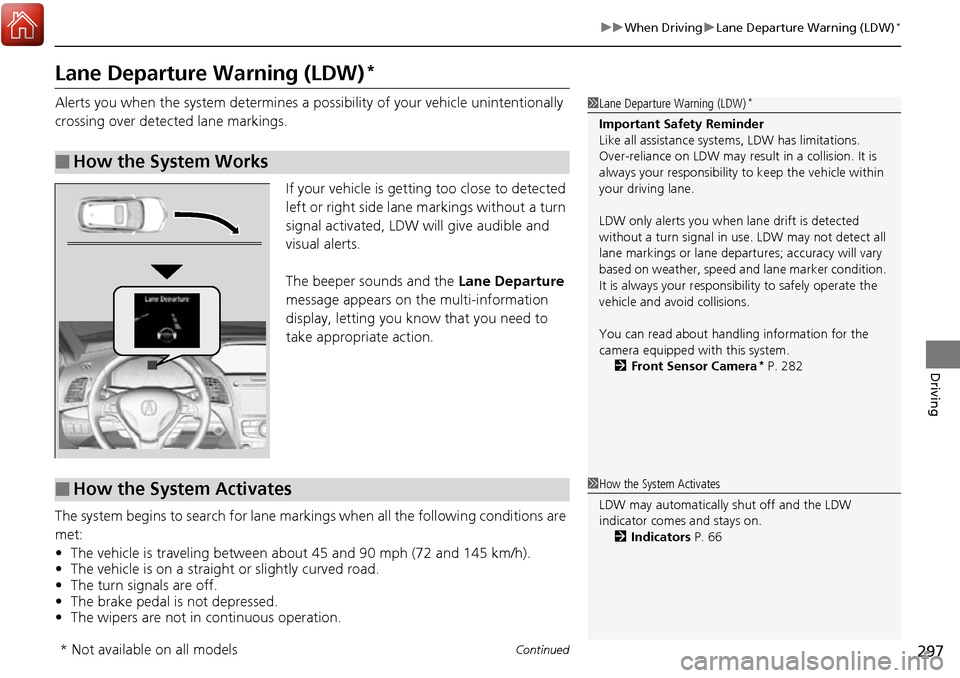
If your vehicle is getting too close to detected
left or right side lane markings without a turn
signal activated, LDW will give audible and
visual alerts.
The beeper sounds and the Lane Departure
message appears on the multi-information
display, letting you know that you need to
take appropriate action.
The system begins to search for lane mark ings when all the following conditions are
met:
• The vehicle is traveling between about 45 and 90 mph (72 and 145 km/h).
• The vehicle is on a straight or slightly curved road.
• The turn signals are off.
• The brake pedal is not depressed.
• The wipers are not in continuous operation.
■How the System Works
1Lane Departure Warning (LDW)*
Important Safety Reminder
Like all assistance systems, LDW has limitations.
Over-reliance on LDW may result in a collision. It is
always your respons ibility to keep the vehicle within
your driving lane.
LDW only alerts you when lane drift is detected
without a turn signal in us e. LDW may not detect all
lane markings or lane departures; a ccuracy will vary
based on weather, speed and lane marker condition.
It is always your responsibility to safely operate the
vehicle and avoid collisions.
You can read about handling information for the
camera equipped with this system. 2 Front Sensor Camera
* P. 282
■How the System Activates1How the System Activates
LDW may automatically shut off and the LDW
indicator comes and stays on.
2 Indicators P. 66
* Not available on all models
Page 302 of 449
301
uuWhen Driving uLane Keeping Assist System (LKAS)*
Continued
Driving
Lane Keeping Assist System (LKAS)*
Provides steering input to help keep the vehicle in the middle of a detected lane and
provides audible and visual alerts if the vehicle is detected drifting out of its lane.1Lane Keeping Assist System (LKAS)*
Important Safety Reminders
The LKAS is for your convenience only. It is not a
substitute for your vehicl e control. The system does
not work if you take y our hands off the steering
wheel or fail to steer the vehicle.
2 Multi-Information Display Warning and
Information Messages P. 91
Do not place objects on the instrument panel.
Objects may reflect on th e front windshield and
prevent correct detectio n of the traffic lanes.
LKAS only alerts you when lane drift is detected
without a turn signal in use. LKAS may not detect all
lane markings or lane departures; a ccuracy will vary
based on weather, speed, an d lane marker condition.
It is always your responsibility to safely operate the
vehicle and avoid collisions.
The LKAS is convenient when it is used on freeways.
The LKAS may not work properly or may work
improperly under the certain conditions: 2 LKAS Conditions and Limitations P. 307
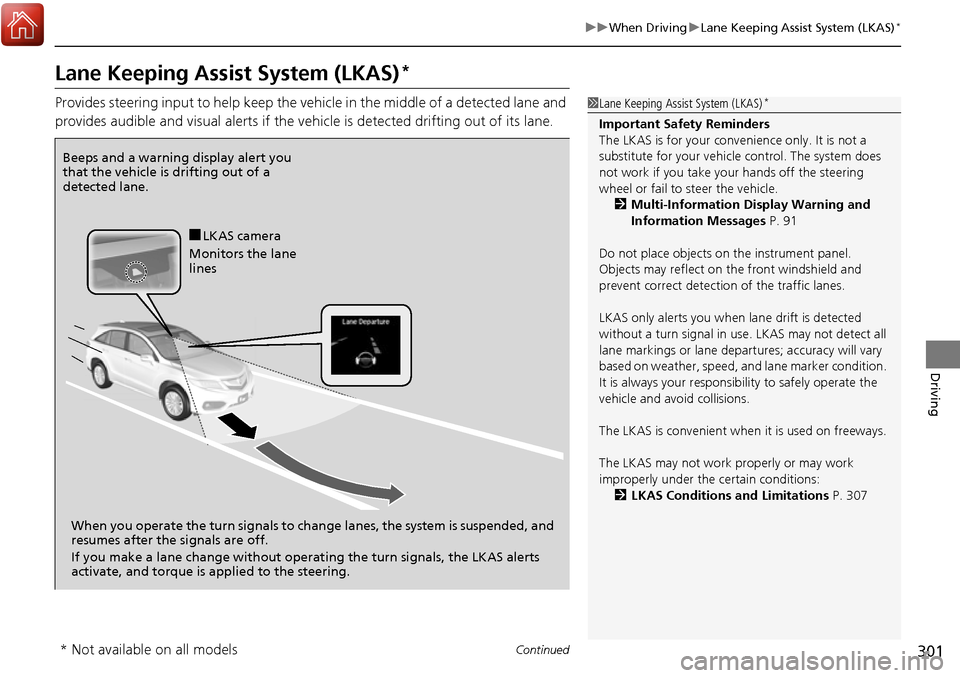
Beeps and a warning display alert you
that the vehicle is drifting out of a
detected lane.
When you operate the turn signals to chan ge lanes, the system is suspended, and
resumes after the signals are off.
If you make a lane change without operat ing the turn signals, the LKAS alerts
activate, and torque is applied to the steering.
■LKAS camera
Monitors the lane
lines
* Not available on all models
Page 312 of 449
311
uuWhen Driving uBlind spot information (BSI) System*
Continued
Driving
Blind spot informa tion (BSI) System*
Is designed to detect vehicles in specified alert zones adjacent to your vehicle,
particularly in harder to see areas commonly known as “blind spots.”
When the system detects vehicles approach ing from behind in adjacent lanes, the
appropriate indicator comes on for a few se conds, providing assistance when you
change lanes.
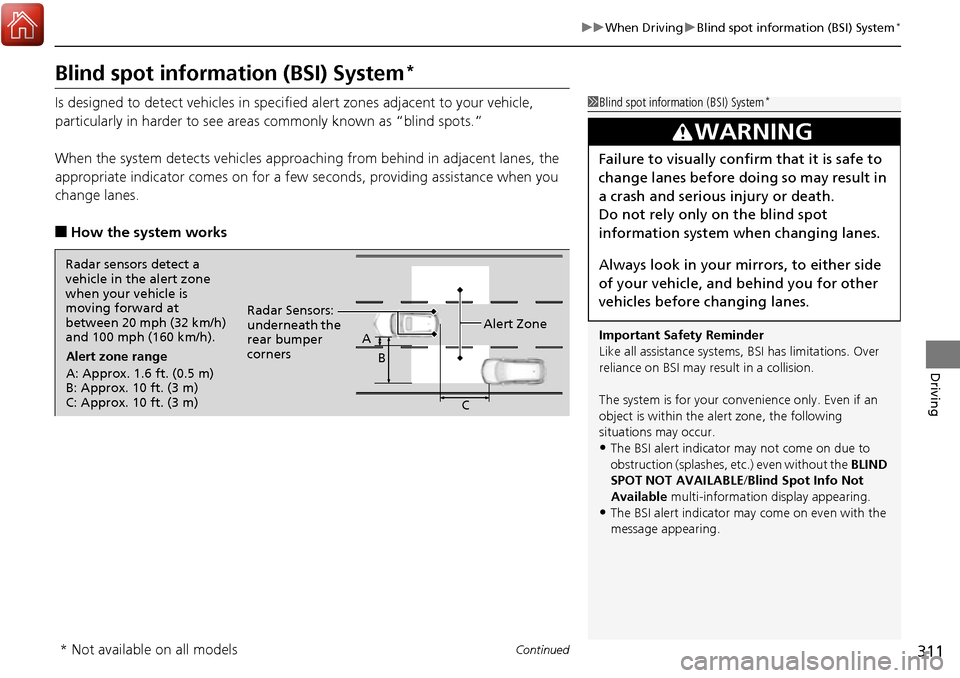
■How the system works
1 Blind spot inform ation (BSI) System*
Important Safety Reminder
Like all assistance systems, BSI has limitations. Over
reliance on BSI may re sult in a collision.
The system is for your convenience only. Even if an
object is within the alert zone, the following
situations may occur.
•The BSI alert indicator may not come on due to
obstruction (splashes, et c.) even without the BLIND
SPOT NOT AVAILABLE/Blind Spot Info Not
Available multi-information display appearing.
•The BSI alert indicator may come on even with the
message appearing.
3WARNING
Failure to visually confirm that it is safe to
change lanes before doing so may result in
a crash and serious injury or death.
Do not rely only on the blind spot
information system wh en changing lanes.
Always look in your mirrors, to either side
of your vehicle, and behind you for other
vehicles before changing lanes.
Radar sensors detect a
vehicle in the alert zone
when your vehicle is
moving forward at
between 20 mph (32 km/h)
and 100 mph (160 km/h). Alert zone range
A: Approx. 1.6 ft. (0.5 m)
B: Approx. 10 ft. (3 m)
C: Approx. 10 ft. (3 m) Radar Sensors:
underneath the
rear bumper
corners
Alert Zone
A
B
C
* Not available on all models
Page 323 of 449

322
uuBraking uCollision Mitigation Braking SystemTM (CMBSTM)*
Driving
Collision Mitigati on Braking SystemTM (CMBSTM)*
Can assist you when there is a possibility of your vehicle colliding with a vehicle or a
pedestrian detected in front of yours. The CMBSTM is designed to alert you when a
potential collision is determined, as well as to reduce your vehicle speed to help
minimize collision severity when a collision is deemed unavoidable.
■How the system works
1 Collision Mitigation Braking SystemTM (CMBSTM)*
Important Safety Reminder
The CMBSTM is designed to reduce the severity of an
unavoidable collision. It does not prevent collision nor
stop the vehicle automatically. It is still your
responsibility to operate the brake pedal and steering
wheel appropriately acco rding to the driving
conditions.
The CMBS
TM may not activate or may not detect a
vehicle in front of y our vehicle under certain
conditions:
2 CMBS
TM Conditions and Limitations P. 326
You can read about handling information for the
camera equipped with this system. 2 Front Sensor Camera
* P. 282
The system starts monitoring the roadway ah ead when your vehicle speed is about
3 mph (5 km/h) and there is a vehicle in front of you. The radar sensor is
in the front grille.
The CMBS
TM activates when:●The speed difference between your vehicle and a vehicle or pedestrian
detected in front of you becomes about 3 mph (5 km/h) and over with a chance
of a collision.
●Your vehicle speed is about 62 mph (100 km/h) or less and there is a chance of a
collision with an oncoming detected vehicle or a pedestrian in front of you. The camera is
located behind the
rearview mirror.
When to use
* Not available on all models
Page 335 of 449
uuParking Your Vehicle uParking Sensor System*
334
Driving
1. Make sure that the parking sensor system is not activated. Set the power mode to
VEHICLE OFF (LOCK).
2. Press and hold the parking sensor system button, and set the power mode to ON.
3. Keep pressing the button for 10 seconds. Release the button when the indicator
in the button flashes.
4. Press the button again. The indi cator in the button goes off.
u The beeper sounds twice. The re ar sensors are now turned off.
To turn the rear sensors on again, follo w the above procedure. The beeper sounds
three times when the rear sensors come back on.
■Turning off All Rear Sensors1 Turning off All Rear Sensors
When you shift to
(R, the indicator in the parking
sensor system button blinks as a reminder that the
rear sensors have been turned off.
Page 344 of 449
343
Maintenance
This chapter discusses basic maintenance.
Before Performing MaintenanceInspection and Maintenance ............ 344
Safety When Performing Maintenance..... 345Parts and Fluids Used in Maintenance Service ........................................... 346
Maintenance Minder
TM..................... 347
Maintenance Under the Hood
Maintenance Items Under the Hood ..... 351Opening the Hood ........................... 352
Recommended Engine Oil ................ 353
Oil Check ......................................... 354
Adding Engine Oil ............................ 355
Changing the Engine Oil and Oil Filter ..... 356
Engine Coolant ................................ 358
Transmission Fluid ............................ 360
Brake Fluid ....................................... 361
Refilling Window Washer Fluid......... 362
Replacing Light Bulbs ....................... 363
Checking and Maintaining Wiper Blades.... 370Checking and Maintaining Tires
Checking Tires ................................. 374
Tire and Loading Information Label ...... 375Tire Labeling .................................... 375DOT Tire Quality Grading (U.S. Vehicles)....... 377Wear Indicators................................ 379
Tire Service Life ................................ 379 Tire and Wheel Replacement ........... 380
Tire Rotation .................................... 381
Winter Tires ..................................... 382
Battery ............................................... 383
Remote Transmitter Care Replacing the Button Battery ........... 384
Climate Control System Maintenance..... 386Cleaning
Interior Care .................................... 387
Exterior Care.................................... 389
Page 348 of 449
347Continued
Maintenance
Maintenance MinderTM
If the engine oil life is less than 15%, you will see the Maintenance Minder messages
appear on the multi-information display ev ery time you set the power mode to ON.
The messages notify you when to change the engine oil, or when to bring your
vehicle to a dealer for indicated maintenance services.
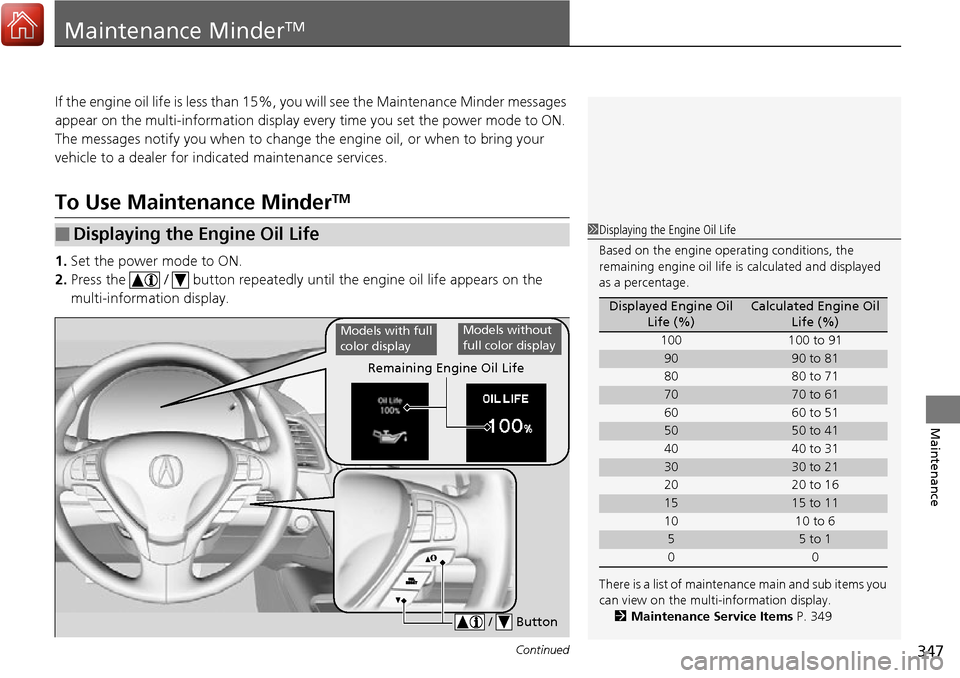
To Use Maintenance MinderTM
1. Set the power mode to ON.
2. Press the / button repeatedly until the engine oil life appears on the
multi-information display.
■Displaying the Engine Oil Life1 Displaying the Engine Oil Life
Based on the engine ope rating conditions, the
remaining engine oi l life is calculated and displayed
as a percentage.
There is a list of maintena nce main and sub items you
can view on the multi-information display. 2 Maintenance Service Items P. 349
Displayed Engine Oil
Life (%)Calculated Engine Oil Life (%)
100 100 to 91
9090 to 81
80 80 to 71
7070 to 61
60 60 to 51
5050 to 41
40 40 to 31
3030 to 21
20 20 to 16
1515 to 11
10 10 to 6
55 to 1
00
Remaining Engine Oil Life
/ Button
Models with full
color displayModels without
full color display
Page 349 of 449

348
uuMaintenance MinderTMuTo Use Maintenance MinderTM
Maintenance
*1 : On the left: Models with full color display
On the right: Models without full color display
The system message indicator ( ) comes on along with the Maintenance Minder message.
■Maintenance Minder Messages on the Multi-Information
Display
Maintenance Message*1Oil Life Display*1ExplanationInformation
Maintenance Due Soon/
SERVICE DUE SOON15%The remaining engine oil life is 15 to 6
percent. Once you switch the display
by pressing the / (information)
button, this message will go off.The engine oil is approaching the end
of its service life, and the maintenance
items should be inspected and serviced
soon.
Maintenance Due Now /
SERVICE DUE NOW5%The remaining engine oil life is 5 to 1
percent. Press the / button to
switch to another display.The engine oil has almost reached the
end of its service life, and the
maintenance items should be
inspected and serviced as soon as
possible.
Maintenance Past Due /
SERVICE PAST DUENegative DistanceThe remaining engine oil life has
passed its service life, and a negative
distance appears after driving over 10
miles (U.S. models) or 10 km
(Canadian models). Press the /
button to switch to another display.The engine oil life has passed.
The maintenance items must be
inspected and serviced immediately.
A