problem display Acura RDX 2017 Owner's Guide
[x] Cancel search | Manufacturer: ACURA, Model Year: 2017, Model line: RDX, Model: Acura RDX 2017Pages: 449, PDF Size: 10.88 MB
Page 207 of 449
uuAudio System Basic Operation*uPlaying an iPod
206
Features
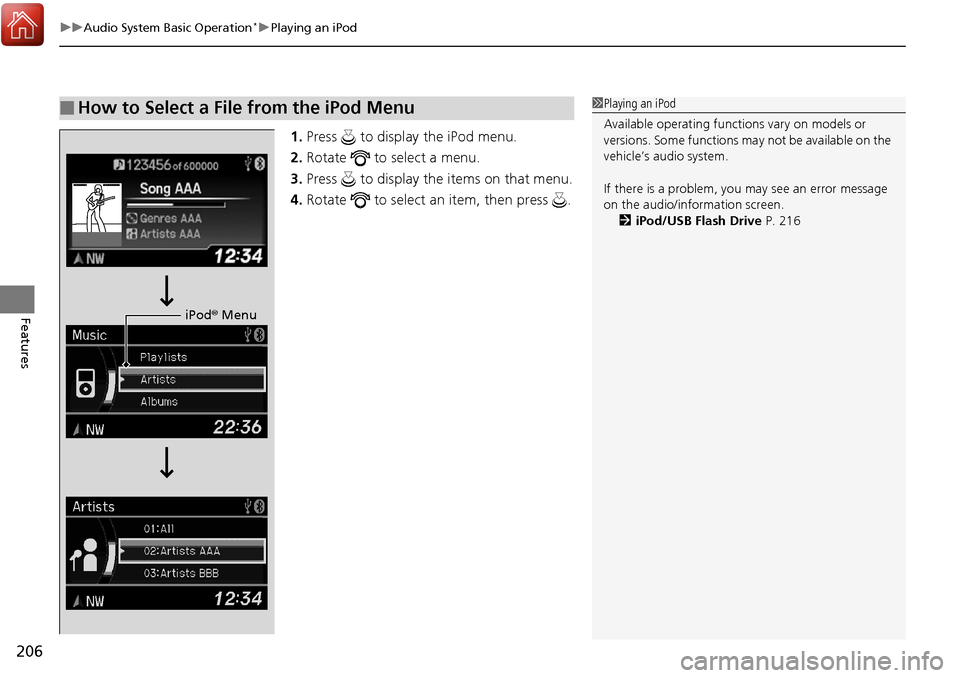
1. Press to display the iPod menu.
2. Rotate to select a menu.
3. Press to display the items on that menu.
4. Rotate to select an item, then press .
■How to Select a File from the iPod Menu1Playing an iPod
Available operating functi ons vary on models or
versions. Some functions ma y not be available on the
vehicle’s audio system.
If there is a problem, you may see an error message
on the audio/information screen. 2 iPod/USB Flash Drive P. 216
iPod® Menu
Page 210 of 449
209
uuAudio System Basic Operation*uPlaying Pandora ®
Features
You can operate some of the Pandora menu items from your vehicle’s audio system.
The available items are:
•Station List (QuickMix is also available)
• Like
• Dislike
• Resume/Pause
• SKIP
• Bookmark this song
• Bookmark this artist
■Operating a menu item
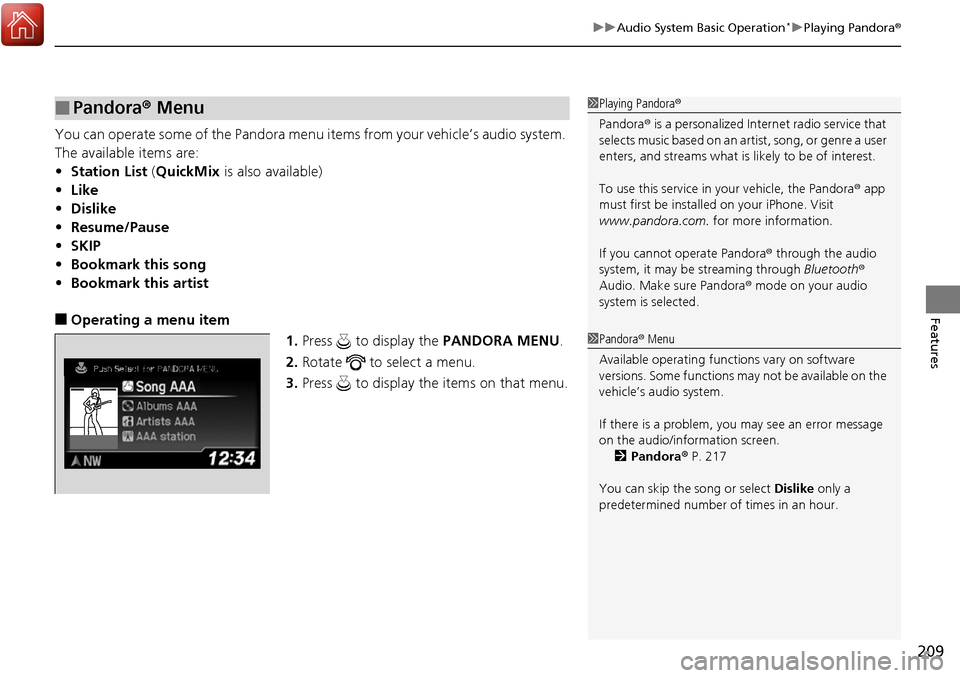
1.Press to display the PANDORA MENU.
2. Rotate to select a menu.
3. Press to display the items on that menu.
■Pandora ® Menu1 Playing Pandora ®
Pandora ® is a personalized Internet radio service that
selects music based on an artist, song, or genre a user
enters, and streams what is likely to be of interest.
To use this service in your vehicle, the Pandora ® app
must first be installe d on your iPhone. Visit
www.pandora.com. for more information.
If you cannot operate Pandora ® through the audio
system, it may be streaming through Bluetooth®
Audio. Make sure Pandora ® mode on your audio
system is selected.
1 Pandora ® Menu
Available operating functi ons vary on software
versions. Some functions ma y not be available on the
vehicle’s audio system.
If there is a problem, you may see an error message
on the audio/information screen. 2 Pandora ® P. 217
You can skip the song or select Dislike only a
predetermined number of times in an hour.
Page 212 of 449
Continued211
uuAudio System Basic Operation*uPlaying a USB Flash Drive
Features
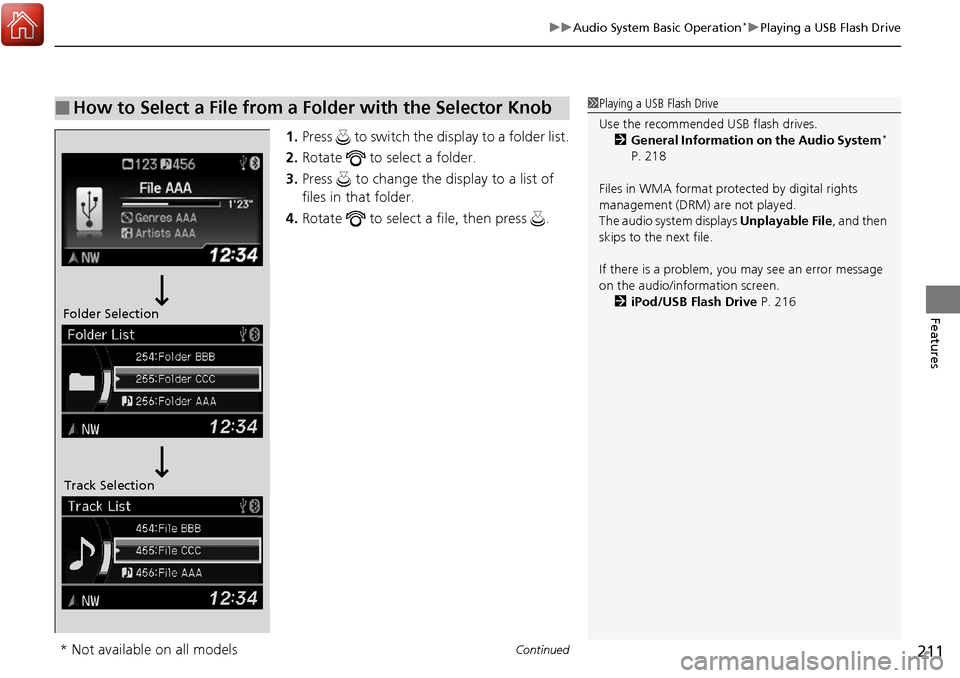
1. Press to switch the display to a folder list.
2. Rotate to select a folder.
3. Press to change the display to a list of
files in that folder.
4. Rotate to select a file, then press .
■How to Select a File from a Folder with the Selector Knob1Playing a USB Flash Drive
Use the recommended USB flash drives.
2 General Information on the Audio System
*
P. 218
Files in WMA format prot ected by digital rights
management (DRM) are not played.
The audio system displays Unplayable File, and then
skips to the next file.
If there is a problem, you may see an error message
on the audio/information screen.
2 iPod/USB Flash Drive P. 216
Folder Selection
Track Selection
* Not available on all models
Page 219 of 449
218
Features
General Information on the Audio System*
SiriusXM® Radio Service
1. You need your radio ID ready before registering for subscription. To see the ID in
the display: Turn the selector knob until 0 appears.
2. Have your radio ID and credit card num ber ready, and either call or visit the
SiriusXM ® website to subscribe.
Press the (SiriusXM ®) button and stay in this mode for about 30 minutes
until the service is activated. Make sure yo ur vehicle is in an open area with good
reception.
Loading...:
SiriusXM ® is loading the audio or program information.
Channel Off Air:
The channel is not currently broadcasting.
Channel Not Authorized:
SiriusXM ® radio is receiving information update from the network.
No Signal:
The signal is too weak in the current location.
--------:
No such channel exists, the channel is not pa rt of your subscription, or the artist or
title information is unavailable.
Check Antenna:
There is a problem with the SiriusXM ® antenna. Contact a dealer.
■Subscribing to SiriusXM® Radio
■Receiving SiriusXM® Radio
■SiriusXM® Radio Display Messages
1 Subscribing to SiriusXM ® Radio
Contact Information for SiriusXM ® Radio:
US: SiriusXM ® Radio at www.siriusxm.com or (800)
852-9696
Canada: SiriusXM ® Canada at www.siriusxm.ca, or
(877) 209-0079
1 Receiving SiriusXM ® Radio
The SiriusXM ® satellites are in orbit over the equator;
therefore, objects south of the vehicle may cause
satellite reception interruptions. Sa tellite signals are
more likely to be blocked by tall buildings and
mountains the farther north you travel from the
equator.
You may experience rece ption problems under the
following circumstances:
•In a location with an obstruction to the south of
your vehicle.
•In tunnels•On the lower level of a multi-tiered road
•Large items carried on the roof rack
* Not available on all models
Page 277 of 449
uuWhen Driving uShifting
276
Driving
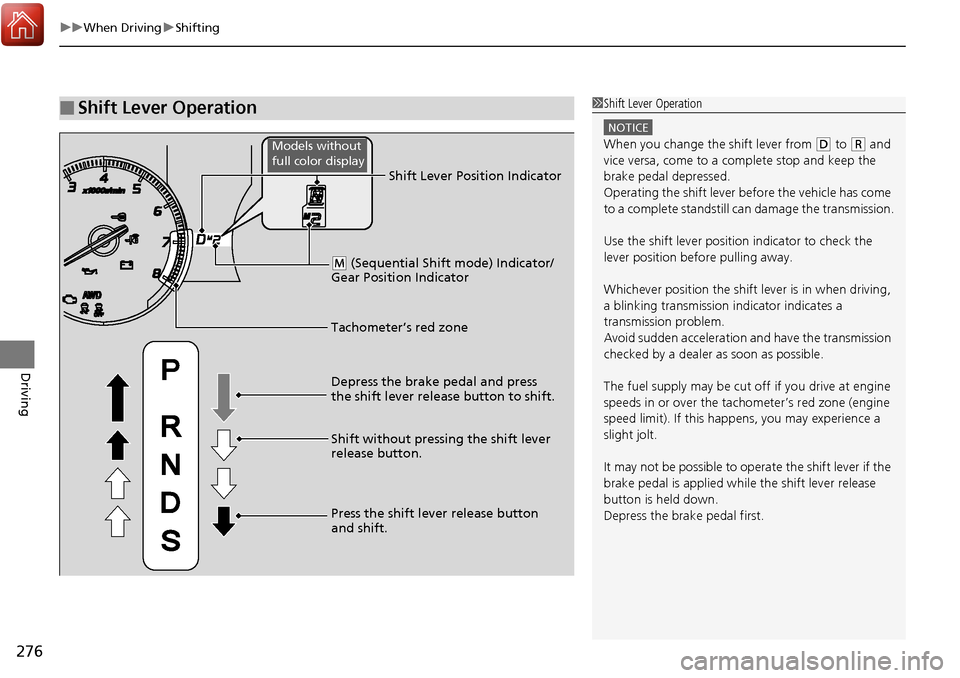
■Shift Lever Operation1Shift Lever Operation
NOTICE
When you change the shift lever from (D to (R and
vice versa, come to a complete stop and keep the
brake pedal depressed.
Operating the shift lever be fore the vehicle has come
to a complete standstill can damage the transmission.
Use the shift lever position indicator to check the
lever position befo re pulling away.
Whichever position the shift lever is in when driving,
a blinking transmission indicator indicates a
transmission problem.
Avoid sudden acceleration and have the transmission
checked by a dealer as soon as possible.
The fuel supply may be cut of f if you drive at engine
speeds in or over the tachometer’s red zone (engine
speed limit). If this happe ns, you may experience a
slight jolt.
It may not be possible to operate the shift lever if the
brake pedal is applied while the shift lever release
button is held down.
Depress the brake pedal first.
Tachometer’s red zone Shift Lever Position Indicator
Depress the brake pedal and press
the shift lever release button to shift.
Shift without pressing the shift lever
release button.
Press the shift lever release button
and shift.
( M (Sequential Shift mode) Indicator/
Gear Position Indicator
Models without
full color display
Page 316 of 449
315
uuWhen Driving uTire Pressure Monitoring System (TPMS)
Driving
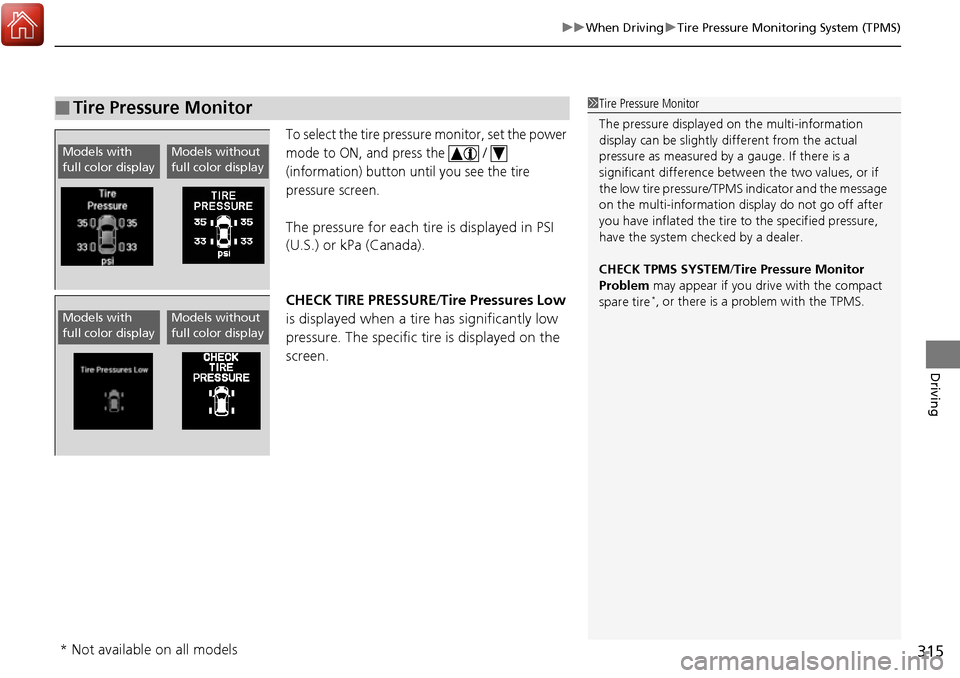
To select the tire pressure monitor, set the power
mode to ON, and press the /
(information) button until you see the tire
pressure screen.
The pressure for each tire is displayed in PSI
(U.S.) or kPa (Canada).
CHECK TIRE PRESSURE /Tire Pressures Low
is displayed when a tire has significantly low
pressure. The specific tire is displayed on the
screen.
■Tire Pressure Monitor1 Tire Pressure Monitor
The pressure displayed on the multi-information
display can be slightly different from the actual
pressure as measured by a gauge. If there is a
significant di fference between the two values, or if
the low tire pressure/TPMS indicator and the message
on the multi-information di splay do not go off after
you have inflated the tire to the specified pressure,
have the system checked by a dealer.
CHECK TPMS SYSTEM /Tire Pressure Monitor
Problem may appear if you drive with the compact
spare tire
*, or there is a problem with the TPMS.
Models with
full color displayModels without
full color display
Models with
full color displayModels without
full color display
* Not available on all models
Page 351 of 449
uuMaintenance MinderTMuTo Use Maintenance MinderTM
350
Maintenance
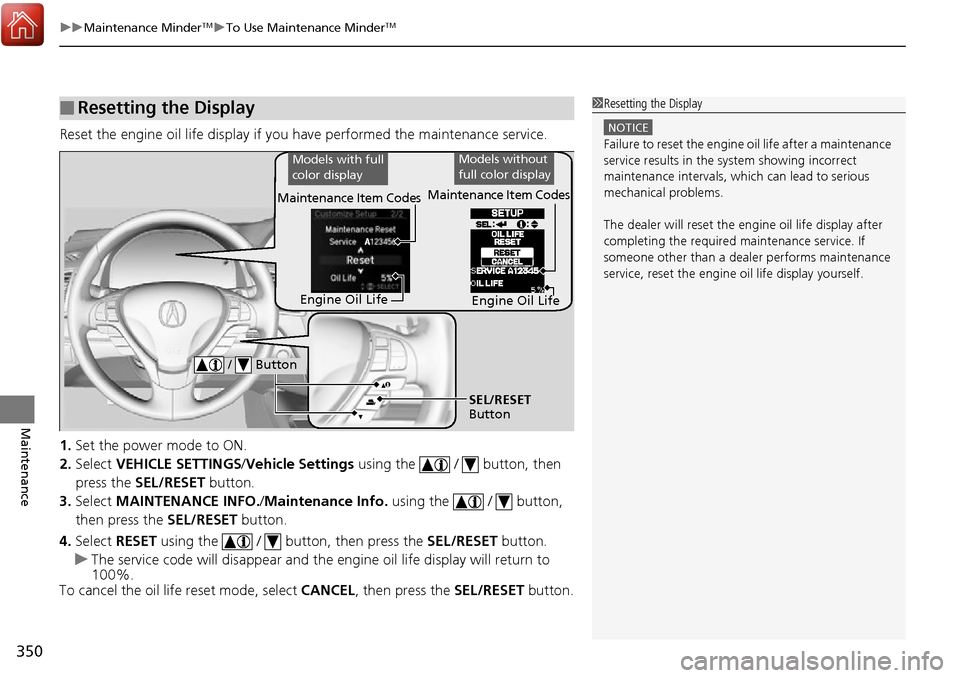
Reset the engine oil life display if you have performed the maintenance service.
1. Set the power mode to ON.
2. Select VEHICLE SETTINGS /Vehicle Settings using the / button, then
press the SEL/RESET button.
3. Select MAINTENANCE INFO. /Maintenance Info. using the / button,
then press the SEL/RESET button.
4. Select RESET using the / button, then press the SEL/RESET button.
u The service code will disappear and the en gine oil life display will return to
100%.
To cancel the oil life reset mode, select CANCEL, then press the SEL/RESET button.
■Resetting the Display1Resetting the Display
NOTICE
Failure to reset the engine oil life after a maintenance
service results in the sy stem showing incorrect
maintenance intervals, which can lead to serious
mechanical problems.
The dealer will reset the en gine oil life display after
completing the required ma intenance service. If
someone other than a deal er performs maintenance
service, reset the engine oil life display yourself.
Engine Oil Life
SEL/RESET
Button
/ Button
Maintenance Item Codes
Models with full
color displayModels without
full color display
Engine Oil Life
Maintenance Item Codes
Page 401 of 449
uuIf a Tire Goes Flat uChanging a Flat Tire*
400
Handling the Unexpected
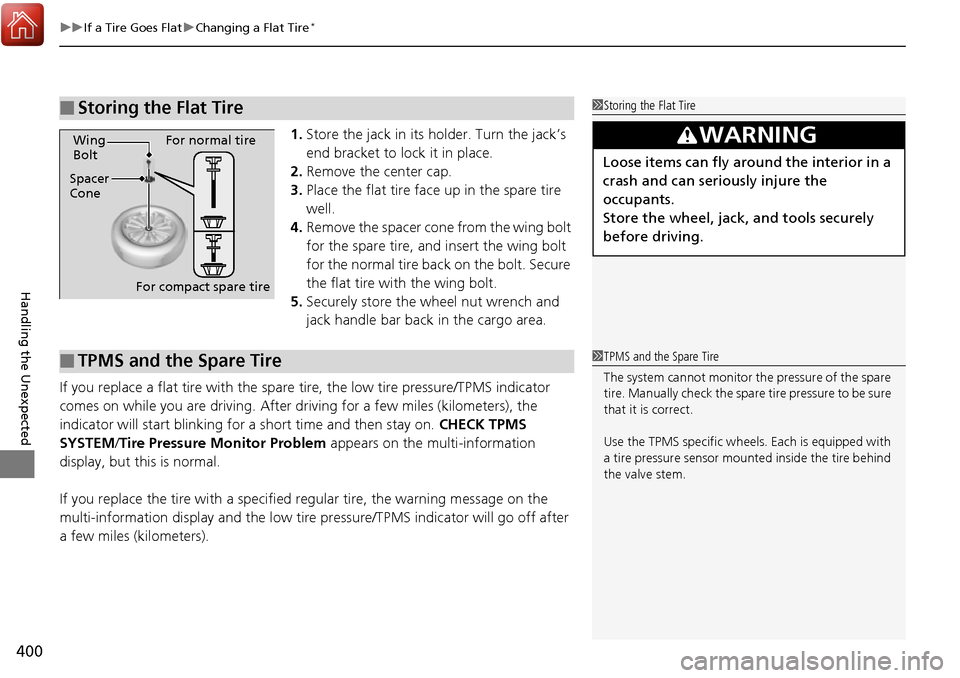
1. Store the jack in its holder. Turn the jack’s
end bracket to lock it in place.
2. Remove the center cap.
3. Place the flat tire face up in the spare tire
well.
4. Remove the spacer cone from the wing bolt
for the spare tire, and insert the wing bolt
for the normal tire back on the bolt. Secure
the flat tire with the wing bolt.
5. Securely store the wheel nut wrench and
jack handle bar back in the cargo area.
If you replace a flat tire with the spare tire, the low tire pressure/TPMS indicator
comes on while you are driving. After driving for a few miles (kilometers), the
indicator will start blinking for a short time and then stay on. CHECK TPMS
SYSTEM/ Tire Pressure Monitor Problem appears on the multi-information
display, but this is normal.
If you replace the tire with a specified regular tire, the warning message on the
multi-information display and the low tire pressure/TPMS indicator will go off after
a few miles (kilometers).
■Storing the Flat Tire1 Storing the Flat Tire
3WARNING
Loose items can fly around the interior in a
crash and can seriously injure the
occupants.
Store the wheel, jack, and tools securely
before driving.Spacer
ConeWing
Bolt
For compact spare tireFor normal tire
■TPMS and the Spare Tire1
TPMS and the Spare Tire
The system cannot monitor th e pressure of the spare
tire. Manually check the spare tire pressure to be sure
that it is correct.
Use the TPMS specific wheels. Each is equipped with
a tire pressure sensor mount ed inside the tire behind
the valve stem.
Page 413 of 449
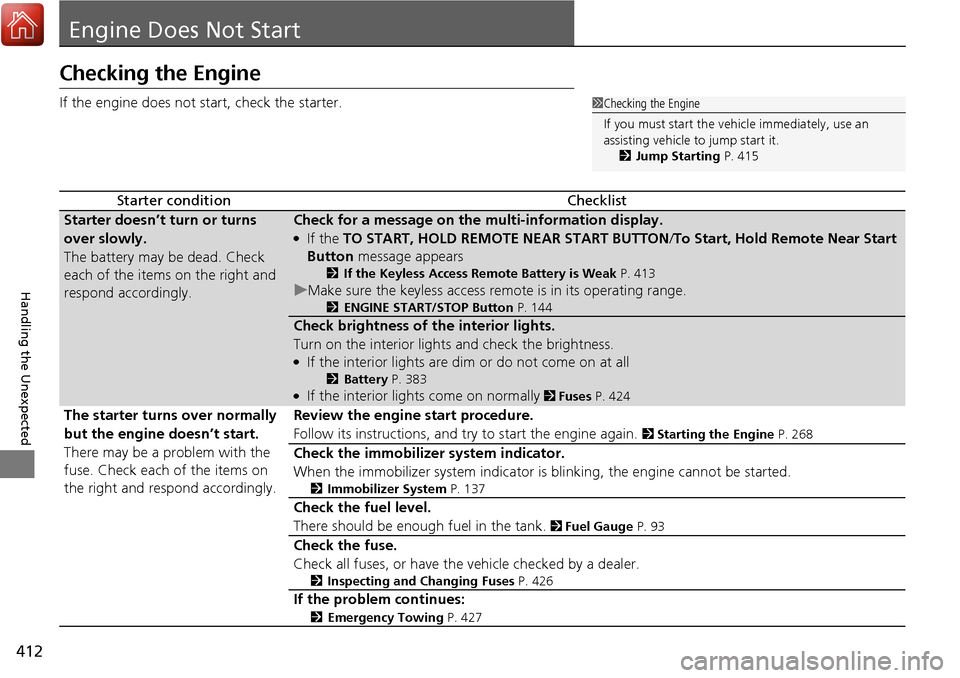
412
Handling the Unexpected
Engine Does Not Start
Checking the Engine
If the engine does not start, check the starter.
Starter conditionChecklist
Starter doesn’t turn or turns
over slowly.
The battery may be dead. Check
each of the items on the right and
respond accordingly.Check for a message on the multi-information display.
●If the TO START, HOLD REMOTE NEAR START BUTTON /To Start, Hold Remote Near Start
Button message appears
2If the Keyless Access Remote Battery is Weak P. 413
uMake sure the keyless access remo te is in its operating range.
2ENGINE START/STOP Button P. 144
Check brightness of the interior lights.
Turn on the interior lights and check the brightness.
●If the interior lights are dim or do not come on at all
2Battery P. 383●If the interior lights come on normally 2 Fuses P. 424
The starter turns over normally
but the engine doesn’t start.
There may be a problem with the
fuse. Check each of the items on
the right and respond accordingly. Review the engine start procedure.
Follow its instructions, and try to start the engine again.
2
Starting the Engine P. 268
Check the immobilizer system indicator.
When the immobilizer system indicator is blinking, the engine cannot be started.
2Immobilizer System P. 137
Check the fuel level.
There should be enough fuel in the tank.
2 Fuel Gauge P. 93
Check the fuse.
Check all fuses, or have the vehicle checked by a dealer.
2Inspecting and Changing Fuses P. 426
If the problem continues:
2Emergency Towing P. 427
1Checking the Engine
If you must start the vehi cle immediately, use an
assisting vehicle to jump start it.
2 Jump Starting P. 415