warning light Acura RDX 2017 Owner's Manual
[x] Cancel search | Manufacturer: ACURA, Model Year: 2017, Model line: RDX, Model: Acura RDX 2017Pages: 449, PDF Size: 10.88 MB
Page 11 of 449
10
Quick Reference Guide
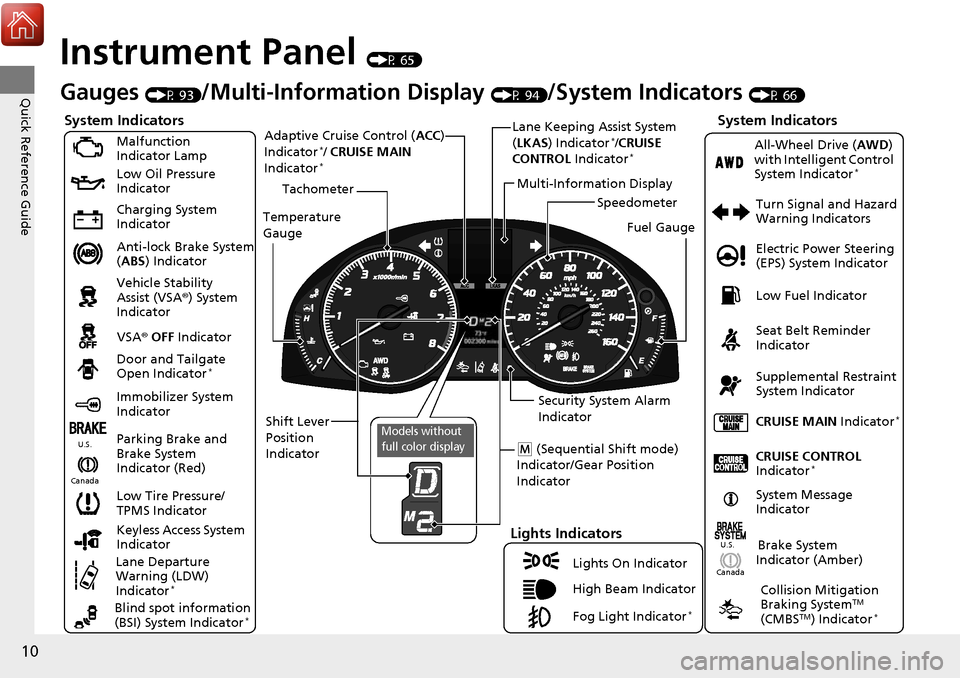
Instrument Panel (P 65)
CanadaU.S.
Turn Signal and Hazard
Warning Indicators
All-Wheel Drive (
AWD)
with Intelligent Control
System Indicator
*
System Indicators
Malfunction
Indicator Lamp
Low Oil Pressure
Indicator
Charging System
Indicator
Anti-lock Brake System
( ABS ) Indicator
Vehicle Stability
Assist (VSA ®) System
Indicator
VSA ® OFF Indicator
Low Tire Pressure/
TPMS Indicator
Lights Indicators
Lights On Indicator
High Beam Indicator
Fog Light Indicator
*
Immobilizer System
Indicator Seat Belt Reminder
Indicator
System Indicators
CRUISE CONTROL
Indicator*
Parking Brake and
Brake System
Indicator (Red) Supplemental Restraint
System Indicator
Door and Tailgate
Open Indicator
*
CRUISE MAIN
Indicator*
Tachometer
Speedometer
Fuel Gauge
Security System Alarm
Indicator
Shift Lever
Position
Indicator Low Fuel Indicator
Gauges (P 93)/Multi-Informa
tion Display (P 94)/System Indicators (P 66)
System Message
IndicatorBrake System
Indicator (Amber)
Temperature
Gauge
Electric Power Steering
(EPS) System Indicator
Canada
U.S.
Keyless Access System
Indicator
Lane Departure
Warning (LDW)
Indicator
*
Blind spot information
(BSI) System Indicator*
Collision Mitigation
Braking SystemTM
(CMBSTM) Indicator*
Lane Keeping Assist System
( LKAS) Indicator*/CRUISE
CONTROL Indicator*
Multi-Information Display
(M (Sequential Shift mode)
Indicator/Gear Position
Indicator
Models without
full color display
Adaptive Cruise Control ( ACC)
Indicator*/ CRUISE MAIN
Indicator*
Page 48 of 449
Continued47
uuAirbags uAirbag System Indicators
Safe Driving
■When side curtain airbags deploy in a frontal collision
One or both side curtain airbags may inflate in a moderate to severe angled frontal
collision.
In this case, the side curtain airbags will deploy slightly after the front airbags.
Airbag System Indicators
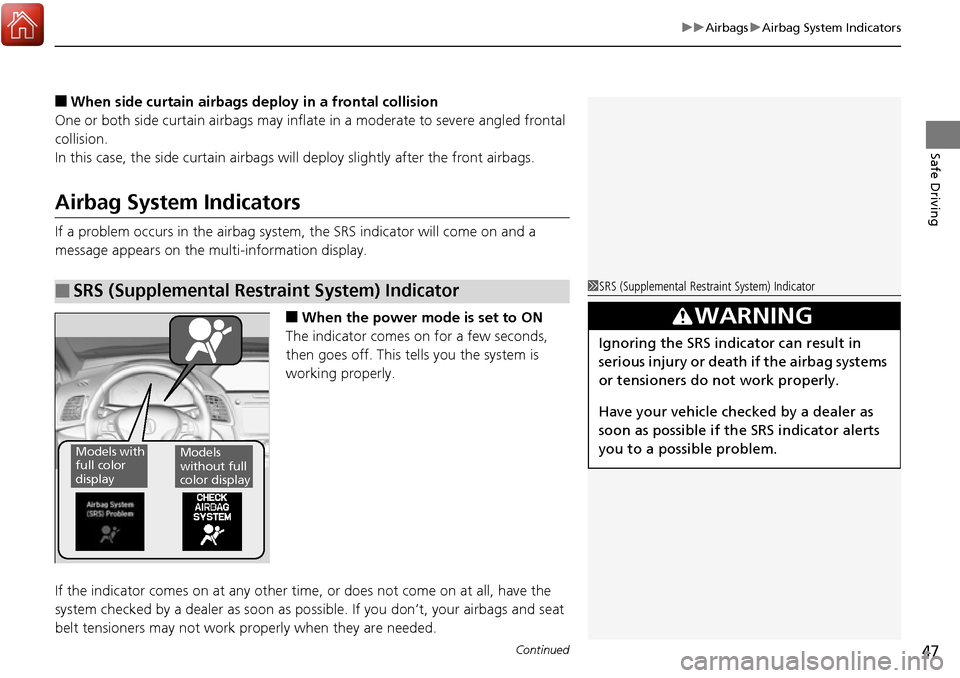
If a problem occurs in the airbag system , the SRS indicator will come on and a
message appears on the mu lti-information display.
■When the power mode is set to ON
The indicator comes on for a few seconds,
then goes off. This tells you the system is
working properly.
If the indicator comes on at any other time , or does not come on at all, have the
system checked by a dealer as soon as po ssible. If you don’t, your airbags and seat
belt tensioners may not work properly when they are needed.
■SRS (Supplemental Restraint System) Indicator1SRS (Supplemental Restraint System) Indicator
3WARNING
Ignoring the SRS indicator can result in
serious injury or death if the airbag systems
or tensioners do not work properly.
Have your vehicle checked by a dealer as
soon as possible if th e SRS indicator alerts
you to a possible problem.
Models with
full color
displayModels
without full
color display
Page 74 of 449
73
uuIndicators u
Continued
Instrument Panel
*1:On the left: Models wi thout full color display
On the right: Models with full color display
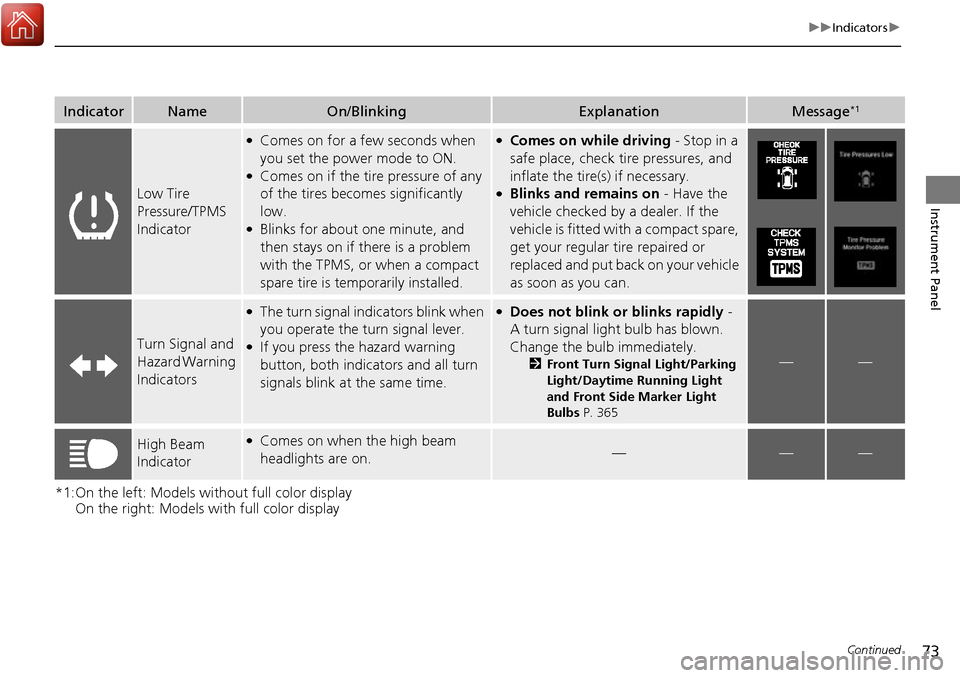
IndicatorNameOn/BlinkingExplanationMessage*1
Low Tire
Pressure/TPMS
Indicator
●Comes on for a few seconds when
you set the power mode to ON.
●Comes on if the tire pressure of any
of the tires becomes significantly
low.
●Blinks for about one minute, and
then stays on if there is a problem
with the TPMS, or when a compact
spare tire is temporarily installed.
●Comes on while driving - Stop in a
safe place, check tire pressures, and
inflate the tire(s) if necessary.
●Blinks and remains on - Have the
vehicle checked by a dealer. If the
vehicle is fitted with a compact spare,
get your regular tire repaired or
replaced and put back on your vehicle
as soon as you can.
Turn Signal and
Hazard Warning
Indicators
●The turn signal indicators blink when
you operate the turn signal lever.
●If you press the hazard warning
button, both indicators and all turn
signals blink at the same time.
●Does not blink or blinks rapidly -
A turn signal light bulb has blown.
Change the bulb immediately.
2 Front Turn Signal Light/Parking
Light/Daytime Running Light
and Front Side Marker Light
Bulbs P. 365——
High Beam
Indicator●Comes on when the high beam
headlights are on.———
Page 88 of 449
87
uuIndicators uMulti-Information Display Warning and Information Messages
Continued
Instrument Panel
*1:On the left: Models wi thout full color display
On the right: Models with full color display
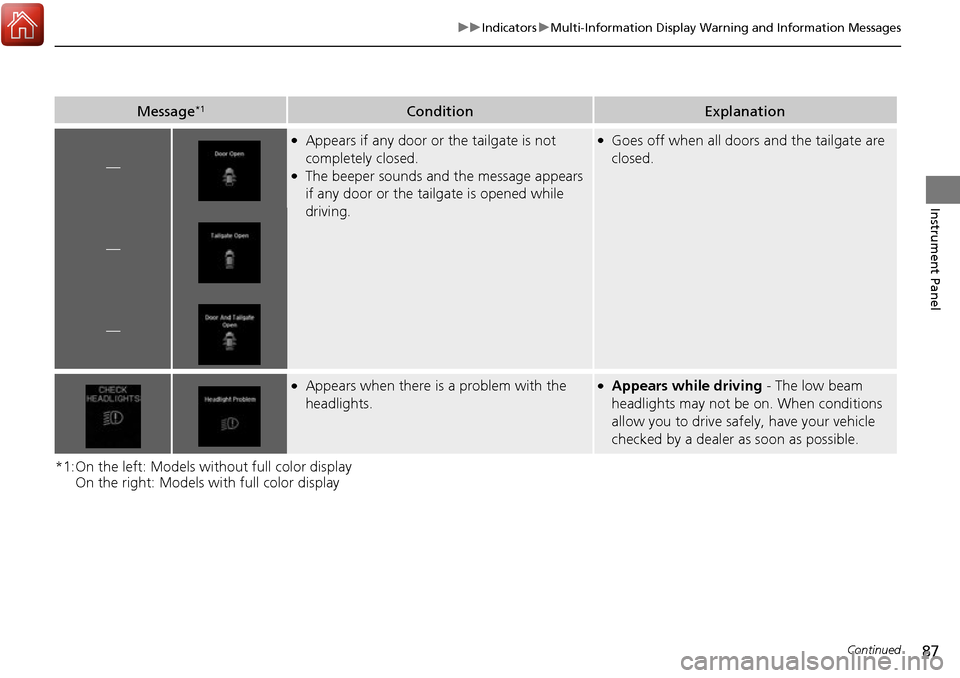
Message*1ConditionExplanation
—
●Appears if any door or the tailgate is not
completely closed.
●The beeper sounds and the message appears
if any door or the tailgate is opened while
driving.
●Goes off when all doors and the tailgate are
closed.
—
—
●Appears when there is a problem with the
headlights.●Appears while driving - The low beam
headlights may not be on. When conditions
allow you to drive safely, have your vehicle
checked by a dealer as soon as possible.
Page 108 of 449
107
uuGauges and Multi-Information Display uMulti-Information Display
Continued
Instrument Panel
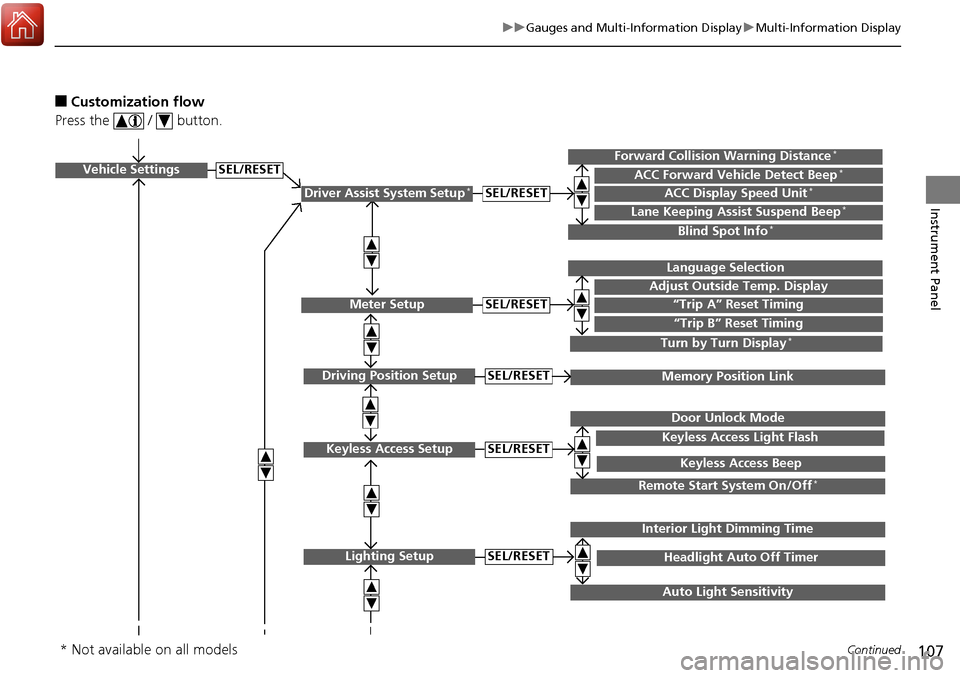
■Customization flow
Press the / button.
Vehicle Settings
Meter Setup
Keyless Access Setup
Lighting Setup
“Trip A” Reset Timing
Adjust Outside Temp. Display
Language Selection
“Trip B” Reset Timing
Keyless Access Light Flash
Door Unlock Mode
Keyless Access Beep
Headlight Auto Off Timer
Interior Light Dimming Time
Auto Light Sensitivity
SEL/RESET
SEL/RESET
SEL/RESET
SEL/RESET
Remote Start System On/Off*
Driver Assist System Setup*ACC Display Speed Unit*ACC Forward Vehicle Detect Beep*Forward Collision Warning Distance*
Lane Keeping Assist Suspend Beep*
Blind Spot Info*
SEL/RESET
Turn by Turn Display*
Driving Position SetupMemory Position LinkSEL/RESET
* Not available on all models
Page 141 of 449
140
Controls
Opening and Closing the Windows
Opening/Closing the Power Windows
The power windows can be opened and closed when the power mode is in ON,
using the switches on the do ors. The driver side switches can be used to open and
close all of the windows.
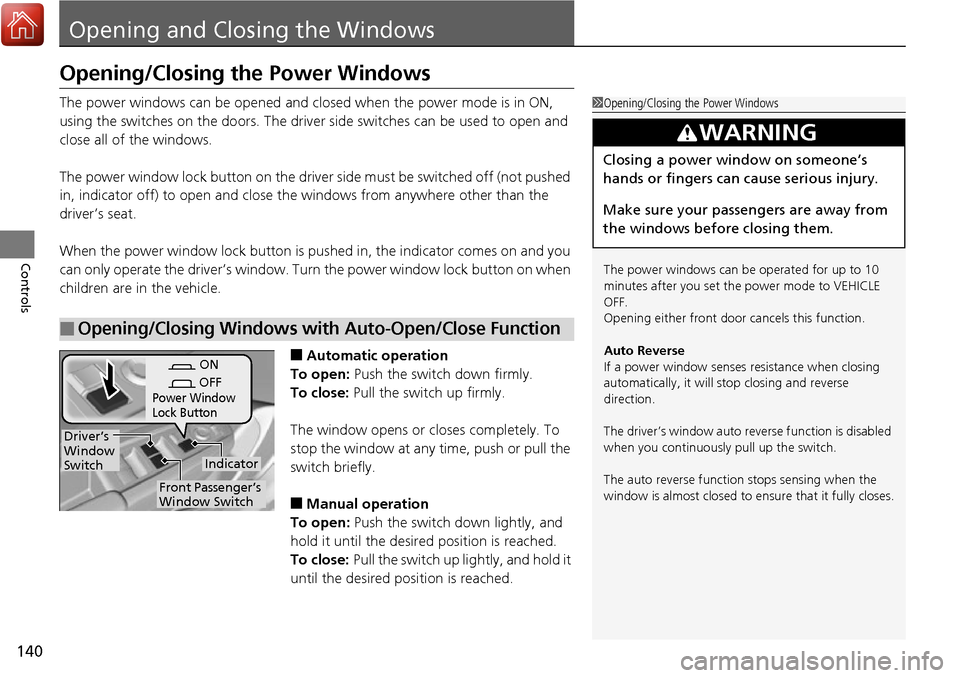
The power window lock button on the driver side must be switched off (not pushed
in, indicator off) to open and close th e windows from anywhere other than the
driver’s seat.
When the power window lock button is pu shed in, the indicator comes on and you
can only operate the driver’s window. Turn the power window lock button on when
children are in the vehicle.
■Automatic operation
To open: Push the switch down firmly.
To close: Pull the switch up firmly.
The window opens or closes completely. To
stop the window at any time, push or pull the
switch briefly.
■Manual operation
To open: Push the switch down lightly, and
hold it until the desired position is reached.
To close: Pull the switch up lightly, and hold it
until the desired position is reached.
■Opening/Closing Windows with Auto-Open/Close Function
1 Opening/Closing the Power Windows
The power windows can be operated for up to 10
minutes after you set the power mode to VEHICLE
OFF.
Opening either front door cancels this function.
Auto Reverse
If a power window senses resistance when closing
automatically, it will stop closing and reverse
direction.
The driver’s window auto re verse function is disabled
when you continuously pull up the switch.
The auto reverse function stops sensing when the
window is almost closed to en sure that it fully closes.
3WARNING
Closing a power window on someone’s
hands or fingers can cause serious injury.
Make sure your passengers are away from
the windows before closing them.
ON
OFF
Power Window
Lock Button
Indicator
Driver’s
Window
Switch
Front Passenger’s
Window Switch
Page 144 of 449
143
Controls
Opening and Closing the Moonroof
You can only operate the moonroof when the power mode is in ON. Use the switch
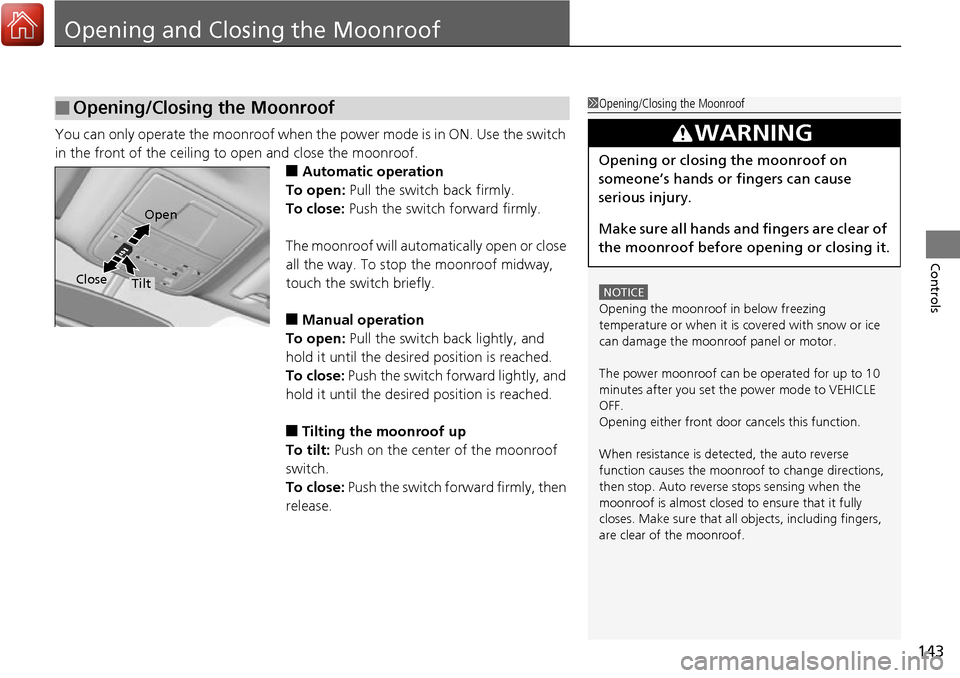
in the front of the ceiling to open and close the moonroof.
■Automatic operation
To open: Pull the switch back firmly.
To close: Push the switch forward firmly.
The moonroof will automatically open or close
all the way. To stop the moonroof midway,
touch the switch briefly.
■Manual operation
To open: Pull the switch back lightly, and
hold it until the desired position is reached.
To close: Push the switch forward lightly, and
hold it until the desired position is reached.
■Tilting the moonroof up
To tilt: Push on the center of the moonroof
switch.
To close: Push the switch forward firmly, then
release.
■Opening/Closing the Moonroof1 Opening/Closing the Moonroof
NOTICE
Opening the moonroof in below freezing
temperature or when it is covered with snow or ice
can damage the moonr oof panel or motor.
The power moonroof can be operated for up to 10
minutes after you set the power mode to VEHICLE
OFF.
Opening either front door cancels this function.
When resistance is detected, the auto reverse
function causes the moonroof to change directions,
then stop. Auto reverse stops sensing when the
moonroof is almost closed to ensure that it fully
closes. Make sure that al l objects, including fingers,
are clear of the moonroof.
3WARNING
Opening or closing the moonroof on
someone’s hands or fingers can cause
serious injury.
Make sure all hands and fingers are clear of
the moonroof before opening or closing it.
Open
Close
Tilt
Page 172 of 449
171
uuInterior Lights/Interior Convenience Items uInterior Convenience Items
Continued
Controls
Interior Convenience Items
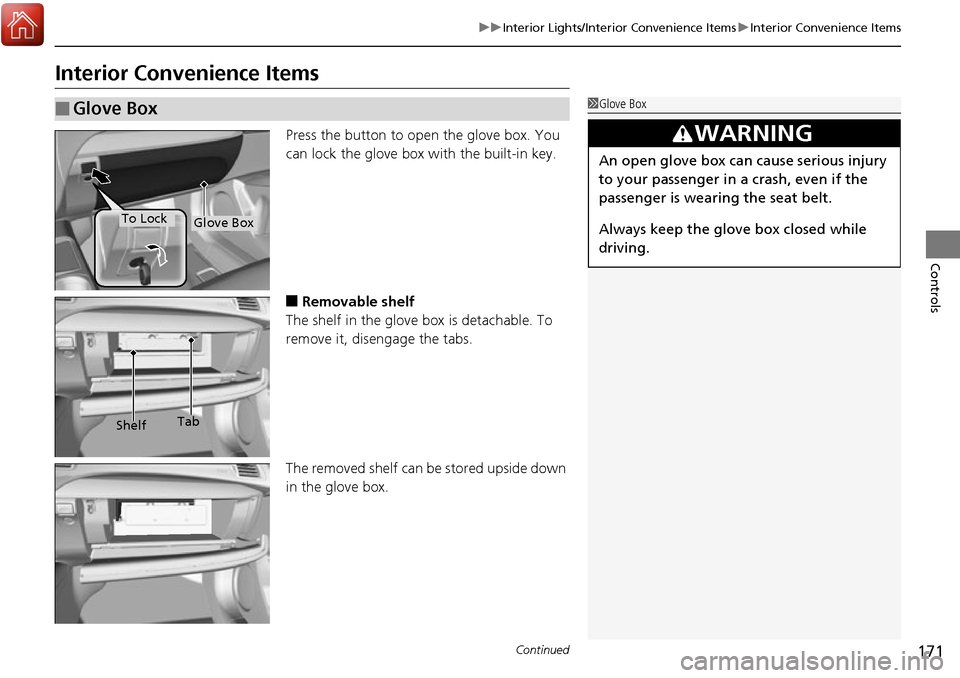
Press the button to open the glove box. You
can lock the glove box with the built-in key.
■Removable shelf
The shelf in the glove box is detachable. To
remove it, disengage the tabs.
The removed shelf can be stored upside down
in the glove box.
■Glove Box1 Glove Box
3WARNING
An open glove box can cause serious injury
to your passenger in a crash, even if the
passenger is wearing the seat belt.
Always keep the glove box closed while
driving.
Glove BoxTo Lock
Shelf Tab
Page 178 of 449
Continued177
uuInterior Lights/Interior Convenience Items uInterior Convenience Items
Controls
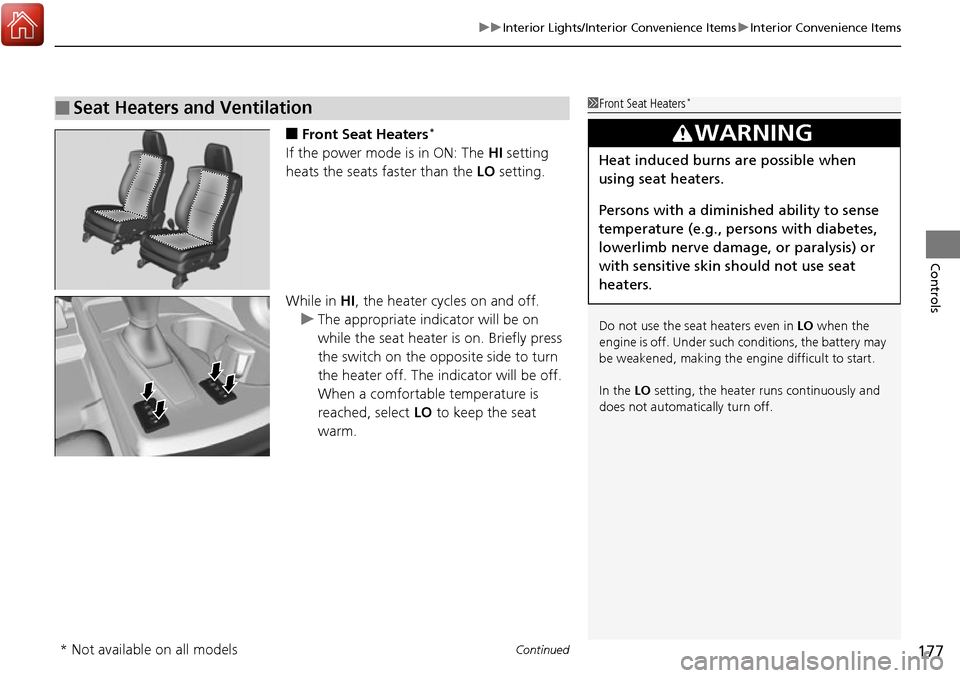
■Front Seat Heaters*
If the power mode is in ON: The HI setting
heats the seats faster than the LO setting.
While in HI , the heater cycles on and off.
u The appropriate indicator will be on
while the seat heater is on. Briefly press
the switch on the opposite side to turn
the heater off. The indicator will be off.
When a comfortable temperature is
reached, select LO to keep the seat
warm.
■Seat Heaters and Ventilation1 Front Seat Heaters*
Do not use the seat heaters even in LO when the
engine is off. Under such conditions, the battery may
be weakened, making the engine difficult to start.
In the LO setting, the heater runs continuously and
does not automatically turn off.
3WARNING
Heat induced burns are possible when
using seat heaters.
Persons with a diminished ability to sense
temperature (e.g., persons with diabetes,
lowerlimb nerve damage, or paralysis) or
with sensitive skin should not use seat
heaters.
* Not available on all models
Page 179 of 449
uuInterior Lights/Interior Convenience Items uInterior Convenience Items
178
Controls
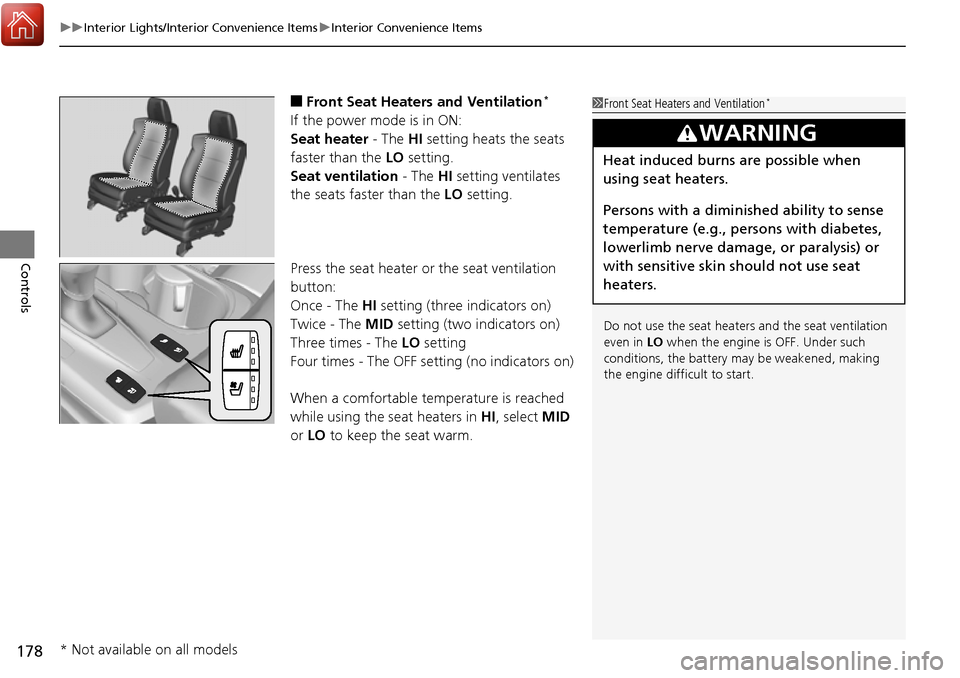
■Front Seat Heaters and Ventilation*
If the power mode is in ON:
Seat heater - The HI setting heats the seats
faster than the LO setting.
Seat ventilation - The HI setting ventilates
the seats faster than the LO setting.
Press the seat heater or the seat ventilation
button:
Once - The HI setting (three indicators on)
Twice - The MID setting (two indicators on)
Three times - The LO setting
Four times - The OFF se tting (no indicators on)
When a comfortable temperature is reached
while using the s eat heaters in HI, select MID
or LO to keep the seat warm.
1Front Seat Heaters and Ventilation*
Do not use the seat heater s and the seat ventilation
even in LO when the engine is OFF. Under such
conditions, the battery ma y be weakened, making
the engine difficult to start.
3WARNING
Heat induced burns are possible when
using seat heaters.
Persons with a diminished ability to sense
temperature (e.g., persons with diabetes,
lowerlimb nerve damage, or paralysis) or
with sensitive skin should not use seat
heaters.
* Not available on all models