side Acura RDX 2018 Manual PDF
[x] Cancel search | Manufacturer: ACURA, Model Year: 2018, Model line: RDX, Model: Acura RDX 2018Pages: 453, PDF Size: 20.13 MB
Page 180 of 453
Continued179
uuInterior Lights/Interior Convenience Items uInterior Convenience Items
Controls
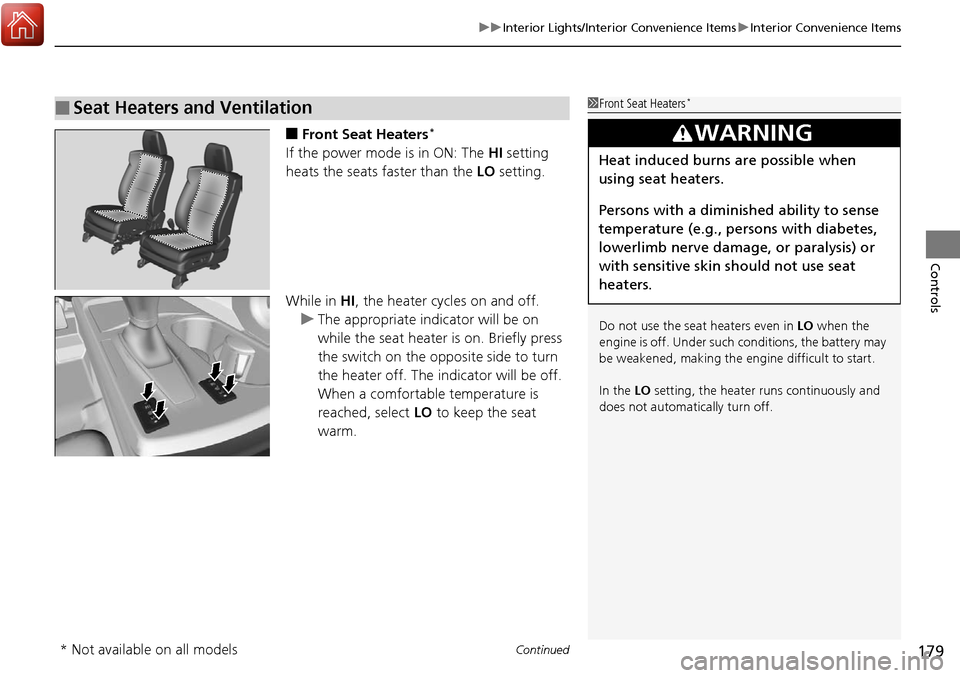
■Front Seat Heaters*
If the power mode is in ON: The HI setting
heats the seats faster than the LO setting.
While in HI , the heater cycles on and off.
u The appropriate indicator will be on
while the seat heater is on. Briefly press
the switch on the opposite side to turn
the heater off. The indicator will be off.
When a comfortable temperature is
reached, select LO to keep the seat
warm.
■Seat Heaters and Ventilation1 Front Seat Heaters*
Do not use the seat heaters even in LO when the
engine is off. Under such conditions, the battery may
be weakened, making the engine difficult to start.
In the LO setting, the heater runs continuously and
does not automatically turn off.
3WARNING
Heat induced burns are possible when
using seat heaters.
Persons with a diminished ability to sense
temperature (e.g., persons with diabetes,
lowerlimb nerve damage, or paralysis) or
with sensitive skin should not use seat
heaters.
* Not available on all models
Page 182 of 453
181
uuInterior Lights/Interior Convenience Items uInterior Convenience Items
Controls
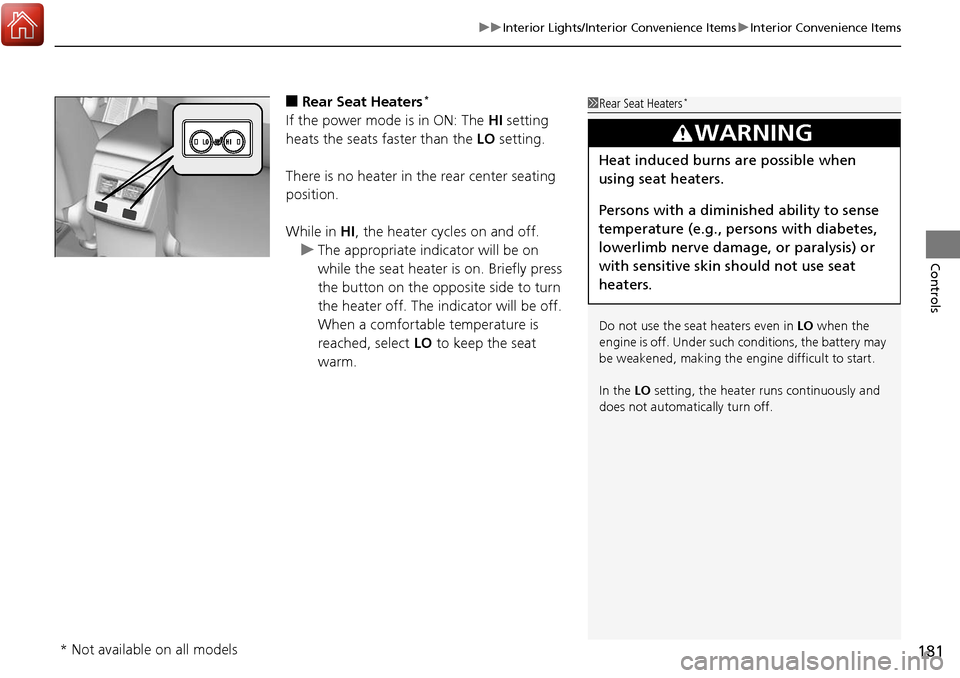
■Rear Seat Heaters*
If the power mode is in ON: The HI setting
heats the seats faster than the LO setting.
There is no heater in the rear center seating
position.
While in HI , the heater cycles on and off.
u The appropriate indicator will be on
while the seat heater is on. Briefly press
the button on the opposite side to turn
the heater off. The indicator will be off.
When a comfortable temperature is
reached, select LO to keep the seat
warm.
1 Rear Seat Heaters*
Do not use the seat heaters even in LO when the
engine is off. Under such conditions, the battery may
be weakened, making the engine difficult to start.
In the LO setting, the heater runs continuously and
does not automatically turn off.
3WARNING
Heat induced burns are possible when
using seat heaters.
Persons with a diminished ability to sense
temperature (e.g., persons with diabetes,
lowerlimb nerve damage, or paralysis) or
with sensitive skin should not use seat
heaters.
* Not available on all models
Page 183 of 453
182
Controls
Climate Control System
Using Automatic Climate Control
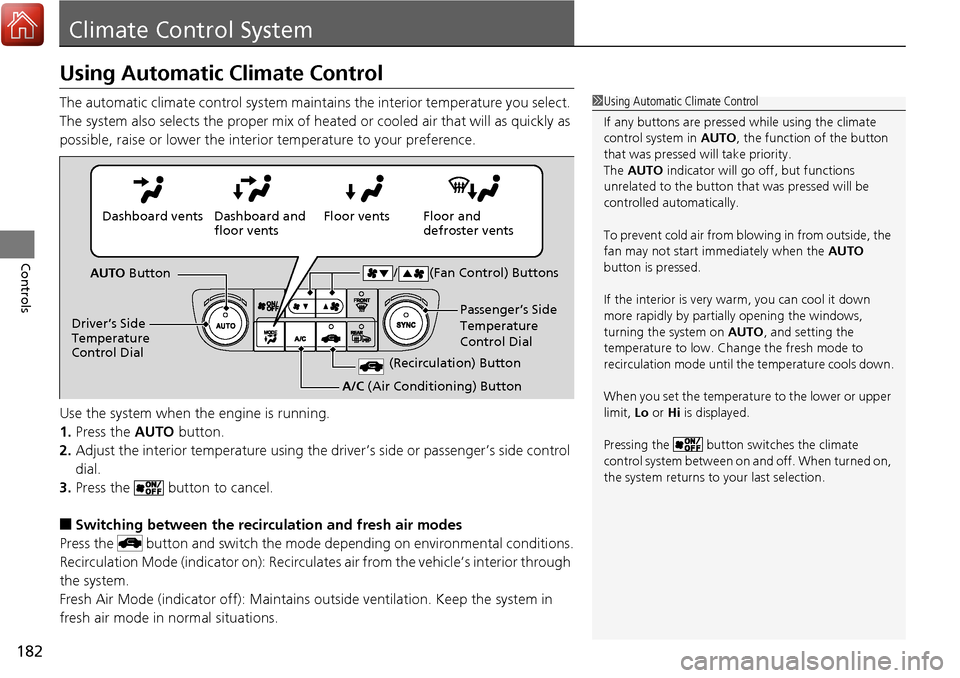
The automatic climate control system maintains the interior temperature you select.
The system also selects the proper mix of heated or cooled air that will as quickly as
possible, raise or lower the interior temperature to your preference.
Use the system when the engine is running.
1. Press the AUTO button.
2. Adjust the interior temperature using the dr iver’s side or passenger’s side control
dial.
3. Press the button to cancel.
■Switching between the recirculation and fresh air modes
Press the button and switch the mode depending on environmental conditions.
Recirculation Mode (indicator on): Recirculates air from the vehicle’s interior through
the system.
Fresh Air Mode (indicator off): Maintains outside ventilation. Keep the system in
fresh air mode in normal situations.
1 Using Automatic Climate Control
If any buttons are presse d while using the climate
control system in AUTO, the function of the button
that was pressed will take priority.
The AUTO indicator will go off, but functions
unrelated to the button th at was pressed will be
controlled automatically.
To prevent cold air from bl owing in from outside, the
fan may not start i mmediately when the AUTO
button is pressed.
If the interior is very warm, you can cool it down
more rapidly by partial ly opening the windows,
turning the system on AUTO, and setting the
temperature to low. Change the fresh mode to
recirculation mode until the temperature cools down.
When you set the temperature to the lower or upper
limit, Lo or Hi is displayed.
Pressing the button switches the climate
control system between on and off. When turned on,
the system returns to your last selection.
Floor and
defroster vents
Floor vents
Dashboard and
floor vents
Dashboard vents
AUTO Button
Driver’s Side
Temperature
Control Dial Passenger’s Side
Temperature
Control Dial
/ (Fan Control) Buttons
(Recirculation) Button
A/C
(Air Conditioning) Button
Page 184 of 453
183
uuClimate Control System uUsing Automatic Climate Control
Controls
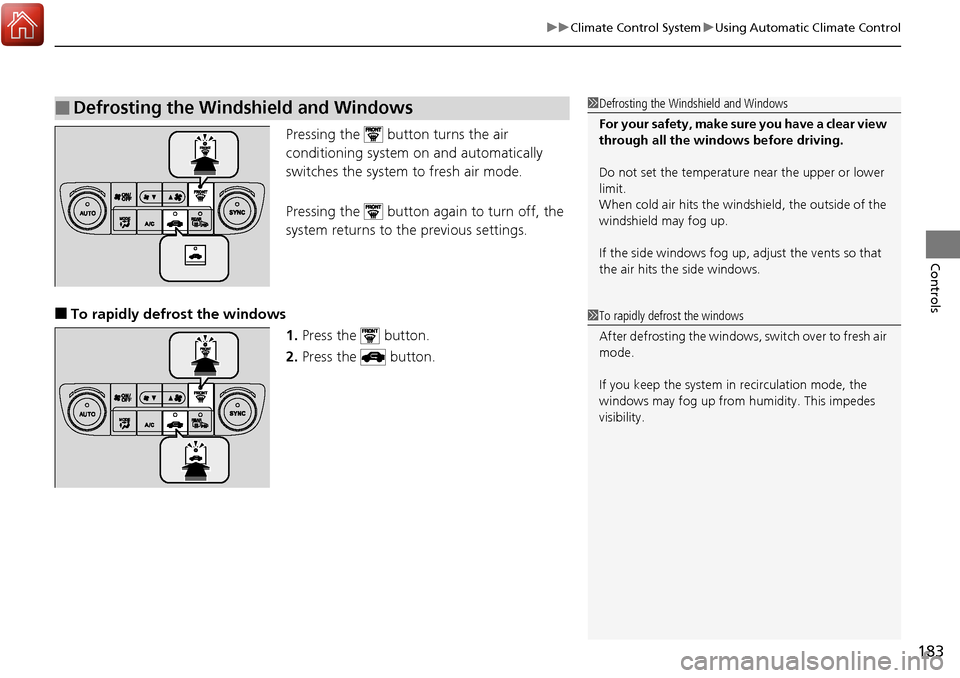
Pressing the button turns the air
conditioning system on and automatically
switches the system to fresh air mode.
Pressing the button again to turn off, the
system returns to the previous settings.
■To rapidly defrost the windows
1.Press the button.
2. Press the button.
■Defrosting the Windshield and Windows1Defrosting the Windshield and Windows
For your safety, make sure you have a clear view
through all the windows before driving.
Do not set the temperatur e near the upper or lower
limit.
When cold air hits the windshield, the outside of the
windshield may fog up.
If the side windows fog up, adjust the vents so that
the air hits th e side windows.
1To rapidly defrost the windows
After defrosting the windows, switch over to fresh air
mode.
If you keep the system in recirculation mode, the
windows may fog up from humidity. This impedes
visibility.
Page 185 of 453
184
uuClimate Control System uSynchronized Mode
Controls
Synchronized Mode
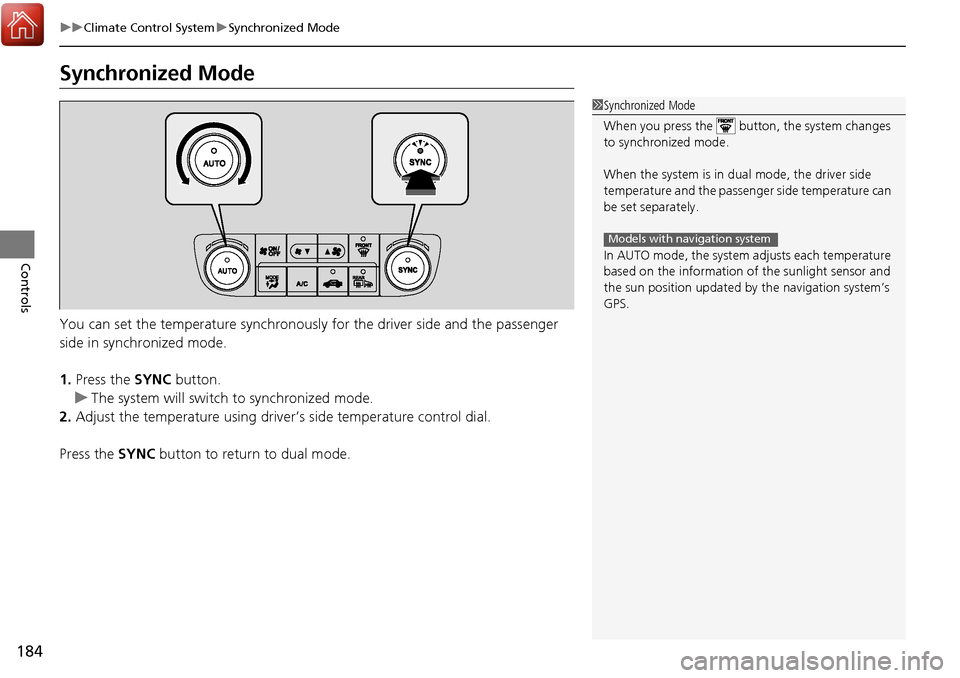
You can set the temperature synchronously for the driver side and the passenger
side in synchronized mode.
1. Press the SYNC button.
u The system will switch to synchronized mode.
2. Adjust the temperature using driver ’s side temperature control dial.
Press the SYNC button to return to dual mode.
1Synchronized Mode
When you press the button, the system changes
to synchronized mode.
When the system is in dua l mode, the driver side
temperature and the passenger side temperature can
be set separately.
In AUTO mode, the system adjusts each temperature
based on the information of the sunlight sensor and
the sun position updated by the navigation system’s
GPS.
Models with navigation system
Page 201 of 453
200
uuAudio System Basic Operation*uPlaying the AM/FM Radio
Features
Playing the AM/FM Radio
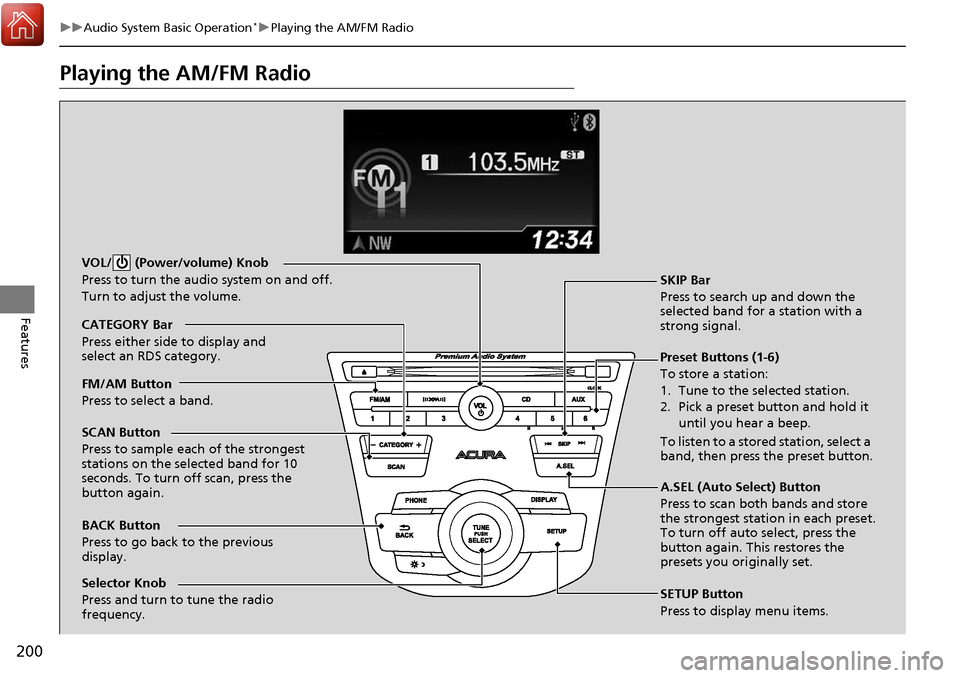
BACK Button
Press to go back to the previous
display. SCAN Button
Press to sample each of the strongest
stations on the selected band for 10
seconds. To turn off scan, press the
button again. VOL/ (Power/volume) Knob
Press to turn the audio system on and off.
Turn to adjust the volume.
Preset Buttons (1-6)
To store a station:
1. Tune to the selected station.
2. Pick a preset button and hold it
until you hear a beep.
To listen to a stored station, select a
band, then press the preset button. SKIP Bar
Press to search up and down the
selected band for a station with a
strong signal.
SETUP Button
Press to display menu items.
Selector Knob
Press and turn to tune the radio
frequency. FM/AM Button
Press to select a band. CATEGORY Bar
Press either side to display and
select an RDS category.
A.SEL (Auto Select) Button
Press to scan both bands and store
the strongest station in each preset.
To turn off auto select, press the
button again. This restores the
presets you originally set.
Page 203 of 453
202
uuAudio System Basic Operation*uPlaying the SiriusXM ® Radio
Features
Playing the SiriusXM ® Radio
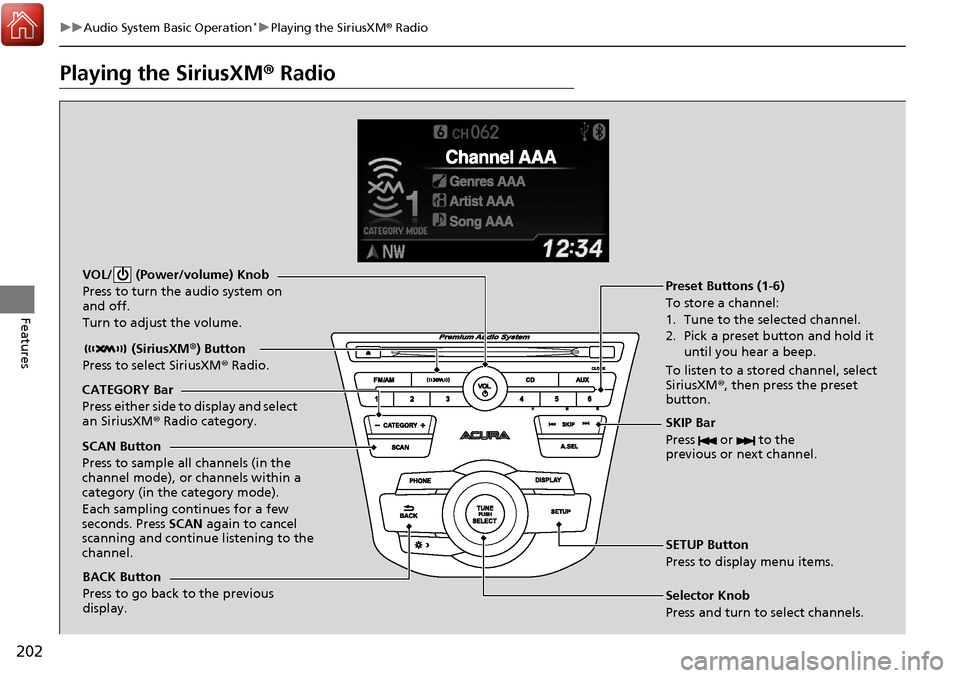
BACK Button
Press to go back to the previous
display. (SiriusXM
®) Button
Press to select SiriusXM ® Radio.
VOL/ (Power/volume) Knob
Press to turn the audio system on
and off.
Turn to adjust the volume.
SKIP Bar
Press or to the
previous or next channel.
SETUP Button
Press to display menu items.
Selector Knob
Press and turn to select channels. Preset Buttons (1-6)
To store a channel:
1. Tune to the selected channel.
2. Pick a preset button and hold it
until you hear a beep.
To listen to a stored channel, select
SiriusXM® , then press the preset
button.
SCAN Button
Press to sample all channels (in the
channel mode), or channels within a
category (in the category mode).
Each sampling continues for a few
seconds. Press SCAN again to cancel
scanning and continue listening to the
channel. CATEGORY Bar
Press either side to display and select
an SiriusXM ® Radio category.
Page 223 of 453
uuGeneral Information on the Audio System*uRecommended CDs
222
Features
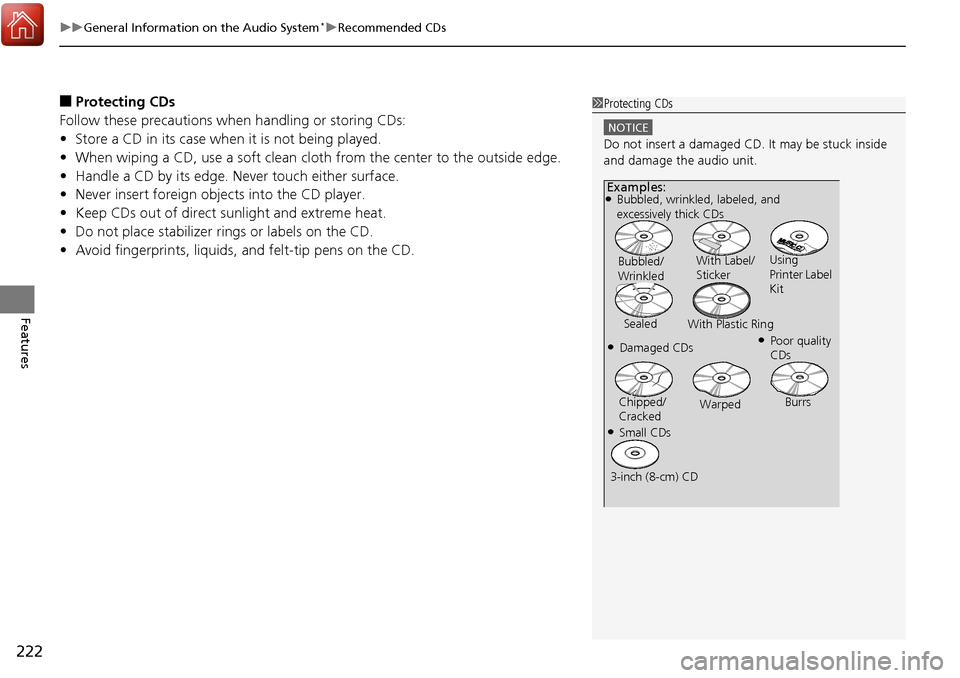
■Protecting CDs
Follow these precautions when handling or storing CDs:
• Store a CD in its case when it is not being played.
• When wiping a CD, use a soft clean clot h from the center to the outside edge.
• Handle a CD by its edge. Never touch either surface.
• Never insert foreign objects into the CD player.
• Keep CDs out of direct sunlight and extreme heat.
• Do not place stabilizer ri ngs or labels on the CD.
• Avoid fingerprints, liquids, and felt-tip pens on the CD.1Protecting CDs
NOTICE
Do not insert a damaged CD. It may be stuck inside
and damage the audio unit.
Examples:●Bubbled, wrinkled, labeled, and
excessively thick CDs
Bubbled/
Wrinkled With Label/
Sticker
Using
Printer Label
Kit
Sealed With Plastic Ring
●Poor quality
CDs●Damaged CDs
Chipped/
Cracked Warped
Burrs
●Small CDs
3-inch (8-cm) CD
Page 225 of 453
224
Features
HomeLink® Universal Transceiver
The HomeLink ® Universal Transceiver can be pr ogrammed to operate up to three
remote controlled devices around your home, such as garage doors, lighting, or
home security systems.
Refer to the safety information that came wi th your garage door opener to test that
the safety features are functioning properly. If you do not have the safety
information, contact the manufacturer.
Before programming HomeLink, make sure that people and objects are out of the
way of the garage or gate to prevent potential injury or damage.
When programming a garage door opener, park just outside the garage door’s
path.
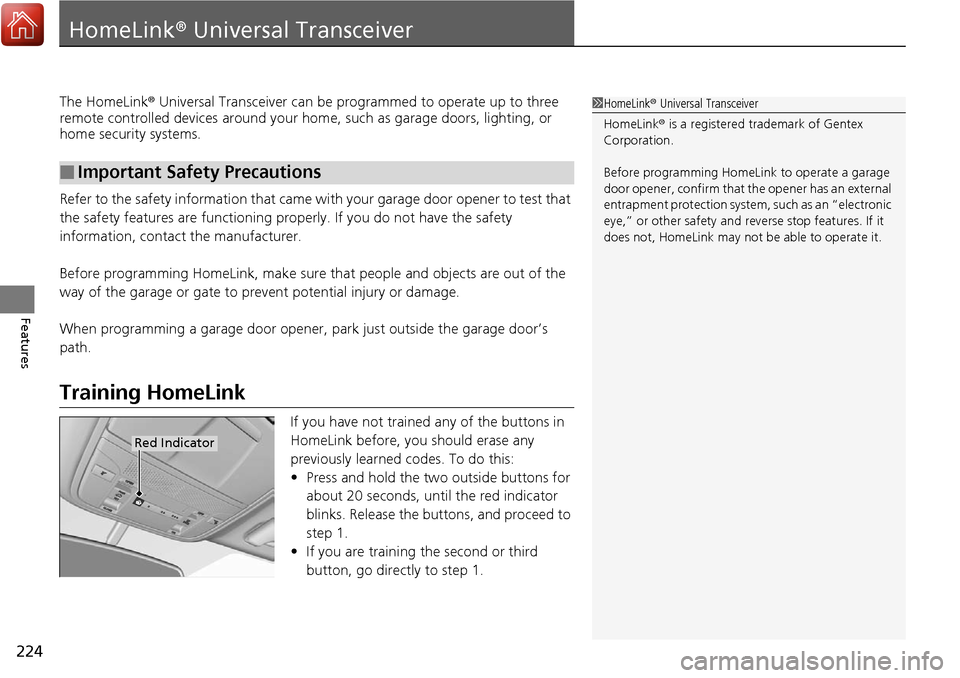
Training HomeLink
If you have not trained any of the buttons in
HomeLink before, you should erase any
previously learned codes. To do this:
• Press and hold the two outside buttons for
about 20 seconds, until the red indicator
blinks. Release the bu ttons, and proceed to
step 1.
• If you are training the second or third
button, go directly to step 1.
■Important Safety Precautions
1HomeLink ® Universal Transceiver
HomeLink® is a registered tra demark of Gentex
Corporation.
Before programming HomeLi nk to operate a garage
door opener, confirm that the opener has an external
entrapment protection system, such as an “electronic
eye,” or other safety and reverse stop features. If it
does not, HomeLink may not be able to operate it.
Red Indicator
Page 226 of 453
225
uuHomeLink ® Universal Transceiver uTraining HomeLink
Features
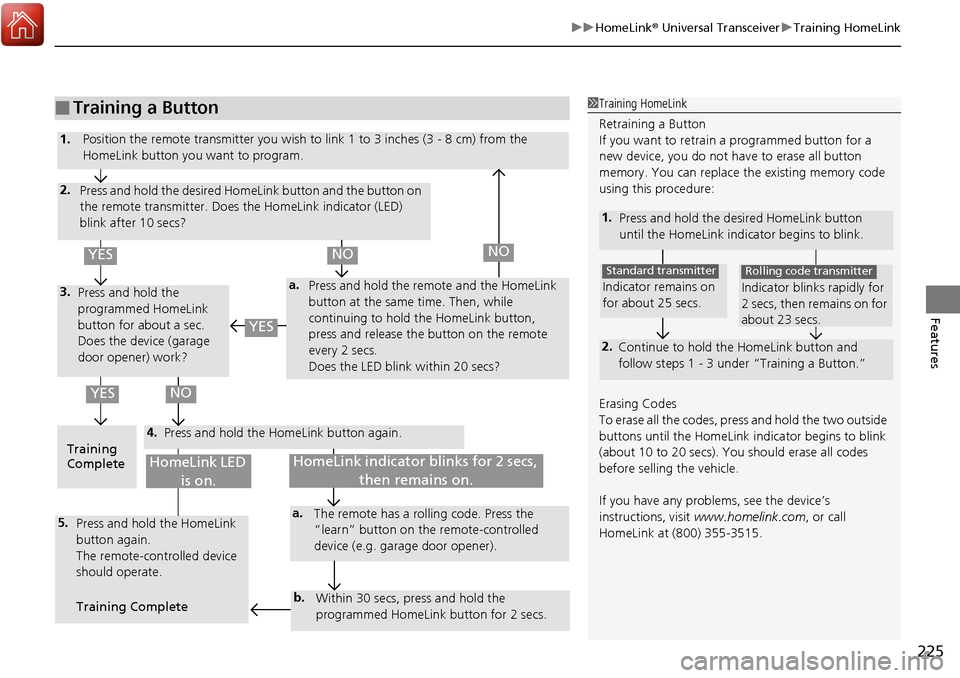
■Training a Button1Training HomeLink
Retraining a Button
If you want to retrain a programmed button for a
new device, you do not ha ve to erase all button
memory. You can replace the existing memory code
using this procedure:
1. Press and hold the desired HomeLink button
until the HomeLink indi cator begins to blink.
2.
Continue to hold the HomeLink button and
follow steps 1 - 3 unde r “Training a Button.”
Indicator remains on
for about 25 secs.
Standard transmitter
Indicator blinks rapidly for
2 secs, then remains on for
about 23 secs.
Rolling code transmitter
Erasing Codes
To erase all the codes, press and hold the two outside
buttons until the HomeLink i ndicator begins to blink
(about 10 to 20 secs). You should erase all codes
before selling the vehicle.
If you have any problems, see the device’s
instructions, visit www.homelink.com , or call
HomeLink at (800) 355-3515.
4.
a.3.
2.
5.a.
b.
1. Position the remote transmitter you wish to link 1 to 3 inches (3 - 8 cm) from the
HomeLink button you want to program.
Press and hold the desired HomeLink button and the button on
the remote transmitter. Does the HomeLink indicator (LED)
blink after 10 secs?
Press and hold the
programmed HomeLink
button for about a sec.
Does the device (garage
door opener) work? Press and hold the remote and the HomeLink
button at the same time. Then, while
continuing to hold the HomeLink button,
press and release the button on the remote
every 2 secs.
Does the LED blink within 20 secs?
Training
Complete Press and hold the HomeLink button again.
Press and hold the HomeLink
button again.
The remote-controlled device
should operate.
Training Complete The remote has a ro
lling code. Press the
“learn” button on the remote-controlled
device (e.g. garage door opener).
Within 30 secs, press and hold the
programmed HomeLink button for 2 secs.
HomeLink indicator blinks for 2 secs, then remains on.HomeLink LED is on.
YESNO
YES
YESNONO