display Acura RDX 2020 Owner's Manual
[x] Cancel search | Manufacturer: ACURA, Model Year: 2020, Model line: RDX, Model: Acura RDX 2020Pages: 657, PDF Size: 33.2 MB
Page 516 of 657
515
uuSurround View Camera System*uDisplaying an Image From the Surround View Cameras
Continued
Driving
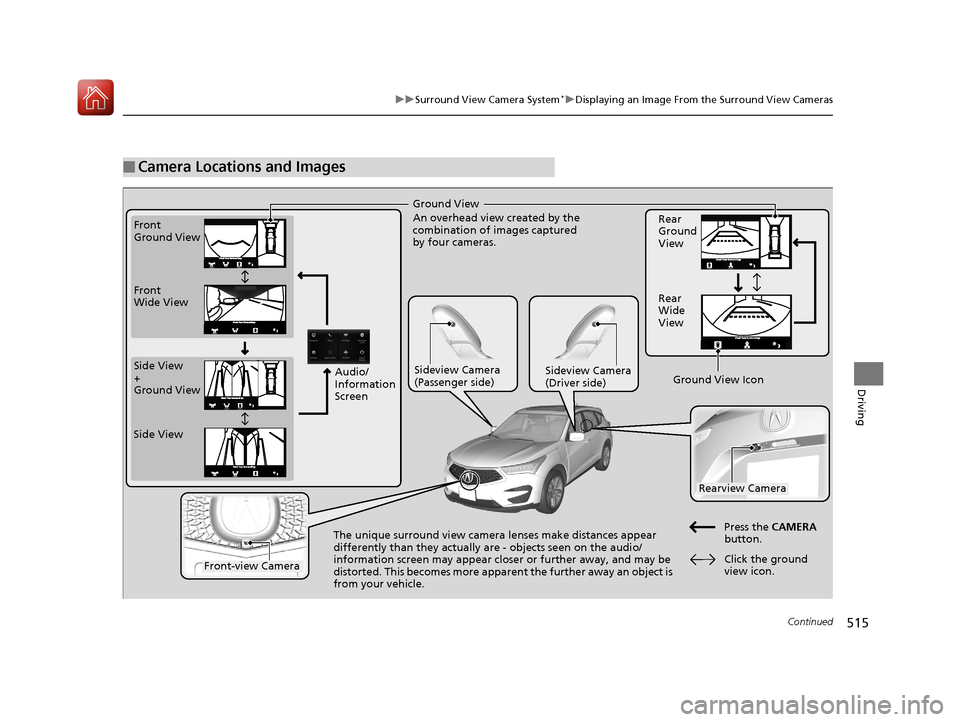
■Camera Locations and Images
Ground View
An overhead view created by the
combination of images captured
by four cameras.
Front
Ground View
Side View
+
Ground View Front
Wide View
Sideview Camera
(Passenger side)Sideview Camera
(Driver side)
The unique surround view camera lenses make distances appear
differently than they actually
are - objects seen on the audio/
information screen may appear closer or further away, and may be
distorted. This becomes more apparent the further away an object is
from your vehicle. Rear
Ground
View
Rear
Wide
View
Press the CAMERA
button.
Rearview Camera
Front-view Camera
Side View
Audio/
Information
Screen
Click the ground
view icon.
Ground View Icon
20 ACURA RDX-31TJB6111.book 515 ページ 2020年2月11日 火曜日 午後2時6分
Page 517 of 657

uuSurround View Camera System*uDisplaying an Image From the Surround View Cameras
516
Driving
The following can be displaye d when the system is on.
Guide lines : Help you to get a sense of a distance between your vehicle and the
rear surroundings. The distan ce may appear differently than the actual distance.
Projection lines : Indicate vehicle direction while th e steering wheel is in the current
position.
■Reference Lines and Guides1 Reference Lines and Guides
The positions/distances indi cated by the guide lines
and camera views on the display may differ from the
actual positions/distances due to the changes in the
vehicle height, road condi tions, and other factors.
The guide lines should be used as a reference only.
The guide lines can be tu rned on and off using the
audio/information screen.
2 Customized Features P. 335
If you turn the guide lines off, they remain off until
you turn them back on.
20 ACURA RDX-31TJB6111.book 516 ページ 2020年2月11日 火曜日 午後2時6分
Page 518 of 657
517
uuSurround View Camera System*uUsing the Surround View Camera System
Continued
Driving
Using the Surround View Camera System
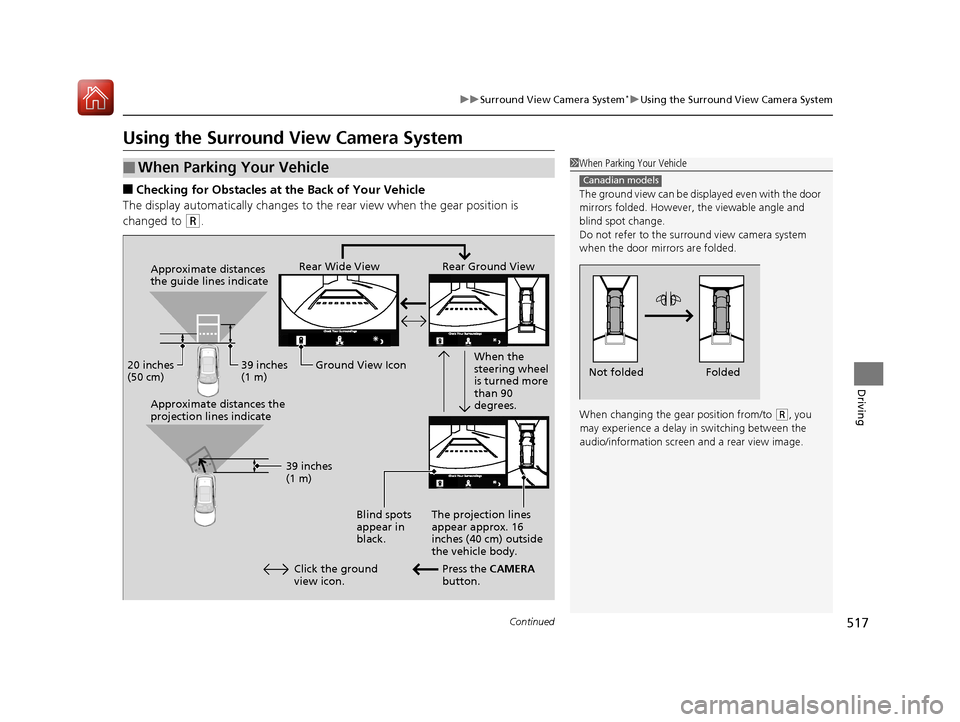
■Checking for Obstacles at the Back of Your Vehicle
The display automatically changes to the rear view when the gear position is
changed to
(R.
■When Parking Your Vehicle1 When Parking Your Vehicle
The ground view can be disp layed even with the door
mirrors folded. However, the viewable angle and
blind spot change.
Do not refer to the surround view camera system
when the door mirrors are folded.
When changing the gear position from/to
( R, you
may experience a delay in switching between the
audio/information screen and a rear view image.
Canadian models
Folded
Not folded
Rear Wide View Rear Ground View
When the
steering wheel
is turned more
than 90
degrees.
The projection lines
appear approx. 16
inches (40 cm) outside
the vehicle body.
Blind spots
appear in
black.
Press the CAMERA
button.
Approximate distances
the guide lines indicate
Approximate distances the
projection lines indicate
39 inches
(1 m)
20 inches
(50 cm)
39 inches
(1 m)
Ground View Icon
Click the ground
view icon.
20 ACURA RDX-31TJB6111.book 517 ページ 2020年2月11日 火曜日 午後2時6分
Page 519 of 657

uuSurround View Camera System*uUsing the Surround View Camera System
518
Driving
You can display the front ground view screen using all the four cameras for the
system. Pressing the CAMERA button when the vehicle speed is at below 12 mph
(20 km/h) changes the image as follows.
■Checking for the Sides of Your Vehicle1 Checking for the Sides of Your Vehicle
When the vehicle speed exceeds 16 mph (25 km/h),
the front or side view on the screen automatically
switches to the audio/information screen. The front
or side view screen resumes when the vehicle speed
is reduced below 12 mph (20 km/h).
0 mph (0 km/h)
Down Up Camera
Screen
Camera
Screen
Audio/Information
Screen
Audio/Information
Screen 16 mph (25 km/h)
12 mph (20 km/h)
0 mph (0 km/h)
Front Ground View Front Wide View
Audio/Information Screen
Approximate distance
the reference line
indicates. Press the CAMERA
button.
approx. 3 feet (1 m) Blind spots appear
in black.
Click the ground
view icon. Ground View Icon
Side View + Ground View Side View
20 ACURA RDX-31TJB6111.book 518 ページ 2020年2月11日 火曜日 午後2時6分
Page 520 of 657
Continued519
uuSurround View Camera System*uUsing the Surround View Camera System
Driving
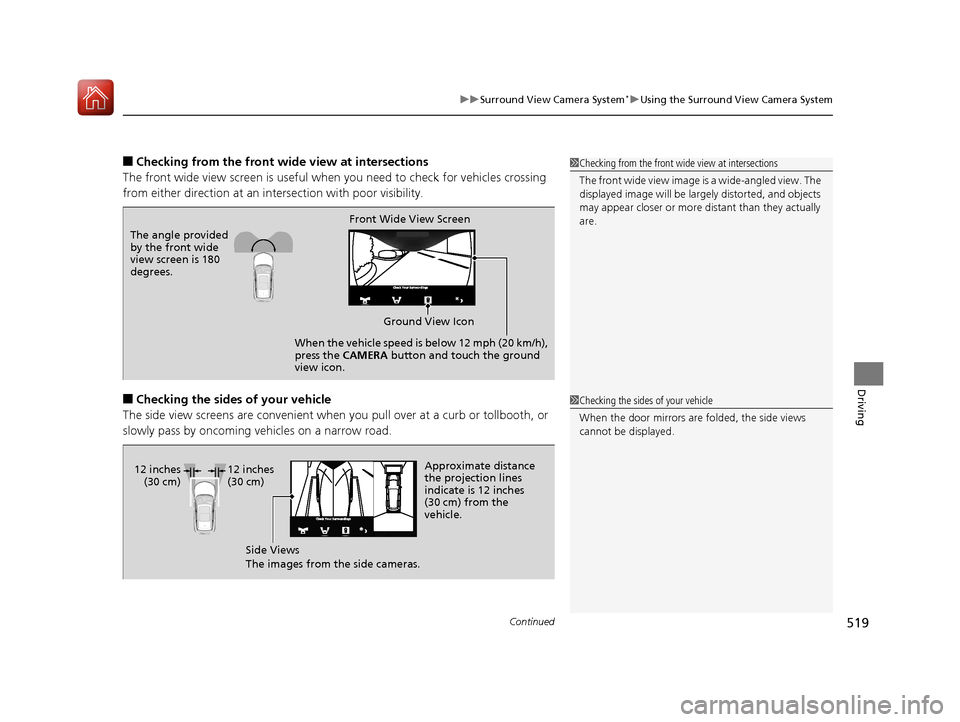
■Checking from the front wide view at intersections
The front wide view screen is useful when you need to check for vehicles crossing
from either direction at an inte rsection with poor visibility.
■Checking the sides of your vehicle
The side view screens are co nvenient when you pull over at a curb or tollbooth, or
slowly pass by oncoming vehicles on a narrow road.
1 Checking from the front wide view at intersections
The front wide view image is a wide-angled view. The
displayed image will be larg ely distorted, and objects
may appear closer or more distant than they actually
are.
The angle provided
by the front wide
view screen is 180
degrees. Front Wide View Screen
When the vehicle speed is below 12 mph (20 km/h),
press the CAMERA button and touch the ground
view icon. Ground View Icon
1
Checking the sides of your vehicle
When the door mirrors are folded, the side views
cannot be displayed.
12 inches
(30 cm) Approximate distance
the projection lines
indicate is 12 inches
(30 cm) from the
vehicle.
Side Views
The images from the side cameras.
12 inches
(30 cm)
20 ACURA RDX-31TJB6111.book 519 ページ 2020年2月11日 火曜日 午後2時6分
Page 521 of 657
520
uuSurround View Camera System*uUsing the Surround View Camera System
Driving
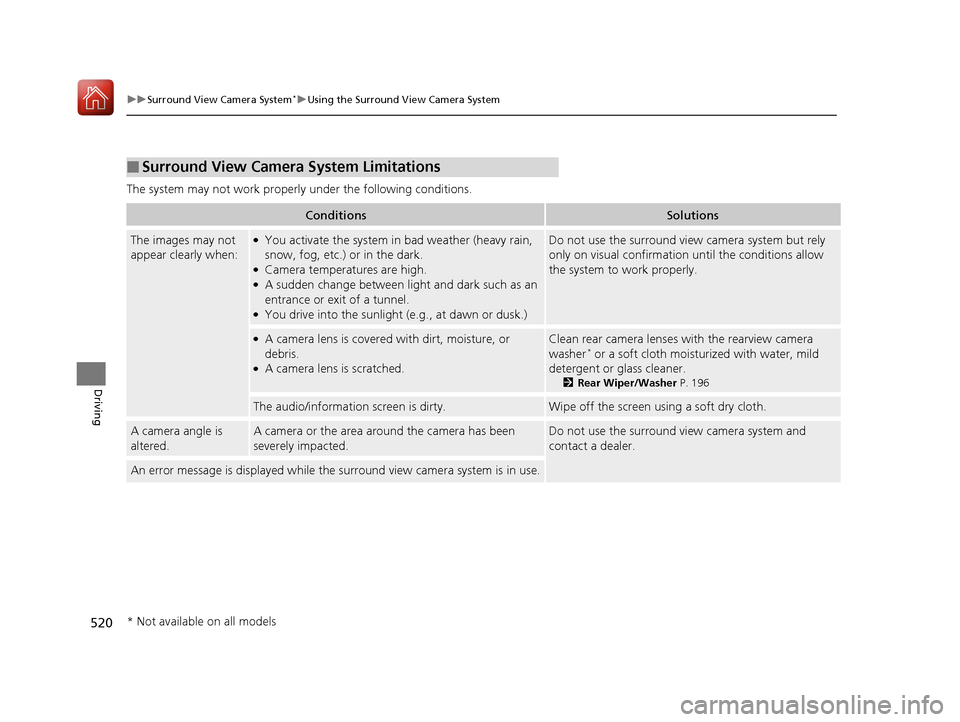
The system may not work properly under the following conditions.
■Surround View Camera System Limitations
ConditionsSolutions
The images may not
appear clearly when:●You activate the system in bad weather (heavy rain,
snow, fog, etc.) or in the dark.
●Camera temperatures are high.●A sudden change between lig ht and dark such as an
entrance or exit of a tunnel.
●You drive into the sunlight (e.g., at dawn or dusk.)
Do not use the surround view camera system but rely
only on visual confirmation until the conditions allow
the system to work properly.
●A camera lens is covered with dirt, moisture, or
debris.
●A camera lens is scratched.
Clean rear camera lenses with the rearview camera
washer* or a soft cloth moisturized with water, mild
detergent or glass cleaner.
2 Rear Wiper/Washer P. 196
The audio/information screen is dirty.Wipe off the screen using a soft dry cloth.
A camera angle is
altered.A camera or the area around the camera has been
severely impacted.Do not use the surround view camera system and
contact a dealer.
An error message is displayed while the surround view camera system is in use.
* Not available on all models
20 ACURA RDX-31TJB6111.book 520 ページ 2020年2月11日 火曜日 午後2時6分
Page 525 of 657
524
Driving
Fuel Economy and CO2 Emissions
Improving Fuel Economy and Reducing CO2 Emissions
Achieving fuel economy and reducing CO2 emissions is dependent on several
factors, including driving conditions, load weight, idling time, driving habits, and
vehicle condition. Depending on these and other factors, you may not achieve the
rated fuel economy of this vehicle.
You can optimize your fuel economy with proper maintenance of your vehicle.
Always maintain your vehicle in accord ance with the messages displayed on the
multi-information display.
• Use the recommended viscosity engine oil.
2 Recommended Engine Oil P. 541
•Maintain the specified tire pressure.
• Do not load the vehicl e with excess cargo.
• Keep your vehicle clean. A buildup of snow or mud on your vehicle’s underside
adds weight and increases wind resistance.
■Maintenance and Fuel Economy
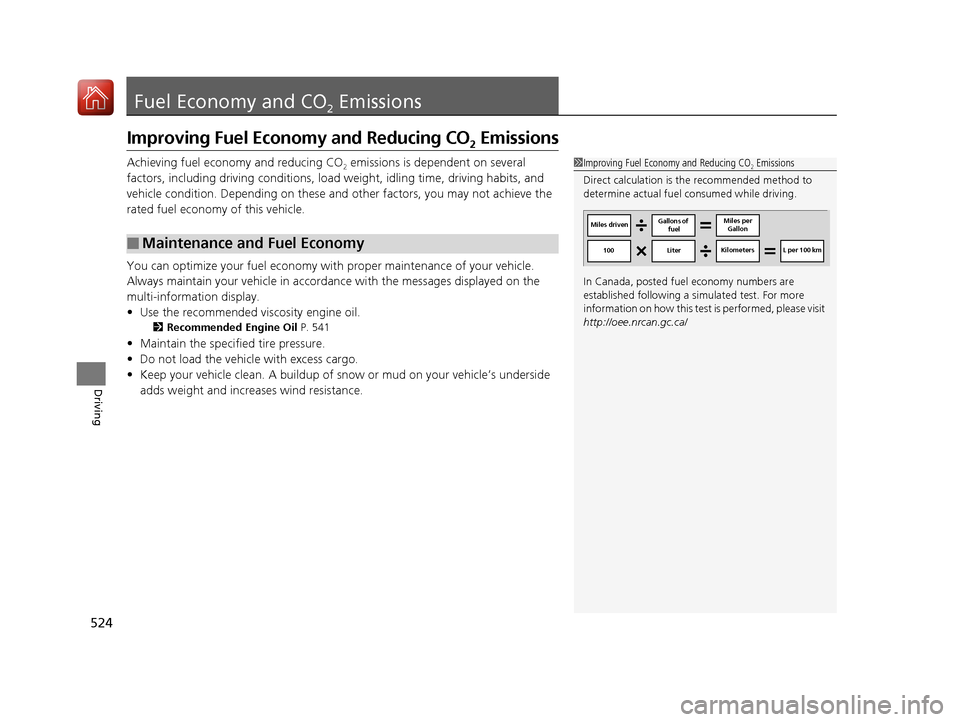
1Improving Fuel Economy and Reducing CO2 Emissions
Direct calculation is the recommended method to
determine actual fuel consumed while driving.
In Canada, posted fuel economy numbers are
established following a simulated test. For more
information on how this test is performed, please visit
http://oee.nrcan.gc.ca/
Miles driven Gallons of
fuel Miles per
Gallon
100 LiterKilometers L per 100 km
20 ACURA RDX-31TJB6111.book 524 ページ 2020年2月11日 火曜日 午後2時6分
Page 526 of 657
525
Driving
Turbo Engine Vehicle
Handling Precautions
The turbocharger is a high-precision device to obtain greater horsepower by
delivering a large volume of compressed air into the engine using a turbine driven by
the engine’s exhaust gas pressure.
• When the engine is cold just after sta rting, avoid revving the engine or sudden
acceleration.
• Always replace the engine oil and engine oil filter according to the Maintenance
Minder. The turbine rotates at very high speeds over 100,000 rpm and its
temperature reaches over 1,292°F (700°C). It is lubricated and cooled by engine
oil. If you fail to replace the engine oil and filter at the scheduled distance or
interval, deteriorated engine oil may cause failure such as sticking and abnormal
noise of the turbine bearing.1 Turbo Engine Vehicle
The scheduled maintenance intervals for replacing
the filter is indicated on the multi-information
display. Follow the information of when to replace
them. 2 Maintenance Minder
TM P. 531
The temperature gauge pointer is at the mark
when you restart the engi ne after driving under high
load conditions such as at high speed or in hilly
terrain. This is normal. The gauge goes down after
you idle or drive the vehi cle for about one minute.
H
20 ACURA RDX-31TJB6111.book 525 ページ 2020年2月11日 火曜日 午後2時6分
Page 529 of 657
528
Maintenance
Before Performing Maintenance
Inspection and Maintenance
For your safety, perform all listed inspections and maintenance to keep your vehicle
in good condition. If you become aware of any abnormality (noise, smell, insufficient
brake fluid, oil residue on the ground, etc.), have your vehicle inspected by a dealer.
(Note, however, that service at a dealer is not mandatory to keep your warranties in
effect.) Refer to the separate maintena nce booklet for detailed maintenance and
inspection information.
■Daily inspections
Perform inspections before long distance tri ps, when washing the vehicle, or when
refueling.
■Periodic inspections
• Check the brake fluid level monthly.
2 Checking the Brake Fluid P. 549
•Check the tire pressure monthly. Examin e the tread for wear and foreign objects.
2Checking and Maintaining Tires P. 560
•Check the operation of the exterior lights monthly.
2 Replacing Light Bulbs P. 551
•Check the condition of the wiper bl ades at least every six months.
2Checking and Maintaining Wiper Blades P. 555
■Types of Inspection and Maintenance
1Inspection and Maintenance
Maintenance, replacement, or repair of
emissions control devices and systems may be
done by any automotive repair establishment or
individuals using parts that are “certified” to
EPA standards.
According to state and fede ral regulations, failure to
perform maintenance on the maintenance main
items marked with # will not void your emissions
warranties. However, all ma intenance services should
be performed in accordan ce with the intervals
indicated by the mult i-information display.
2 Maintenance Service Items P. 535
If you want to perform complex maintenance tasks
that require more skills a nd tools, you can purchase a
subscription to the Service Express website at
www.techinfo.honda.com .
2 Authorized Manuals P. 643
If you want to perform ma intenance yourself, make
sure that you have the necessary tools and skills first.
After performing ma intenance, update the records in
the separate maintenance booklet.
U.S. models
20 ACURA RDX-31TJB6111.book 528 ページ 2020年2月11日 火曜日 午後2時6分
Page 532 of 657
531
Maintenance
Maintenance MinderTM
If the engine oil life is less than 15%, you will see the Maintenance Minder messages
appear on the multi-information display ev ery time you set the power mode to ON.
The messages notify you when to change the engine oil, or when to bring your
vehicle to a dealer for indicated maintenance services.
20 ACURA RDX-31TJB6111.book 531 ページ 2020年2月11日 火曜日 午後2時6分