turn signal Acura RL 2000 3.5 User Guide
[x] Cancel search | Manufacturer: ACURA, Model Year: 2000, Model line: RL, Model: Acura RL 2000Pages: 330, PDF Size: 4.53 MB
Page 148 of 330

Audi
o Syste m
3.5 RL with Navigation System
Operatin g th e Radi oThe ignition switch must be in
ACCESSORY (I) or ON (II) to
operate the audio system. Turn the
system on by pushing the PWR/
VOL knob or the AM/FM button.
Adjust the volume by turning the knob.
The band and frequency that the ra-
dio was last tuned to is displayed. To
change bands, press the AM/FM but-
ton. On the FM band, ST will be dis-
played if the station is broadcastingin stereo. ST will flash if you are driv-
ing in an area where the radio signal
is weak. Stereo reproduction on AM
is not available. You can use any of three methods to
find radio stations on the selectedband: TUNE, SEEK, or the Preset
buttons.
TUN E — Use the TUNE bar to tune
the radio to a desired frequency.
Push and release the appropriate side of the bar quickly. The
frequency numbers will change in small increments.
SEE K — The SEEK function
searches the band for a station with
a strong signal. To activate it, push either of the SEEK bar ( — or +)
until you hear a beep. Push the bar on the + side to scan up from the
current frequency, and on the —
side to scan down. It stops when it
finds a station with a strong signal. Prese
t — You can store the
frequencies of your favorite radio stations in the six preset buttons.
Each button will store one frequency
on the AM band, and two
frequencies on the FM band.
CONTINUED
Comfor t an d Convenienc e Feature s
Page 150 of 330

Audi
o Syste m
AUTO SELECT — If you are
traveling far from home and can no
longer receive the stations you
preset, you can use the Auto Select
feature to find stations in the local
area.
To activate Auto Select, press the
A. SELECT button. A. SELECT will appear in the display, and the system
will go into scan mode for several seconds. It automatically scans both
bands, looking for stations with strong signals. It stores the frequen-
cies of six AM stations and twelve
FM stations in the preset buttons.
You can then use the preset buttons to select those stations.
If you are in a remote area, Auto
Select may not find six strong AMstations or twelve strong FM stations.
If this happens, you will see a "0" displayed when you press any preset
button that does not have a station
stored.
With Auto Select on, you cannot
manually store any frequencies in
the preset buttons. If you do not like
the stations found by Auto Select,
you can use the TUNE and SEEK
functions to find other stations. Auto Select does not erase the
frequencies that you preset pre-
viously. When you return home, turn off Auto Select by pressing the
A. SELECT button. The preset buttons will then select the fre-quencies you originally set.
Comfor t an d Convenienc e Feature s
PRESE
T BUTTON S
AUT O SELEC T
INDICATO R TUNE/SEE
K BA R
AUTO SELEC T BUTTO N
AM/F M BUTTO N
Page 152 of 330
Audi
o Syste m
Audi o Syste m Lightin g
You can use the instrument panel brightness control dial to adjust the il-
lumination of the audio system (see
page 66). The audio systemilluminates when the parking lightsare on, even if the radio is turned off.
Radi o Frequencie s
Your Acura's radio can receive the complete AM and FM bands.
Those bands cover these frequen-
cies:
AM band:
530 to 1,710 kilohertz
FM band:
87.7 to 107.9 megahertz
Radio stations on the AM band are assigned frequencies at least ten
kilohertz apart (530, 540, 550). Stations on the FM band are
assigned frequencies at least 0.2
megahertz apart (87.9, 88.1, 88.3).
Stations must use these exact
frequencies. It is fairly common for stations to round-off the frequency in
their advertising, so your radio could display a frequency of 100.9 even
though the announcer may identify
the station as "FM101."
Radio Reception
How well your Acura's radio receives stations is dependent on many
factors, such as the distance from
the station's transmitter, nearby
large objects, and atmospheric conditions.
A radio station's signal gets weaker as you get farther away from its
transmitter. If you are listening to an
AM station, you will notice the sound volume becoming weaker, and the station drifting in and out. If you are
listening to an FM station, you will see the stereo indicator flickering off
and on as the signal weakens.
Eventually, the stereo indicator will go off and the sound will fade
completely as you get out of range of
the station's signal.
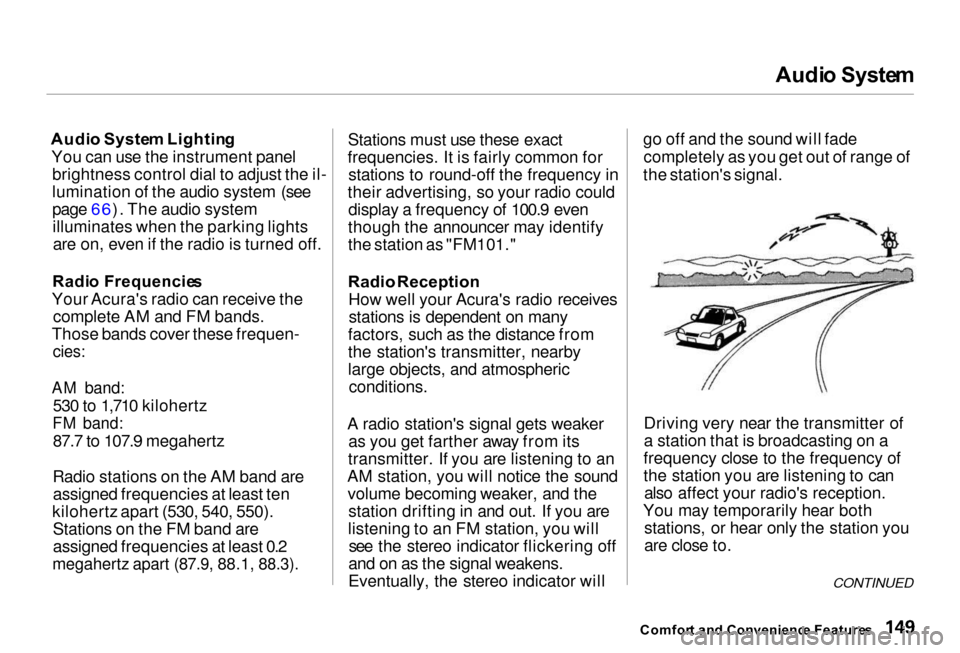
Driving very near the transmitter of
a station that is broadcasting on a
frequency close to the frequency of
the station you are listening to can also affect your radio's reception.
You may temporarily hear both stations, or hear only the station you
are close to.
Comfor t an d Convenienc e Feature s
CONTINUED
Page 216 of 330
Owne
r Maintenanc e Check s
You should check the following items at the specified intervals. If
you are unsure of how to perform any check, turn to the page given. Engine oil level — Check every
time you fill the fuel tank. See
page 169.
Engine coolant level — Check the
radiator reserve tank every time
you fill the fuel tank. See page 170.
Windshield washer fluid — Check the level in the reservoir monthly.If weather conditions cause you to
use the washers frequently, check
the reservoir each time you stop
for fuel. See page 225 . Automatic transmission — Check
the fluid level monthly. See page
226.
Brakes — Check the fluid level
monthly. See page 22 8 . Tires —
Check the tire pressure
monthly. Examine the tread for
wear and foreign objects. See page
241.
Lights — Check the operation of
the headlights, parking lights,
taillights, high-mount brake light,
turn signals, brake lights, and license plate lights monthly. See
page 248.
Maintenance
Page 252 of 330
Light
s
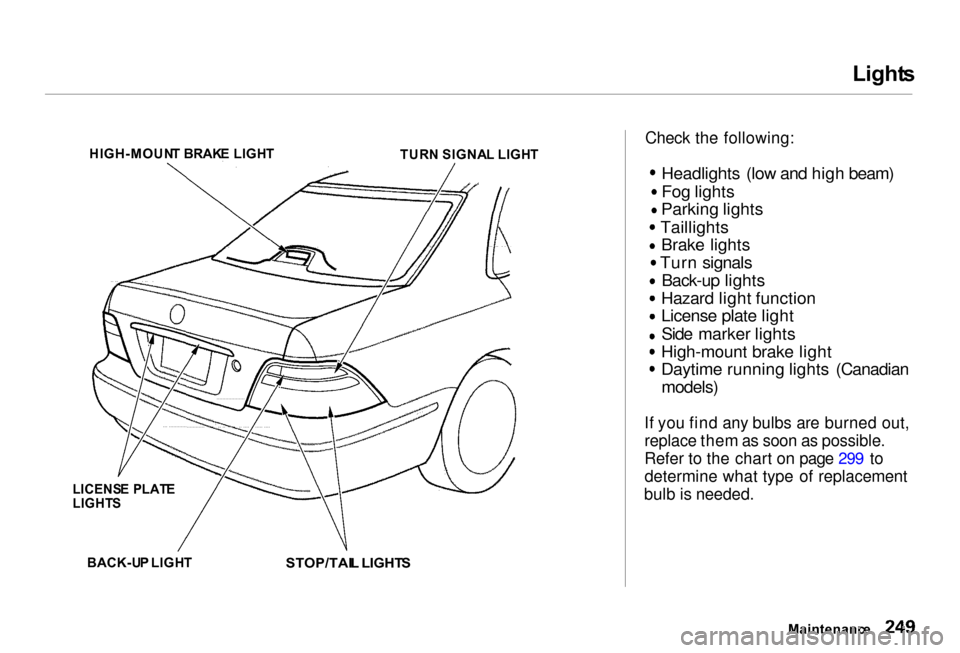
Check the following:
Headlights (low and high beam)
Fog lights
Parking lights Taillights
Brake lights Turn signals
Back-up lights
Hazard light function
License plate light
Side marker lights
High-mount brake light
Daytime running lights (Canadian
models)
If you find any bulbs are burned out,
replace them as soon as possible.
Refer to the chart on page 299 to
determine what type of replacement
bulb is needed.
Maintenance
HIGH-MOUN
T BRAK E LIGH T
TURN SIGNA L LIGH T
LICENS E PLAT E
LIGHT S
BACK-U P LIGH T
STOP/TAIL LIGHT S
Page 256 of 330
Light
s
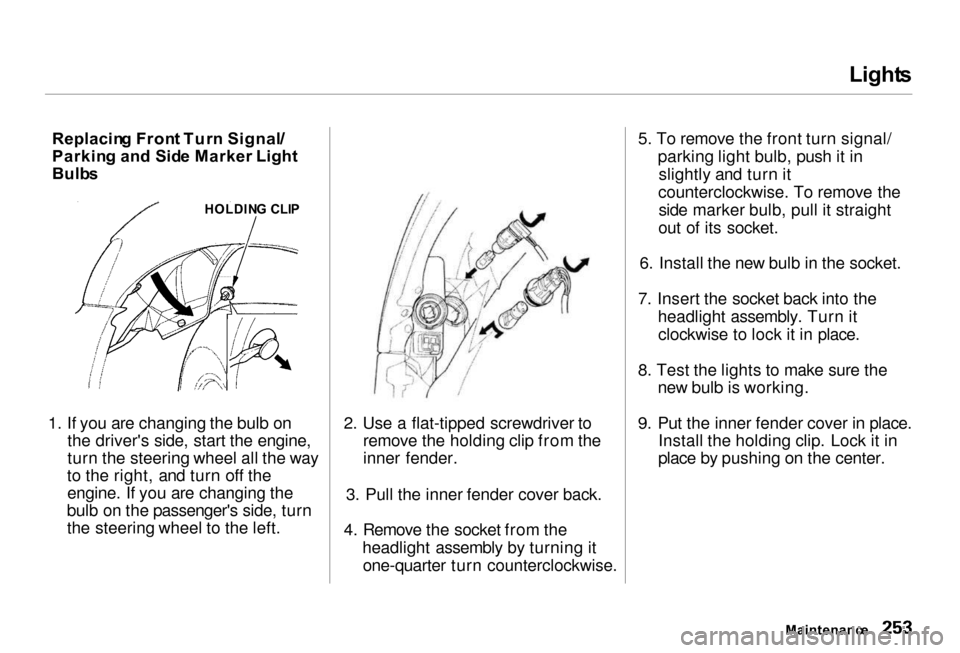
Replacin g Fron t Tur n Signal/
Parkin g an d Sid e Marker Light
Bulb s
1. If you are changing the bulb on the driver's side, start the engine,
turn the steering wheel all the way
to the right, and turn off the engine. If you are changing the
bulb on the passenger's side, turn
the steering wheel to the left. 2. Use a flat-tipped screwdriver to
remove the holding clip from the
inner fender.
3. Pull the inner fender cover back.
4. Remove the socket from the headlight assembly by turning itone-quarter turn counterclockwise. 5. To remove the front turn signal/
parking light bulb, push it inslightly and turn it
counterclockwise. To remove the side marker bulb, pull it straight
out of its socket.
6. Install the new bulb in the socket.
7. Insert the socket back into the headlight assembly. Turn itclockwise to lock it in place.
8. Test the lights to make sure the new bulb is working.
9. Put the inner fender cover in place. Install the holding clip. Lock it in
place by pushing on the center.
Maintenance
HOLDIN
G CLI P
Page 257 of 330
Light
s
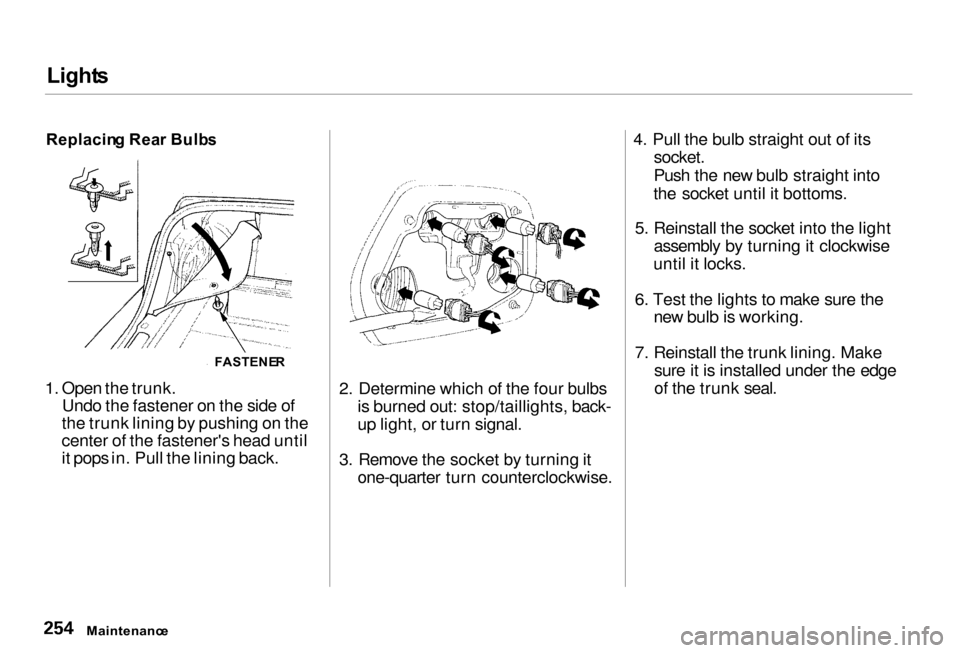
Replacin g Rea r Bulb s
1. Open the trunk. Undo the fastener on the side of
the trunk lining by pushing on the
center of the fastener's head until
it pops in. Pull the lining back. 2. Determine which of the four bulbs
is burned out: stop/taillights, back-
up light, or turn signal.
3. Remove the socket by turning it one-quarter turn counterclockwise. 4. Pull the bulb straight out of its
socket.
Push the new bulb straight into
the socket until it bottoms.
5. Reinstall the socket into the light assembly by turning it clockwise
until it locks.
6. Test the lights to make sure the new bulb is working.
7. Reinstall the trunk lining. Make sure it is installed under the edge
of the trunk seal.
Maintenanc e
FASTENE
R
Page 303 of 330
Vehicl
e Stabilit y Assis t (VSA ) Syste m
The Vehicle Stability Assist system (VSA) monitors the car's actions
during straight-line acceleration and
cornering behavior. It reduces
engine power and applies selective
braking if it senses any loss of
traction.
Controllin g Tractio n Durin g
Straight-lin e Acceleratio n
If one drive wheel is turning faster
than the other, or both drive wheels
are turning faster than the non- driven wheels, VSA senses
wheelspin. It reduces engine power and applies braking at the wheels as
necessary to increase traction.
To do this, VSA monitors the pulse frequencies from the wheel speed sensors. It also uses information
from the steering wheel angle sensor
and the lateral acceleration sensor to determine if the car is accelerating in
a straight line or if it is cornering.
VSA can then calculate how much wheelspin, if any, to allow. It signals
the ECU to reduce fuel flow andretard ignition timing. This reduces
available engine power. The ECU
will also apply braking at the wheels as necessary. When wheelspin has
been controlled, braking and engine
control return to normal.
Controllin g Tractio n Durin g
Cornerin g
VSA monitors steering input and the car's expected response to that input.
VSA's yaw rate sensor measures the car's actual cornering behavior. If VSA determines that the car is
turning more or less than expected,
the system reduces engine power
and applies braking at the
appropriate wheel to try and
maintain adequate traction during
cornering.
VSA uses the same wheel speed sensor assemblies as the ABS.
Additional sensors measure steering wheel angle, lateral acceleration, and
yaw rate.
The control unit monitors the VSA circuitry while driving. If it senses a
problem, it turns off the system and illuminates the VSA System
Indicator on the instrument panel.
Technica l Informatio n
Page 321 of 330
Inde
x
Automatic Speed Control................ 73
Automatic Transmission............... 180
Capacity, Fluid........................... 298
Checking Fluid Level................ 226
Shifting........................................ 180
Shift Lever Position Indicator.. 180
Shift Lever Positions................. 180
Shift Lock Release..................... 183
Battery
Charging System
Indicator............................ 54, 283
Jump Starting............................. 278
Maintenance............................... 234
Specifications............................. 299
Before Driving............................... 165
Belts, Seat..................................... 8, 40
Beverage Holder............................ 111
Body Repair.................................... 267
Brakes
Anti-lock System (ABS)............ 186
Break-in, New Linings .............. 166
Fluid............................................ 227
Light, Burned-out...................... 254 Parking........................................ 108
System Indicator.................. 54, 285
Wear Indicators......................... 185
Brakes, ABS Operation.................................... 186System Indicator.................. 56, 187
Braking System.............................
. 185
Break-in, New Car......................... 166
Brightness Control, Instruments... 66
Brights, Headlights......................... 63
Bulb Replacement Back-up Lights........................... 254
Brake Lights............................... 254
Ceiling Lights............................. 257
Courtesy Lights......................... 257
Fog Lights.................................. 251 Front Side Marker Lights......... 253
Headlights.................................. 250
High-mount Brake Light.......... 255
License Plate Lights.................. 256
Specifications............................. 299
Trunk Light................................ 258
Turn Signal Lights..................... 253
Bulbs, Halogen............................... 250
Cables, Jump Starting With.......... 278
Cancel Button................................... 75
Capacities Chart............................. 298
Carbon Monoxide Hazard.............. 49
Carrying, Cargo............................. 174
Cassette Player
Care............................................. 154
Operation........................... 139, 151
CAUTION, Explanation of............... ii
CD Changer................. 142, 155, 157
Ceiling Lights................................. 117
Certification Label......................... 296
Chains............................................. 247
Change Oil
How to......................................... 217
When to....................................... 206
Changing a Flat Tire..................... 271
Changing Engine Coolant............. 221
Charging System Indicator.... 54, 283
Checking Automatic Transmission
Fluid........................................ 226
Battery Condition...................... 234
Brake Fluid................................. 227
Page 325 of 330
Inde
x
Jacking up the Car......................... 272
Jack, Tire........................................ 272
Jump Starting................................. 278
Keys................................................... 77
Label, Certification........................ 296
Lane Change, Signaling.................. 66
Lap/Shoulder Belt........................... 40
Leaking of Exhaust into Car.......... 49
Learning Key.................................... 78
Leather, Cleaning.......................... 264
Lights On Indicator......................... 55Lighter, Cigarette.......................... 115
Lights Bulb Replacement..................... 250
Ceiling......................................... 117
Courtesy...................................... 118
Indicator........................................ 53
Parking.......................................... 63 Turn Signal................................... 66Load Limit...................................... 175
LOCK (Ignition Key Position)....... 80
Locks
Anti-theft Steering Column........ 80
Childproof Door........................... 85
Fuel Fill Door............................. 167
Glove Box.....................................
87
Power Door.................................. 81
Trunk............................................ 86
Trunk Pass-through Cover......... 97
Low Coolant Level......................... 170
Low Fuel Indicator.......................... 57
Low Oil Pressure Indicator.... 54, 282
Lubricant Specifications
Chart........................................... 298
Luggage.......................................... 174
Maintenance................................... 201
Owner Maintenance Checks.... 213
Record.................................. 211- 212
Required Indicator....................... 61
Safety........................................... 202
Schedule.............................. 206- 210
Malfunction Indicator Lamp .. 55, 284
Memory, Driving Position............ 100
Meters, Gauges................................ 58
Methanol in Gasoline.................... 303
Mirrors, Adjusting........................... 98
Moonroof........................................ 106
Closing Manually....................... 286
Operation.................................... 106
Neutral Gear Position.................... 181 New Vehicle Break-in ................... 166
NOTICE, Explanation of.................... i
Numbers, Identification................ 296
Octane Requirement, Gasoline.... 166Odometer.......................................... 59
Odometer, Trip................................ 59
Oil
Change, How to......................... 217
Change, When to....................... 206
Checking Engine....................... 169
Pressure Indicator............... 54, 282