child seat Acura RL 2000 3.5 Owner's Guide
[x] Cancel search | Manufacturer: ACURA, Model Year: 2000, Model line: RL, Model: Acura RL 2000Pages: 330, PDF Size: 4.53 MB
Page 37 of 330
Protectin
g Childre n
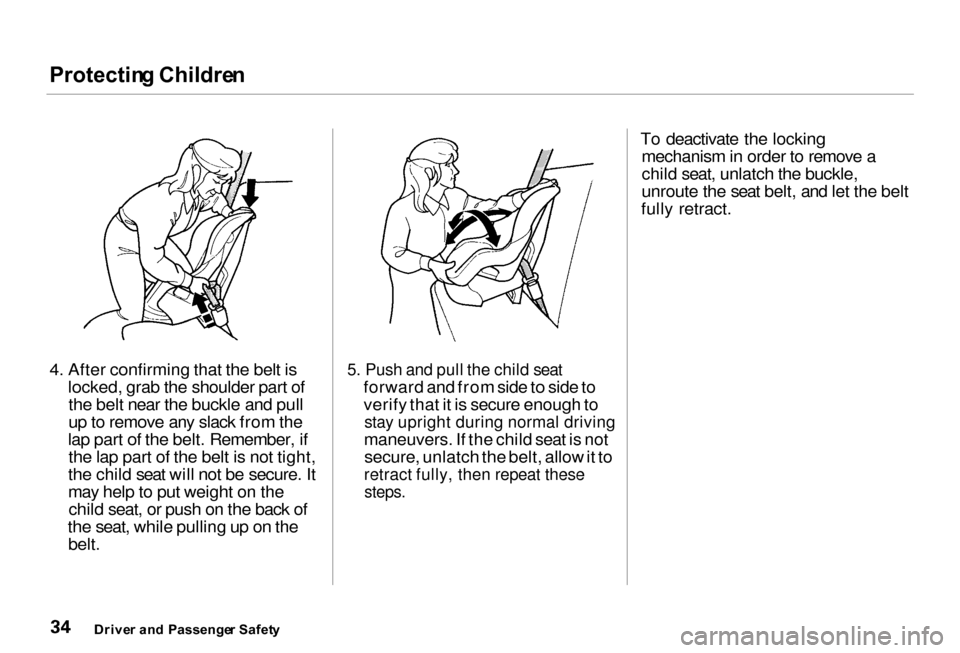
4. After confirming that the belt is locked, grab the shoulder part ofthe belt near the buckle and pull
up to remove any slack from the
lap part of the belt. Remember, if the lap part of the belt is not tight,
the child seat will not be secure. It
may help to put weight on the child seat, or push on the back of
the seat, while pulling up on the belt.
5. Push and pull the child seat
forward and from side to side to
verify that it is secure enough to
stay upright during normal driving
maneuvers. If the child seat is not secure, unlatch the belt, allow it to
retract fully, then repeat these
steps.
To deactivate the locking
mechanism in order to remove a
child seat, unlatch the buckle,
unroute the seat belt, and let the belt
fully retract.
Drive r an d Passenge r Safet y
Page 38 of 330
Protectin
g Childre n
Additional Precautions for Small
Children
Never hold a small child on your
lap. If you are not wearing a seat
belt in a crash, you could be thrown forward into thedashboard and crush the child.
If you are wearing a seat belt, the child can be torn from your arms
during a crash. For example, if
your car crashes into a parked
vehicle at 30 mph (48 km/h), a 30-lb (14 kg) child will become a
900-lb (410 kg) force, and you will
not be able to hold on.
Never put a seat belt over yourself
and a child. During a crash, the
belt could press deep into the child
and cause very serious injuries.
Protectin
g Large r Childre n
When a child reaches the recommended weight or height limit
for a forward-facing child seat, the child should sit in the back seat and
wear a lap/shoulder belt.
If a child is too short for the shoulder
part of the belt to properly fit, we recommend that the child use a
booster seat until they are tall enough to use the seat belt without a
booster.
The following pages give instructions on how to check proper
seat belt fit, what kind of booster
seat to use if one is needed, and
important precautions for children
who must sit in the front seat.
CONTINUED
Drive r an d Passenge r Safet y
Allowing a larger child to sit
improperly in the front seat canresult in injury or death if the
passenger's front airbag inflates.
If a larger child must sit in front,
make sure the child moves the
seat as far back as possible
and wears the seat belt properly.
Page 39 of 330
Protectin
g Childre n
Checking Seat Belt Fit
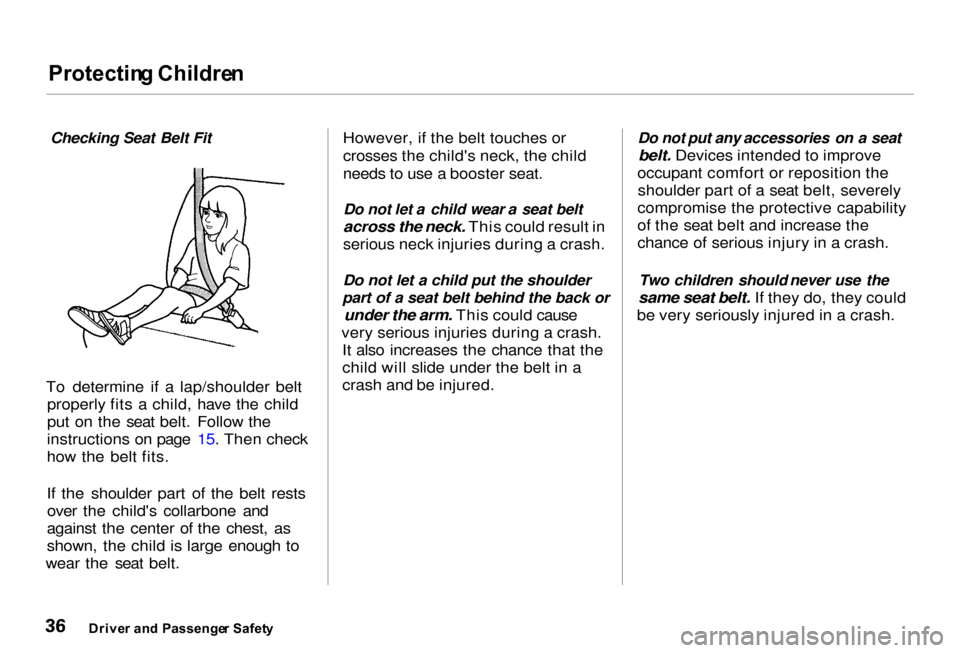
To determine if a lap/shoulder belt properly fits a child, have the child
put on the seat belt. Follow the
instructions on page 15. Then check
how the belt fits.
If the shoulder part of the belt rests over the child's collarbone and
against the center of the chest, as
shown, the child is large enough to
wear the seat belt. However, if the belt touches or
crosses the child's neck, the child
needs to use a booster seat.
Do not let a child wear a seat belt
across the neck. This could result in
serious neck injuries during a crash.
Do not let a child put the shoulder
part of a seat belt behind the back or
under the arm. This could cause
very serious injuries during a crash. It also increases the chance that the
child will slide under the belt in a
crash and be injured.
Do not put any accessories on a seat
belt. Devices intended to improve
occupant comfort or reposition the shoulder part of a seat belt, severely
compromise the protective capability
of the seat belt and increase the
chance of serious injury in a crash.
Two children should never use the
same seat belt. If they do, they could
be very seriously injured in a crash.
Drive r an d Passenge r Safet y
Page 40 of 330
Protectin
g Childre n
Using a Booster Seat
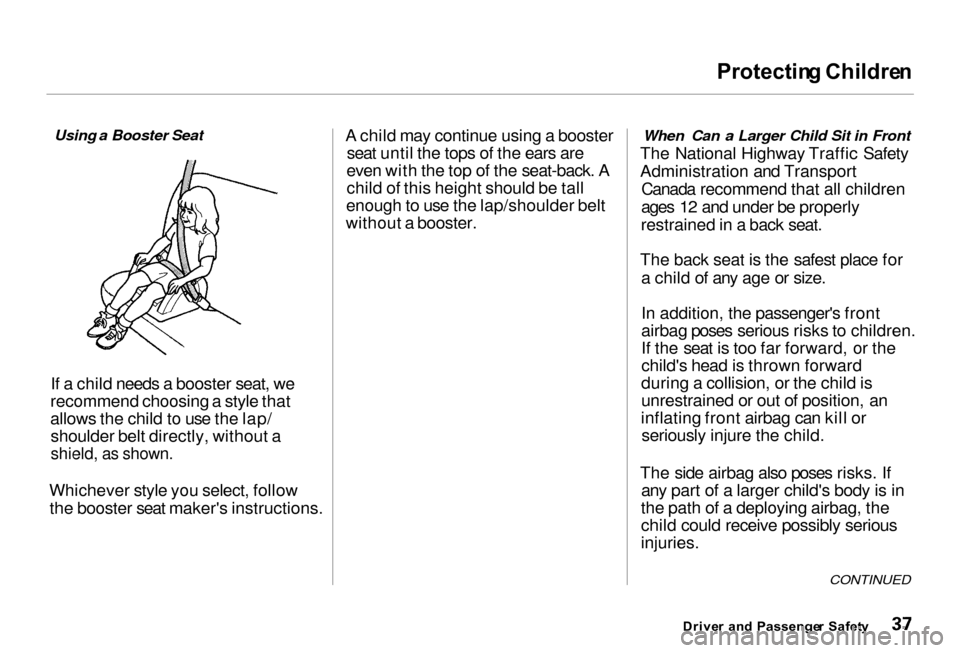
If a child needs a booster seat, we
recommend choosing a style that
allows the child to use the lap/ shoulder belt directly, without a
shield, as shown.
Whichever style you select, follow the booster seat maker's instructions. A child may continue using a booster
seat until the tops of the ears are
even with the top of the seat-back. A
child of this height should be tall
enough to use the lap/shoulder belt
without a booster. When Can a Larger Child Sit in Front
The National Highway Traffic Safety
Administration and Transport Canada recommend that all children
ages 12 and under be properly
restrained in a back seat.
The back seat is the safest place for a child of any age or size.
In addition, the passenger's front
airbag poses serious risks to children.
If the seat is too far forward, or the
child's head is thrown forward
during a collision, or the child is
unrestrained or out of position, an
inflating front airbag can kill or seriously injure the child.
The side airbag also poses risks. If any part of a larger child's body is in
the path of a deploying airbag, the
child could receive possibly serious
injuries.
Driver an d Passenge r Safet y
CONTINUED
Page 41 of 330
Protectin
g Childre n
Of course, children vary widely. And
while age may be one indicator of when a child can safely ride in the
front, there are other important
factors you should consider. Physical Size
Physically, a child must be large
enough for the lap/shoulder belt to
properly fit over the hips, chest, and shoulder (see pages 15 and 35). If
the seat belt does not fit properly, the child should not sit in the front.
Maturity
To safely ride in front, a child must be able to follow the rules, includingsitting properly and wearing the seat
belt properly throughout a ride. If you decide that a child can safely
ride up front, be sure to: Carefully read the owner's manual
and make sure you understand all seat belt instructions and all safety
information. Move the vehicle seat to the rear-
most position. Have the child sit up straight, back
against the seat, and feet on or
near the floor.
Check that the child's seat belt is
properly positioned and secured.
Supervise the child. Even mature
children sometimes need to be
reminded to fasten the seat belts
or sit properly.
Drive r an d Passenge r Safet y
Page 42 of 330
Protectin
g Childre n
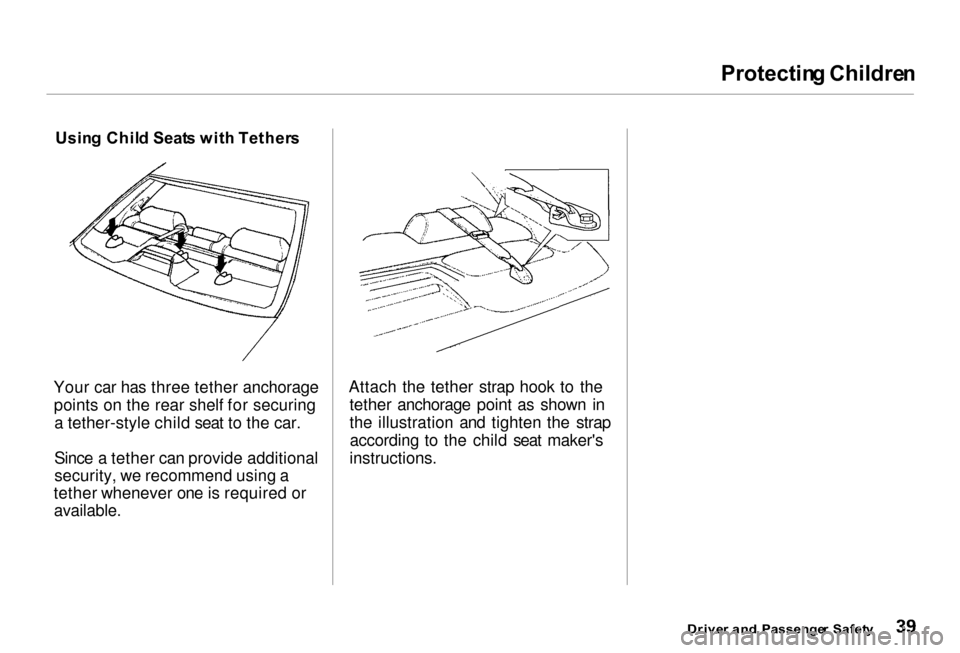
Usin g Chil d Seat s wit h Tether s
Your car has three tether anchorage points on the rear shelf for securinga tether-style child seat to the car.
Since a tether can provide additional
security, we recommend using a
tether whenever one is required or
available.
Attach the tether strap hook to the
tether anchorage point as shown in
the illustration and tighten the strapaccording to the child seat maker's
instructions.
Driver an d Passenge r Safet y
Page 43 of 330
Additiona
l Informatio n Abou t You r Sea t Belt s
Sea t Bel t Syste m Component s
Your seat belt system includes lap/ shoulder belts in all five seating
positions. The front seat belts are
also equipped with automatic seat
belt tensioners.
The seat belt system alsoincludes a light on the
instrument panel to remind you and
your passengers to fasten your belts. If the driver's seat belt is not
fastened before the ignition is turned ON (II), the light will come on and a
beeper will also sound. The beeper
will stop after a few seconds, but the light will stay on until the driver'sseat belt is fastened. Lap/Shoulde
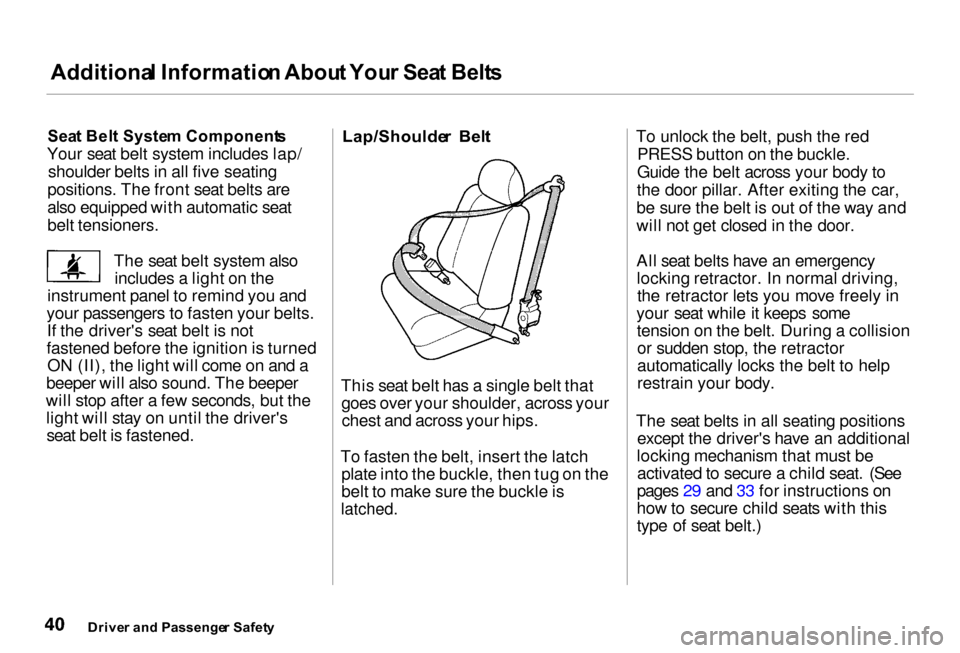
r Bel t
This seat belt has a single belt that goes over your shoulder, across yourchest and across your hips.
To fasten the belt, insert the latch plate into the buckle, then tug on the
belt to make sure the buckle is
latched.
To unlock the belt, push the red
PRESS button on the buckle.
Guide the belt across your body to
the door pillar. After exiting the car,
be sure the belt is out of the way and
will not get closed in the door.
All seat belts have an emergency locking retractor. In normal driving,the retractor lets you move freely in
your seat while it keeps some tension on the belt. During a collisionor sudden stop, the retractor
automatically locks the belt to help
restrain your body.
The seat belts in all seating positions except the driver's have an additional
locking mechanism that must be activated to secure a child seat. (See
pages 29 and 33 for instructions on
how to secure child seats with this
type of seat belt.)
Drive r an d Passenge r Safet y
Page 50 of 330
Additiona
l Informatio n Abou t You r Sid e Airbag s
Ho w Th e Sid e Airba g Indicato r
Ligh t Work s
The purpose of this light is to alert you if the
passenger's side airbag has been automatically shut off.
Although Acura does not encourage children to ride in the front, to help
prevent injury, your car has an automatic cutoff system for the
passenger's side airbag. This system is designed to shut off the airbag if a
child leans sideways and the child's
head is in the deployment path of the side airbag.
The side airbag may also shut off if a small adult leans sideways, or a
larger adult slouches and leans sideways, and the adult's head is in
the deployment path of the airbag. A front seat passenger should not
use a cushion or other object as a
backrest. It may prevent the cutoff system from working properly.
If this light comes on, you should
have the passenger sit upright. Once
the passenger is out of the deployment path of the side airbag,
the airbag will turn on and the light
will go out.
When you turn the ignition ON (II), the indicator light should light up
briefly and go out (see page 55). If it doesn't light, or it stays on or comes
on without a passenger in the front
seat, have the system checked. The SRS indicator light will
come on if there is a
problem with your side airbags or
the automatic cutoff system (see
page 45).
Driver an d Passenge r Safet y
S
R S
SID E
AIRBA G
Page 54 of 330
Instrument
s an d Control s
This section gives information about the controls and displays thatcontribute to the daily operation of
your Acura. All the essential controls are within easy reach.
Control Locations............................ 52
Indicator Lights................................ 53
Gauges.............................................. 58
Speedometer................................ 58
Tachometer.................................. 58
Odometer...................................... 59
Trip Meter/Outside Temperature Indicator............ 59
Temperature Gauge.................... 60 Fuel Gauge................................... 60
Maintenance Required Indicator.................................... 61
Controls Near the Steering Wheel........................................ 62
Headlights.................................... 63
Automatic Lighting..................... 64
Daytime Running Lights............. 65
Instrument Panel Brightness..... 66
Turn Signals................................. 66
Fog Lights.................................... 67 Windshield Wipers...................... 68
Windshield Washers................... 70
Hazard Warning........................... 70
Rear Window Defogger.............. 71
Steering Wheel Adjustments..... 71
Steering Wheel Controls ................ 73 Cruise Control.............................. 73
Remote Audio Controls .............. 76
Keys and Locks................................ 77 Keys............................................... 77
Immobilizer System..................... 78
Ignition Switch............................. 80
Power Door Locks....................... 81
Remote Transmitter.................... 82
Childproof Door Locks............... 85
Trunk............................................86
Glove Box..................................... 87
HomeLink Universal Transmitter......... 88
Customer Assistance.................. 88
Important Safety Precautions.... 88
Training the Transmitter............ 89
Training With a Rolling Code System....................................... 91
Erasing Codes.............................. 92
Seat Adjustments............................. 93
Driver's Seat Adjustments.......... 93
Driver's Lumbar Support............ 95
Front Passenger's Seat
Adjustments............................. 95
Head Restraints........................... 95
Armrest............................................. 96
Mirrors.............................................. 98
Adjusting the Power Mirrors..... 98
Driving Position Memory
System......................................... 100
Seat Heaters................................... 102
Ski Sleeve........................................ 103
Power Windows............................. 105
Moonroof........................................ 106
Parking Brake................................ 108
Digital Clock................................... 108
Sunglasses Holder......................... 110
Beverage Holder............................111
Console Compartment.................. 112
Coin Box......................................... 112
Sun Visor......................................... 113
Vanity Mirror................................. 113
Accessory Power Socket.............. 114 Cigarette Lighter........................... 115
Ashtrays.......................................... 116
Ceiling Lights................................. 117
Courtesy Lights............................. 118
Instrument s an d Control s
Page 88 of 330
Key
s an d Lock s
As required by the FCC:
This device complies with Part 15 of the
FCC rules. Operation is subject to the
following two conditions: (1) This device
may not cause harmful interference, and (2) this device must accept any
interference received, including
interference that may cause undesired operation.
Changes or modifications not expressly
approved by the party responsible for compliance could void the user's
authority to operate the equipment.
This device complies with Industry
Canada Standard RSS-210.
Operation is subject to the following two
conditions: (1) this device may not cause
interference, and (2) this device must accept any interference that may causeundesired operation of the device. Transmitter Care
Avoid severe shock to the trans- mitter, such as dropping or throwing
it. Also, protect it from extreme hot
or cold temperatures.
Clean the transmitter case with a
soft cloth. Do not use strong
cleaners or solvents that could harm
the case. Immersing the transmitter in any liquid will harm the trans-
mitter and cause it to not function
properly.
If you lose a transmitter, you will
need to have the replacement
programmed to your car's system by
your Acura dealer. Any other transmitters you have will also need
to be reprogrammed. Childproo
f Doo r Lock s
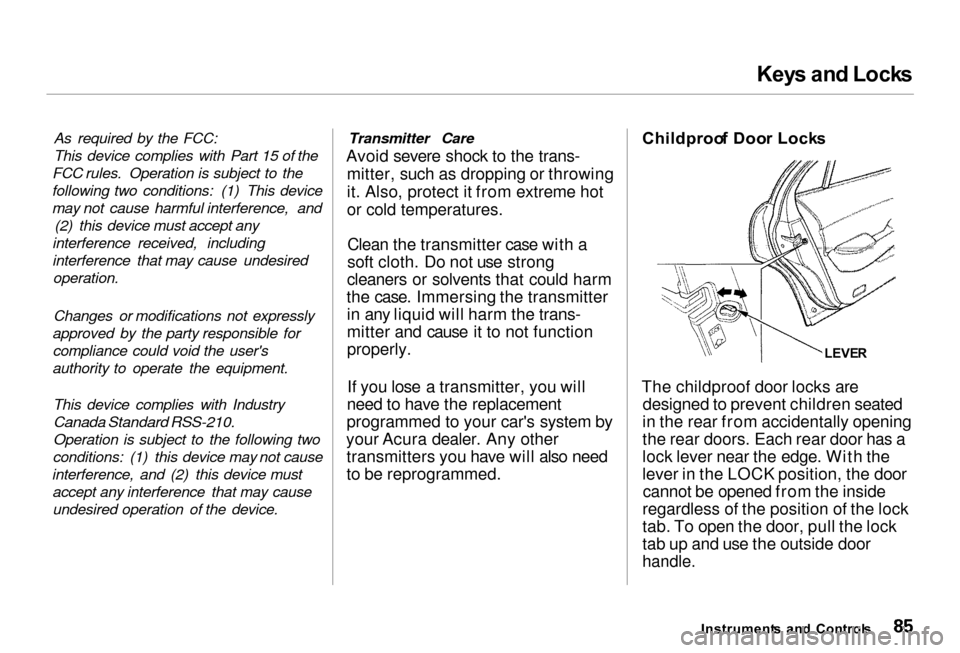
The childproof door locks are designed to prevent children seated
in the rear from accidentally opening
the rear doors. Each rear door has a
lock lever near the edge. With the
lever in the LOCK position, the door cannot be opened from the inside
regardless of the position of the lock
tab. To open the door, pull the lock
tab up and use the outside door
handle.
Instrument s an d Control s
LEVE
R