CD player Acura RL 2000 3.5 Owner's Manual
[x] Cancel search | Manufacturer: ACURA, Model Year: 2000, Model line: RL, Model: Acura RL 2000Pages: 330, PDF Size: 4.53 MB
Page 122 of 330
Comfor
t an d Convenienc e Feature s
The climate control system in your
Acura provides a comfortable driving
environment in all weather condi-
tions.
The standard audio system has
many features. This section de-
scribes those features and how to
use them.
Your Acura has an anti-theft audio
system that requires a code number
to enable it.
The security system helps to dis-
courage vandalism and theft of your
Acura. Climate Control System................ 120
3.5 RL without Navigation System
Fully-automatic Operation........ 122
Semi-automatic Operation........ 123
3.5 RL with Navigation System
Fully-automatic Operation ........ 127
Semi-automatic Operation ........ 128
Rear Ventilation ......................... 132
Sunlight Sensor/ Temperature Sensor.............
133
Audio System ................................. 134
AM/FM/Cassette Stereo
Audio System......................... 134
3.5 RL without Navigation System
Operating the Radio.................. 135
Adjusting the Sound.................. 138
Audio System Lighting............. 139 Operating the Cassette Player...................................... 139
Tape Search Functions............. 140 Operating the CD Changer...... 142
3.5 RL with Navigation System
Operating the Radio.................. 145
Adjusting the Sound.................. 148
Audio System Lighting............. 149 Radio Frequencies..................... 149
Radio Reception......................... 149Operating the Cassette
Player...................................... 151
Tape Search Functions............. 151 Caring for the Cassette Player...................................... 154
Operating the CD Changer...... 155
Loading the CD Changer ......... 157
Protecting Compact Discs........ 159 CD Changer Error Indications.............................. 160
Remote Audio Controls ............ 161
Theft Protection........................ 162
Security System............................. 163
Comfor t an d Convenienc e Feature s
Page 142 of 330
Audi
o Syste m
Audi o Syste m Lightin g
You can use the instrument panel brightness control dial to adjust the il-
lumination of the audio system (see
page 66 ). The audio system illuminates when the parking lights
are on, even if the radio is turned off.
Radi o Frequencie s an d Reception
For information, See page 149 .
Operatin
g th e Cassett e Playe r
The ignition switch must be in
ACCESSORY (I) or ON (II). Make sure the tape opening on the
cassette is facing to the right, then
insert the cassette most of the way
into the slot. The system will pull it
in the rest of the way, and begin to
play.
The tape direction indicator will light to show you which side of the cassette is playing. The indicates
the side you inserted facing upward is now playing. If you want to play
the other side, press the PROG/PLAY button.
Dolby B noise reduction turns on
when you insert a cassette. The indicator will light in the dis-
play. If the tape was not recorded
with Dolby B noise reduction, turn it off by pressing the button.When the system reaches the end of
the tape, it will automatically reversedirection and play the other side. If
you want to remove the cassette from the drive, press the EJECT
button.
If you turn the system off while a
tape is playing, either with the PWR/
VOL knob or by turning off the ignition, the cassette will remain in
the drive. When you turn the system
back on, the tape will begin playing
where it left off.
To switch to the radio or CD changer while listening to a tape,
press the AM/FM or CD/TAPE but-
ton. To change back to the cassette
player, press the CD/TAPE button.
Comfor t an d Convenienc e Feature s
Page 147 of 330
Audi
o Syste m
You can use the SEEK/SKIP buttons to select tracks within a disc. If you
push and release either of the
SEEK/SKIP buttons ( — or +), thesystem will move to the beginning of
a track. Push the + button to move
to the beginning of the next track, and push the — button to move to
the beginning of the current track.
If you push and hold the SEEK/
SKIP button, you will hear a beep
and the system will continue to move
across tracks. Release the button
when you think it has reached the de- sired place on the disc. REPEA
T — When you activate the
Repeat feature by pressing the
REPEAT button, the system continu-
ously replays the current track. You
will see RPT in the display as a reminder. Press the REPEAT buttonagain to turn it off.
RANDOM PLAY — This feature,
when activated, plays the tracks on a CD in random order, rather than in
the order they are recorded on the CD. To activate Random Play, press
the A. SELECT button. You will see
A. SELECT in the display. The sys- tem will then select and play tracksrandomly on the current disc. When
all tracks on that disc have been
played, the next disc is loaded and
played randomly. This continues un-
til you deactivate Random Play by
pressing A. SELECT again. To take the system out of CD mode,
press the AM/FM button or insert acassette in the player. If a tape is
already in the cassette player, press
the CD/TAPE button. When you return to CD mode, play will contin-
ue at the same point that it left off.
If you turn the system off while a CD
is playing, either with the PWR/VOL
knob or the ignition switch, play will continue at the same point when you
turn it back on.
Protectin g Compac t Disc s
For information on how to handle
and protect compact discs, see page
159.
Comfor t an d Convenienc e Feature s
Page 154 of 330
Audi
o Syste m
Operatin g th e Cassett e Playe r
The ignition switch must be in
ACCESSORY (I) or ON (II) Make sure the tape opening on the
cassette is facing to the right, then
insert the cassette most of the way
into the slot. The system will pull it
in the rest of the way, and begin to
play.
The tape direction indicator will light to show you which side of the cassette is playing. The indicates
the side you inserted facing upward is now playing. If you want to play
the other side, press the PROG/PLAY button.
Dolby B noise reduction turns on
when you insert a cassette. The indicator in the button will light.
If the tape was not recorded with
Dolby B noise reduction, turn it off
by pressing the button. When the system reaches the end of
the tape, it will automatically reversedirection and play the other side. If
you want to remove the cassette from the drive, press the EJECT
button.
If you turn the system off while a
tape is playing, either with the PWR/
VOL knob or by turning off the ignition, the cassette will remain in
the drive. When you turn the system
back on, the tape will begin playing
where it left off.
To switch to the radio or CD changer while listening to a tape,
press the AM/FM or CD/TAPE but-
ton. To change back to the cassette
player, press the CD/TAPE button.
Tap
e Searc h Function s
With a cassette playing, you can use the FF, REW, TMS, or REPEAT
function to find a desired program.
FF/RE W — Fast Forward and
Rewind move the tape rapidly. To
rewind the tape, push the REW
button. The indicator in this button
will light. To fast forward the tape, push the FF button. The indicator in
this button will light. Press thePROG/PLAY button to take the
system out of rewind or fast forward.
When the system reaches the end of the tape, it reverses direction and
begins to play if in fast forward, or it
begins to play if in rewind.
CONTINUED
Comfor t an d Convenienc e Feature s
Page 157 of 330
Audi
o Syste m
Carin g fo r th e Cassett e Playe r
The cassette player picks up dirt and oxides from the tape. This contami-
nation builds up over time and causes the sound quality to degrade.
To prevent this, you should clean the player after every 30 hours of use.
Your dealer has a cleaning kit
available.
If you do not clean the cassette
player regularly, it may eventually
become impossible to remove the
contamination with a normal
cleaning kit.
Use 100-minute or shorter cassettes. Cassettes longer than that use
thinner tape that may break or jam
the drive. Look at the cassette before you
insert it. If the tape is loose, tighten
it by turning a hub with a pencil or
your finger. If the label is peeling off, remove it
from the cassette or it could cause
the cassette to jam in the player. Never try to insert a warped or
damaged cassette in the player.
When they are not in use, store cassettes in their cases to protect
them from dust and moisture. Never
place cassettes where they will be exposed to direct sunlight, high heat,
or high humidity. If a cassette is
exposed to extreme heat or cold, let
it reach a moderate temperature
before inserting it in the player.
Never try to insert foreign objects
into the cassette player. If you see the error indication
(3.5 RL with navigation
system) / (3.5 RL without
navigation system) on the display,
press the EJECT button to remove
the cassette from the unit. Make
sure the tape is not damaged. If the
cassette will not eject or the error
indication stays on after the cassette
ejects, take the car to your Acura
dealer.
Comfor t an d Convenienc e Feature s
Page 159 of 330
Audi
o Syste m
To select a different disc, press the
appropriate preset button (1 — 6). If
you select an empty slot in the magazine, the changer will, after
finding that slot empty, try to load the CD in the next slot. This
continues until it finds a CD to load
and play.
You can use the SEEK bar to select tracks within a disc. If you push and
release either of the SEEK bar (— or + ), the system will move to the be-
ginning of a track. Push the + but-
ton to move to the beginning of the
next track, and push the — button to
move to the beginning of the current
track. If you push and hold the SEEK bar
(— or +), you will hear a beep and
the system will continue to move across tracks. Release the button
when you think it has reached the desired place on the disc.
REPEA T — When you activate the
Repeat feature by pressing the REPEAT button, the system
continuously replays the current
track. You will see REPEAT in the display as a reminder. Press the
REPEAT button again to turn it off.
RANDOM PLAY — This feature,when activated, plays the tracks on a
CD in random order, rather than in
the order they are recorded on the
CD. To activate Random Play, press
the A. SELECT button. You will see
A. SELECT in the display. The sys- tem will then select and play tracks
randomly on the current disc. Whenall tracks on that disc have been
played, the next disc is loaded and
played randomly. This continues un-
til you deactivate Random Play by
pressing A. SELECT again.
To take the system out of CD mode, press the AM/FM button or insert acassette in the player. If a tape is
already in the cassette player, press
the CD/TAPE button. When you return to CD mode, play will contin-
ue at the same point that it left off.
If you turn the system off while a CD
is playing, either with the PWR/VOL
knob or the ignition switch, play will
continue at the same point when you
turn it back on.
Protecting Compact Discs
For information on how to handle
and protect compact discs, see page
159.
Comfor t an d Convenienc e Feature s
Page 162 of 330
Audi
o Syste m
Protectin g Compac t Disc s
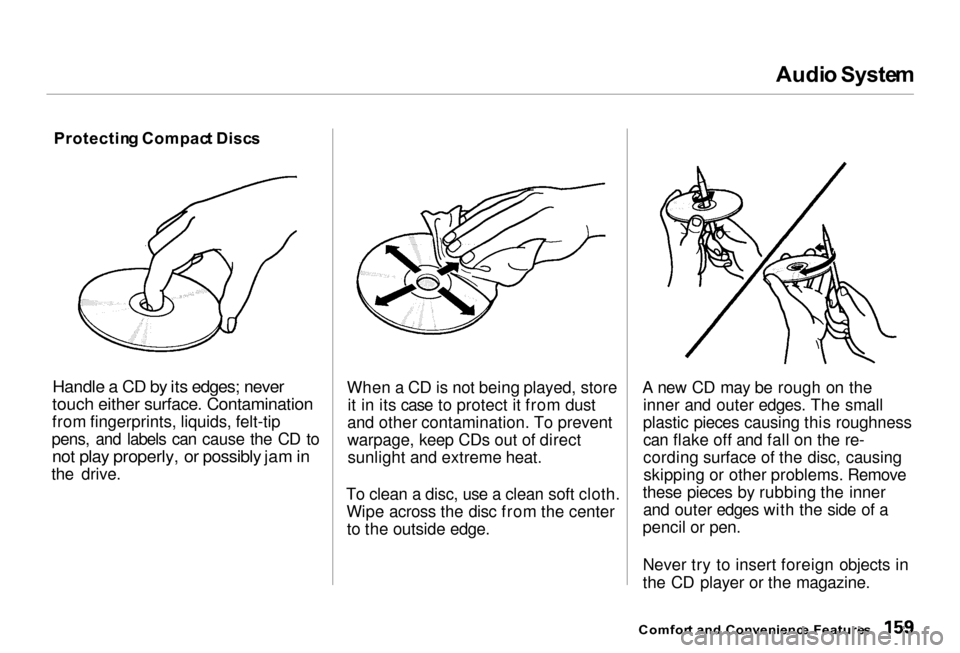
Handle a CD by its edges; never
touch either surface. Contamination
from fingerprints, liquids, felt-tip
pens, and labels can cause the CD to
not play properly, or possibly jam in
the drive. When a CD is not being played, store
it in its case to protect it from dust
and other contamination. To prevent
warpage, keep CDs out of direct sunlight and extreme heat.
To clean a disc, use a clean soft cloth. Wipe across the disc from the centerto the outside edge. A new CD may be rough on the
inner and outer edges. The small
plastic pieces causing this roughness
can flake off and fall on the re-
cording surface of the disc, causingskipping or other problems. Remove
these pieces by rubbing the inner and outer edges with the side of a
pencil or pen.
Never try to insert foreign objects in
the CD player or the magazine.
Comfor t an d Convenienc e Feature s
Page 321 of 330
Inde
x
Automatic Speed Control................ 73
Automatic Transmission............... 180
Capacity, Fluid........................... 298
Checking Fluid Level................ 226
Shifting........................................ 180
Shift Lever Position Indicator.. 180
Shift Lever Positions................. 180
Shift Lock Release..................... 183
Battery
Charging System
Indicator............................ 54, 283
Jump Starting............................. 278
Maintenance............................... 234
Specifications............................. 299
Before Driving............................... 165
Belts, Seat..................................... 8, 40
Beverage Holder............................ 111
Body Repair.................................... 267
Brakes
Anti-lock System (ABS)............ 186
Break-in, New Linings .............. 166
Fluid............................................ 227
Light, Burned-out...................... 254 Parking........................................ 108
System Indicator.................. 54, 285
Wear Indicators......................... 185
Brakes, ABS Operation.................................... 186System Indicator.................. 56, 187
Braking System.............................
. 185
Break-in, New Car......................... 166
Brightness Control, Instruments... 66
Brights, Headlights......................... 63
Bulb Replacement Back-up Lights........................... 254
Brake Lights............................... 254
Ceiling Lights............................. 257
Courtesy Lights......................... 257
Fog Lights.................................. 251 Front Side Marker Lights......... 253
Headlights.................................. 250
High-mount Brake Light.......... 255
License Plate Lights.................. 256
Specifications............................. 299
Trunk Light................................ 258
Turn Signal Lights..................... 253
Bulbs, Halogen............................... 250
Cables, Jump Starting With.......... 278
Cancel Button................................... 75
Capacities Chart............................. 298
Carbon Monoxide Hazard.............. 49
Carrying, Cargo............................. 174
Cassette Player
Care............................................. 154
Operation........................... 139, 151
CAUTION, Explanation of............... ii
CD Changer................. 142, 155, 157
Ceiling Lights................................. 117
Certification Label......................... 296
Chains............................................. 247
Change Oil
How to......................................... 217
When to....................................... 206
Changing a Flat Tire..................... 271
Changing Engine Coolant............. 221
Charging System Indicator.... 54, 283
Checking Automatic Transmission
Fluid........................................ 226
Battery Condition...................... 234
Brake Fluid................................. 227
Page 328 of 330
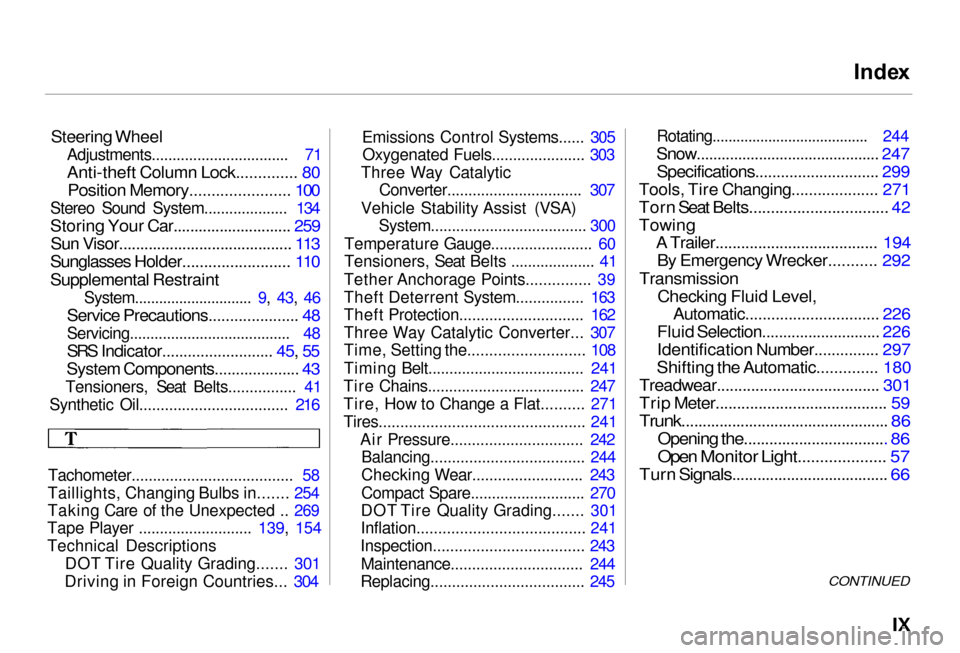
Inde
x
Steering Wheel
Adjustments................................. 71
Anti-theft Column Lock.............. 80
Position Memory....................... 100
Stereo Sound System.................... 134
Storing Your Car............................ 259
Sun Visor......................................... 113
Sunglasses Holder......................... 110
Supplemental Restraint
System............................. 9
,
43, 4
6
Service Precautions..................... 48
Servicing....................................... 48
SRS Indicator.......................... 45, 55
System Components.................... 43
Tensioners, Seat Belts................ 41
Synthetic Oil................................... 216
Tachometer...................................... 58
Taillights, Changing Bulbs in....... 254
Taking Care of the Unexpected .. 269
Tape Player ........................... 139, 154
Technical Descriptions
DOT Tire Quality Grading....... 301
Driving in Foreign Countries... 304 Emissions Control Systems...... 305
Oxygenated Fuels...................... 303
Three Way Catalytic Converter................................ 307
Vehicle Stability Assist (VSA) System..................................... 300
Temperature Gauge........................ 60
Tensioners, Seat Belts .................... 41
Tether Anchorage Points............... 39
Theft Deterrent System................ 163
Theft Protection............................. 162
Three Way Catalytic Converter... 307
Time, Setting the........................... 108
Timing Belt..................................... 241
Tire Chains..................................... 247
Tire, How to Change a Flat.......... 271
Tires................................................ 241 Air Pressure............................... 242Balancing.................................... 244
Checking Wear.......................... 243
Compact Spare........................... 270
DOT Tire Quality Grading....... 301
Inflation....................................... 241
Inspection................................... 243
Maintenance............................... 244
Replacing.................................... 245
Rotating....................................... 244
Snow............................................ 247
Specifications............................. 299
Tools, Tire Changing.................... 271
Torn Seat Belts................................ 42
Towing
A Trailer...................................... 194
By Emergency Wrecker........... 292
Transmission
Checkin g
Fluid Level,
Automatic............................... 226
Fluid Selection............................ 226
Identification Number............... 297
Shifting the Automatic.............. 180
Treadwear...................................... 301
Trip Meter........................................ 59
Trunk................................................. 86
Opening the.................................. 86
Open Monitor Light.................... 57
Turn Signals..................................... 66
CONTINUED