tow Acura RL 2000 3.5 Owner's Manual
[x] Cancel search | Manufacturer: ACURA, Model Year: 2000, Model line: RL, Model: Acura RL 2000Pages: 330, PDF Size: 4.53 MB
Page 1 of 330

2000 RL Online Reference Owner's Manual
Use these links (and links throughout this manual) to navigate through\
this reference.
For a printed owner's manual, click on authorized manuals or go to www.h\
elminc.com.
Contents
Owner's Identification Form
Introduction ........................................................................\
................................................................. i
A Few Words About Safety........................................................................\
........................................ .ii
Your Vehicle at a Glance........................................................................\
............................................ .2
Driver and Passenger Safety ........................................................................\
..................................... .5
Proper use and care of your vehicle's seat belts, and Supplemental Restr\
aint System.
Instruments and Controls........................................................................\
........................................ .51
Instrument panel indicator and gauge, and how to use dashboard and steering colu\
mn controls.
Comfort and Convenience Features ........................................................................\
..................... .119
How to operate the climate control system, the audio system, and other c\
onvenience features.
Before Driving........................................................................\
..........................................................165
What gasoline to use, how to break-in your new vehicle, and how to load luggage and other cargo.
Driving ........................................................................\
..................................................................... .177
The proper way to start the engine, shift the transmission, and park, pl\
us towing a trailer.
Maintenance........................................................................\
.............................................................201
The Maintenance Schedule shows you when you need to take your vehicle to the dealer.
Appearance Care........................................................................\
..................................................... .261
Tips on cleaning and protecting your vehicle. Things to look for if your\
vehicle ever needs body repairs.
Taking Care of the Unexpected........................................................................\
..............................269
This section covers several problems motorists sometimes experience, a nd how to handle them.
Technical Information........................................................................\
............................................ .295
ID numbers, dimensions, capacities, and technical information.
Warranty and Customer Relations (U.S. and Canada)................................................................309
A summary of the warranties covering your new Acura, and how to contact \
us.
Authorized Manuals (U.S. only)........................................................................\
..............................315
How to order manuals and other technical literature.
Index........................................................................\
........................................................................\
...... I
Service Information Summary
A summary of information you need when you pull up to the fuel pump.
Page 20 of 330
Protectin
g Adult s
6 . Adjus t th e Steerin g Whee l
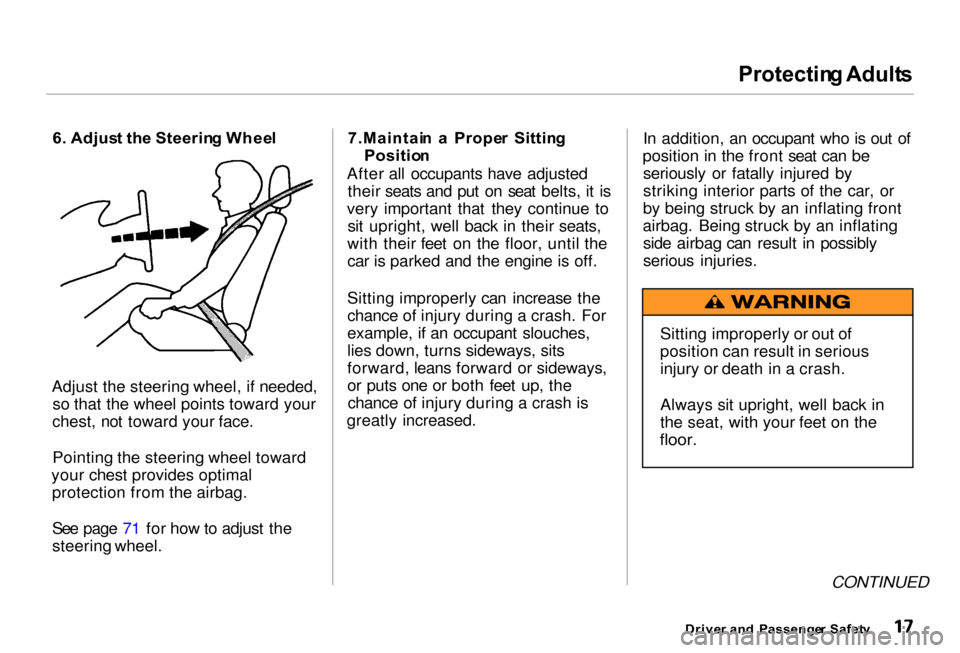
Adjust the steering wheel, if needed, so that the wheel points toward your
chest, not toward your face.
Pointing the steering wheel toward
your chest provides optimal protection from the airbag.
See page 71 for how to adjust the
steering wheel. 7.Maintai
n a Prope r Sittin g
Positio n
After all occupants have adjusted their seats and put on seat belts, it is
very important that they continue to sit upright, well back in their seats,
with their feet on the floor, until the
car is parked and the engine is off.
Sitting improperly can increase the
chance of injury during a crash. For
example, if an occupant slouches,
lies down, turns sideways, sits
forward, leans forward or sideways,
or puts one or both feet up, the chance of injury during a crash is
greatly increased. In addition, an occupant who is out of
position in the front seat can be seriously or fatally injured by
striking interior parts of the car, or
by being struck by an inflating front
airbag. Being struck by an inflating side airbag can result in possibly
serious injuries.
CONTINUED
Drive r an d Passenge r Safet y
Sitting improperly or out of
position can result in serious
injury or death in a crash.
Always sit upright, well back in
the seat, with your feet on the
floor.
Page 34 of 330
Protectin
g Childre n
Rear-Facing Child Seat Installation
Tips
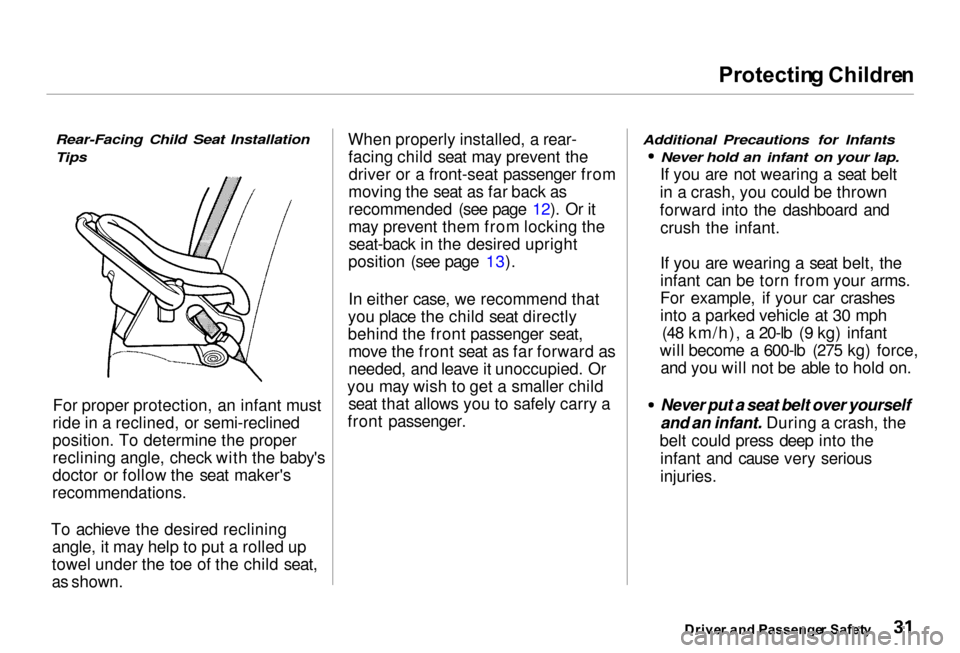
For proper protection, an infant must
ride in a reclined, or semi-reclined
position. To determine the proper
reclining angle, check with the baby's
doctor or follow the seat maker's
recommendations.
To achieve the desired reclining angle, it may help to put a rolled up
towel under the toe of the child seat,
as shown. When properly installed, a rear-
facing child seat may prevent thedriver or a front-seat passenger from
moving the seat as far back as
recommended (see page 12). Or it
may prevent them from locking the seat-back in the desired upright
position (see page 13).
In either case, we recommend that
you place the child seat directly
behind the front passenger seat, move the front seat as far forward as
needed, and leave it unoccupied. Or
you may wish to get a smaller child seat that allows you to safely carry a
front passenger.
Additional Precautions for Infants Never hold an infant on your lap.
If you are not wearing a seat belt
in a crash, you could be thrown
forward into the dashboard and crush the infant.
If you are wearing a seat belt, the
infant can be torn from your arms.
For example, if your car crashes
into a parked vehicle at 30 mph (48 km/h), a 20-lb (9 kg) infant
will become a 600-lb (275 kg) force, and you will not be able to hold on.
Never put a seat belt over yourself
and an infant. During a crash, the
belt could press deep into the infant and cause very serious
injuries.
Drive r an d Passenge r Safet y
Page 75 of 330
Control
s Nea r th e Steerin g Whee l
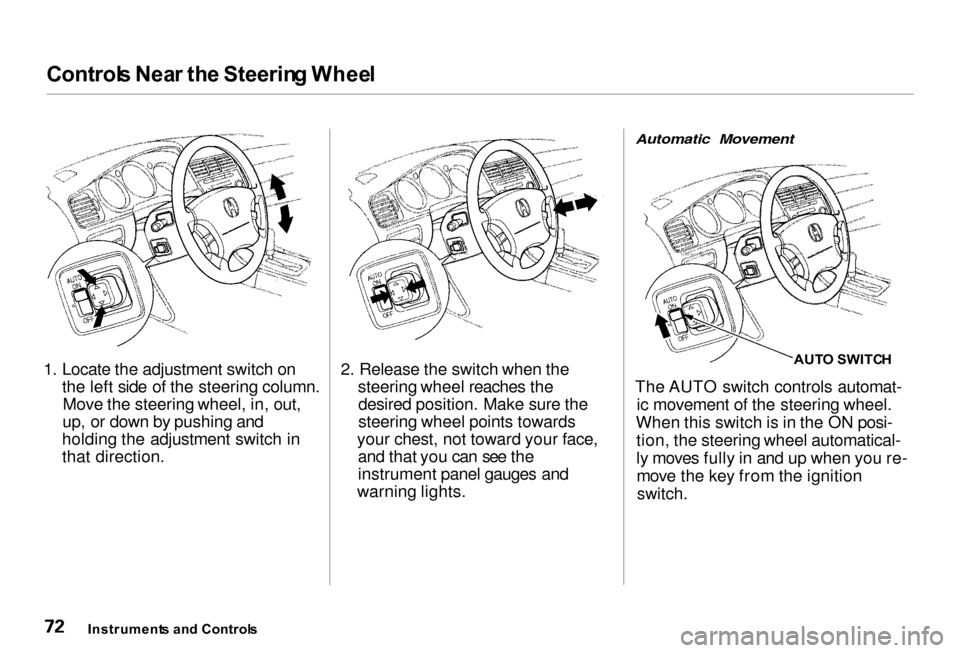
1. Locate the adjustment switch on the left side of the steering column.Move the steering wheel, in, out,
up, or down by pushing and
holding the adjustment switch in
that direction. 2. Release the switch when the
steering wheel reaches thedesired position. Make sure the
steering wheel points towards
your chest, not toward your face, and that you can see the
instrument panel gauges and
warning lights.
Automatic Movement
AUTO SWITC H
The AUTO switch controls automat- ic movement of the steering wheel.
When this switch is in the ON posi- tion, the steering wheel automatical-
ly moves fully in and up when you re-move the key from the ignition
switch.
Instrument s an d Control s
Page 116 of 330
Su
n Visor , Vanit y Mirro r
Su n Viso r
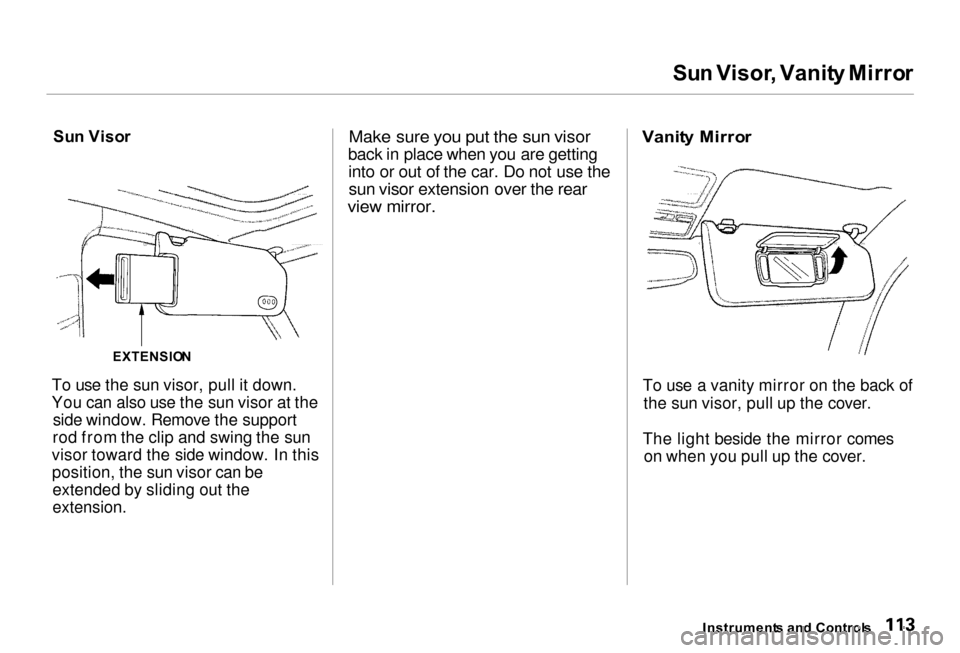
To use the sun visor, pull it down.
You can also use the sun visor at the side window. Remove the support
rod from the clip and swing the sun
visor toward the side window. In this position, the sun visor can beextended by sliding out the
extension.
Make sure you put the sun visor
back in place when you are getting into or out of the car. Do not use the
sun visor extension over the rear
view mirror. Vanit
y Mirro r
To use a vanity mirror on the back of the sun visor, pull up the cover.
The light beside the mirror comes on when you pull up the cover.
Instrument s an d Control s
EXTENSIO
N
Page 172 of 330
Servic
e Statio n Procedure s
If you can open the hood without
sliding the hood latch handle, or the
hood latch handle moves stiffly or does not spring back as before, the
mechanism should be cleaned and
lubricated (see page 229 ).
3. Lift the hood up most of the way.
The hydraulic supports will lift it up the rest of the way and hold it
up .
To close the hood, lower it to about a
foot (30 cm) above the fender, thenpress down firmly with your hands.
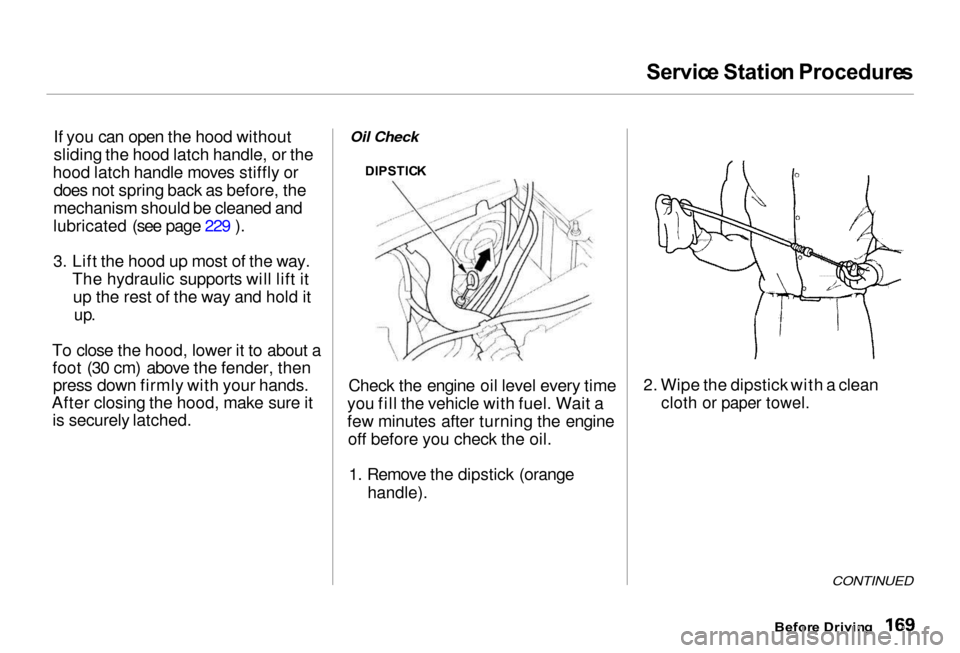
After closing the hood, make sure it is securely latched. Oil Check
Check the engine oil level every time
you fill the vehicle with fuel. Wait a
few minutes after turning the engine off before you check the oil.
1. Remove the dipstick (orange
handle).
2. Wipe the dipstick with a clean
cloth or paper towel.
CONTINUED
Befor e Drivin g
DIPSTIC
K
Page 177 of 330
Carryin
g Carg o
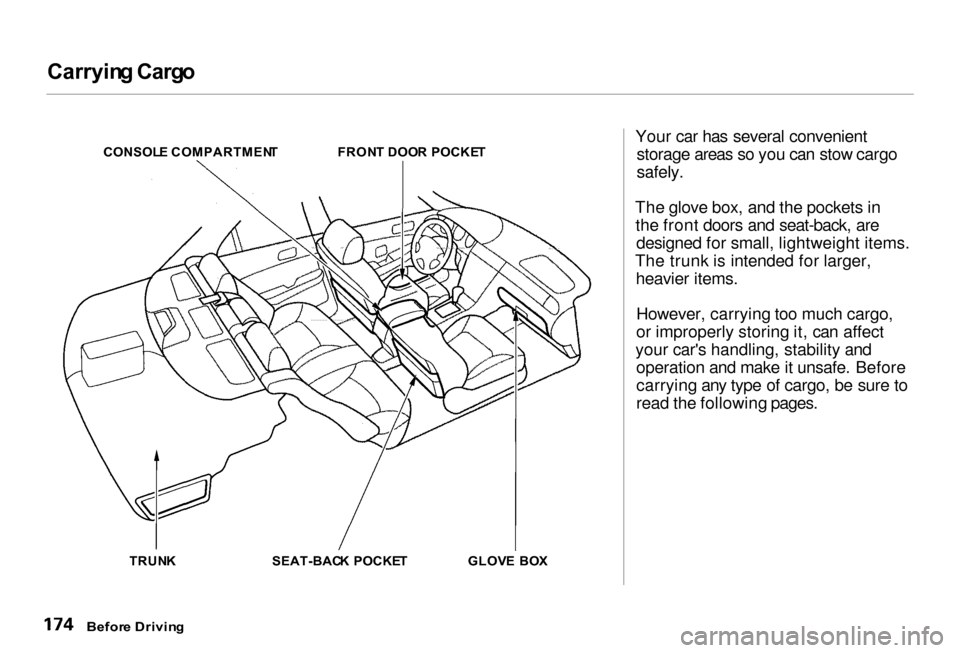
CONSOL E COMPARTMEN T
FRONT DOO R POCKE T
TRUN K SEAT-BACK POCKE T GLOVE BO X Your car has several convenient
storage areas so you can stow cargo
safely.
The glove box, and the pockets in the front doors and seat-back, are designed for small, lightweight items.
The trunk is intended for larger, heavier items.
However, carrying too much cargo,
or improperly storing it, can affect
your car's handling, stability and operation and make it unsafe. Before
carrying any type of cargo, be sure to
read the following pages.
Befor e Drivin g
Page 178 of 330
Carryin
g Carg o
Loa d Limi t
The maximum load for your car is 850 Ibs(395 kg).
This figure includes the total weight of all occupants, cargo, accessories,
and the tongue weight if you are
towing a trailer.
To figure out how much cargo you can carry: Add up the weight of all occupants.
If you are towing a trailer, add the
tongue weight to the number
above.
Subtract the total from 850 Ibs
(395 kg).
The final number is the total weight
of cargo you can carry.
Carryin
g Item s i n th e Passenge r
Compartmen t
Store or secure all items that could
be thrown around and hurt someone during a crash.
Do not put any items on top of the
rear shelf. They can block your
view and be thrown around the car during a crash. Be sure items placed on the floor
behind the front seats cannot roll under the seats and interfere with
the driver's ability to operate the
pedals, or with the proper operation of the seats.
Keep the glove box closed while
driving. If the lid is open, a
passenger could injure their knees during a crash or sudden stop.
Before Drivin g
Overloading or improper
loading can affect handling and
stability and cause a crash in
which you can be hurt or killed.
Follow all load limits and other
loading guidelines in this
manual.
Page 180 of 330

Drivin
g
This section gives you tips on starting the engine under various
conditions, and how to operate the
automatic transmission. It also
includes important information on
parking your car, the braking system,
the Vehicle Stability Assist System, and facts you need if you are
planning to tow a trailer. Preparing to Drive......................... 178
Starting the Engine........................ 179
Starting in Cold Weather at High Altitude ..................... 179
Automatic Transmission............... 180 Shift Lever Position Indicator.. 180
Shift Lever Positions................. 180
Engine Speed Limiter............... 182
Shift Lock Release..................... 183
Parking............................................ 184
The Braking System...................... 185 Brake Wear Indicators.............. 185
Brake System Design................ 186
Anti-lock Brakes........................ 186 Important Safety
Reminders.......................... 187
ABS Indicator......................... 187
Vehicle Stability Assist System.... 189 Driving in Bad Weather................ 192
Towing a Trailer............................ 194
Driving
Page 185 of 330
Automati
c Transmissio n
Driv e (D 4) — Use this position for
your normal driving. The transmis- sion automatically selects a suitable
gear for your speed and acceleration.
You may notice the transmission shifting up at higher speeds when
the engine is cold. This helps the engine warm up faster.
Driv e (D 3) —This position is similar
to D4, except only the first three
gears are selected. Use D3 when
towing a trailer in hilly terrain, or to
provide engine braking when going down a steep hill. D3 can also keep
the transmission from cycling
between third and fourth gears in stop-and-go driving.
For faster acceleration when in D3 or
D4, you can get the transmission to
automatically downshift by pushing
the accelerator pedal to the floor.
The transmission will shift down one or two gears, depending on your
speed.
Secon
d (2 ) — This position locks
the transmission in second gear. It does not downshift to first gear
when you come to a stop. Second
gives you more power when climbing, and increased engine braking when
going down steep hills. Use second
gear when starting out on a slippery surface or in deep snow. It will help
reduce wheelspin.
Firs t (1 ) — To shift from Second to
First, push down on the shift lever.
With the lever in this position, the transmission locks in First gear. By upshifting and downshifting through1, 2, D3 and D4, you can operate this
transmission much like a manual
transmission without a clutch pedal. Engin
e Spee d Limite r
If you exceed the maximum speed
for the gear you are in, the engine speed will enter into the tachometer's
red zone. If this occurs, you may feel
the engine cut in and out. This is caused by a limiter in the engine's
computer controls. The engine will
run normally when you reduce the
RPM below the red zone.
Drivin g