change time Acura RLX 2014 Owner's Guide
[x] Cancel search | Manufacturer: ACURA, Model Year: 2014, Model line: RLX, Model: Acura RLX 2014Pages: 518, PDF Size: 15.83 MB
Page 194 of 518
193Features
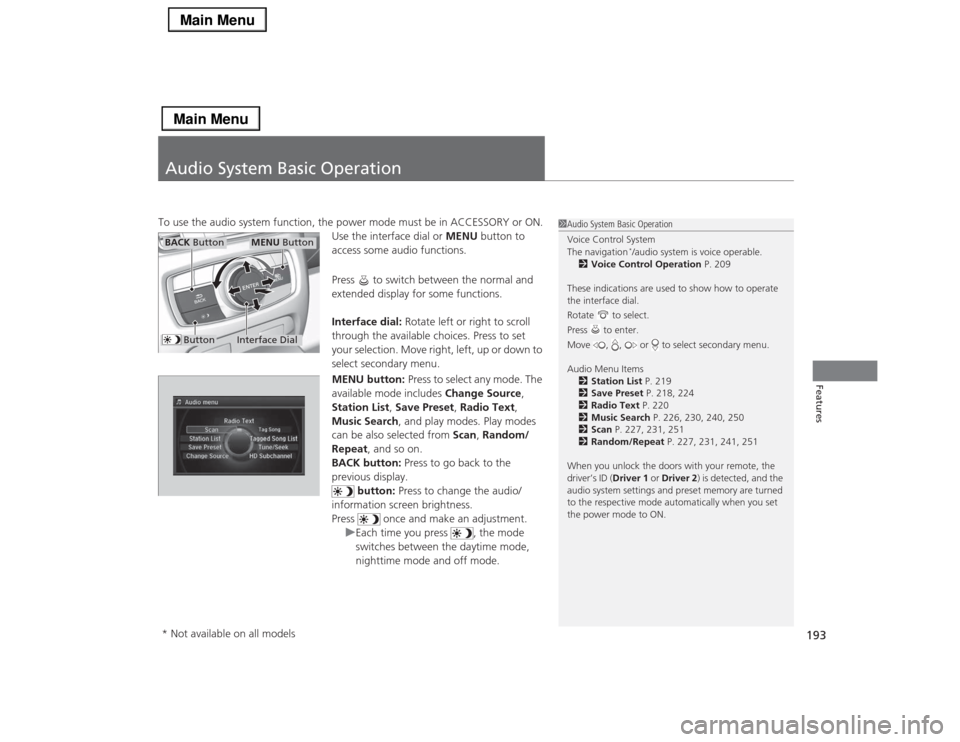
Audio System Basic OperationTo use the audio system function, the power mode must be in ACCESSORY or ON.
Use the interface dial or MENU button to
access some audio functions.
Press to switch between the normal and
extended display for some functions.
Interface dial: Rotate left or right to scroll
through the available choices. Press to set
your selection. Move right, left, up or down to
select secondary menu.
MENU button: Press to select any mode. The
available mode includes Change Source,
Station List, Save Preset, Radio Text,
Music Search, and play modes. Play modes
can be also selected from Scan, Random/
Repeat, and so on.
BACK button: Press to go back to the
previous display.
button: Press to change the audio/
information screen brightness.
Press once and make an adjustment.
uEach time you press , the mode
switches between the daytime mode,
nighttime mode and off mode.
1Audio System Basic Operation
Voice Control System
The navigation
*/audio system is voice operable.
2Voice Control Operation P. 209
These indications are used to show how to operate
the interface dial.
Rotate to select.
Press to enter.
Move , , or to select secondary menu.
Audio Menu Items
2Station List P. 219
2Save Preset P. 218, 224
2Radio Text P. 220
2Music Search P. 226, 230, 240, 250
2Scan P. 227, 231, 251
2Random/Repeat P. 227, 231, 241, 251
When you unlock the doors with your remote, the
driver’s ID (Driver 1 or Driver 2) is detected, and the
audio system settings and preset memory are turned
to the respective mode automatically when you set
the power mode to ON.
Interface Dial
MENU Button
BACK Button
Button
* Not available on all models
Page 203 of 518
uuAudio System Basic OperationuOn Demand Multi-Use Display
TM
202Features
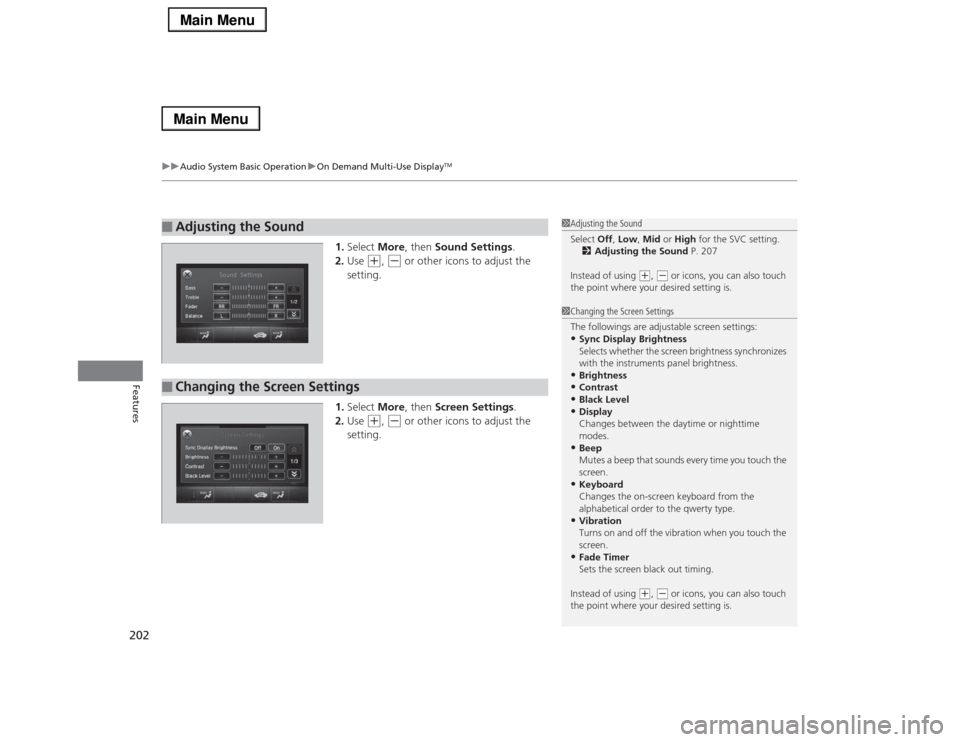
1.Select More, then Sound Settings.
2.Use
(+
, (-
or other icons to adjust the
setting.
1.Select More, then Screen Settings.
2.Use
(+
, (-
or other icons to adjust the
setting.
■
Adjusting the Sound
1Adjusting the Sound
Select Off, Low, Mid or High for the SVC setting.
2Adjusting the Sound P. 207
Instead of using
(+, (- or icons, you can also touch
the point where your desired setting is.
■
Changing the Screen Settings
1Changing the Screen Settings
The followings are adjustable screen settings:•Sync Display Brightness
Selects whether the screen brightness synchronizes
with the instruments panel brightness.•Brightness•Contrast•Black Level•Display
Changes between the daytime or nighttime
modes.•Beep
Mutes a beep that sounds every time you touch the
screen.•Keyboard
Changes the on-screen keyboard from the
alphabetical order to the qwerty type.•Vibration
Turns on and off the vibration when you touch the
screen.•Fade Timer
Sets the screen black out timing.
Instead of using
(+, (- or icons, you can also touch
the point where your desired setting is.
Page 206 of 518
Continued
205
uuAudio System Basic OperationuAudio/Information Screen
Features
You can change, store, and delete the wallpaper on the audio/information screen.■Import wallpaper
You can import up to three images, one at a time, for wallpaper from a USB flash
drive.
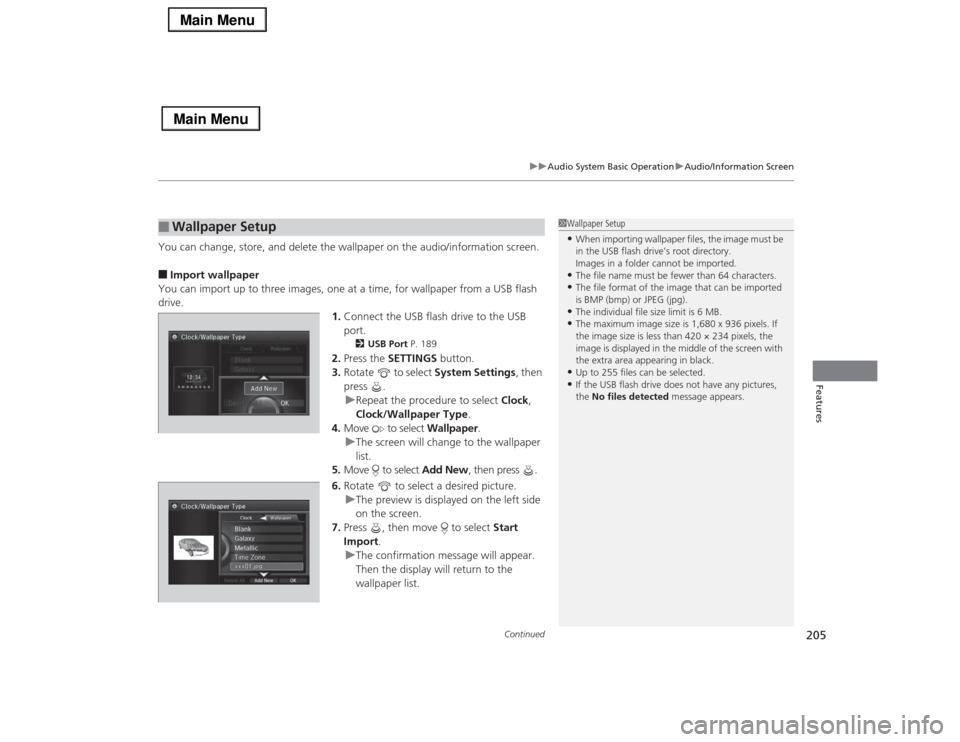
1.Connect the USB flash drive to the USB
port.
2USB Port P. 189
2.Press the SETTINGS button.
3.Rotate to select System Settings, then
press .
uRepeat the procedure to select Clock,
Clock/Wallpaper Type.
4.Move to select Wallpaper.
uThe screen will change to the wallpaper
list.
5.Move to select Add New, then press .
6.Rotate to select a desired picture.
uThe preview is displayed on the left side
on the screen.
7.Press , then move to select Start
Import.
uThe confirmation message will appear.
Then the display will return to the
wallpaper list.
■
Wallpaper Setup
1Wallpaper Setup•When importing wallpaper files, the image must be
in the USB flash drive’s root directory.
Images in a folder cannot be imported.•The file name must be fewer than 64 characters.•The file format of the image that can be imported
is BMP (bmp) or JPEG (jpg).•The individual file size limit is 6 MB.•The maximum image size is 1,680 x 936 pixels. If
the image size is less than 420 × 234 pixels, the
image is displayed in the middle of the screen with
the extra area appearing in black.•Up to 255 files can be selected.•If the USB flash drive does not have any pictures,
the No files detected message appears.
Page 273 of 518
272
uuCustomized Featuresu
Features
*1:Default SettingSetup
GroupCustomizable Features Description Selectable SettingsSystem
Settings
Voice
Recog-
nition
Volume
Changes the volume of the voice prompt.
—
Voice Prompt
Turns the voice prompt on and off.
On
*1/Off
Song by Voice
Turns the Song By Voice
TM on and off.
2Song By Voice
TM (SBV) P. 242
On
*1/Off
Song by Voice Phonetic
Modification
Modifies a voice command for music stored in
the HDD or an iPod®.
2Phonetic Modification P. 244
—
Phonebook Phonetic
Modification
Modifies a voice command for the phonebook.
2Phonebook Phonetic Modification P. 308
—
Opening
Sound Volume
Changes the volume of the system’s startup sound.
—
Clock
Clock/
Wallpaper
Type
Clock
Changes the clock display type.
Analog/Digital
*1/
Small Digital/Off
Wallpaper
●Changes the wallpaper type.●Imports an image file for a new wallpaper.●Deletes an image file for a wallpaper.2Wallpaper Setup P. 205
Blank/Galaxy
*1/
Metallic
Clock Adjustment
Adjust Clock.
2Setting the Clock P. 114
—
Clock Format
Selects the digital clock display from 12H to 24H.
12H
*1/24H
Auto Time Zone
*
Sets the navigation system to automatically adjust
the clock when driving through different time zones.
On
*1/Off
* Not available on all models
Page 274 of 518
273
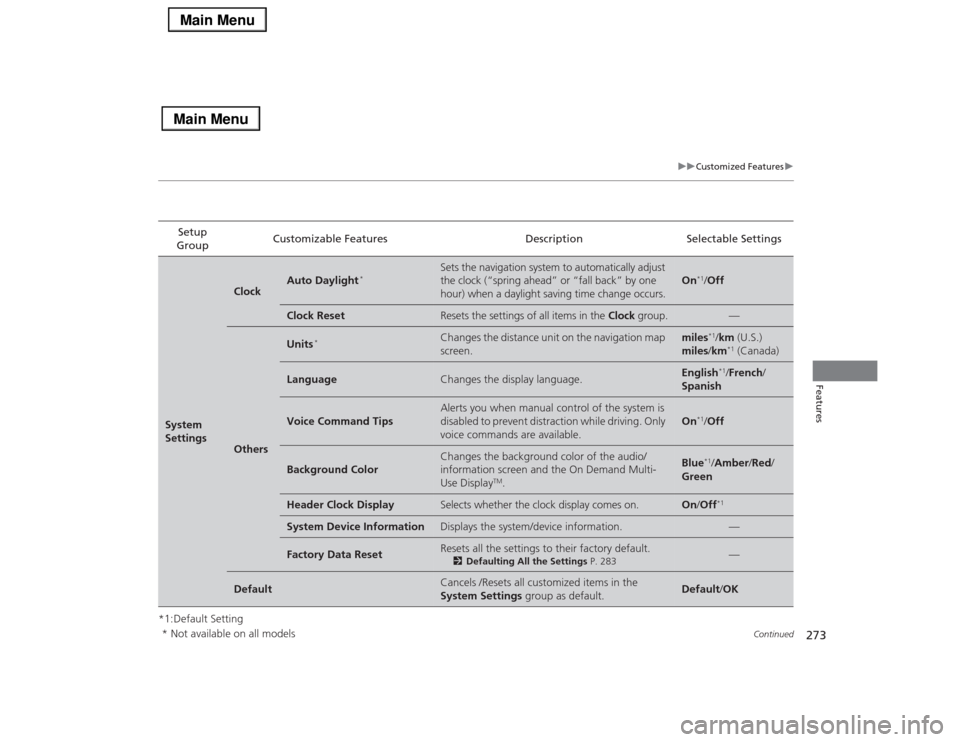
uuCustomized Featuresu
Continued
Features
*1:Default SettingSetup
GroupCustomizable Features Description Selectable SettingsSystem
Settings
Clock
Auto Daylight
*
Sets the navigation system to automatically adjust
the clock (“spring ahead” or “fall back” by one
hour) when a daylight saving time change occurs.
On
*1/Off
Clock Reset
Resets the settings of all items in the Clock group.
—
Others
Units
*
Changes the distance unit on the navigation map
screen.
miles
*1/km (U.S.)
miles/km*1 (Canada)
Language
Changes the display language.
English
*1/French/
Spanish
Voice Command Tips
Alerts you when manual control of the system is
disabled to prevent distraction while driving. Only
voice commands are available.
On
*1/Off
Background Color
Changes the background color of the audio/
information screen and the On Demand Multi-
Use Display
TM.
Blue
*1/Amber/Red/
Green
Header Clock Display
Selects whether the clock display comes on.
On/Off
*1
System Device Information
Displays the system/device information.
—
Factory Data Reset
Resets all the settings to their factory default.
2Defaulting All the Settings P. 283
—
Default
Cancels /Resets all customized items in the
System Settings group as default.
Default/OK
* Not available on all models
Page 276 of 518
275
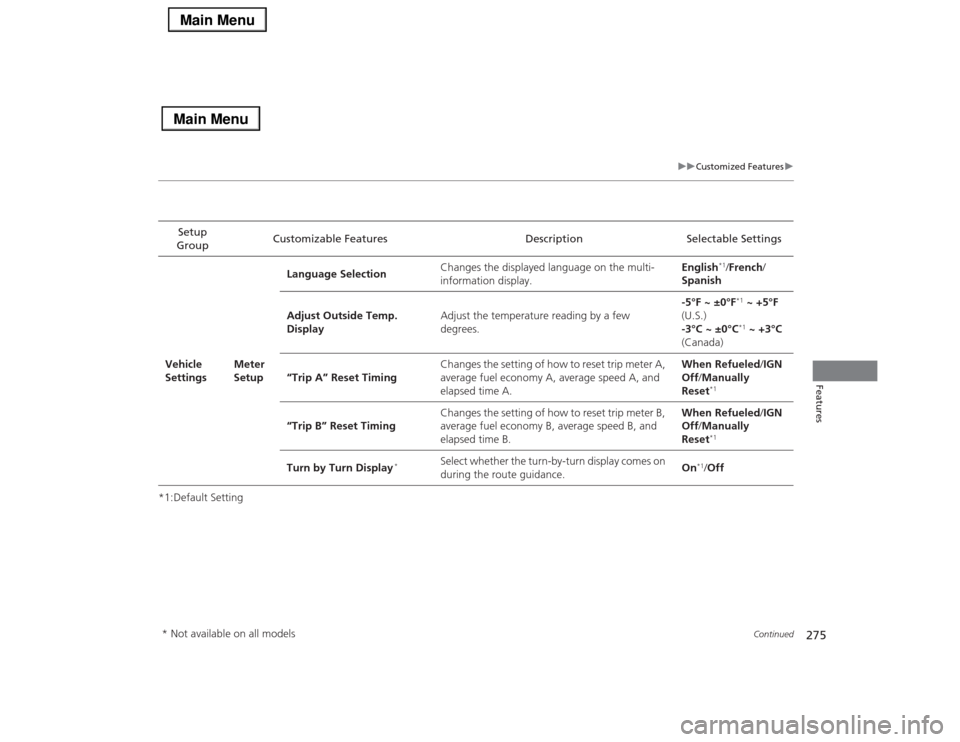
uuCustomized Featuresu
Continued
Features
*1:Default SettingSetup
GroupCustomizable Features Description Selectable Settings
Vehicle
SettingsMeter
SetupLanguage SelectionChanges the displayed language on the multi-
information display.English
*1/French/
Spanish
Adjust Outside Temp.
DisplayAdjust the temperature reading by a few
degrees.-5°F ~ ±0°F*1 ~ +5°F
(U.S.)
-3°C ~ ±0°C*1 ~ +3°C
(Canada)
“Trip A” Reset TimingChanges the setting of how to reset trip meter A,
average fuel economy A, average speed A, and
elapsed time A.When Refueled/IGN
Off/Manually
Reset
*1
“Trip B” Reset TimingChanges the setting of how to reset trip meter B,
average fuel economy B, average speed B, and
elapsed time B.When Refueled/IGN
Off/Manually
Reset
*1
Turn by Turn Display
*
Select whether the turn-by-turn display comes on
during the route guidance.On
*1/Off
* Not available on all models
Page 277 of 518

276
uuCustomized Featuresu
Features
*1:Default SettingSetup
GroupCustomizable Features Description Selectable Settings
Vehicle
SettingsDriving
Position
SetupMemory Position LinkTurns the driving position memory system on and
off.On
*1/Off
Auto Tilt & TelescopicMoves the steering wheel fully up when you get
in/get out of the vehicle.On*1/Off
Auto Seatbelt Tension
*
Turns the auto seatbelt tension setting for the
seat belt e-pretensioner on and off.On
*1/Off
Keyless
Access
SetupDoor Unlock ModeChanges which doors unlock when you grab the
driver’s door handle.Driver Door Only
*1/
All Doors
Keyless Access Light FlashCauses some exterior lights to flash when you
unlock/lock the doors.On
*1/Off
Keyless Access BeepCauses the beeper to sound when you unlock/
lock the doors.On*1/Off
Lighting
SetupInterior Light Dimming
TimeChanges the length of time the interior lights stay
on after you close the doors.60seconds/
30seconds
*1/
15seconds
Headlight Auto Off TimerChanges the length of time the exterior lights
stay on after you close the driver’s door.60seconds/
30seconds/
15seconds*1/
0seconds
Auto Light SensitivityChanges the timing for the headlights to come
on.Max/High/Mid
*1/
Low/Min
* Not available on all models
Page 278 of 518

277
uuCustomized Featuresu
Continued
Features
*1:Default SettingSetup
GroupCustomizable Features Description Selectable Settings
Vehicle
SettingsDoor
SetupAuto Door LockChanges the setting for the automatic locking
feature.With Vehicle Speed
*1/
Shift from P/Off
Auto Door UnlockChanges the setting for when the doors unlock
automatically.All Doors When
Driver’s Door Opens*1/
All Doors When
Shifted to Park/All
Doors When Ignition
Switched Off/Off
Key And Remote Unlock
ModeSets up either the driver’s door or all doors to
unlock on the first push of the remote.Driver Door
*1/All
Doors
Keyless Lock Answer BackLOCK/UNLOCK- The exterior lights flash.
LOCK (2nd push)- The beeper sounds.On
*1/Off
Security Relock TimerChanges the time it takes for the doors to relock
and the security system to set after you unlock
the vehicle without opening any door.90seconds/
60seconds/
30seconds
*1
Auto Folding Door Mirror
*
Changes how you can fold the door mirrors.
Auto Fold With
Keyless
*1/Manual Only
Wiper
SetupWiper Action
*
Changes the setting for the automatic
intermittent wipers in the AUTO position.Rain Sensing
*1/
Intermittent/Speed
Sensitive
Front Wiper Action
*
Changes the setting for the wipers in the INT
position.Speed Sensitive
*1/
Intermittent
* Not available on all models
Page 296 of 518
Continued
295
uuBluetooth® HandsFreeLink®uHFL Menus
Features
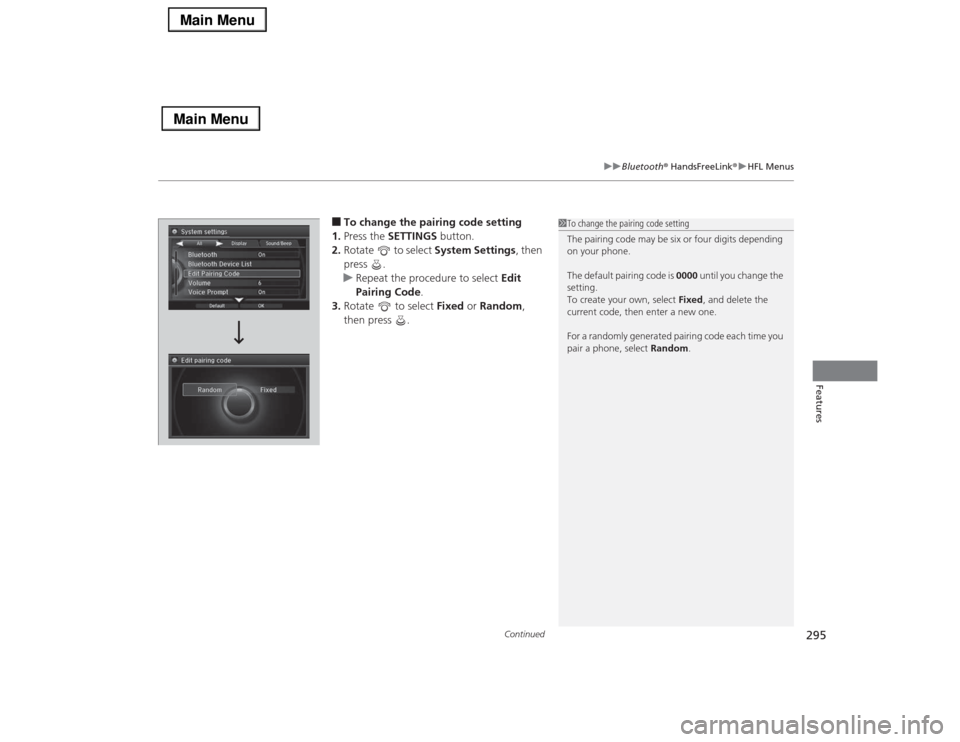
■To change the pairing code setting
1.Press the SETTINGS button.
2.Rotate to select System Settings, then
press .
uRepeat the procedure to select Edit
Pairing Code.
3.Rotate to select Fixed or Random,
then press .
1To change the pairing code setting
The pairing code may be six or four digits depending
on your phone.
The default pairing code is 0000 until you change the
setting.
To create your own, select Fixed, and delete the
current code, then enter a new one.
For a randomly generated pairing code each time you
pair a phone, select Random.
Page 361 of 518
360
uuWhen DrivinguAdaptive Cruise Control (ACC) with Low Speed Follow (LSF)
*
Driving
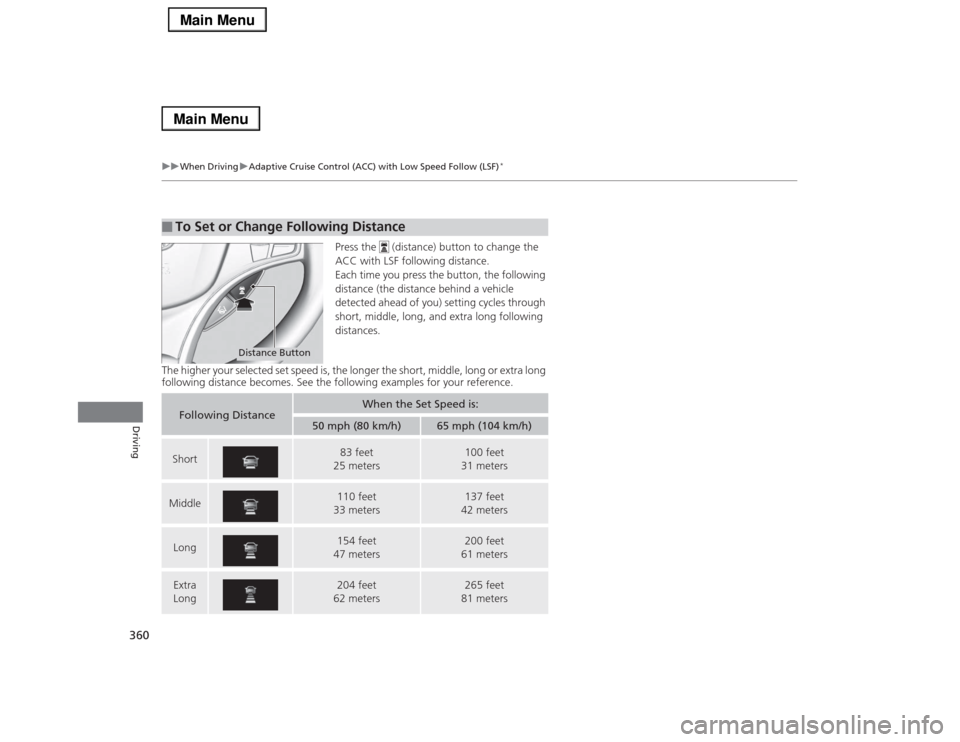
Press the (distance) button to change the
ACC with LSF following distance.
Each time you press the button, the following
distance (the distance behind a vehicle
detected ahead of you) setting cycles through
short, middle, long, and extra long following
distances.
The higher your selected set speed is, the longer the short, middle, long or extra long
following distance becomes. See the following examples for your reference.
■
To Set or Change Following Distance
Distance Button
Following Distance
When the Set Speed is:
50 mph (80 km/h)
65 mph (104 km/h)
Short
83 feet
25 meters
100 feet
31 meters
Middle
110 feet
33 meters
137 feet
42 meters
Long
154 feet
47 meters
200 feet
61 meters
Extra
Long
204 feet
62 meters
265 feet
81 meters