oil pressure Acura RLX 2014 Owner's Manual
[x] Cancel search | Manufacturer: ACURA, Model Year: 2014, Model line: RLX, Model: Acura RLX 2014Pages: 518, PDF Size: 15.83 MB
Page 9 of 518
8Quick Reference Guide
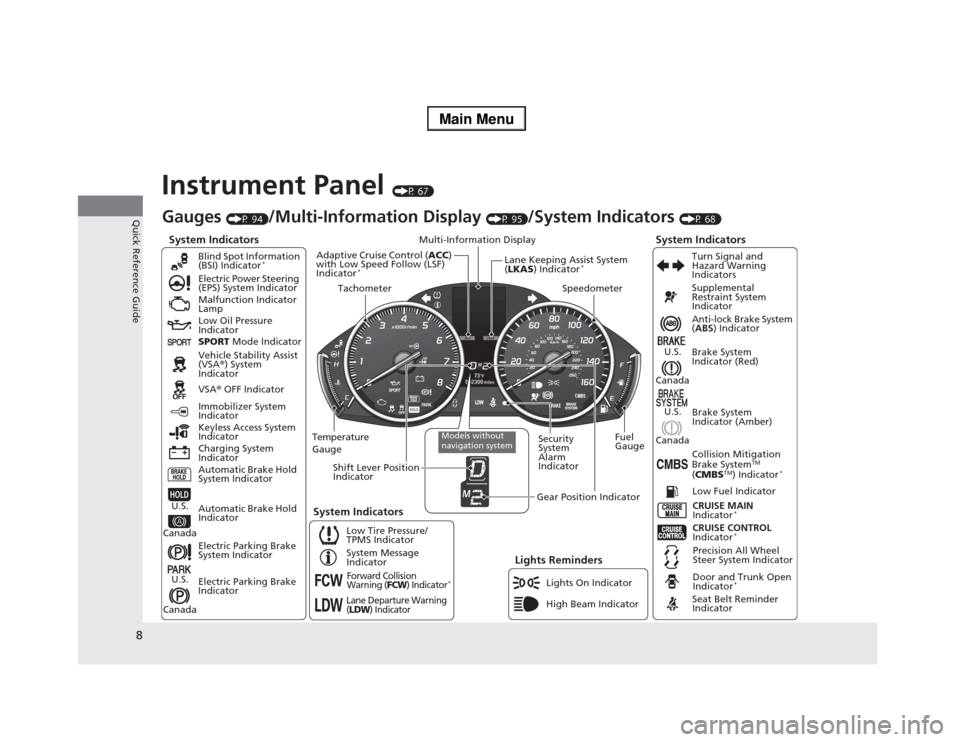
Instrument Panel
(P 67)
System Indicators
Malfunction Indicator
Lamp
Low Oil Pressure
Indicator
Charging System
IndicatorAnti-lock Brake System
(ABS) Indicator
Vehicle Stability Assist
(VSA®) System
Indicator
VSA® OFF Indicator Electric Power Steering
(EPS) System Indicator
Lights Reminders
Lights On Indicator
High Beam Indicator Immobilizer System
Indicator
Seat Belt Reminder
Indicator
System Indicators
CRUISE CONTROL
Indicator
*
System Message
IndicatorBrake System
Indicator (Red)Supplemental
Restraint System
Indicator
Door and Trunk Open
Indicator
*
CRUISE MAIN
Indicator
*
Low Fuel Indicator
Gauges
(P 94)
/Multi-Information Display
(P 95)
/System Indicators
(P 68)
Low Tire Pressure/
TPMS IndicatorTurn Signal and
Hazard Warning
Indicators
Keyless Access System
Indicator
Temperature
GaugeSecurity
System
Alarm
IndicatorFuel
Gauge
Tachometer
Multi-Information Display
Speedometer
Shift Lever Position
Indicator
Gear Position Indicator
Electric Parking Brake
System Indicator
Electric Parking Brake
Indicator Automatic Brake Hold
System IndicatorBrake System
Indicator (Amber)
SPORT Mode Indicator Blind Spot Information
(BSI) Indicator
*
System Indicators
Collision Mitigation
Brake System
TM
(CMBS
TM) Indicator
*
Precision All Wheel
Steer System Indicator
Forward Collision
Warning (
FCW
) Indicator
*
Lane Departure Warning
(LDW
) Indicator
Models without
navigation system
Lane Keeping Assist System
(LKAS) Indicator
*
Adaptive Cruise Control (ACC)
with Low Speed Follow (LSF)
Indicator
*
Automatic Brake Hold
Indicator
U.S.
CanadaU.S.
Canada
U.S.
Canada
U.S.
Canada
Page 18 of 518
17Quick Reference Guide
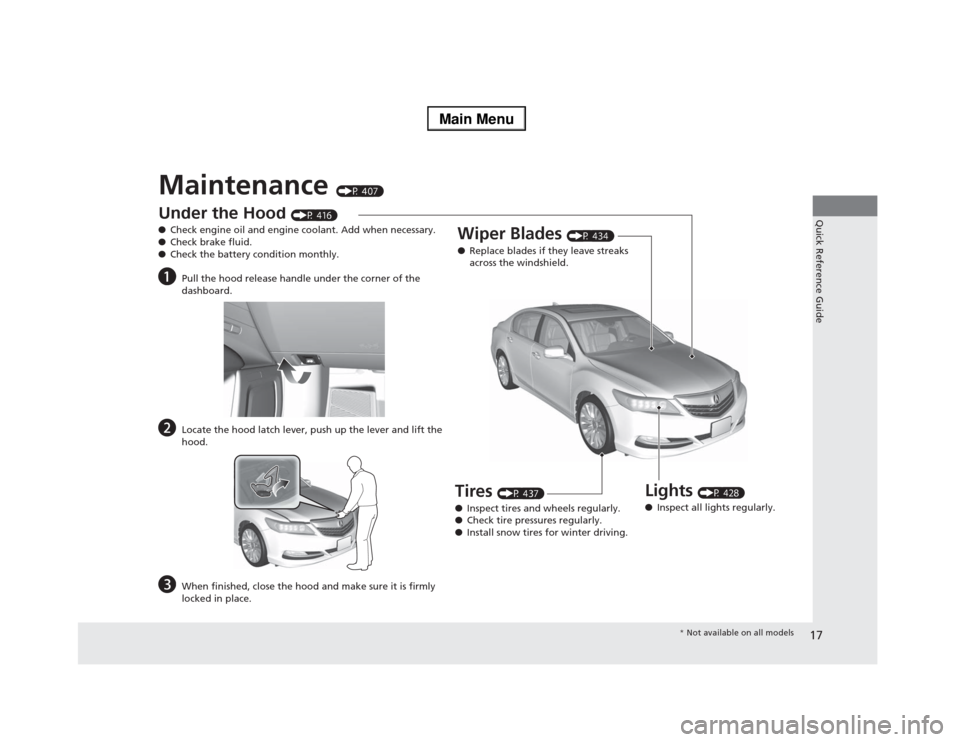
Maintenance
(P 407)
Under the Hood
(P 416)
●Check engine oil and engine coolant. Add when necessary.
●Check brake fluid.
●Check the battery condition monthly.
a
Pull the hood release handle under the corner of the
dashboard.
b
Locate the hood latch lever, push up the lever and lift the
hood.
c
When finished, close the hood and make sure it is firmly
locked in place.
Lights
(P 428)
●Inspect all lights regularly.
Wiper Blades
(P 434)
●Replace blades if they leave streaks
across the windshield.
Tires
(P 437)
●Inspect tires and wheels regularly.
●Check tire pressures regularly.
●Install snow tires for winter driving.
* Not available on all models
Page 69 of 518
68Instrument Panel
Indicators*1:On the left: Models with navigation system
On the right: Models without navigation systemIndicator
Name
On/Blinking
Explanation
Message
*1
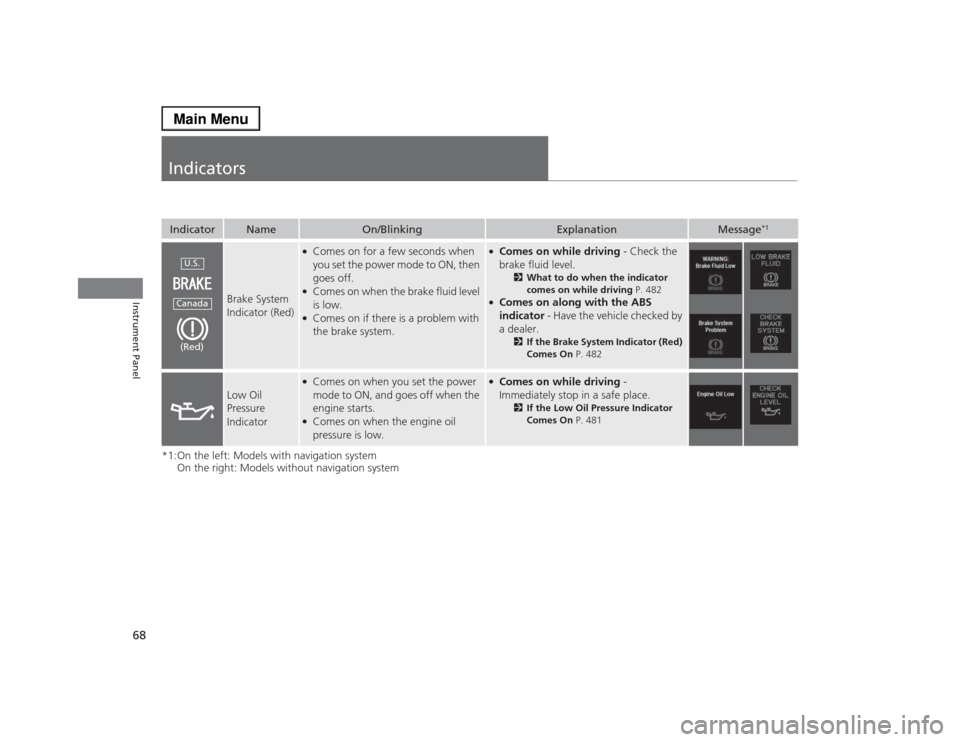
Brake System
Indicator (Red)
●Comes on for a few seconds when
you set the power mode to ON, then
goes off.●Comes on when the brake fluid level
is low.●Comes on if there is a problem with
the brake system.
●Comes on while driving - Check the
brake fluid level.
2What to do when the indicator
comes on while driving P. 482
●Comes on along with the ABS
indicator - Have the vehicle checked by
a dealer.
2If the Brake System Indicator (Red)
Comes On P. 482
Low Oil
Pressure
Indicator
●Comes on when you set the power
mode to ON, and goes off when the
engine starts.●Comes on when the engine oil
pressure is low.
●Comes on while driving -
Immediately stop in a safe place.
2If the Low Oil Pressure Indicator
Comes On P. 481
U.S.Canada(Red)
Page 96 of 518

95
uuGauges and Multi-Information DisplayuMulti-Information Display
Continued
Instrument Panel
Multi-Information DisplayThe multi-information display shows the odometer, trip meter, outside temperature
indicator, and other gauges. It also displays important messages such as warnings
and other helpful information.
Roll the right selector wheel or press the TRIP button to change the display.■
Switching the DisplayModels with navigation systemRight Selector WheelEngine Oil Life Vehicle SettingsElapsed Time
OFFAverage Speed Range Instant Fuel Economy/
Average Fuel Economy
Turn-by-Turn
Directions Tire Pressure for
Each TireCurrent Mode
for ACC with LSF
*
* Not available on all models
Page 98 of 518

97
uuGauges and Multi-Information DisplayuMulti-Information Display
Continued
Instrument Panel
Models without navigation system
Engine Oil Life
Vehicle SettingsElapsed Time
OFF
Average SpeedRange Average Fuel Economy/
Instant Fuel Economy
Tire Pressure for
Each Tire Right Selector Wheel
Page 102 of 518

101
uuGauges and Multi-Information DisplayuMulti-Information DisplayContinued
Instrument Panel
Shows the remaining oil life and Maintenance Minder
TM.
2Maintenance Minder
TM P. 411
Shows each tire’s pressure.2Tire Pressure Monitoring System (TPMS) P. 380■
Engine Oil Life
■
Tire Pressure Monitor
Page 406 of 518

405Driving
Fuel EconomyImproving Fuel EconomyFuel economy depends on several conditions, including driving conditions, your
driving habits, the condition of your vehicle, and loading. Depending on these and
other conditions, you may or may not achieve the rated fuel economy of this vehicle.
You can optimize your fuel economy with proper maintenance of your vehicle.
Always maintain your vehicle in accordance with the messages displayed on the
multi-information display.
•Use the recommended viscosity engine oil, displaying the API Certification Seal.
•Maintain the specified tire pressure.
•Do not load the vehicle with excess cargo.
•Keep your vehicle clean. A buildup of snow or mud on your vehicle’s underside
adds weight and increases wind resistance.■
Maintenance and Fuel Economy
1Improving Fuel Economy
Direct calculation is the recommended method to
determine actual fuel consumed while driving.
In Canada, posted fuel economy numbers are
established following a simulated test. For more
information on how this test is performed, please visit
http://oee.nrcan.gc.ca/
Miles drivenGallons of
fuelMiles per
Gallon
100L per 100 km Liters of
fuelKilometers
driven
Page 409 of 518
408Maintenance
Before Performing MaintenanceInspection and MaintenanceFor your safety, perform all listed inspections and maintenance to keep your vehicle
in good condition. If you become aware of any abnormality (noise, smell, insufficient
brake fluid, oil residue on the ground, etc.), have your vehicle inspected by a dealer.
(Note, however, that service at a dealer is not mandatory to keep your warranties in
effect.) Refer to the separate maintenance booklet for detailed maintenance and
inspection information.■Daily inspections
Perform inspections before long distance trips, when washing the vehicle, or when
refueling.■Periodic inspections
•Check the brake fluid level monthly.2Brake Fluid P. 427
•Check the tire pressure monthly. Examine the tread for wear and foreign objects.
2Checking and Maintaining Tires P. 437
•Check the operation of the exterior lights monthly.
2Replacing Light Bulbs P. 428
•Check the condition of the wiper blades at least every six months.
2Checking and Maintaining Wiper Blades P. 434
■
Types of Inspection and Maintenance
1Inspection and Maintenance
Maintenance, replacement, or repair of
emissions control devices and systems may be
done by any automotive repair establishment or
individuals using parts that are “certified” to
EPA standards.
According to state and federal regulations, failure to
perform maintenance on the maintenance main
items marked with # will not void your emissions
warranties. However, all maintenance services should
be performed in accordance with the intervals
indicated by the multi-information display.
2Maintenance Service Items P. 414
If you want to perform complex maintenance tasks
that require more skills and tools, you can purchase a
subscription to the Service Express website at
www.techinfo.honda.com.
2Authorized Manuals P. 505
If you want to perform maintenance yourself, make
sure that you have the necessary tools and skills first.
After performing maintenance, update the records in
the separate maintenance booklet.U.S. models
Page 423 of 518

422
uuMaintenance Under the HooduChanging the Engine Oil and Oil Filter
Maintenance
Changing the Engine Oil and Oil FilterYou must change the engine oil and oil filter regularly in order to maintain the
engine’s lubrication. The engine may be damaged if they are not changed regularly.
Change the oil and filter in accordance with the maintenance message on the multi-
information display.
1.Run the engine until it reaches normal
operating temperature, and then turn the
engine off.
2.Open the hood and remove the engine oil
fill cap.
3.Remove the drain bolt and washer from
the bottom of the engine, and drain the
oil into a suitable container.
4.Remove the oil filter and dispose of the
remaining oil.
5.Check that the filter gasket is not stuck to
the engine contact surface.
uIf it is stuck, you must detach it.
6.Wipe away dirt and dust adhering to the
contact surface of the engine block, and
install a new oil filter.
uApply a light coat of new engine oil to
the oil filter rubber seal.
7.Put a new washer on the drain bolt, then
reinstall the drain bolt.
uTightening torque:
30 lbf∙ft (40 N∙m, 4.0 kgf∙m)
1Changing the Engine Oil and Oil FilterNOTICEYou may damage the environment if you do not
dispose of the oil in a suitable way. If you are
changing the oil by yourself, appropriately dispose of
the used oil. Put the oil in a sealed container and take
it to a recycling center. Do not throw the oil away
into a garbage can or onto the ground.
You will need a special wrench to replace the oil
filter. You can buy this wrench from a dealer.
When installing the new oil filter, follow the
instructions supplied with the oil filter.
Reinstall the engine oil fill cap. Start the engine. The
low oil pressure indicator should go off within five
seconds. If it does not, turn off the engine, and check
your work.
Drain Bolt
Washer
Oil Filter
Page 454 of 518
453
Handling the Unexpected
This chapter explains how to handle unexpected troubles.
Tools
Types of Tools .................................. 454
If a Tire Goes Flat
Temporarily Repairing a Flat Tire....... 455
Changing a Flat Tire ......................... 466
Engine Does Not Start
Checking the Engine ........................ 472
If the Keyless Access Remote Battery is
Weak ............................................. 473
Emergency Engine Stop ................... 474
Jump Starting.................................... 475
Shift Lever Does Not Move.............. 478
Overheating
How to Handle Overheating ............. 479Indicator, Coming On/Blinking
If the Low Oil Pressure Indicator Comes
On ............................................. 481If the Charging System Indicator Comes
On ................................................. 481
If the Malfunction Indicator Lamp Comes
On or Blinks ................................... 482If the Brake System Indicator (Red) Comes On .. 482If the Electric Power Steering (EPS) System
Indicator Comes On .............................. 483
If the Electric Parking Brake System Indicator
Comes On............................................. 483
If the Low Tire Pressure/TPMS Indicator
Comes On or Blinks ....................... 484
Fuses
Fuse Locations ................................. 485
Inspecting and Changing Fuses ........ 489
Emergency Towing........................... 490
When You Cannot Unlock the Fuel Fill
Door................................................. 491When You Cannot Open the Trunk..... 492RefuelingRefueling From a Portable Fuel Container ... 493