run flat Acura RLX 2016 Owner's Manual
[x] Cancel search | Manufacturer: ACURA, Model Year: 2016, Model line: RLX, Model: Acura RLX 2016Pages: 581, PDF Size: 31.43 MB
Page 3 of 581
Contents
This owner’s manual should be considered a permanent part of the
vehicle and should remain with the vehicle when it is sold.
This owner’s manual covers all models of your vehicle. You may find
descriptions of equipment and features that are not on your
particular model.
Images throughout this owner’s manu al (including the front cover)
represent features and equipment that are available on some, but
not all, models. Your particular mo del may not have some of these
features.
This owner’s manual is for vehicles sold in the United States and
Canada.
The information and specifications in cluded in this publication were
in effect at the time of approval for printing. Honda Motor Co., Ltd.
reserves the right, however, to discontinue or change specifications
or design at any time without notice and without incurring any
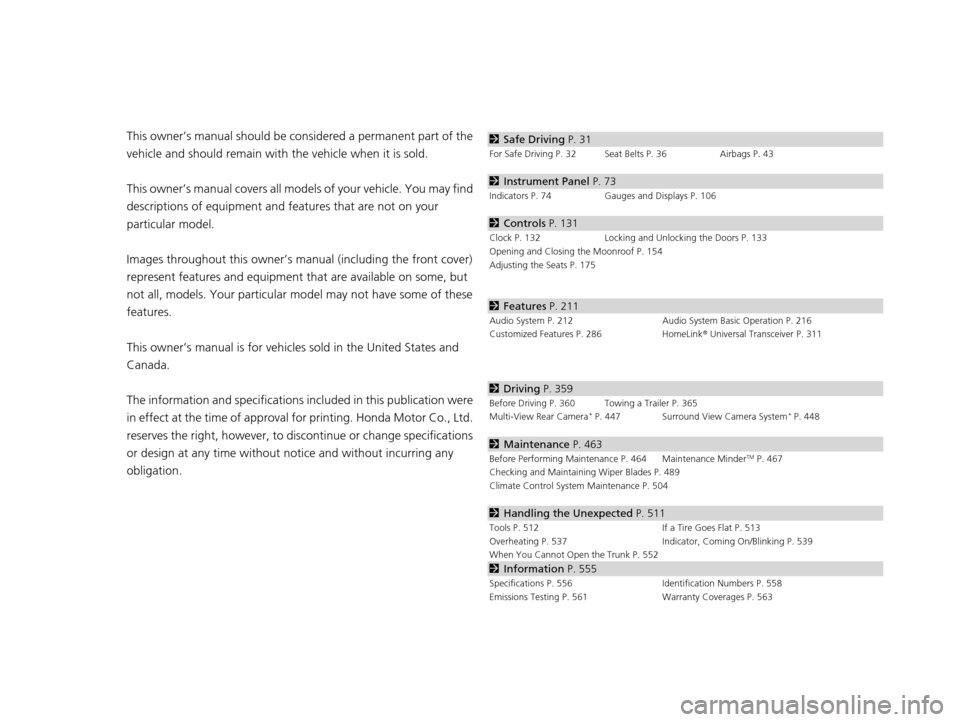
obligation.2 Safe Driving P. 31
For Safe Driving P. 32 Seat Belts P. 36 Airbags P. 43
2Instrument Panel P. 73
Indicators P. 74 Gauges and Displays P. 106
2Controls P. 131
Clock P. 132 Locking and Unlocking the Doors P. 133
Opening and Closing the Moonroof P. 154
Adjusting the Seats P. 175
2 Features P. 211
Audio System P. 212 Audio System Basic Operation P. 216
Customized Features P. 286 HomeLink® Universal Transceiver P. 311
2 Driving P. 359
Before Driving P. 360 Towing a Trailer P. 365
Multi-View Rear Camera* P. 447 Surround View Camera System* P. 448
2Maintenance P. 463
Before Performing Maintenance P. 464 Maintenance MinderTM P. 467
Checking and Maintaining Wiper Blades P. 489
Climate Control System Maintenance P. 504
2Handling the Unexpected P. 511
Tools P. 512 If a Tire Goes Flat P. 513
Overheating P. 537 Indicator, Coming On/Blinking P. 539
When You Cannot Open the Trunk P. 552
2 Information P. 555
Specifications P. 556 Identification Numbers P. 558
Emissions Testing P. 561 Warranty Coverages P. 563
16 ACURA RLX E-AWD-31TY36200.book 2 ページ 2015年5月22日 金曜日 午後3時50分
Page 28 of 581

Quick Reference Guide
27
Handling the Unexpected (P 511)
Flat Tire (P 513)
● Park in a safe location and repair the flat
tire using the temporary tire repair kit.
Park in a safe location and replace the
flat tire with the comp act spare tire in the
trunk.
Indicators Come On
(P 539)
● Identify the indica tor and consult the
owner’s manual.
Vehicles with optional spare tire kit
Power System Won’t Start
(P 531)
● If the 12-volt battery is dead, jump start
using a booster battery.
Blown Fuse
(P 544)
● Check for a blown fuse if an electrical
device does not operate.
Overheating (P 537)
● Park in a safe location. If you do not see
steam under the hood, open the hood,
and let the power system and the engine
cool down.
Emergency Towing
(P 550)
●Call a professional towing service if you
need to tow your vehicle.
16 ACURA RLX E-AWD-31TY36200.book 27 ページ 2015年5月22日 金曜日 午後3時5 0分
Page 194 of 581
Continued193
uuInterior Lights/Interior Convenience Items uInterior Convenience Items
Controls
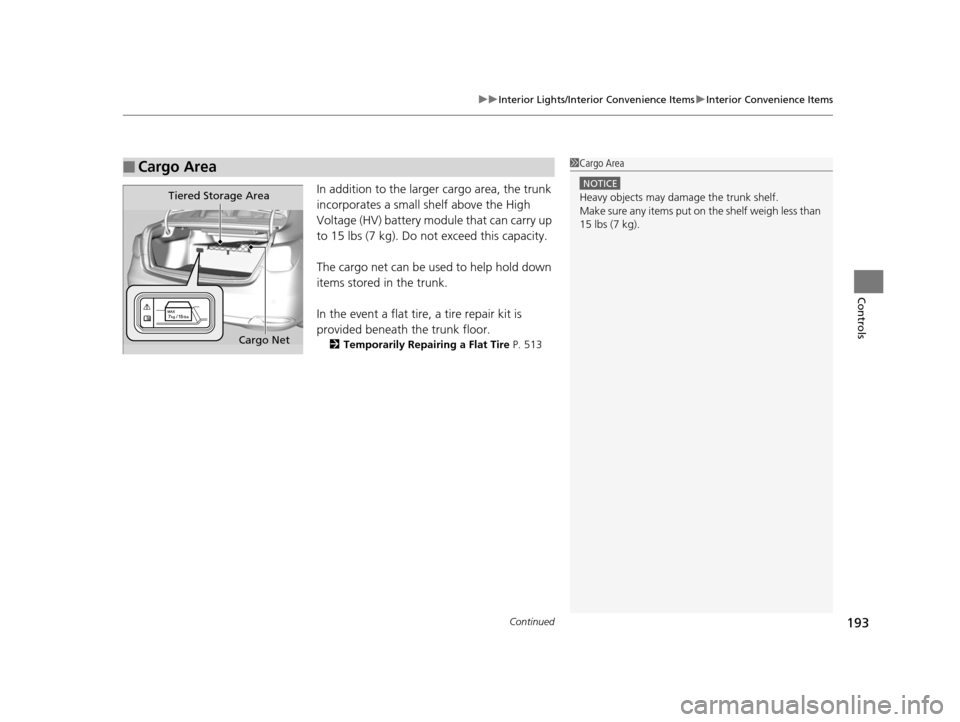
In addition to the larger cargo area, the trunk
incorporates a small shelf above the High
Voltage (HV) battery module that can carry up
to 15 lbs (7 kg). Do not exceed this capacity.
The cargo net can be used to help hold down
items stored in the trunk.
In the event a flat tire, a tire repair kit is
provided beneath the trunk floor.
2 Temporarily Repairing a Flat Tire P. 513
■Cargo Area1Cargo Area
NOTICE
Heavy objects may damage the trunk shelf.
Make sure any items put on the shelf weigh less than
15 lbs (7 kg).Tiered Storage Area
Cargo Net
16 ACURA RLX E-AWD-31TY36200.book 193 ページ 2015年5月22日 金曜日 午後3時 50分
Page 391 of 581

uuWhen Driving uAdaptive Cruise Control (ACC) with Low Speed Follow (LSF)
390
Driving
The system may automatically shut off and the ACC indicator will come on under
certain conditions. Some examples of th ese conditions are listed below. Other
conditions may reduce some of the ACC functions.
2 Front Sensor Camera P. 383
■Environmental conditions
• Driving in bad weather (rain, fog, snow, etc.).
■Roadway conditions
• Driving on a snowy or wet roadway (obscured lane marking, vehicle tracks,
reflected lights, road spray, high contrast).
■Vehicle conditions
• The outside of the windshie ld is blocked by dirt, mud, leaves, wet snow, etc.
• An abnormal tire or wheel condition (Wrong sized, varied size or construction,
improperly inflated, compact spare tire
*, etc.).
• The camera temperature gets too high.
• The parking brake is applied.
• When the front grille is dirty.
• When the front of the vehicle tilts up due to heavy cargo in the trunk or rear seats.
• When tire chains are installed.
■ACC with LSF Conditions and Limitations1ACC with LSF Conditions and Limitations
The radar sensor for ACC with LSF is shared with the
collision mitigation braking system
TM (CMBSTM).
2 Collision Mitigation Braking SystemTM
(CMBSTM) P. 430
You can read about handling information for the
camera equipped with this system. 2 Front Sensor Camera P. 383
* Not available on all models
16 ACURA RLX E-AWD-31TY36200.book 390 ページ 2015年5月22日 金曜日 午後3時 50分
Page 512 of 581
511
Handling the Unexpected
This chapter explains how to handle unexpected troubles.
ToolsTypes of Tools .................................. 512
If a Tire Goes Flat Temporarily Repairi ng a Flat Tire....... 513
Changing a Flat Tire ......................... 525
Power System Won’t Start Checking the Procedure ................... 531
If the Keyless Access Remote Battery is Weak ............................................. 532
Emergency Power System Off........... 533
Jump Starting .................................... 534
Overheating How to Handle Overheating ............. 537 Indicator, Coming On/BlinkingIf the Low Oil Pressure Indicator Comes On ...... 539
If the 12-Volt Battery Charging System
Indicator Comes On ....................... 539
If the Malfunction Indicator Lamp Comes
On or Blinks ................................... 540
If the Brake System Indicator (Red) Comes On .. 540
If the Electric Power Steering (EPS) System Indicator Comes On .............................. 541
If the Electric Parking Brake System Indicator Comes On............................................. 541
If the Low Tire Pressure/TPMS Indicator Comes On or Blinks........................ 542 If the Transmission I
ndicator Blinks along
with the Warning Message ............ 543
Fuses
Fuse Locations ................................. 544
Inspecting and Changing Fuses ........ 549
Emergency Towing ........................... 550
When You Cannot Unlock the Fuel Fill Door ................................................. 551
When You Cannot Open the Trunk ..... 552
Refueling
Refueling From a Portable Fuel Container ... 553
16 ACURA RLX E-AWD-31TY36200.book 511 ページ 2015年5月22日 金曜日 午後3時 50分
Page 513 of 581
512
Handling the Unexpected
Tools
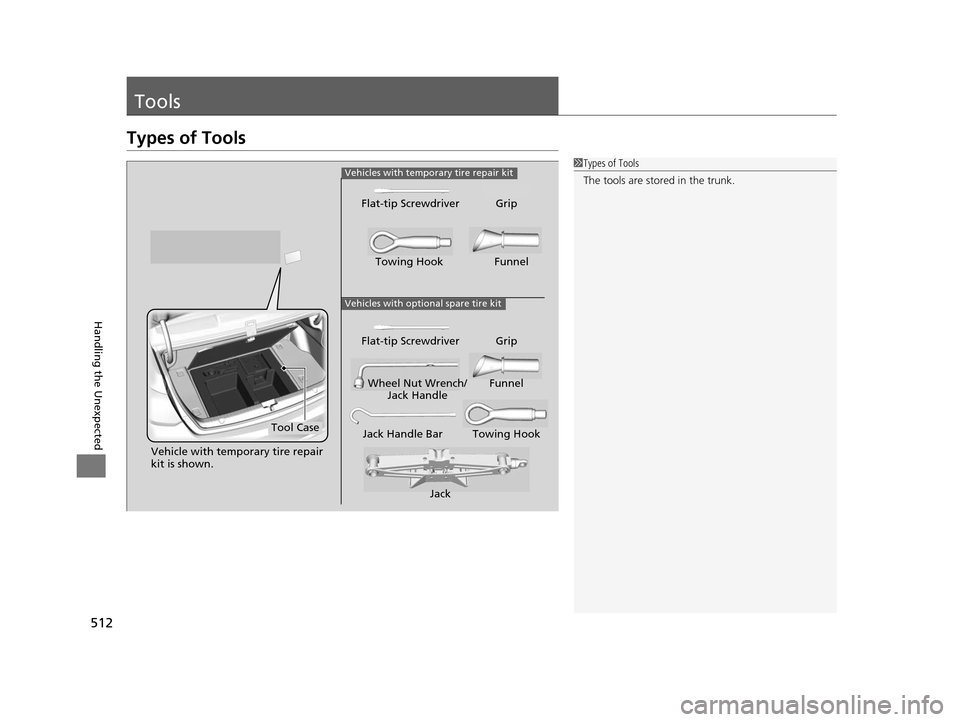
Types of Tools
1Types of Tools
The tools are stored in the trunk.
Vehicles with optional spare tire kit
Jack
Jack Handle Bar Towing Hook
Wheel Nut Wrench/
Jack Handle Funnel
Flat-tip Screwdriver Grip Towing Hook Funnel
Flat-tip Screwdriver Grip
Tool Case
Vehicle with temporary tire repair
kit is shown.
Vehicles with temporary tire repair kit
16 ACURA RLX E-AWD-31TY36200.book 512 ページ 2015年5月22日 金曜日 午後3時
50分
Page 516 of 581
515
uuIf a Tire Goes Flat uTemporarily Repairing a Flat Tire
Continued
Handling the Unexpected
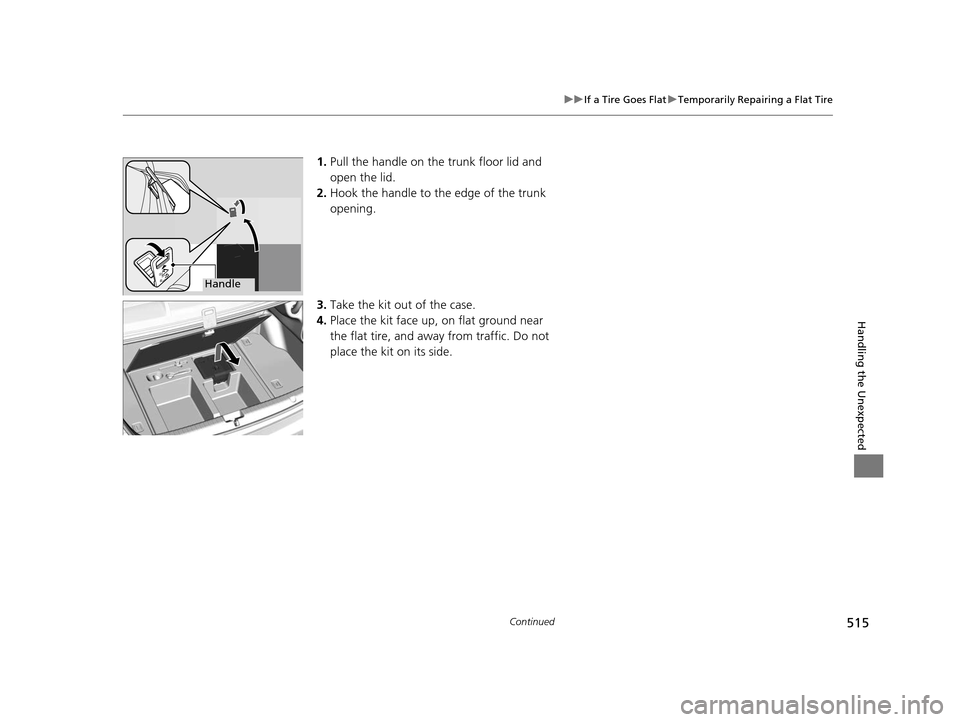
1. Pull the handle on the trunk floor lid and
open the lid.
2. Hook the handle to the edge of the trunk
opening.
3. Take the kit out of the case.
4. Place the kit face up, on flat ground near
the flat tire, and away from traffic. Do not
place the kit on its side.
Handle
16 ACURA RLX E-AWD-31TY36200.book 515 ページ 2015年5月22日 金曜日 午後3時 50分
Page 518 of 581

Continued517
uuIf a Tire Goes Flat uTemporarily Repairing a Flat Tire
Handling the Unexpected
4. Plug in the compressor to the accessory
power socket.
u Be careful not to pinch the cord in a
door or window.
u Do not plug any other electronic
devices into other accessory power
sockets.
2 Accessory Power Sockets P. 190
5.Turn the power system on.
u Keep the power system on while
injecting sealant and air.
2 Carbon Monoxide Gas P. 70
6.Turn the selector switch to SEALANT/
AIR .
1Injecting Sealant and Air
NOTICE
Do not operate the temporary tire repair kit
compressor for more than 15 minutes. The
compressor can overheat and become permanently
damaged.
Until the sealant injection is complete, the pressure
shown on the pressure gauge will appear higher than
actual. After the sealant injection is complete the
pressure will drop and then begin to rise again as the
tire is inflated with air. This is normal. To accurately
measure the air pressure usi ng the gauge, turn the air
compressor off only after the sealant injection is
complete.
3WARNING
Running the engine with the vehicle in an
enclosed or even partly enclosed area can
cause a rapid build-up of toxic carbon
monoxide.
Breathing this colorless, odorless gas can
cause unconsciousness and even death.
Only run the engine to power the air
compressor with th e vehicle outdoors.
SEALANT/AIR side
16 ACURA RLX E-AWD-31TY36200.book 517 ページ 2015年5月22日 金曜日 午後3時 50分
Page 522 of 581

Continued521
uuIf a Tire Goes Flat uTemporarily Repairing a Flat Tire
Handling the Unexpected
• Greater than 19 psi (130 kPa), but less
than 36 psi (250 kPa):
Turn the air compressor on to inflate the
tire until the tire pressure reaches 36 psi
(250 kPa).
2 Inflating an Under-inflated Tire P. 522
Then drive carefully for 10 more minutes or
until you reach the nearest service station.
Do not exceed 50 mph (80 km/h).
u You should repeat this procedure as long
as the air pressure is within this range.
7. Press the pressure relief button until the
gauge returns to 0 psi (0 kPa).
8. Repackage and properly stow the kit.
AIR ONLY
side
ON
1 Distributing the Sealant in the Tire
3WARNING
Running the engine with the vehicle in an
enclosed or even partly enclosed area can
cause a rapid build-up of toxic carbon
monoxide.
Breathing this colorless, odorless gas can
cause unconsciousness and even death.
Only run the engine to power the air
compressor with the vehicle outdoors.
Pressure Relief Button
16 ACURA RLX E-AWD-31TY36200.book 521 ページ 2015年5月22日 金曜日 午後3時 50分
Page 523 of 581

uuIf a Tire Goes Flat uTemporarily Repairing a Flat Tire
522
Handling the Unexpected
You can use the kit to inflate a non-punctured under-inflated tire.
1.Open the trunk floor lid.
2 Getting Ready to Temporarily Repair
the Flat Tire P. 514
2.Remove the kit from the case.
3. Place the kit, face up, on flat ground near
the flat tire, away from traffic. Do not
place the kit on its side.
4. Remove the air only hose from the kit.
5. Remove the valve cap.
6. Attach the air only hose onto the tire valve
stem. Screw it until it is tight.
■Inflating an Under-inflated Tire1Inflating an Under-inflated Tire
NOTICE
Do not operate the temporary tire repair kit
compressor for more than 15 minutes. The
compressor can overheat and become permanently
damaged.
Air Only Hose
Valve Cap
Valve Stem
Air Only Hose
16 ACURA RLX E-AWD-31TY36200.book 522 ページ 2015年5月22日 金曜日 午後3時 50分