light Acura RSX 2004 Owner's Guide
[x] Cancel search | Manufacturer: ACURA, Model Year: 2004, Model line: RSX, Model: Acura RSX 2004Pages: 250, PDF Size: 3.3 MB
Page 117 of 250

The security system helps to protect
your vehicle and valuables f rom thef t.
The horn sounds and a combination
of headlights, parking lights, side
marker lights, and taillights f lash if
someone attempts to break into your
vehicle. This alarm continues for 2
minutes, then the alarm stops. To
reset an alarming system bef ore the
2 minutes have elapsed, unlock
either door with the key or the
remote transmitter.
The security system sets
automatically, 15 seconds after you
lock the doors, hood, and hatch. The
security system indicator starts
blinking immediately to show you
the system is setting itself.Once the security system is set,
opening either door (without using
the key or the remote transmitter),
or the hood, will cause it to alarm. It
also alarms if the radio is removed
f rom the dashboard or the wiring is
cut.The security system will not set if
the hood, hatch, or either door is not
f ully closed. If the system will not set,
check the Door-open Indicator on
the instrument panel (see page ),
to see if the doors and the hatch are
f ully closed. Since it is not part of the
monitor display, manually check the
hood.
Do not attempt to alter this system
or add other devices to it.
52
Security System
Comf ort and Convenience Feat ures114
SECURITY SYSTEM INDICATOR
Page 120 of 250

Press and hold the SET/decel
button. Release the button when
you reach the desired speed.
To slow down in very small
amounts, tap the SET/decel
button. Each time you do this,
your vehicle will slow down about
1 mph (1.6 km/h).
Tap the brake or clutch pedal
lightly with your f oot. The
CRUISE CONTROL indicator on
the instrument panel will go out.
When the vehicle slows to the
desired speed, press the SET/
decel button.Even with the cruise control turned
on, you can still use the accelerator
pedal to speed up f or passing. Af ter
completing the pass, take your foot
of f the accelerator pedal. The vehicle
will return to the set cruising speed.
Resting your f oot on the brake or
clutch pedal will cause the cruise
control to cancel.
Youcancancelthecruisecontrolin
any of these ways:
Tap the brake or clutch pedal.
Push the CANCEL button on the
steering wheel.
Press the Cruise Control Master
Switch.
You can decrease the set cruising
speed in any of these ways:
Cruise Control
Cancelling the Cruise Control
Comf ort and Convenience Feat ures117
Page 126 of 250

Screw the fuel fill cap back on
until it clicks at least three times.
If you do not properly tighten the
cap, the Malf unction Indicator
Lampmaycomeon(seepage).
Push the f uel f ill door closed until
it latches.
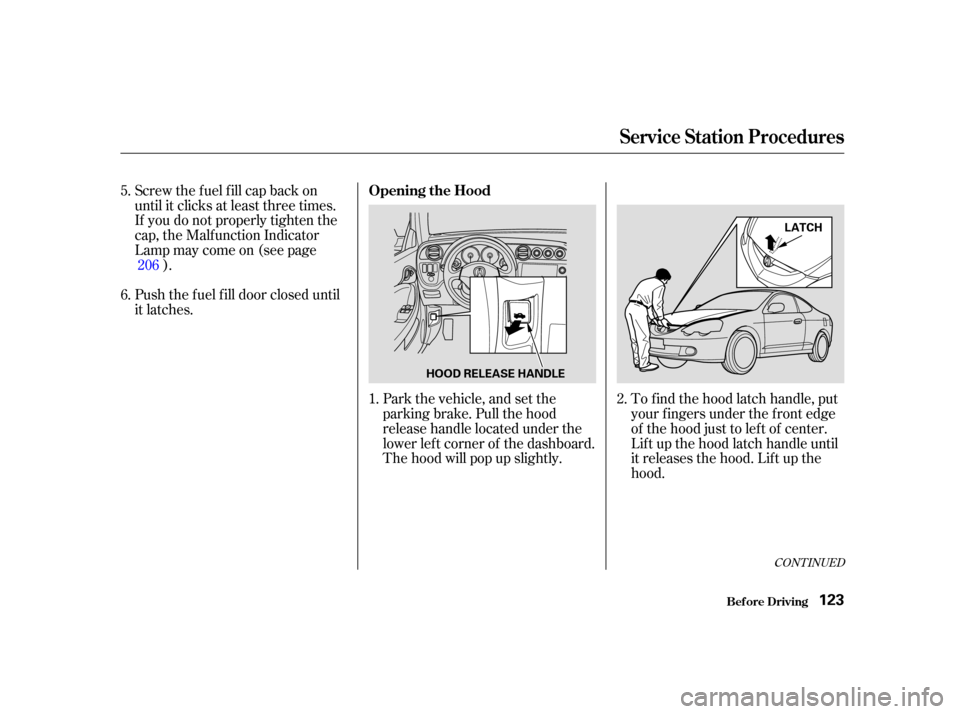
Park the vehicle, and set the
parking brake. Pull the hood
release handle located under the
lower lef t corner of the dashboard.
The hood will pop up slightly.To f ind the hood latch handle, put
your f ingers under the f ront edge
of the hood just to lef t of center.
Lif t up the hood latch handle until
it releases the hood. Lif t up the
hood.
1.
2.
5.
6.
206
CONT INUED
Opening the Hood
Bef ore Driving
Service Station Procedures
123
HOOD RELEASE HANDLE LATCH
Page 127 of 250

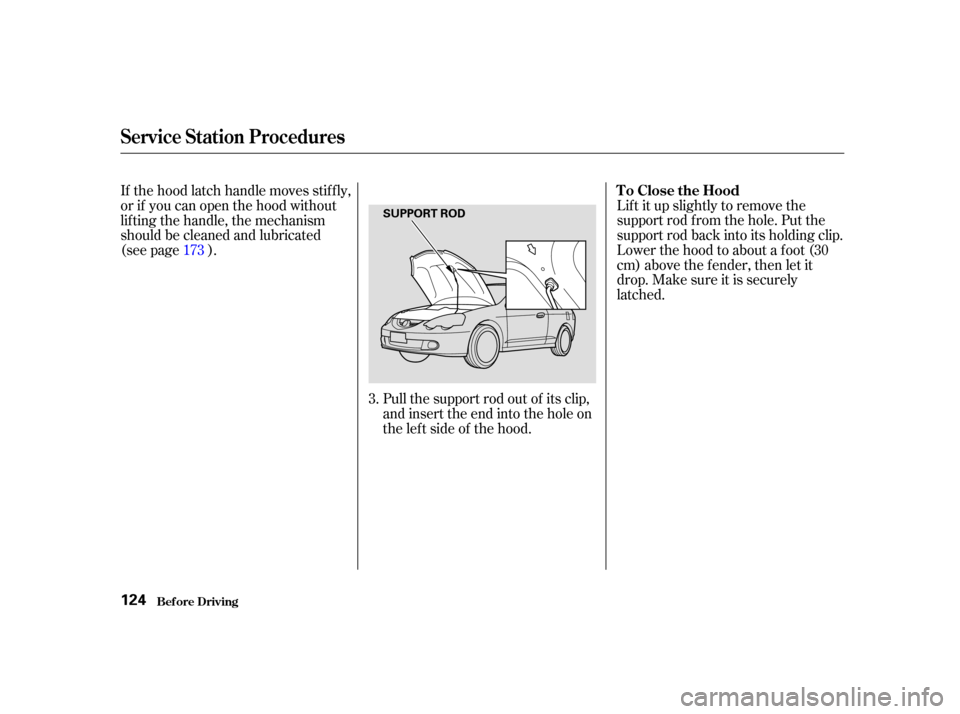
Pull the support rod out of its clip,
and insert the end into the hole on
theleftsideof thehood.Lif t it up slightly to remove the
support rod f rom the hole. Put the
support rod back into its holding clip.
Lower the hood to about a f oot (30
cm) above the f ender, then let it
drop. Make sure it is securely
latched.
If the hood latch handle moves stif f ly,
or if you can open the hood without
lif ting the handle, the mechanism
should be cleaned and lubricated
(see page ).
3.
173
T o Close the Hood
Bef ore Driving
Service Station Procedures
124
SUPPORT ROD
Page 130 of 250

Modif ying your vehicle, or installing
some non-Acura accessories, can
make your vehicle unsaf e. Bef ore
you make any modif ications or add
anyaccessories,besuretoreadthe
f ollowing inf ormation.
Your dealer has Acura accessories
that allow you to personalize your
vehicle. These accessories have
been designed and approved f or your
vehicle, and are covered by warranty.
Although aftermarket accessories
may f it on your vehicle, they may not
meet f actory specif ications, and
could adversely af f ect your vehicle’s
handling and stability.When properly installed, cellular
phones, alarms, two-way radios, and
low-powered audio systems should
not interf ere with your vehicle’s
computer controlled systems, such
as the SRS and anti-lock brake
system.
Bef ore installing any accessory:
Make sure the accessory does not
obscure any lights, or interf ere
with proper vehicle operation or
perf ormance.
Be sure electronic accessories do
not overload electrical circuits
(see page ) or interf ere with
proper operation.
Have the installer contact your
Acura dealer f or assistance bef ore
installing any electronic accessory. 210
A ccessories
Bef ore Driving
A ccessories and Modif ications
127
Improper accessories or
modifications can affect your
vehicle’s handling, stability, and
performance, and cause a
crash in which you can be hurt
or killed.
Follow all instructions in this
owner’s manual regarding
accessories and modifications.
Page 137 of 250

Youshoulddothefollowingchecks
and adjustments every day bef ore
you drive your vehicle.Make sure all windows, mirrors,
and outside lights are clean and
unobstructed. Remove f rost, snow,
or ice. Check the seat adjustment (see
page ).
Check the adjustment of the
inside and outside mirrors (see
page ).
Check the steering wheel
adjustment (see page ).
Make sure the doors and hatch
are securely closed and locked.
Fasten your seat belt. Check that
your passengers have f astened
their seat belts (see page ).When you start the engine, check
the gauges and indicators in the
instrument panel (see page ).
Check that the hood is f ully closed.
Visually check the tires. If a tire
looks low, use a gauge to check its
pressure.
Check that any items you may be
carrying are stored properly or
f astened down securely.
1.
2.
3.
9. 8.
7. 6. 5.
4. 10.
72
6214 49
80
Preparing to Drive
Driving134
Page 148 of 250

Always use the parking brake when
you park your vehicle. Make sure
the parking brake is set f irmly or
your vehicle may roll if it is on an
incline.
Set the parking brake bef ore you put
the transmission in Park. This keeps
the vehicle from moving and putting
pressure on the parking mechanism
in the transmission.Make sure the moonroof and the
windows are closed.
Turn of f the lights.
Place any packages, valuables, etc.
in the cargo area, or take them
with you.
Lock the doors.
Never park over dry leaves, tall
grass, or other f lammable
materials. The hot three way
catalytic converter could cause
these materials to catch on fire.If the vehicle is f acing uphill, turn
the f ront wheels away f rom the
curb.
If the vehicle is f acing downhill,
turn the front wheels toward the
curb.
Make sure the parking brake is
f ully released bef ore driving away.
Driving with the parking brake
partially set can overheat or
damage the rear brakes.
Parking T ips
Parking
Driving145
Page 149 of 250

Your Acura is equipped with disc
brakes at all f our wheels. A power
assist helps reduce the ef f ort needed
on the brake pedal. The ABS helps
you retain steering control when
braking very hard.
Resting your f oot on the pedal keeps
the brakes applied lightly, builds up
heat, and reduces their ef f ectiveness.
It also keeps your brake lights on all
the time, conf using drivers behind
you.
Constant application of the brakes
when going down a long hill builds
up heat and reduces their ef f ective-
ness. Use the engine to assist the
brakes by taking your f oot of f the
accelerator and downshif ting to a
lower gear.Check the brakes after driving
through deep water. Apply the
brakes moderately to see if they f eel
normal. If not, apply them gently and
f requently until they do. Be extra
cautious in your driving.
The hydraulic system that operates
the brakes has two separate circuits.
Each circuit works diagonally across
the vehicle (the lef t-f ront brake is
connected with the right-rear brake,etc.). If one circuit should develop a
problem, you will still have braking
at two wheels.
If the brake pads need replacing, you
will hear a distinctive, metallic
screeching sound when you apply
the brake pedal. If you do not have
the brake pads replaced, they will
screech all the time. It is normal f or
the brakes to occasionally squeal or
squeak when you apply them.
Braking System
Braking System
Braking System DesignBrake Wear Indicators
Driving146
Front
Page 155 of 250

Acura recommends that any trailer
having a total weight of 1,000 lbs
(450 kg) or more be equipped with
its own electric or surge-type brakes.
If you choose electric brakes, be
sure they are electrically actuated.
Do not attempt to tap into your
vehicle’s hydraulic system. No
matter how successf ul it may seem,
any attempt to attach trailer brakes
to your vehicle’s hydraulic system
will lower braking ef f ectiveness and
create a potential hazard.If you use a converter, you can get
the connector and pins that mate
with the connector in your vehicle
f rom your Acura dealer.
Your vehicle has a trailer lighting
connector located behind the right
side panel in the cargo area. Ref er to
thedrawingaboveforthewiring
color code and purpose of each pin. Since lighting and wiring vary in
trailer type and brand, you should
also have a qualified mechanic install
a suitable connector between the
vehicleandthetrailer.
Towing a Trailer
Driving
Trailer Brakes
Trailer Lights
152
TAILLIGHT
(RED/YELLOW)LEFT TURN SIGNAL
(GREEN/RED)RIGHT TURN SIGNAL
(GREEN/YELLOW)
GROUND
(BLACK)
BACK UP LIGHT
(GREEN)
BRAKE LIGHT
(WHITE/BLACK)
Page 158 of 250

This section explains why it is
important to keep your vehicle well
maintained and how to f ollow basic
maintenance saf ety precautions.
This section also includes
Maintenance Schedules f or normal
driving and severe driving conditions,
a Maintenance Record, and instruc-
tions f or simple maintenance tasks
you may want to take care of
yourself .......................
Maintenance Saf ety .156
.................
Maintenance Schedule . 157
....................
Maintenance Record .161
..............................
Fluid Locations .163
........................
Adding Engine Oil .164
..........
Changing the Oil and Filter .165
....................
Windshield Washers .167
..............................
Engine Coolant .167
....
Automatic Transmission Fluid . 169
........
Manual Transmission Fluid . 170
................
Brake and Clutch Fluid . 171
.....................................
Drive Belts .172
....................
Power Steering Fluid . 173
....................................
Hood Latch .173
.............................................
Lights .174
.......................................
Seat Belts .180
.....................................
Floor Mats .180
..................
DustandPollenFilter . 180
.................................
Wiper Blades .181
...............................................
Tires .183
...................
Checking the Battery . 188
.............................
Vehicle Storage .190
If you have the skills and tools to per-
f orm more complex maintenance
tasks on your Acura, you may want
to purchase the Service Manual. See
page f or inf ormation on how to
obtain a copy, or see your Acura
dealer.
236
Maintenance
Maint enance155