remote control Acura TL 2000 3.2 User Guide
[x] Cancel search | Manufacturer: ACURA, Model Year: 2000, Model line: TL, Model: Acura TL 2000Pages: 311, PDF Size: 3.05 MB
Page 89 of 311

HomeLink Universal Transmitte
Canadian Owners:
The remote control you are trainingfrom may stop transmitting after tw oseconds. This is not long enough for
the HomeLink transmitter to learn the code. Release and press the
button on the remote control every
two seconds until the transmitter has learned the code.
5. The red light in the transmitter should begin flashing. It will flash
slowly at first, then rapidly.
6. When the red light flashes rapidly, release both buttons. The
transmitter should have learned the code from the remote control.
7. Plug in the garage door opener motor, then test the transmitter
button by pushing it. It should operate the garage door.
If the button does not work, repeat
this procedure to train it again. If it still does not work, you may have a
variable or rolling code garage door opener. Test this by pressing
and holding the HomeLink
transmitter button you just trained. If the red light blinks for two
seconds, then stays on, you have a
rolling code garage door opener.
You may be able to verify this with
the manufacturer's documentation.
Go to "Training With a Rolling
Code System."
8. Repeat these steps to train the other two transmitter buttons to
operate any other remotely-
controlled devices around your
home (lighting, automatic gate , security system, etc.). Training With a Rolling Code
SystemFor security purposes, newer garage
door opening systems use a "rolling"
or variable code. Information from
the remote control and the garage door opener are needed before the
HomeLink transmitter can operate
the garage door opener.
The 'Training the Transmitter" procedure trains the HomeLink
transmitter to the proper garagedoor opener code. The following
procedure synchronizes the
HomeLink transmitter to the garage door opener so they send and
receive the correct codes.
Instruments and Controls
Page 91 of 311

HomeLink Universal Transmitter
Retraining a Button
To train an already programmed transmitter button to operate a newdevice:
1. Select the transmitter button you want to train.
2. Press and hold the transmitter button until the red light begins toflash slowly (approximately 20seconds).
3. While continuing to hold the transmitter button, place the
remote control for the device 1 to
3 inches from the HomeLink
transmitter.
4. Press and hold the button on the remote control. Hold both buttons
until the red light begins to flash
rapidly. 5. Release both buttons. The
transmitter, should now be trained
to operate the device.
Erasing Codes
To erase the codes stored in all three buttons, press and hold the twooutside buttons until the red light
begins to flash, then release the
buttons.
You should erase all three codes before selling the car.As required by the FCC:
This device complies with Part 15 of the
FCC rules. Operation is subject to the
following two conditions: (1) This device may not cause harmful interference, and (2) this device must accept any
interference received, including
interference that may cause undesired operation.
Changes or modifications not expressly
approved by the party responsible for compliance could void the user's
authority to operate the equipment.
This device complies with Industry
Canada Standard RSS-210. Operation is subject to the following two
conditions: (1) this device may not cause
interference, and (2) this device must accept any interference that may causeundesired operation of the device.
Instruments and Controls
Page 109 of 311

Accessory Power Sockets, Interior Lights
COVER
ACCESSORY POWER SOCKET
These sockets are intended to supply power for 12 volt DC accessories
that are rated 120 watts or less (10amps).
They will not power an automotive type cigarette lighter element. Ceiling Light
DOOR ACTIVATED
The ceiling light has a three-position
switch. In the OFF position, the light
does not come on. In the center
position, the ceiling light comes on
when you open any door. The light fades out after all doors are closed.
In the ON position, the ceiling lightstays on continuously.
The ceiling light (with the switch in the center position) also comes on
when you unlock the door with the remote transmitter (see page 78). Spotlights
Turn on the spotlight by pushing the button next to each light. Push the
button again to turn it off. You can
use the spotlights at all times.
Instruments and Controls
Page 112 of 311

Comfort and Convenience Features
The climate control system in your
Acura provides a comfortable drivingenvironment in all weather condi-
tions.
The standard audio system hasmany features. This section de-
scribes those features and how to
use them.
The security system helps to dis- courage vandalism and theft of your
Acura.
Climate Control System.......... .......... 110
3.2 TL without Navigation System
Fully-automatic Operation............ 112
Semi-automatic Operation............ 113
Rear Window Defogger
Button.......... .............................. 116
Sunlight Sensor/ Temperature Sensor............ 117
3.2 TL with Navigation System
Fully-automatic Operation.......... 118
Semi-automatic Operation.......... 119
Rear Window Defogger Button........................................ 122
Audio System.............................. 123 Operating the Radio.......... .......... 124
Adjusting the Sound.................... 128
Audio System Lighting.......... .... 129
Radio Frequencies.................... 129
Radio Reception............
........ 129
Operating the CD Player......... ... 131
Operating the CD Changer.......... .. 133
Protecting Compact Discs.......... 134
CD Player Error Indications.......... 135
CD Changer Error
Indications.......... .................... 136Operating the Cassette
Player........................................ 137
Tape Search Functions.......... .. 138
Caring for the Cassette
Player........................................ 140
Remote Audio Controls............ 141
Theft Protection.......... ............ 142
Security System.............................. 143
Comfort and Convenience Features
Page 144 of 311

Audio System
Remote Audio Controls
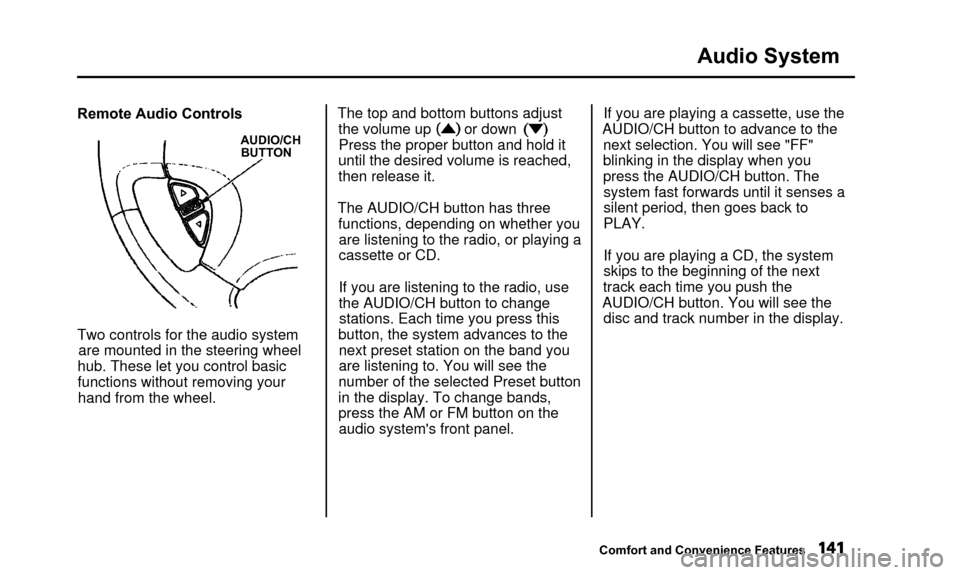
AUDIO/CHBUTTON
Two controls for the audio system
are mounted in the steering wheel
hub. These let you control basic
functions without removing your hand from the wheel. The top and bottom buttons adjust
the volume up or down
Press the proper button and hold it
until the desired volume is reached,
then release it.
The AUDIO/CH button has three functions, depending on whether youare listening to the radio, or playing a
cassette or CD.
If you are listening to the radio, use
the AUDIO/CH button to changestations. Each time you press this
button, the system advances to the next preset station on the band youare listening to. You will see the
number of the selected Preset button
in the display. To change bands,
press the AM or FM button on the audio system's front panel. If you are playing a cassette, use the
AUDIO/CH button to advance to the next selection. You will see "FF"blinking in the display when you
press the AUDIO/CH button. The system fast forwards until it senses a
silent period, then goes back to
PLAY.
If you are playing a CD, the system
skips to the beginning of the next
track each time you push the
AUDIO/CH button. You will see the disc and track number in the display.
Comfort and Convenience Features
Page 307 of 311

Index
O
Octane Requirement, Gasoline.... .......... 146
Odometer....................................... . 58
Odometer, Trip.............................. 59
Oil Change, How to.......... .................... 203
Change, When to...................... 192
Checking Engine...................... 150
Pressure Indicator......... ......... 54, 267
Selecting Proper Viscosity Chart........................................ 202
ON (Ignition Key Position)......... ... 76
Opening the Hood........................ 148
Operation in Foreign Countries... 287
Outside Mirrors......... ....................... 98
Overheating, Engine...................... 265
Owner Maintenance Checks.......... 199
Parking Over Things that Burn... 290
PGM-FI System.......... .................... 289
Polishing and Waxing.................... 247
Power
Door Locks......... ....................... 77
Mirrors.......................................... 97
Steering.......... .............................. 215
Windows........................................ 95
Pre-Drive Safety Checklist.......... .. 11
Pregnancy, Using Seat Belts.......... 18
Protecting Adults......... ..................... 12
Additional Safety Precautions.... 19
Advice for Pregnant Women.......... 18
Protecting Children......... ..................... 20
Protecting Infants......... ............. 28
Protecting Larger Children.......... 35
Protecting Small Children.......... 32
Using Child Seats with
Tethers......... .............................. . 39Rear Seat Armrest.........
........... 92
Rear View Mirror......... ........... 97
Rear Window Defogger......... ........ 67
Reclining the Seat Backs.......... 90
Reminder Lights......... ..................... 53
Remote Transmitter......... ............. 78
Replacement Information Air Cleaner Element.......... .......... 216
Coolant.......... .............................. 208
Engine Oil and Filter.................... 203
Fuses........................................ 273
Light Bulbs.......... .................... 236
Schedule........................................ 192
Spark Plugs.......... .................... 217
Tires.................................................. 231
Wiper Blades.............................. 223
Replacing Seat Belts After a Crash......... ................................ . 42
Reserve Tank, Coolant.......... .......... 151
Restraint, Child.............................. 20
Reverse Gear Position.......... .......... 164
Rotation, Tire.......... ...................... 231
P
Panel Brightness Control......... ........... 64
Park Gear Position...................... 164
Parking.......................................... 171
Parking Brake................................ 99
Parking Lights.................................... . 63R
S
Radiator Overheating..........
.......... 265
Radio/Cassette Sound System.... .. 123
Rear End Towing.......... .......... 277
Rear Lights, Bulb Replacement.... 238 Safety Belts...................................... 8