service Acura TL 2000 3.2 Owner's Manual
[x] Cancel search | Manufacturer: ACURA, Model Year: 2000, Model line: TL, Model: Acura TL 2000Pages: 311, PDF Size: 3.05 MB
Page 1 of 311

2000 TL Online Reference Owner's Manual
Use these links (and links throughout this manual) to navigate through\
this reference.
For a printed owner's manual, click on authorized manuals or go to www.h\
elminc.com.
Contents
Introduction ........................................................................\
................................................................. i
A Few Words About Safet y........................................................................\
.........................................ii
Driver and Passenger Safety ........................................................................\
..................................... .5
Proper use and care of your vehicle's seat belts, and Supplemental Restr\
aint System.
Instruments and Control s........................................................................\
........................................ .51
Instrument panel indicator and gauge, and how to use dashboard and steering colu\
mn controls.
Comfort and Convenience Features ........................................................................\
..................... 109
How to operate the climate control system, the audio system, and other c\
onvenience features.
Before Driving........................................................................\
..........................................................145
What gasoline to use, how to break-in your new vehicle, and how to load luggage and other cargo.
Driving ........................................................................\
..................................................................... .159
The proper way to start the engine, shift the transmission, and park, pl\
us towing a trailer.
Maintenance........................................................................\
.............................................................187
The Maintenance Schedule shows you when you need to take your vehicle to the dealer.
Appearance Car e........................................................................\
..................................................... .245
Tips on cleaning and protecting your vehicle. Things to look for if your\
vehicle ever needs body repairs.
Taking Care of the Unexpecte d........................................................................\
..............................253
This section covers several problems motorists sometimes experience, a nd how to handle them.
Technical Informatio n........................................................................\
.............................................279
ID numbers, dimensions, capacities, and technical information.
Warranty and Customer Relations (U.S. and Canada)................................................................291
A summary of the warranties covering your new Acura, and how to contact \
us.
Authorized Manu als (U.S. only)........................................................................\
..............................297
How to order manuals and other technical literature.
Index........................................................................\
........................................................................\
...... I
Service Information Summary
A summary of information you need when you pull up to the fuel pump. Owner's Identification Form
Your Vehicle at a Glance........................................................................\
............................................ 2
Page 8 of 311
Driver and Passenger Safety
This section gives you importantinformation about how to protect
yourself and your passengers. It shows you how to use seat belts
properly. It explains your Supple- mental Restraint System. And it tells
you how to properly restrain infants and children in your car.
Important Safety Precautions ........6
Your Car's Safety Features ........... 7
Seat Belts ............................ 8
Airbags .....................................9
Seats & Seat-Backs .....................10
Head Restraints .......................10
Door Locks 10
Pre-Drive Safety Checklist.........11
Protecting Adults .........................12 1. Close and Lock the Doors...... 122. Adjust the Front Seats..........12
3. Adjust the Seat-Backs.......... 13
4. Adjust the Head Restraints.... 14
5. Fasten and Position the Seat Belts ................................ 15
6. Adjust the Steering Wheel..... 17
7. Maintain a Proper Sitting Position............................. 17
Advice for Pregnant Women..... 18
Additional Safety Precautions.... 19
Protecting Children.......................20
All Children Must Be Restrained............................ 20
Children Should Sit in the Back
Seat........................................... 21
The Passenger's Front Airbag
Poses Serious Risks
to Children......................... 21
If You Must Drive with Several Children................................ 23
If a Child Requires Close
Attention............................. 23
Additional Safety Precautions.... 23 General Guidelines for Using
Child Seats........................... 24
Protecting Infants......................28 Protecting Small Children...........32
Protecting Larger Children........35
Using Child Seats with
Tethers...................................39
Additional Information About Your Seat Belts..................................40
Seat Belt System Components... 40
Lap/Shoulder Belt..................... 40
Seat Belt Maintenance.............. 42
Additional Information About Your Front Airbags........................ 43
SRS Components...................... 43
How Your Front Airbags
Work...................................43
How the SRS Indicator Light
Works................................... 45
Additional Information About Your Side Airbags.......................... 46
How Your Side Airbags Work.... 46
How The Side Airbag Indicator
Light Works......................... 47
Airbag Service........................... 48
Additional Safety Precautions..... 48
Carbon Monoxide Hazard..............49
Safety Labels.................................50
Driver and Passenger Safety
Page 51 of 311
Additional Information About Your Airbags
Airbag ServiceYour front and side airbag systems are virtually maintenance-free, and
there are no parts you can safely service. However, you must have
your car serviced if:
• Your airbags ever inflate. Any airbag that has deployed must be
replaced along with the control
unit and other related parts. Do
not try to remove or replace any airbag by yourself.
This must be done by an Acura dealer or a knowledgeable body
shop.
• The SRS indicator light alerts you
to a problem. Take your car to anauthorized Acura dealer as soon as
possible. If you ignore this
indication, the airbags might not
inflate when you need them. Additional Safety Precautions
• Do not attempt to deactivate your
airbags. Together, airbags and
seat belts provide the best
protection.
• Do not tamper with airbag components or wiring for anyreason. Tampering could cause
the airbags to deploy, possibly causing very serious injury.
• Do not expose the front seat-backs
to water. If rain or spilled water soaks into a seat-back, it can
prevent the side airbag system
from working properly.
• Do not cover or replace front seat- back covers without consulting an
Acura dealer. Improperlyreplacing or covering front seat-
back covers can prevent your side airbags from inflating during a
collision.
See page 154 for further information
and precautions relating to your
airbags.
Driver and Passenger Safety
Page 53 of 311
Safety Labels
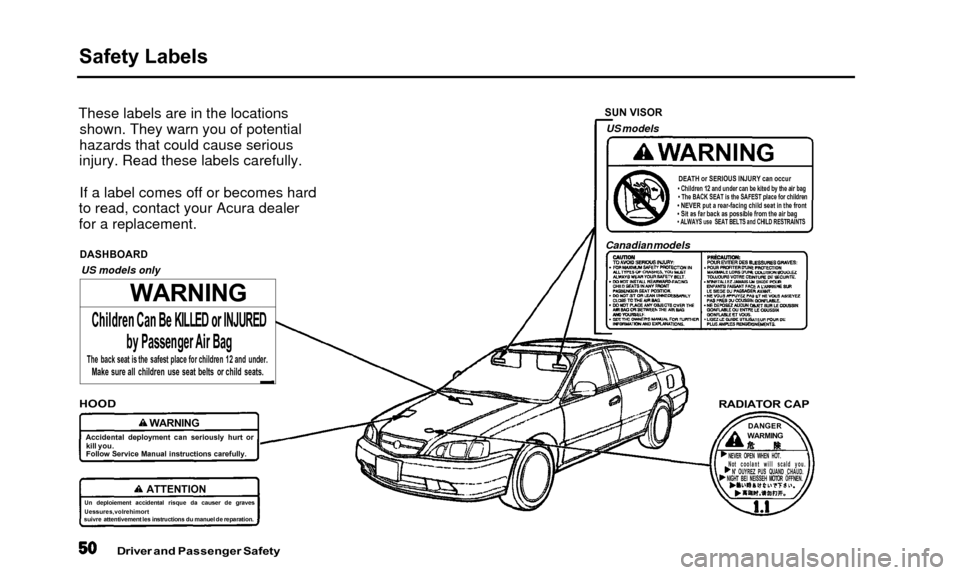
These labels are in the locationsshown. They warn you of potential
hazards that could cause serious
injury. Read these labels carefully.
If a label comes off or becomes hard
to read, contact your Acura dealer
for a replacement.
DASHBOARD
US models only SUN VISOR
US models
DEATH or SERIOUS INJURY can occur• Children 12 and under can be kited by the air bag• The BACK SEAT is the SAFEST place for children
• NEVER put a rear-facing child seat in the front
• Sit as far back as possible from the air bag
• ALWAYS use SEAT BELTS and CHILD RESTRAINTS
Canadian models
HOOD
Accidental deployment can seriously hurt or
kill you.
Follow Service Manual instructions carefully.
Un deploiemen t accidental risque da causer de graves
Uessures,volrehimort
suivre attentivemen t les instructions du manuel de reparation.
Driver and Passenger Safety
RADIATOR CAP
DANGERWARMING
NEVER OPEN WHEN HOT. '
Not coolant will scald you. N' OUYREZ PUS QUAND CHAUD.
NIGHT BEI NEISSEH MOTOR OFFNEN.
WARNING
Children Can Be KILLED or INJURED
by Passenger Air Bag
The back seat is the safest place for children 12 and under.Make sure all children use seat belts or child seats.
WARNING
ATTENTION
Page 148 of 311
Before Driving
Before you begin driving your Acura,
you should know what gasoline to
use, and how to check the levels of important fluids. You also need to
know how to properly store luggage or packages. The information in this
section will help you. If you plan to
add any accessories to your car,
please read the information in this section first. Break-in Period
..................... 146
Gasoline.............................. 146
Service Station Procedures.......... 147
Filling the Fuel Tank ................ 147
Opening the Hood.................. 148
Oil Check............................
150
Engine Coolant Check ......... 151
Fuel Economy...........................
152
Vehicle Condition.................... 152
Driving Habits.......................... 152
Accessories and Modifications..... 153
Carrying Cargo........................... 155
Before Driving
Page 149 of 311

Break-in Period, Gasoline
Break-in Period
Help assure your car's future
reliability and performance by payingextra attention to how you drive
during the first 600 miles (1,000 km).
During this period:
• Avoid full-throttle starts and rapid acceleration.
• Avoid hard braking. New brakesneed to be broken-in by moderate
use for the first 200 miles (300
km).
You should follow these same re- commendations with an overhauledor exchanged engine, or when the
brakes are relined. Gasoline
Your Acura is designed to operate on
premium unleaded gasoline with a
pump octane number of 91 or higher.
Use of a lower octane gasoline can cause occasional, metallic knocking
noises in the engine and will result
in decreased engine performance.
We recommend gasolines containing detergent additives that help prevent
fuel system and engine deposits. Using gasoline containing lead will
damage your car's emissions
controls. This contributes to air
pollution. In Canada, some gasolines contain
an octane-enhancing additive called
MMT. If you use such gasolines,
your emissions control system performance may deteriorate and
the Malfunction Indicator Lamp on
your instrument panel may turn on. If this happens, contact your
authorized Acura dealer for service.
Before Driving
Page 150 of 311
Service Station Procedures
Filling the Fuel Tank
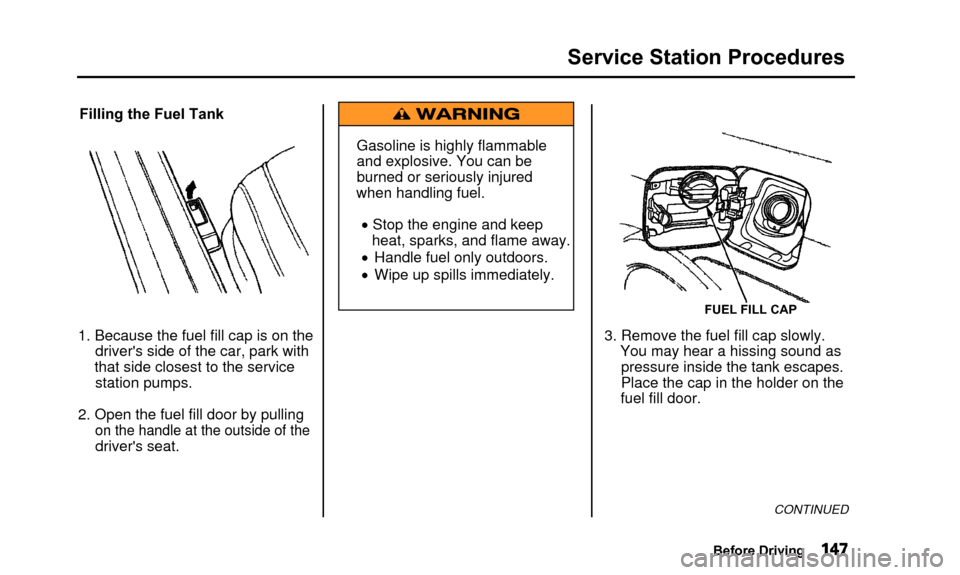
1. Because the fuel fill cap is on the driver's side of the car, park with
that side closest to the service station pumps.
2. Open the fuel fill door by pulling
on the handle at the outside of the
driver's seat. Gasoline is highly flammable
and explosive. You can be
burned or seriously injured
when handling fuel.
• Stop the engine and keep heat, sparks, and flame away.
• Handle fuel only outdoors.
• Wipe up spills immediately.
FUEL FILL CAP
3. Remove the fuel fill cap slowly. You may hear a hissing sound aspressure inside the tank escapes.
Place the cap in the holder on the
fuel fill door.
CONTINUED
Before Driving
Page 151 of 311
Service Station Procedures
4. Stop filling the tank after the fuelnozzle automatically clicks off. Do
not try to "top off' the tank, leavesome room for the fuel to expand
with temperature changes.
Your car has an on-board refueling vapor recovery system to helpkeep fuel vapors from going into
the atmosphere. If the fuel pump
keeps clicking off even though the
tank is not full, there may be aproblem with this system. Consult
your dealer. 5. Screw the fuel fill cap back on,
tighten it until it clicks several
times. If you do not properly
tighten the cap, the MalfunctionIndicator Lamp may come on (see
page 54).
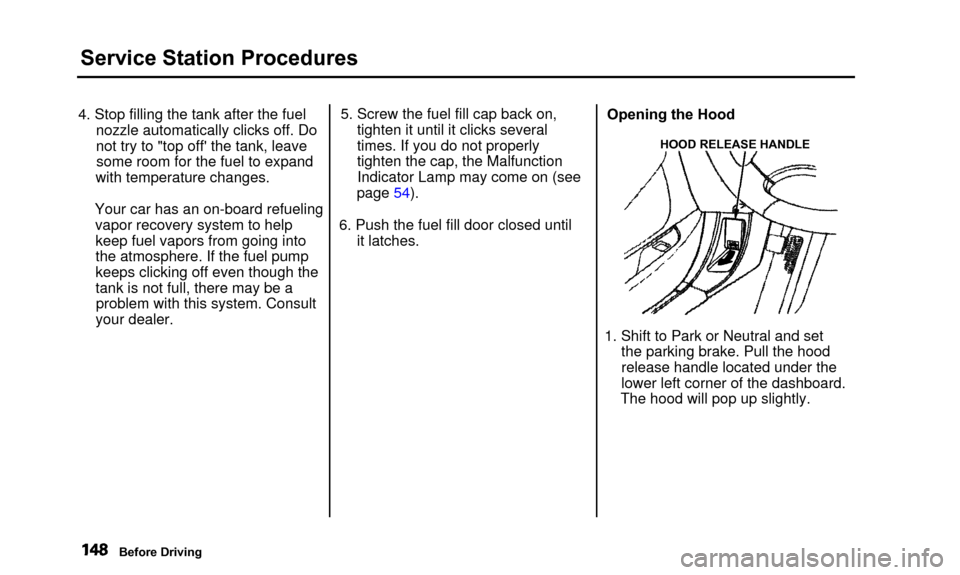
6. Push the fuel fill door closed until it latches. Opening the Hood
HOOD RELEASE HANDLE
1. Shift to Park or Neutral and set
the parking brake. Pull the hood
release handle located under the
lower left corner of the dashboard.
The hood will pop up slightly.
Before Driving
Page 152 of 311

Service Station Procedures
LATCH
2. Standing in front of the car, putyour fingers under the front edgeof the hood to the right of center.Slide your hand to the Ieft until
you feel the hood latch handle. Push this handle up until it
releases the hood. Lift the hood. If you can open the hood without
lifting the hood latch handle, or
the hood latch handIe moves stiffly or does not spring back as
before, the mechanism should be
cleaned and lubricated (see page 215).
3. Lift the hood up most of the way.The hydraulic supports will lift itup the rest of the way and hold itup.
To close the hood, lower it to about a foot (30 cm) above the fender, then
press down firmly with your hands.
After closing the hood, make sure it is securely latched.
CONTINUED
Before Driving
Page 153 of 311
Service Station Procedures
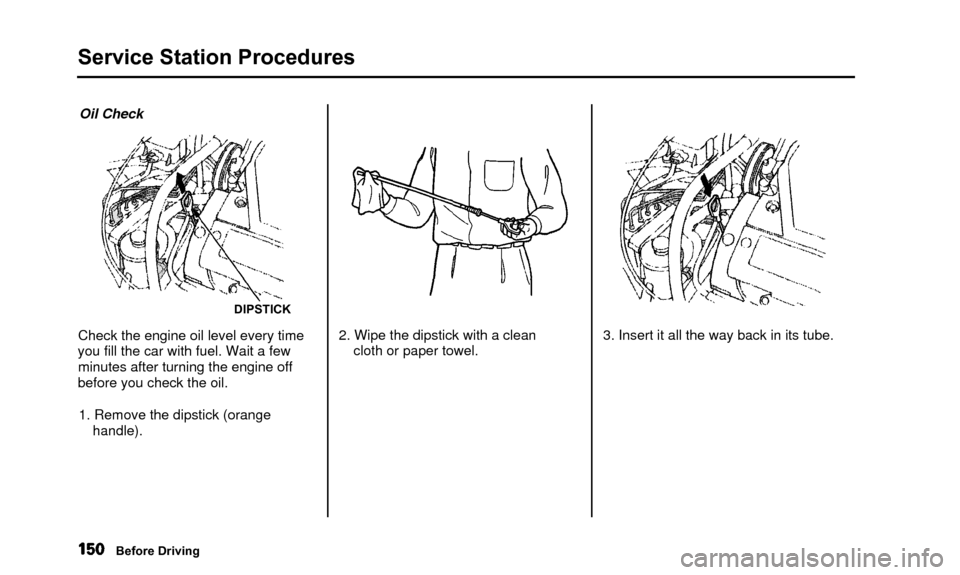
Oil Check
DIPSTICK
Check the engine oil level every time
you fill the car with fuel. Wait a few minutes after turning the engine off
before you check the oil.
1. Remove the dipstick (orange handle). 2. Wipe the dipstick with a clean
cloth or paper towel. 3. Insert it all the way back in its tube.
Before Driving