light Acura TL 2002 3.2 Manual Online
[x] Cancel search | Manufacturer: ACURA, Model Year: 2002, Model line: TL, Model: Acura TL 2002Pages: 339, PDF Size: 4.71 MB
Page 251 of 339
Run the air conditioning at least once
a week during the cold weather
months. Run it f or at least ten
minutes while you are driving at a
steady speed with the engine at
normal operating temperature. This
circulates the lubricating oil con-
tained in the ref rigerant.If the air conditioning does not get as
cold as before, have your dealer
check the system. Recharge the
system with Ref rigerant HFC-134a
(R-134a). (See Specif ications on page
.)
Your car’s air conditioning is a sealed
system. Any major maintenance,
such as recharging, should be done
by a qualif ied mechanic. You can do
a couple of things to make sure the
air conditioning works ef f iciently.
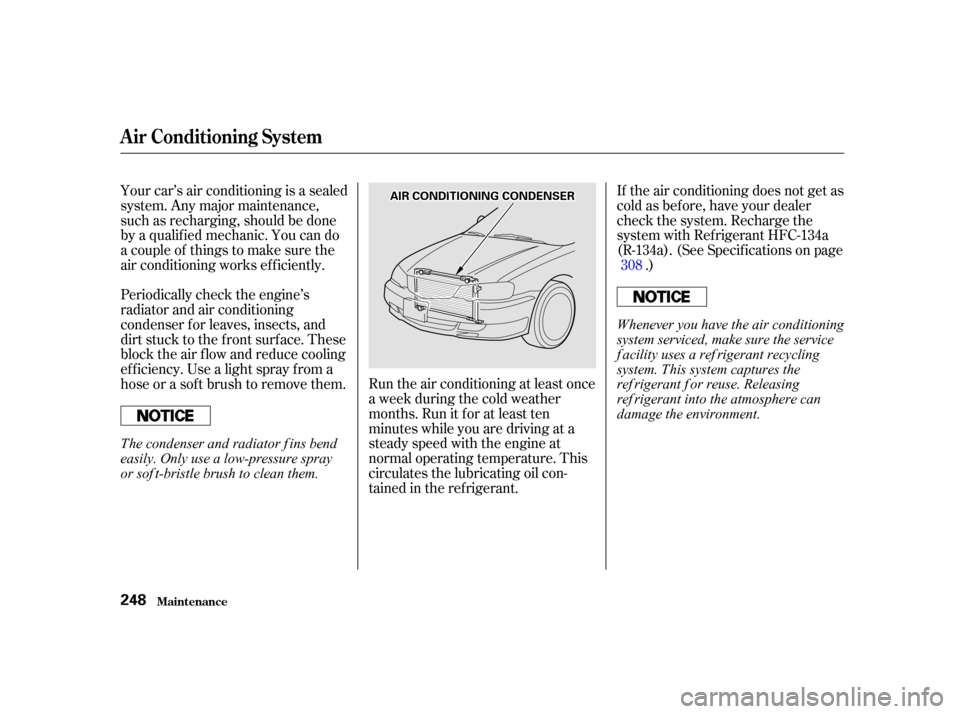
Periodically check the engine’s
radiator and air conditioning
condenser f or leaves, insects, and
dirt stuck to the f ront surf ace. These
block the air f low and reduce cooling
ef f iciency. Use a light spray f rom a
hose or a sof t brush to remove them. 308
A ir Condit ioning Syst em
Maint enance248
A A
I
IRR C
COON NDDI
ITT I
IOON NIINNG G C
COON NDDE
EN
NS SEER
R
Whenever you have the air conditioning
system serviced, make sure the service
f acility uses a ref rigerant recycling
system. This system captures the
ref rigerant f or reuse. Releasing
ref rigerant into the atmosphere can
damage the environment.
The condenser and radiator f ins bend
easily. Only use a low-pressure spray
or sof t-bristle brush to clean them.
00/12/25 14:34:10 31S0K630_251
Page 260 of 339
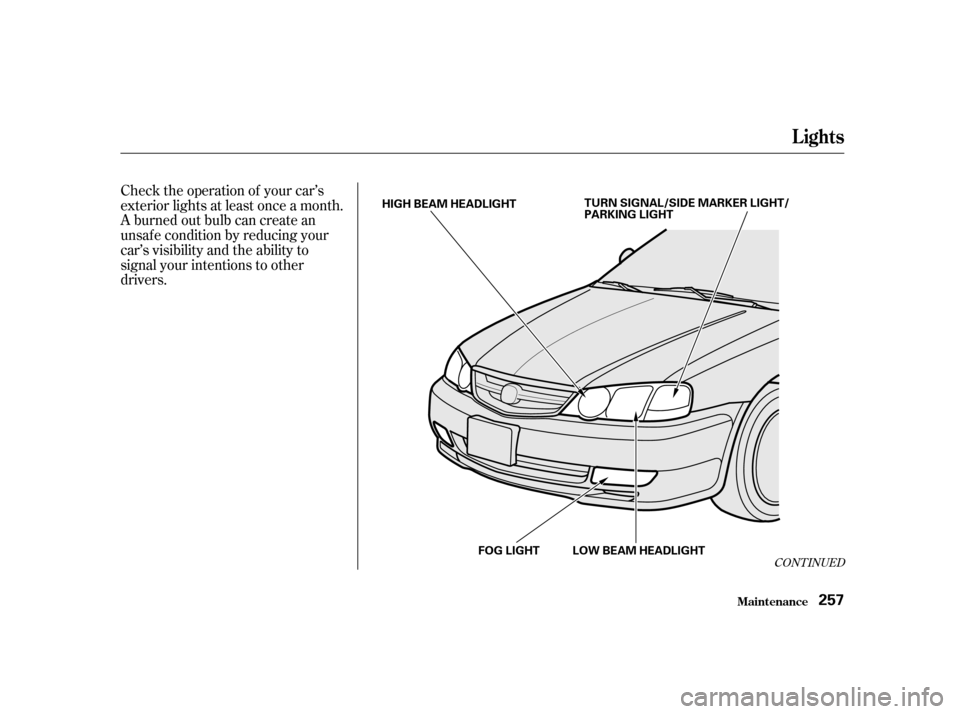
Check the operation of your car’s
exterior lights at least once a month.
A burned out bulb can create an
unsaf e condition by reducing your
car’s visibility and the ability to
signal your intentions to other
drivers.
CONT INUED
Lights
Maint enance257
TURN SIGNAL/SIDE MARKER LIGHT/
PARKING LIGHT
FOG LIGHT
HIGH BEAM HEADLIGHT
LOW BEAM HEADLIGHT
00/12/25 14:35:53 31S0K630_260
Page 261 of 339
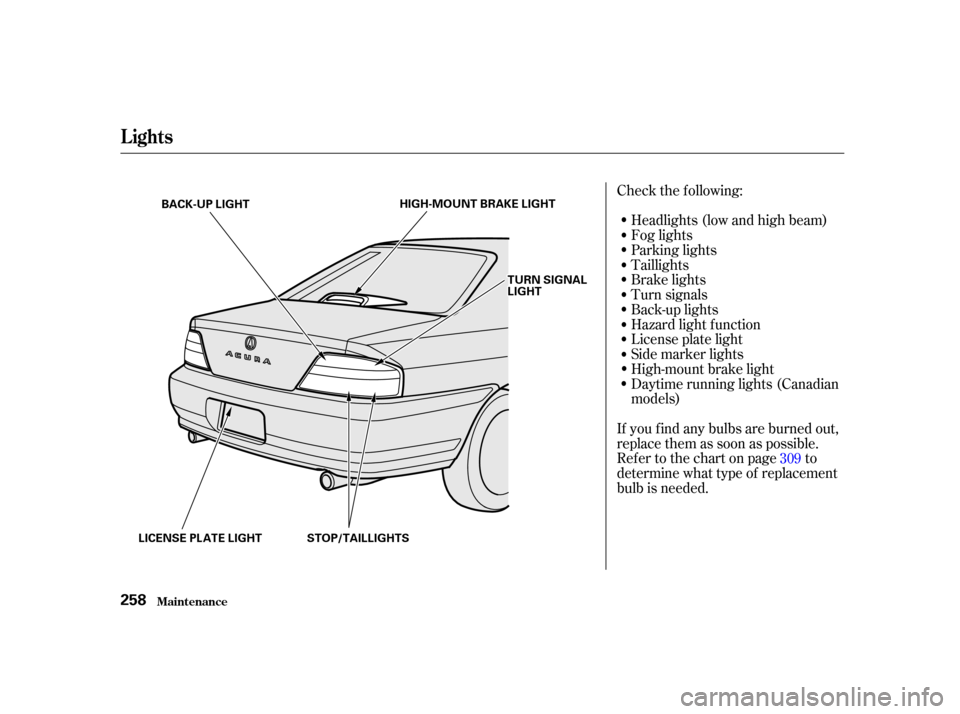
Check the f ollowing:Headlights (low and high beam)
Fog lights
Parking lights
Taillights
Brake lights
Turn signals
Back-up lights
Hazard light f unction
License plate light
Side marker lights
High-mount brake light
Daytime running lights (Canadian
models)
If youfindanybulbsareburnedout,
replace them as soon as possible.
Refer to the chart on page to
determinewhattypeof replacement
bulb is needed. 309
Lights
Maint enance258
H H
I
IGGH H-
-M
M O
OUUNNTT B
BRRAA K
KEE L
LI
IGGH HT
T
T
T U
UR RNN S
SIIGGN NAAL
L
L
L I
IGGH HT
T
B
BA
A C
CKK--U
UP P L
LIIGGH HT
T
L
L I
ICCE EN
NS SEE P
PL
LA
A T
TE
E L
LI
IGGH HT
T
S
STTO
OP P/
/T
T A
A I
ILL L
LI
IGGH HT
TS
S
00/12/25 14:36:01 31S0K630_261
Page 262 of 339
The low beam headlight bulbs are a
type of high voltage discharge tube.
High voltage can remain in the
circuit even with the light switch of f
and the key removed. Because of
this, you should not attempt to
examine or change a low beam
headlight bulb yourself . If a low
beam headlight bulb fails, take the
cartoyourdealertohaveitreplaced.
Halogen bulbs are used f or the high
beam headlight bulbs. When
replacing a high beam headlight bulb,
handle it by its base and protect the
glass from contact with your skin or
hard objects. If you touch the glass,
clean it with denatured alcohol and a
clean cloth.
Theheadlightswereproperlyaimed
when your car was new. If you
regularly carry heavy items in the
trunk or pull a trailer, readjustment
may be required. Adjustment of the
headlights should be perf ormed by
an Acura technician or other
qualif ied mechanic.
CONT INUED
Replacing a Headlight Bulb
Headlight A iming
Lights
Maint enance259
Halogen headlight bulbs get very hot
when lit. Oil, perspiration, or a scratch
on the glass can cause the bulb to
overheat and shatter.
00/12/25 14:36:10 31S0K630_262
Page 263 of 339
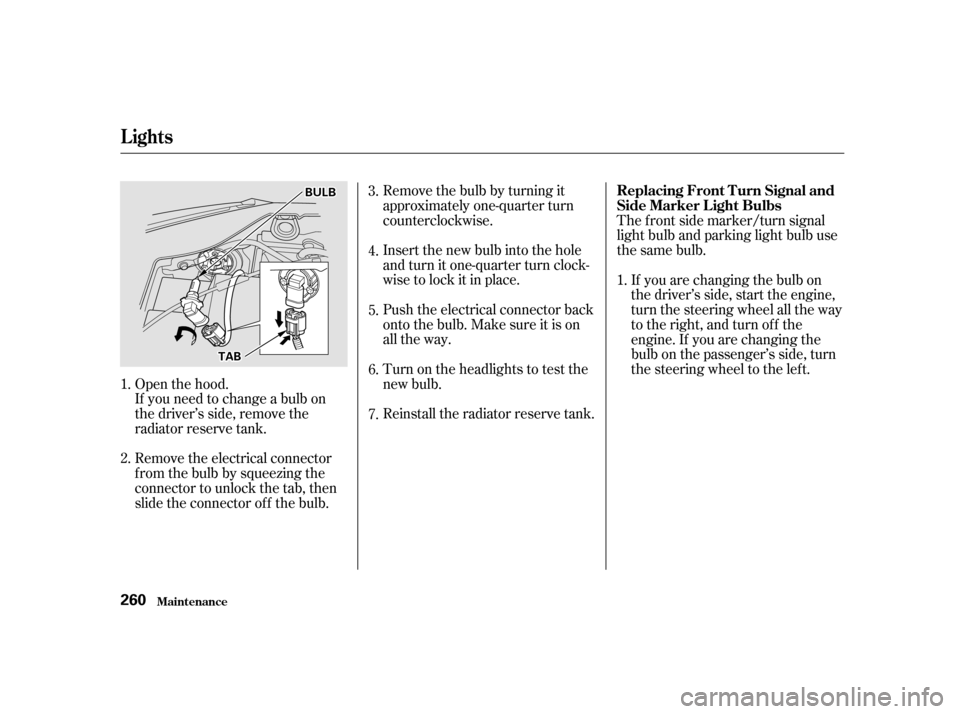
Insert the new bulb into the hole
and turn it one-quarter turn clock-
wise to lock it in place.
Push the electrical connector back
onto the bulb. Make sure it is on
all the way.
Turn on the headlights to test the
new bulb. Remove the bulb by turning it
approximately one-quarter turn
counterclockwise.
Open the hood. Reinstall the radiator reserve tank.
If you need to change a bulb on
the driver’s side, remove the
radiator reserve tank.
Remove the electrical connector
f rom the bulb by squeezing the
connector to unlock the tab, then
slide the connector of f the bulb. The f ront side marker/turn signal
light bulb and parking light bulb use
the same bulb.
If you are changing the bulb on
the driver’s side, start the engine,
turn the steering wheel all the way
to the right, and turn off the
engine. If you are changing the
bulb on the passenger’s side, turn
the steering wheel to the left.
1.
3.
4.
7. 6. 5.
1.
2. Replacing Front Turn Signal and
Side Marker L ight Bulbs
Lights
Maint enance260
B BU
UL LBB
T
T A
A B
B
00/12/25 14:36:24 31S0K630_263
Page 264 of 339
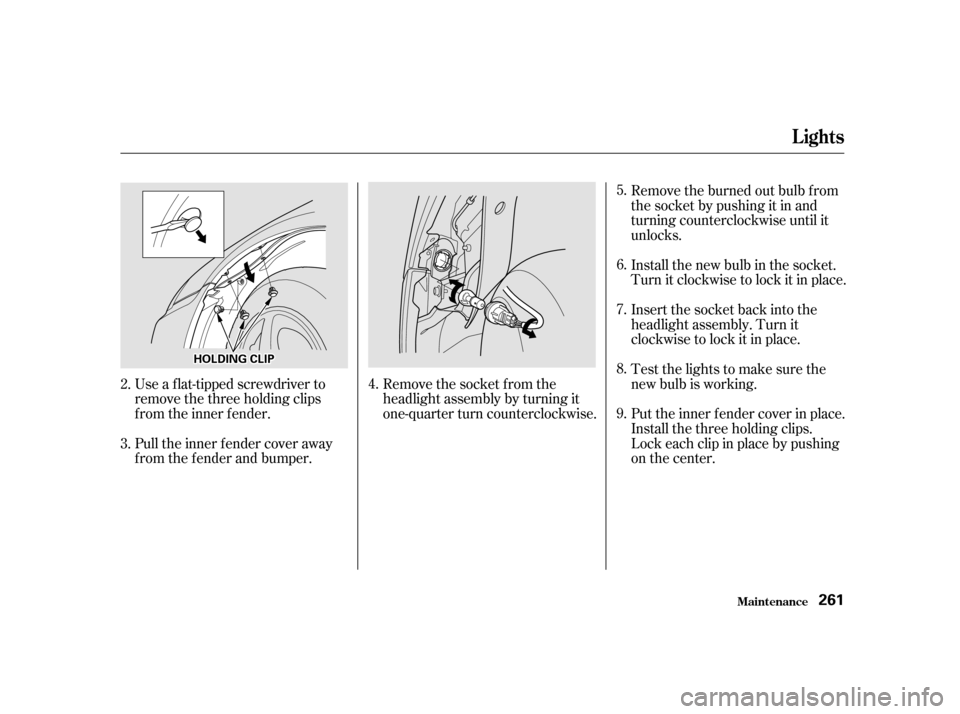
Remove the burned out bulb f rom
thesocketbypushingitinand
turning counterclockwise until it
unlocks.
Install the new bulb in the socket.
Turn it clockwise to lock it in place.
Insert the socket back into the
headlight assembly. Turn it
clockwise to lock it in place.
Testthelightstomakesurethe
new bulb is working.
Remove the socket from the
headlight assembly by turning it
one-quarter turn counterclockwise.
Pull the inner f ender cover away
f rom the f ender and bumper. Put the inner f ender cover in place.
Install the three holding clips.
Lock each clip in place by pushing
on the center.
Use a f lat-tipped screwdriver to
remove the three holding clips
f rom the inner f ender.
4. 5.
6.
7.
8.
9.
2.
3.
Lights
Maint enance261
H H
O
OL LDD I
INNG G C
CLLIIPP
00/12/25 14:36:35 31S0K630_264
Page 265 of 339
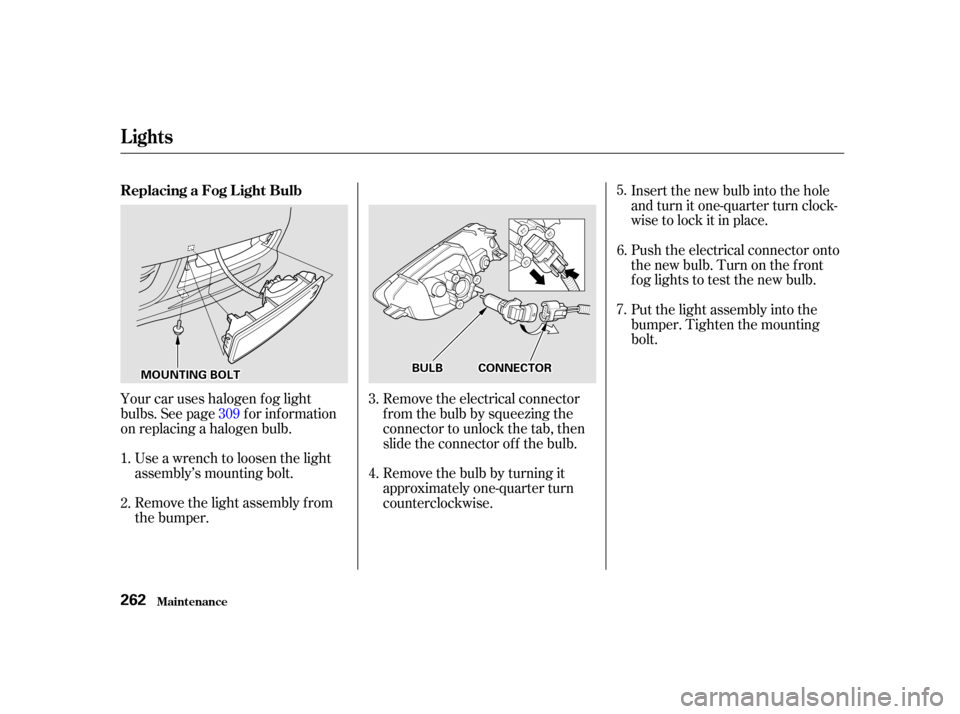
Insert the new bulb into the hole
and turn it one-quarter turn clock-
wise to lock it in place.
Push the electrical connector onto
the new bulb. Turn on the f ront
f og lights to test the new bulb.
Put the light assembly into the
bumper. Tighten the mounting
bolt.
Remove the light assembly f rom
the bumper. Use a wrench to loosen the light
assembly’s mounting bolt.
Your car uses halogen f og light
bulbs. See page f or inf ormation
on replacing a halogen bulb.
Remove the bulb by turning it
approximately one-quarter turn
counterclockwise. Remove the electrical connector
f rom the bulb by squeezing the
connector to unlock the tab, then
slide the connector of f the bulb.5.
6.
7.
1.
2. 3.
4.
309
Lights
Maint enance
ReplacingaFogLightBulb
262
M M
O
OUUNNTTI
INNG G B
BOOL LT
T B
BU
UL LB
B C
COON NNNEEC
CT TO
OR R
00/12/25 14:36:47 31S0K630_265
Page 266 of 339
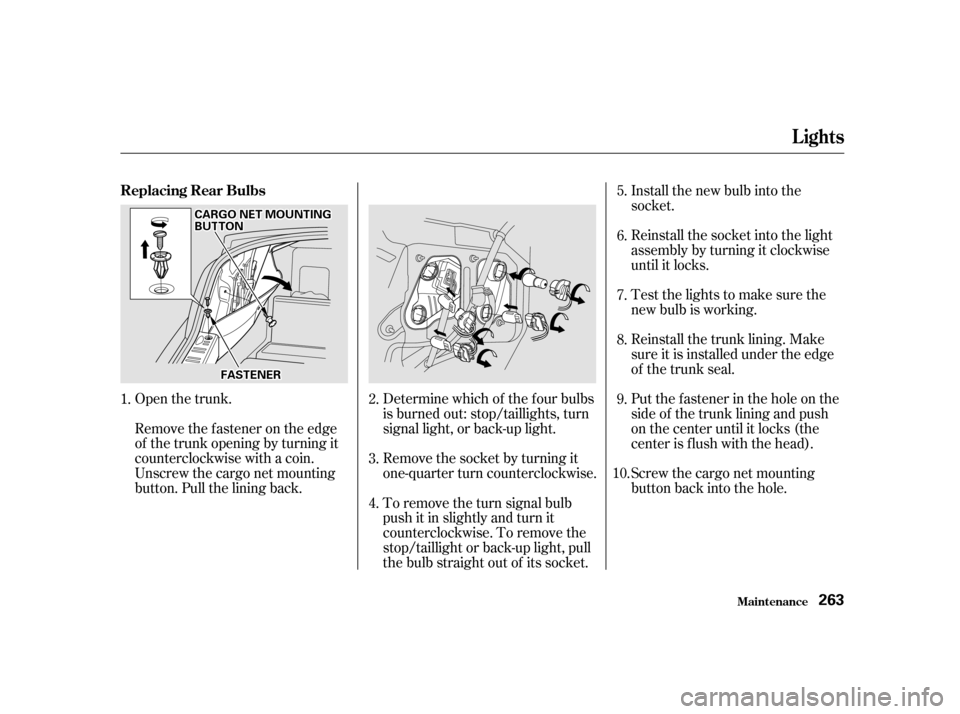
Determine which of the f our bulbs
is burned out: stop/taillights, turn
signal light, or back-up light.
Remove the socket by turning it
one-quarter turn counterclockwise.
Open the trunk.
Remove the f astener on the edge
of the trunk opening by turning it
counterclockwise with a coin.
Unscrew the cargo net mounting
button. Pull the lining back.
Screw the cargo net mounting
button back into the hole. Put the f astener in the hole on the
side of the trunk lining and push
on the center until it locks (the
center is f lush with the head). Reinstall the trunk lining. Make
sure it is installed under the edge
of the trunk seal. Testthelightstomakesurethe
new bulb is working. Reinstall the socket into the light
assembly by turning it clockwise
until it locks.
To remove the turn signal bulb
push it in slightly and turn it
counterclockwise. To remove the
stop/taillight or back-up light, pull
the bulb straight out of its socket. Install the new bulb into the
socket.
3. 2.
4. 5.
6.
7.
8.
9.
1.
10.
Lights
Maint enance
Replacing Rear Bulbs
263
F FAA S
STTE
EN
NE ER
R
C
CA
A R
RGGO O N
NEET
T M
M O
OUUNNTTI
INNG G
B
BU UT TT
TO
ON N
00/12/25 14:37:02 31S0K630_266
Page 267 of 339
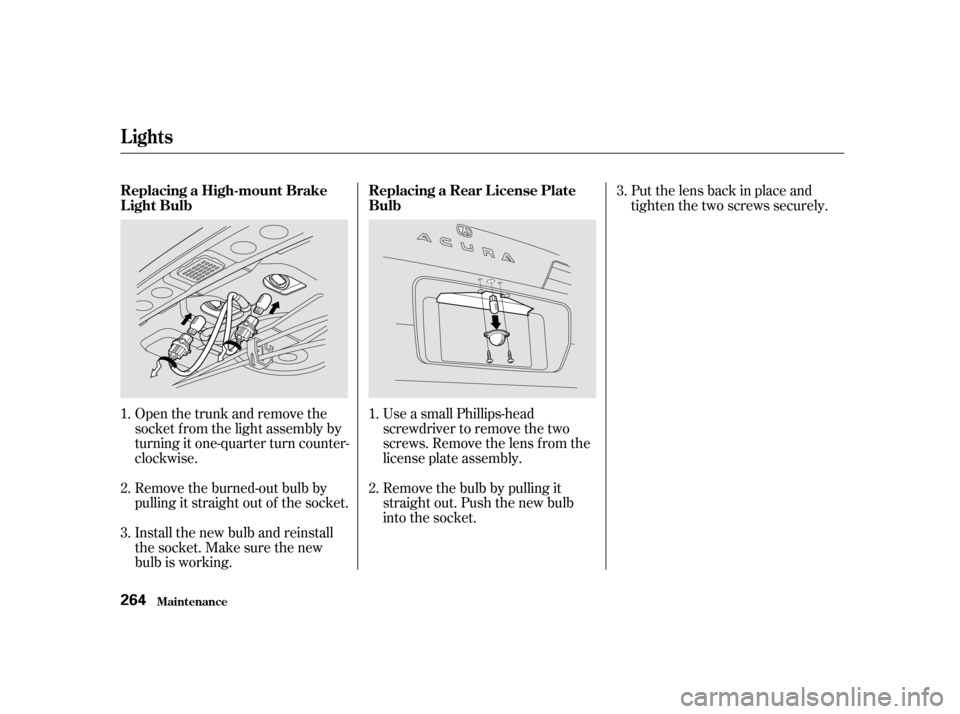
Open the trunk and remove the
socket f rom the light assembly by
turning it one-quarter turn counter-
clockwise.
Remove the burned-out bulb by
pulling it straight out of the socket.
Install the new bulb and reinstall
the socket. Make sure the new
bulb is working.Use a small Phillips-head
screwdriver to remove the two
screws. Remove the lens f rom the
license plate assembly.
Remove the bulb by pulling it
straight out. Push the new bulb
into the socket.Put the lens back in place and
tighten the two screws securely.
1. 2.
3. 1.
2.3.
Replacing a High-mount Brake
Light Bulb Replacing a Rear License Plate
Bulb
Lights
Maint enance264
00/12/25 14:37:13 31S0K630_267
Page 268 of 339

CONT INUED
The ceiling light, door light and
vanity mirror light come apart the
same way, but they do not use the
same type of bulb.Remove the bulb by pulling it
straight out of its metal tabs.
Push the new bulb into the metal
tabs. Snap the lens back in place.
Removethelensbycarefully
prying on the edge of the lens with
a f ingernail f ile or a small f lat-tip
screwdriver. Do not pry on the
edge of the housing around the
lens.
Door light:Pry on the top middle of the lens.
Ceiling light: Pry on the f ront edge of the lens
near both sides.
Spotlights: Pry on the front edge in front of
both spotlights.
1.
2.
3.
Maint enance
Lights
Replacing Bulbs in the Interior
Lights
265
C CEEI
ILLI INNG G L
LIIGGH HT
T S
SPPO
OT TL
LIIGGH HT
TS
S
00/12/25 14:37:25 31S0K630_268