mirror Acura TL 2002 3.2 Owner's Manual
[x] Cancel search | Manufacturer: ACURA, Model Year: 2002, Model line: TL, Model: Acura TL 2002Pages: 339, PDF Size: 4.71 MB
Page 58 of 339
This section gives inf ormation about
the controls and displays that
contribute to the daily operation of
your Acura. All the essential controls
are within easy reach............................
Control Locations .56
...............................
Indicator Lights .57
.............................................
Gauges .64
...............................
Speedometer .64
.................................
Tachometer .64
.....................................
Odometer .65
...................................
Trip Meter .65
Outside Temperature ...................................
Indicator .66
...................
Temperature Gauge . 66
..................................
Fuel Gauge .66
Maintenance Required ...................................
Indicator .67
Controls Near the Steering .......................................
Wheel .68
...................................
Headlights .69 ...................................
Fog Lights .70
Automatic Lighting Off .....................................
Feature .70
............
Daytime Running Lights . 70
....
Instrument Panel Brightness . 71
................................
Turn Signals .71
.....................
Windshield Wipers .72
..................
Windshield Washers . 73
..........................
Hazard Warning .73
.............
Rear Window Def ogger . 74
......
Steering Wheel Adjustment . 75
...............................
Keys and Locks .76
..............................................
Keys .76
....................
Immobilizer System . 77
............................
Ignition Switch .78
......................
Power Door Locks .79
...................
Remote Transmitter . 81
..............
Childproof Door Locks . 84
...........................................
Trunk .85
........
Emergency Trunk Opener . 86
....................................
Glove Box .87
............................
Seat Adjustments .88
Driver’s Seat Full Power ............................
Adjustments .88
...........
Driver’s Lumbar Support . 90Front Passenger’s Seat
............................
Adjustments .90
..........................
Head Restraints .91
........................................
Armrest .92
.............................................
Mirrors .94
....
Adjusting the Power Mirrors . 94
Driving Position Memory ..........................................
System .96
....................................
Seat Heaters .99
............................
Power Windows .100
.......................................
Moonroof .103
...............................
Parking Brake .104
..................................
Digital Clock .105
.................
Console Compartment . 106
........................................
Coin Box .106
Armrest Storage ..........................
Compartments .107
...........................
Beverage Holder .108
........................................
Sun Visor .109
................................
Vanity Mirror .109
........................
Sunglasses Holder .110
............
Accessory Power Sockets . 110
...............................
Interior Lights .111
..................................
Storage Tray .112
Instruments and Controls
Inst rument s and Cont rols55
00/12/25 14:02:33 31S0K630_058
Page 85 of 339
To turn it back on, repeat this
procedure. The LED will come on
for one second to indicate the
f eature has been turned on. If the seat and mirrors are already in
the proper positions, you will hear
three beeps when you open the door.
The driving position memory
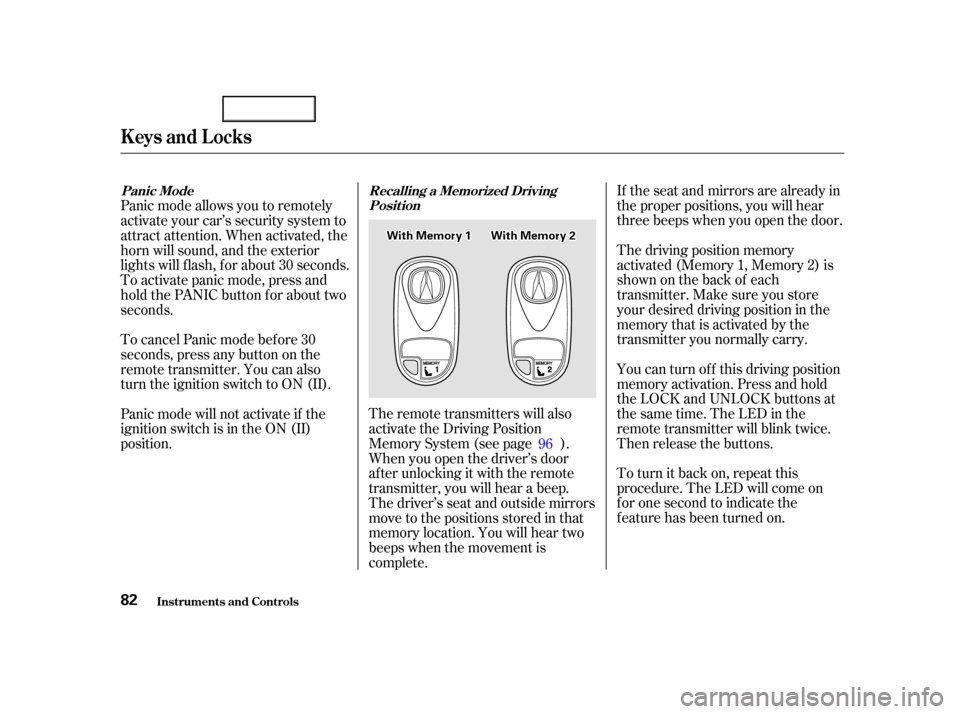
activated (Memory 1, Memory 2) is
shownonthebackof each
transmitter. Make sure you store
your desired driving position in the
memory that is activated by the
transmitter you normally carry.
You can turn of f this driving position
memory activation. Press and hold
the LOCK and UNLOCK buttons at
thesametime.TheLEDinthe
remote transmitter will blink twice.
Then release the buttons.
Theremotetransmitterswillalso
activate the Driving Position
Memory System (see page ).
When you open the driver’s door
after unlocking it with the remote
transmitter, you will hear a beep.
The driver’s seat and outside mirrors
move to the positions stored in that
memory location. You will hear two
beeps when the movement is
complete.
Panic mode allows you to remotely
activate your car’s security system to
attract attention. When activated, the
horn will sound, and the exterior
lights will f lash, f or about 30 seconds.
To activate panic mode, press and
hold the PANIC button for about two
seconds.
To cancel Panic mode bef ore 30
seconds, press any button on the
remote transmitter. You can also
turn the ignition switch to ON (II).
Panic mode will not activate if the
ignition switch is in the ON (II)
position.
96
Keys and Locks
Inst rument s and Cont rols
Recalling a Memorized Driving
Position
Panic Mode
82
W Wi
itth h M
M e
em
m o
or
ryy 1
1 W
Wiitth h M
M e
em
m o
or
ryy 2
2
00/12/25 14:07:28 31S0K630_085
Page 97 of 339
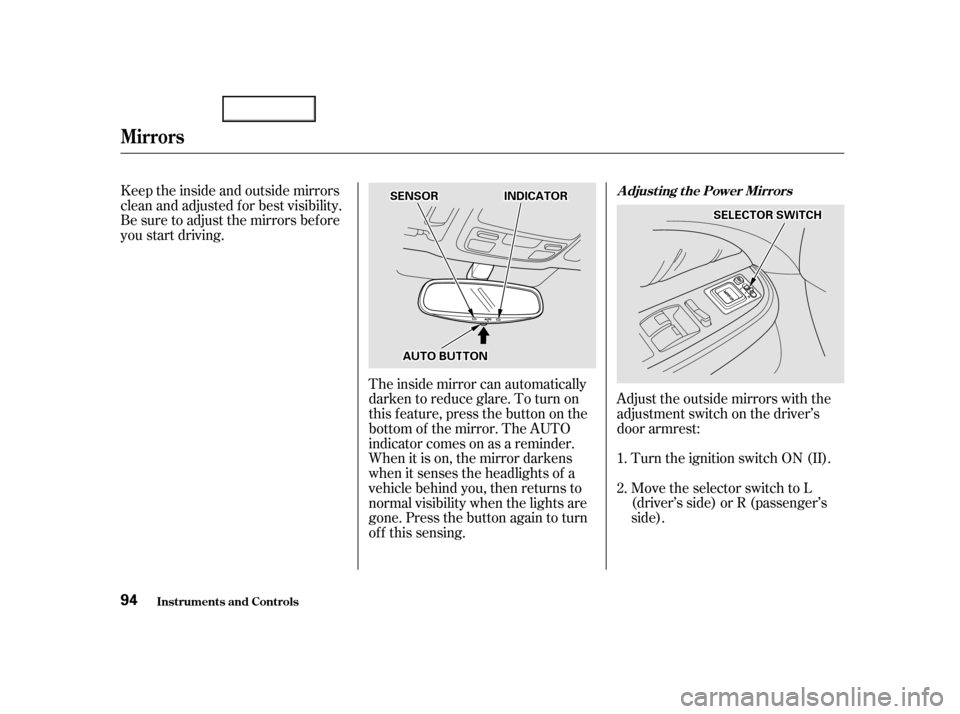
Adjust the outside mirrors with the
adjustment switch on the driver’s
door armrest:Turn the ignition switch ON (II).
Move the selector switch to L
(driver’s side) or R (passenger’s
side).
Keeptheinsideandoutsidemirrors
clean and adjusted f or best visibility.
Be sure to adjust the mirrors bef ore
you start driving.
The inside mirror can automatically
darken to reduce glare. To turn on
this feature, press the button on the
bottom of the mirror. The AUTO
indicator comes on as a reminder.
When it is on, the mirror darkens
when it senses the headlights of a
vehicle behind you, then returns to
normal visibility when the lights are
gone. Press the button again to turn
of f this sensing.1.
2.
Inst rument s and Cont rols
Mirrors
Adjusting the Power Mirrors
94
S SE
EL
LEE C
CT TO
OR R S
SWWI ITT C
CH H
S
SE
EN
NS SOOR R I
INND DI
ICCA A T
TO
OR R
A
A U
UT TO
O B
BUUT TT
TO
ON N
00/12/26 11:14:23 31S0K630_097
Page 98 of 339

Push the appropriate edge of the
adjustment switch to move the
mirrorright,left,up,ordown.When you f inish, move the
selector switch to the center (off)
position. This turns of f the
adjustment switch so you can’t
move a mirror out of position by
accidentally bumping the switch.
With the selector switch in the
center (of f ) position, the passenger’s
side mirror will pivot downward
slightly when you shif t the
transmission into reverse. This will
give you a better view of that side of
the vehicle while parallel parking.
The mirror returns to its original
position when you take the
transmission out of reverse.
Outside mirror positions can be
stored in the driving position
memory system (see page ). The outside mirrors are heated to re-
move fog and frost. With the ignition
switchON(II),turnontheheaters
by pressing the button. The light in
the button comes on as a reminder.
Press the button again to turn the
heaters off.
3. 4.
96
Mirrors
Inst rument s and Cont rols95
A AD
DJ
JU
US STTM
M E
EN
NT T S
SWWI ITT C
CH H H
H
E
EA
A T
TE
ED
D M
MI
IRRR ROOR R B
BUUT TT
TO
ON N
00/12/25 14:09:34 31S0K630_098
Page 99 of 339
Turn the ignition switch ON (II).
You cannot add a new driving
position in the memory unless the
ignition switch is ON (II). You can
recall a memorized position with
the ignition switch in any position.
Store a driving position as explained
in this section only when the car is
parked.
Your Acura has a memory f eature
f or the driver’s seat and outside
mirror positions.
Two seat and outside mirror
positions, f or dif f erent drivers or
drivingconditions,canbestoredin
separate memories. You select a
memorized position by pushing the
appropriate button or using the
appropriate remote transmitter
(Memory1orMemory2).
Adjust the seat to a comfortable
position (see page ).
Adjust the outside mirrors f or best
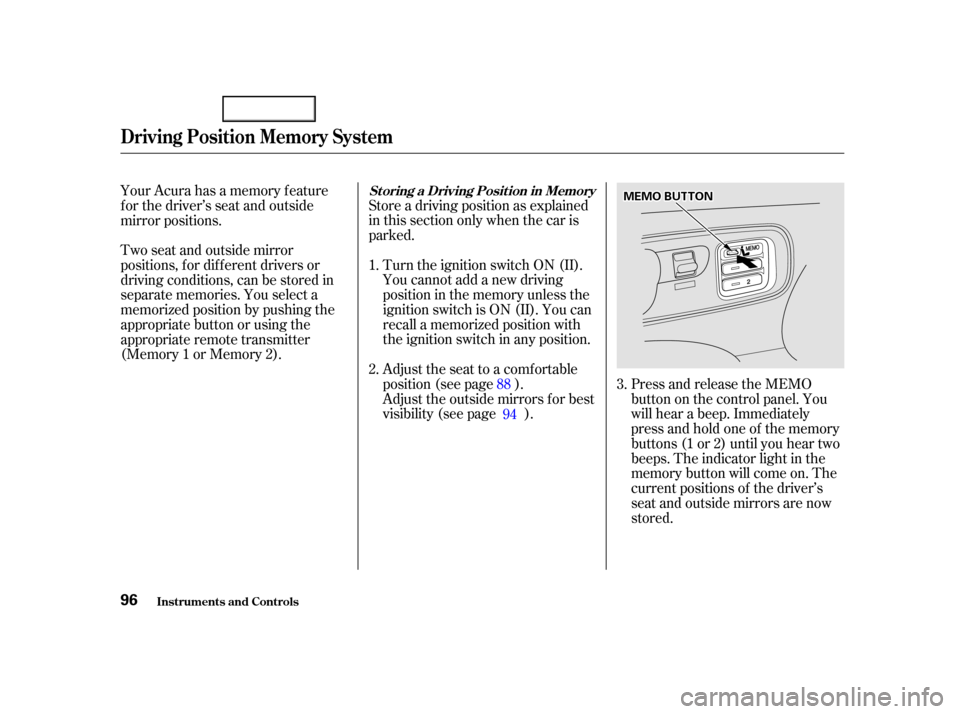
visibility (see page ).Press and release the MEMO
buttononthecontrolpanel.You
will hear a beep. Immediately
press and hold one of the memory
buttons (1 or 2) until you hear two
beeps. The indicator light in the
memory button will come on. The
current positions of the driver’s
seat and outside mirrors are now
stored.
3.
1.
2.
88
94
St oring a Driving Posit ion in Memory
Driving Posit ion Memory Syst em
Inst rument s and Cont rols96
M M E
EM
M O
O B
BUUT TT
TO
ON N
00/12/25 14:09:46 31S0K630_099
Page 100 of 339
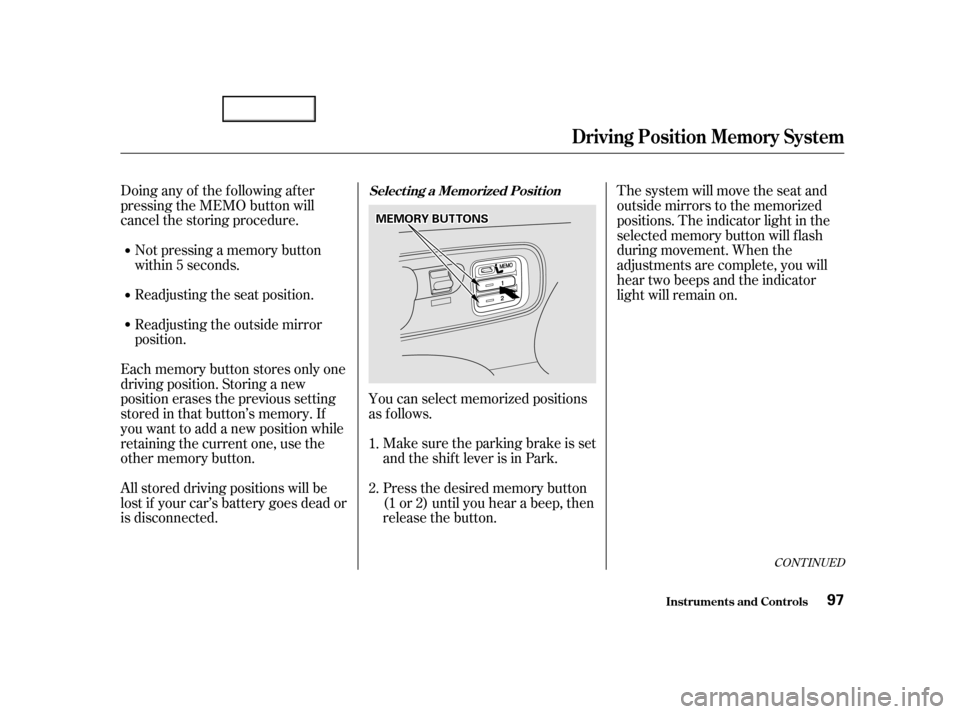
Not pressing a memory button
within 5 seconds.You can select memorized positions
as f ollows.Make sure the parking brake is set
and the shif t lever is in Park.
Doing any of the f ollowing af ter
pressing the MEMO button will
cancel the storing procedure.
Readjusting the seat position.
Readjusting the outside mirror
position.
Each memory button stores only one
driving position. Storing a new
position erases the previous setting
stored in that button’s memory. If
you want to add a new position while
retaining the current one, use the
other memory button.
All stored driving positions will be
lost if your car’s battery goes dead or
is disconnected. Press the desired memory button
(1 or 2) until you hear a beep, then
release the button.The system will move the seat and
outside mirrors to the memorized
positions. The indicator light in the
selected memory button will f lash
during movement. When the
adjustments are complete, you will
hear two beeps and the indicator
light will remain on.
1.
2.
CONT INUED
Select ing a Memorized Posit ion
Driving Posit ion Memory Syst em
Inst rument s and Cont rols97
M M E
EM
M O
ORRYY B
BUUT TT
TO
ON NSS
00/12/25 14:09:59 31S0K630_100
Page 101 of 339

To stop the system’s automatic ad-
justment;If desired, you can use the
adjustment switches to change the
positions of the seat or outside
mirrors af ter they are in their
memorized position. If you change
the memorized position, the
indicator light in the memory button
will go out. To keep this driving
position f or later use, you must store
it in the driving position memory.
Press any button on the control
panel: MEMO, 1 or 2.
Push any of the adjustment
switches f or the seat.
Shif t out of Park.
Adjust the outside mirrors.
Inst rument s and Cont rols
Driving Posit ion Memory Syst em
98
00/12/25 14:10:07 31S0K630_101
Page 112 of 339
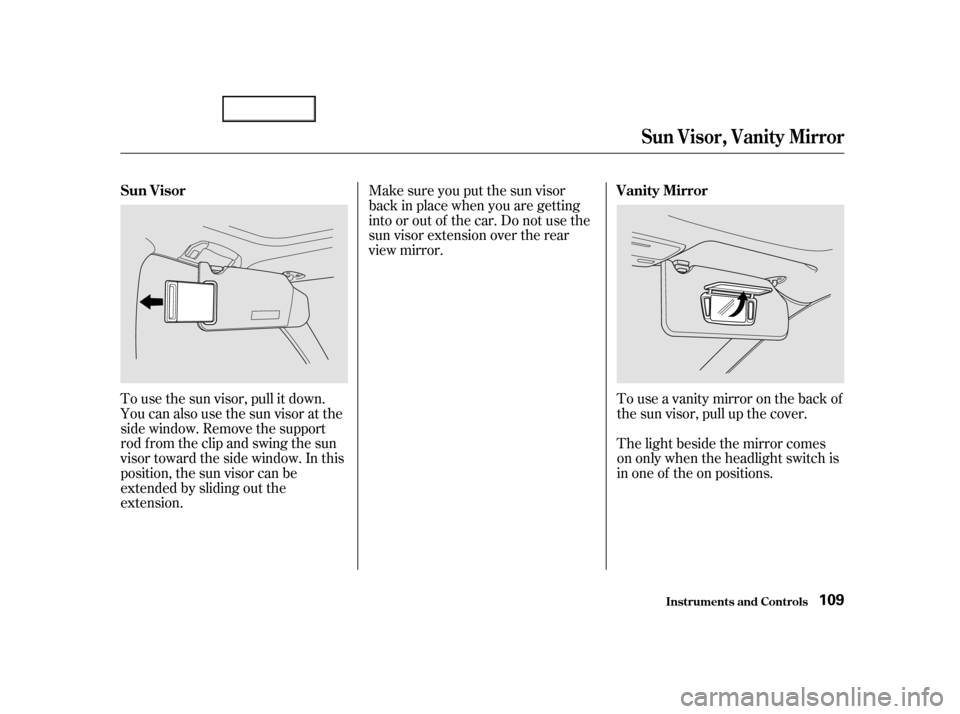
To use the sun visor, pull it down.
You can also use the sun visor at the
side window. Remove the support
rod f rom the clip and swing the sun
visor toward the side window. In this
position, the sun visor can be
extended by sliding out the
extension.Touseavanitymirroronthebackof
the sun visor, pull up the cover.
The light beside the mirror comes
on only when the headlight switch is
in one of the on positions.
Make sure you put the sun visor
back in place when you are getting
into or out of the car. Do not use the
sun visor extension over the rear
view mirror.
Sun Visor Vanity Mirror
Sun Visor, Vanit y Mirror
Inst rument s and Cont rols109
00/12/25 14:11:44 31S0K630_112
Page 181 of 339
Make sure all windows, mirrors,
and outside lights are clean and
unobstructed. Remove f rost, snow,
or ice.
Check that the hood and trunk are
f ully closed.Check the adjustment of the seat
(see page ).
Check the adjustment of the
inside and outside mirrors (see
page ).
Check the adjustment of the
steering wheel (see page ).
Make sure the doors are securely
closed and locked.
Fasten your seat belt. Check that
your passengers have f astened
their seat belts (see page ).Turn the ignition switch ON (II).
Check the indicator lights in the
instrument panel.
Start the engine (see page ).
Check the gauges and indicator
lights in the instrument panel (see
page ).
Check that any items you may be
carrying with you inside are stored
properly or f astened down
securely. Visually check the tires. If a tire
looks low, use a gauge to check its
pressure.
Youshoulddothefollowingchecks
and adjustments every day bef ore
you drive your car.
3.2.
1.
4. 5.
6.
7.
8.
9. 11.
12. 10.
15 75 57
179
88
94
Preparing to Drive
Driving178
00/12/25 14:22:33 31S0K630_181
Page 208 of 339
When preparing to tow, and bef ore
driving away, be sure to check the
f ollowing:The vehicle has been properly
serviced, and the tires, brakes,
suspension, and cooling system
are in good operating condition.
All weights and loads are within
limits (see pages and ).
Allitemsonandinthetrailerare
properly secured and cannot shif t
while you drive.
Many states and Canadian provinces
require special outside mirrors when
towing a trailer. Even if they don’t,
you should install special mirrors if
you cannot clearly see behind you, or
if the trailer creates a blind spot.
Askyourtrailersalesorrental
agency if any other items are
recommended or required f or your
towing situation.
The lights and brakes on your
vehicle and the trailer are working
properly.
Your vehicle tires and spare are
properly inf lated (see page ),
and the trailer tires and spare are
inflated as recommended by the
trailer maker.
Thehitch,safetychains,andany
other attachments are secure. 201 202 252
Pre-T ow Checklist
Additional Trailer Equipment
Towing a Trailer
Driving205
00/12/25 14:27:07 31S0K630_208