lock Acura TL 2008 Navigation Manual
[x] Cancel search | Manufacturer: ACURA, Model Year: 2008, Model line: TL, Model: Acura TL 2008Pages: 152, PDF Size: 7.56 MB
Page 2 of 152
2Navigation System
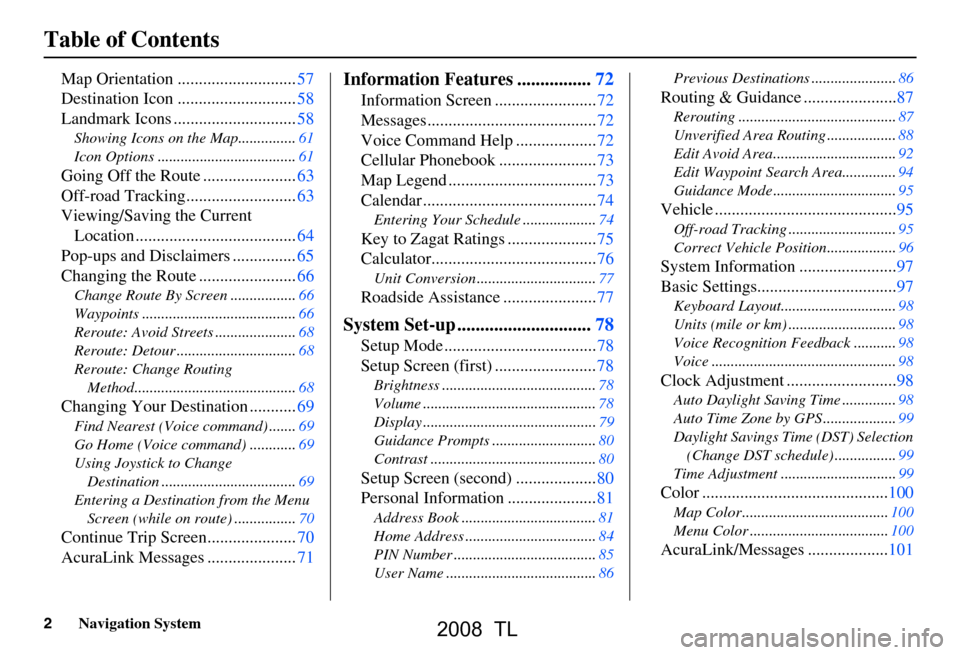
Table of Contents
Map Orientation ............................57
Destination Icon ............................58
Landmark Icons .............................58
Showing Icons on the Map...............61
Icon Options ....................................61
Going Off the Route ......................63
Off-road Tracking..........................63
Viewing/Saving the Current Location ......................................64
Pop-ups and Disclaimers ...............65
Changing the Route .......................66
Change Route By Screen .................66
Waypoints ........................................66
Reroute: Avoid Streets .....................68
Reroute: Detour ...............................68
Reroute: Change Routing
Method..........................................68
Changing Your Destination ...........69
Find Nearest (Voice command) .......69
Go Home (Voice command) ............69
Using Joystick to Change Destination ...................................69
Entering a Destination from the Menu Screen (while on route) ................70
Continue Trip Screen.....................70
AcuraLink Messages .....................71
Information Features ................72
Information Screen ........................72
Messages........................................72
Voice Command Help ...................72
Cellular Phonebook .......................73
Map Legend ...................................73
Calendar .........................................74
Entering Your Schedule ...................74
Key to Zagat Ratings .....................75
Calculator.......................................76
Unit Conversion ...............................77
Roadside Assistance ......................77
System Set-up .............................78
Setup Mode ....................................78
Setup Screen (first) ........................78
Brightness ........................................78
Volume .............................................78
Display .............................................79
Guidance Prompts ....... ....................80
Contrast ...........................................80
Setup Screen (second) ...................80
Personal Information .....................81
Address Book ...................................81
Home Address ..................................84
PIN Number .....................................85
User Name .......................................86 Previous Destinations ......................86
Routing & Guidance ......................87
Rerouting .........................................87
Unverified Area Routing ..................88
Edit Avoid Area................................92
Edit Waypoint Search Area..............94
Guidance Mode ....
............................95
Vehicle ...........................................95
Off-road Tracking ............................95
Correct Vehicle Position..................96
System Information .......................97
Basic Settings.................................97
Keyboard Layout.. ............................98
Units (mile or km) ............................98
Voice Recognition Fe edback ...........98
Voice ................................................98
Clock Adjustment ..........................98
Auto Daylight Saving Time ..............98
Auto Time Zone by GPS ...................99
Daylight Savings Ti me (DST) Selection
(Change DST schedule) ................99
Time Adjustment ..............................99
Color ............................................100
Map Color ......................................100
Menu Color ....................................100
AcuraLink/Messages ...................101
2008 TL
Page 24 of 152
24Navigation System
Getting Started
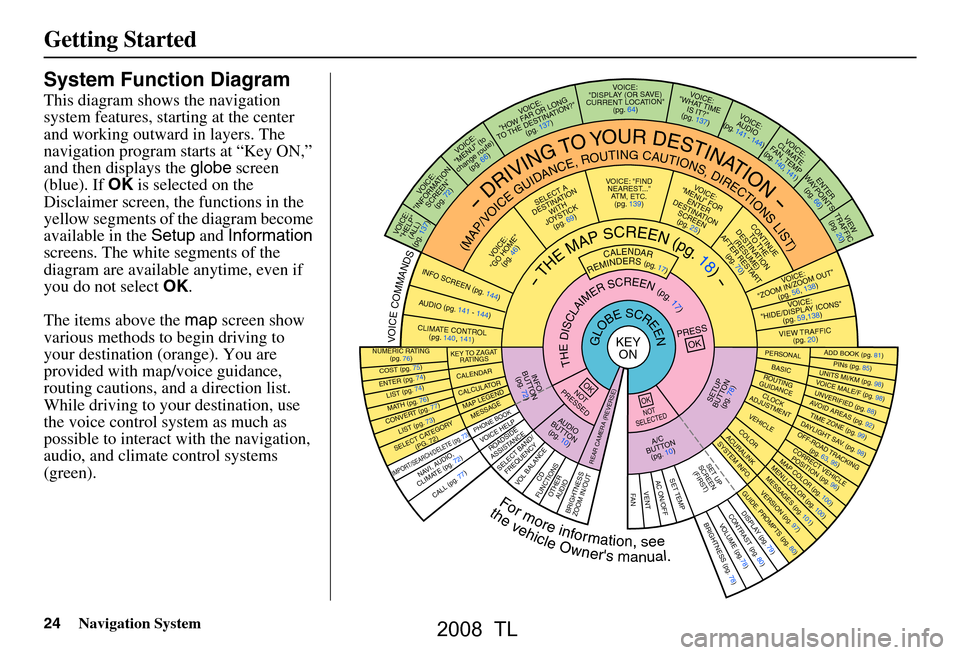
System Function Diagram
This diagram shows the navigation
system features, starting at the center
and working outward in layers. The
navigation program starts at “Key ON,”
and then displays the globe screen
(blue). If OK is selected on the
Disclaimer screen, the functions in the
yellow segments of the diagram become
available in the Setup and Information
screens. The white segments of the
diagram are available anytime, even if
you do not select OK.
The items above the map screen show
various methods to begin driving to
your destination (orange). You are
provided with map/voice guidance,
routing cautions, and a direction list.
While driving to your destination, use
the voice control system as much as
possible to interact with the navigation,
audio, and climat e control systems
(green).
REMINDERS(pg.17)CALENDAR
-THEMAPSCREEN(pg.18)-
(MAP/VOICEGUIDANCE,ROUTINGCAUTIONS,DIRECTIONSLIST)
-DRIVINGTOYOURDESTINATION-
VOI CE:
"HELP"
(ALL)
(pg. 137)
VOICE:
"INFORMA TION
SCREE N"
(pg. 72)
VOICE:
"MENU" (to
change route) (pg. 66)
VOICE:
"HOW F AR OR LONG
TO THE
DESTIN AT ION?"
(pg.
137)
VOICE:
"DISPLAY (OR S AV E )
CURR
ENT LOCA TION"
(pg.
64)VOICE:
"WHAT TIME
IS IT?"
(pg. 137)
VOI CE:
AUD IO
(pg. 141 - 144)
VOI CE:
CLIMA TE
F
AN, TEMP
(pg. 140, 141)
ENTER
WAY POINTS
(pg. 66)
VIEW
TRAFFIC (pg. 20)
VOI CE:
"ZOOM IN/Z OOM OUT"
(pg. 56, 138)
VOI CE:
"HIDE/DISPLA Y ICONS"
(pg. 59,138)
VIEW TRAFFIC (pg. 20)
ADD BOOK (pg. 81)PINs (pg. 85)UNITS MI/KM (pg. 98)VOICE MALE/F (pg . 98)UNVERIFIED (pg. 88)AVOID ARE
AS (pg. 92)TIME ZONE (pg. 99)DAYLIGHT SAV. ( pg. 98)OFF-ROAD TRACKING
(pg. 63, 95)CORRECT VEHICLE POSITIO N (pg. 96)MAP COLOR (pg. 100)MENU COLO R (pg. 100)
GUIDE. PROMPTS (pg. 80)VERSION (pg . 97)
MESS
AGES (pg. 101)
BRIGHTNESS (pg. 78)VO
LUM E (pg.78)DISPLAY (pg. 79)CONTRAST (pg. 80)
CALL (pg. 77)
COST (pg. 75)
NUMERIC RA TING
(pg. 76)
ENTER (pg. 74)LIST (pg. 74)MATH (pg. 76)CONVER T (pg. 77)LIST (pg. 73)
NAVI, AUDIO,
CLIMA TE (pg. 72)
SELECT CA TEGOR Y
(PG. 72)
IMPORT/SEAR CH/DELETE (pg. 73)
PRESS
OK
NOT
PRESSEDOK
NOT
SELECTEDOK
ROAD SIDE
ASSISTAN CE
KEY TO ZAGAT
RATINGS
CALEND ARCALCULA TORMAP LEGEND
PHONE BOOKMESSAGE
VOI CE HELP
SELECT BAND/
FREQUENCYVOL BALANCECD
FUNCTIONSOTHER AUD IOBRIGHTNESS
ZOOM IN/OUT
SETUP
BUT TO N
(pg. 78)
A/C
B
UTTON
(pg. 10)
AUDIO
BUT TO N
(pg. 10)
INFO
BUT TO N
(pg. 72)
REAR CA MERA (REVERSE)
THEDISCLAIMERSCREEN(pg.17)
VOICE: "FIND
NEAREST..." A
TM, ETC .
(pg.
139)
SELECT A
DESTINA TION
WITH
JO YSTIC K
(pg. 69)
VOI CE:
"GO HOME" (pg. 46)
VOICE:
"MENU" FOR ENTER
DESTINATION
SCREEN (pg. 25)
CONTINUE TO THE
DESTINATION
(RESUME)
AFTER REST
ART
(pg. 70)
GLOBESCREENKEYON
Formoreinformation,see
PERSO NALBASICROUTING
GUIDANCE
CLOCK
ADJUSTMENT
VEHICLECOLOR
SET TEMPAC ON/OFFVENTFA N
ACU RALINKSYSTEM INFO .
SET UP
SCREEN (FIRST)
thevehicleOwner'smanual.
VOICECOMMANDS
AUD IO (pg. 141 - 14 4)
CLIMATE CONTR OL
(pg. 140, 141)
INFO SCREEN (pg. 1 44)
2008 TL
Page 58 of 152
58Navigation System
Driving to Your Destination
Destination Icon
The destination icon only shows the
approximate location of the destination.
This occurs because a city block can
have as many as 100 possible addresses
(for example, the 1400 block is followed
by the 1500 block.) Since most cities
use only a portion of the 100 possible
addresses (for example, in the 1400
block, the addresses may only go up to
1425 before the 1500 block starts).
Therefore, the address 1425 will be
shown a quarter of the way down the
block by the system instead of near the
end of the block where the destination is
actually located.
Tip:
When on a route, you can view a map
showing your destination. Using voice
control, say “Display destination map.”
Landmark Icons
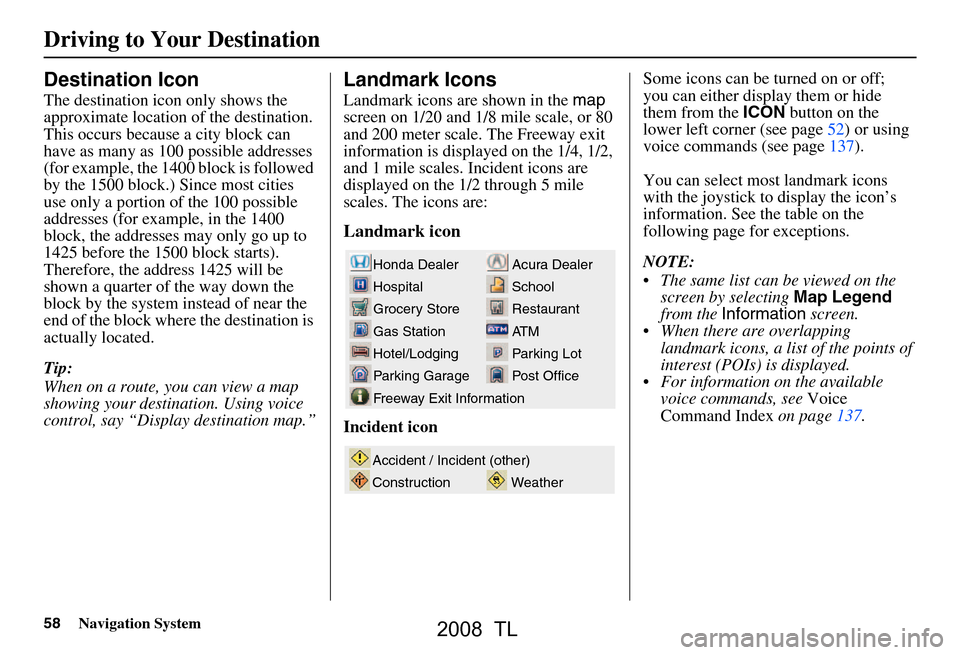
Landmark icons are shown in the map
screen on 1/20 and 1/8 mile scale, or 80
and 200 meter scale. The Freeway exit
information is displayed on the 1/4, 1/2,
and 1 mile scales. Incident icons are
displayed on the 1/2 through 5 mile
scales. The icons are:
Landmark icon
Incident icon Some icons can be turned on or off;
you can either display them or hide
them from the
ICON button on the
lower left corner (see page52) or using
voice commands (see page137).
You can select most landmark icons
with the joystick to display the icon’s
information. See the table on the
following page for exceptions.
NOTE:
The same list can be viewed on the screen by selecting Map Legend
from the Information screen.
When there are overlapping landmark icons, a list of the points of
interest (POIs) is displayed.
For information on the available voice commands, see Voice
Command Index on page137.
Acura Dealer
School
Restaurant
AT M
Parking Lot
Post OfficeHonda Dealer
Hospital
Grocery Store
Gas Station
Hotel/Lodging
Parking Garage
Freeway Exit Information
Weather
Accident / Incident (other)
Construction
2008 TL
Page 96 of 152
96Navigation System
After you have traveled approximately
1/2 mile away from a mapped road, the
system will display a series of white
dots on the map screen to show the path
you have traveled. This is provided so
you can follow the dots to backtrack to
the mapped road you originally left.
Tracking continues until you reach a
mapped road. See Off-road Tracking on
page63.
Tracking is shown only in the 1/20, 1/8,
1/4, and 1/2 mile, or the 80, 200, 400,
and 800 meter scales. Use the ZOOM
buttons to change the scales if
necessary.
NOTE:
To clear existing dots, turn this feature
off and exit Setup. To re-enable this
feature, return to Setup and turn it on
again.Correct Vehicle Position
The system relies on satellites for
positioning information. Buildings,
tunnels, and other objects can block or
reflect these signals, requiring the
system to use “dead reckoning” to
determine your location and direction.
This can sometimes lead to small errors
in positioning, such as showing you on
an adjacent street.
NOTE:
Using this function to adjust vehicle
position is not recommended. When the
system acquires a GPS signal, it will
automatically place the vehicle in the
correct location. If you choose to do this, follow these
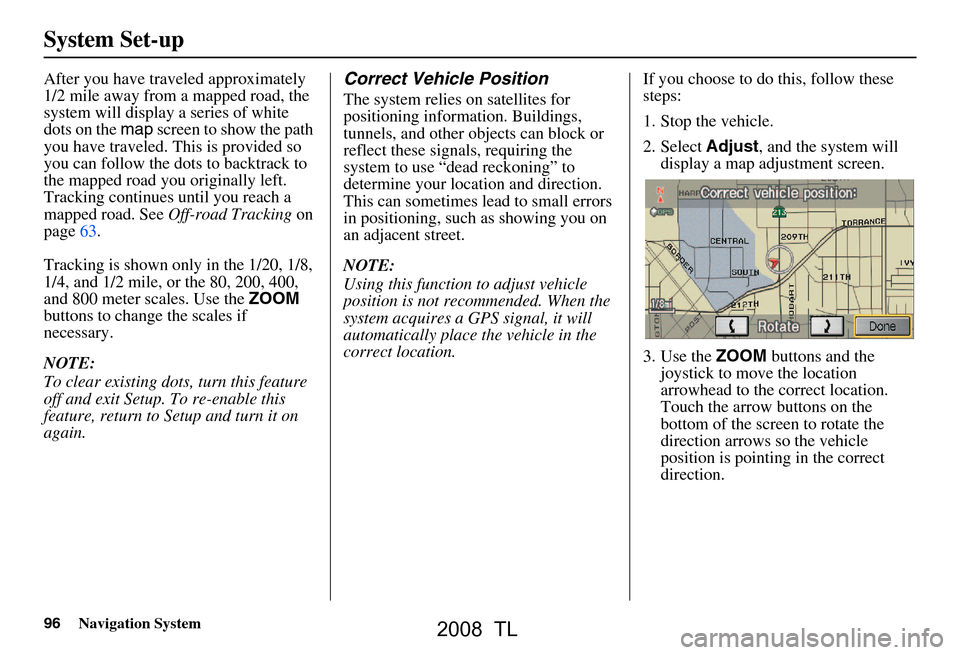
steps:
1. Stop the vehicle.
2. Select
Adjust, and the system will
display a map adjustment screen.
3. Use the ZOOM buttons and the
joystick to move the location
arrowhead to the correct location.
Touch the arrow buttons on the
bottom of the screen to rotate the
direction arrows so the vehicle
position is pointing in the correct
direction.
System Set-up
2008 TL
Page 98 of 152
98Navigation System
Keyboard Layout
Allows you to select the displayed
keypad screen: Alphabet or
QWERTY .
Units (mile or km)
Allows you to select the units for the
entire system ( mile or km ).
Voice Recognition Feedback
Allows you to turn voice control system
prompts On or Off . When Off, you will
not hear the voice control system
confirmations or prompts.
Voice
Allows you to select the guidance voice:
Female or Male .
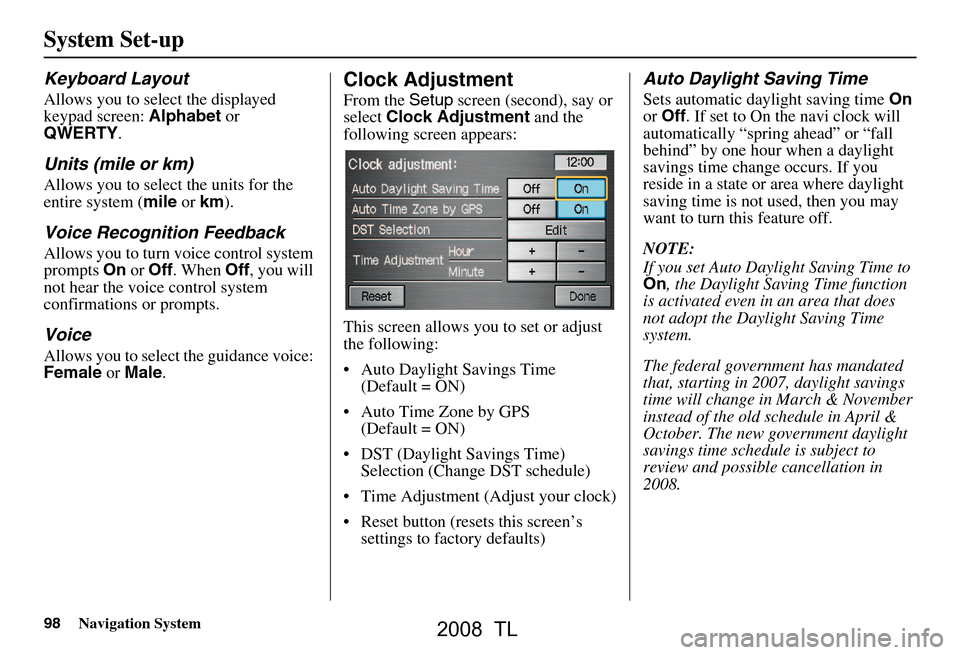
Clock Adjustment
From the Setup screen (second), say or
select Clock Adjustment and the
following screen appears:
This screen allows you to set or adjust
the following:
Auto Daylight Savings Time (Default = ON)
Auto Time Zone by GPS (Default = ON)
DST (Daylight Savings Time) Selection (Change DST schedule)
Time Adjustment (Adjust your clock)
Reset button (resets this screen’s settings to factory defaults)
Auto Daylight Saving Time
Sets automatic daylight saving time On
or Off . If set to On the navi clock will
automatically “spring ahead” or “fall
behind” by one hour when a daylight
savings time change occurs. If you
reside in a state or area where daylight
saving time is not used, then you may
want to turn this feature off.
NOTE:
If you set Auto Daylig ht Saving Time to
On , the Daylight Saving Time function
is activated even in an area that does
not adopt the Daylight Saving Time
system.
The federal government has mandated
that, starting in 2007, daylight savings
time will change in March & November
instead of the old schedule in April &
October. The new government daylight
savings time schedule is subject to
review and possible cancellation in
2008.
System Set-up
2008 TL
Page 99 of 152
Navigation System99
The dates that the navi switches between
standard and daylight savings time are
not triggered by GPS satellite signals.
They are stored in the navi software and
can be selected in the DST schedule
selection screen. Therefore your navi
clock will change based on the daylight
savings time schedule.
Auto Time Zone by GPS
Sets automatic time zone selection by
GPS to On or Off . If you are driving
across the country and passing through
time zones, then this feature will
automatically set the time to the time
zone you are traveling through.
However, if you live and work in two
different time zones, you may want to
turn this feature off.
NOTE:
When driving near a time zone
boundary, the displayed time zone may
fluctuate between the two zone times.
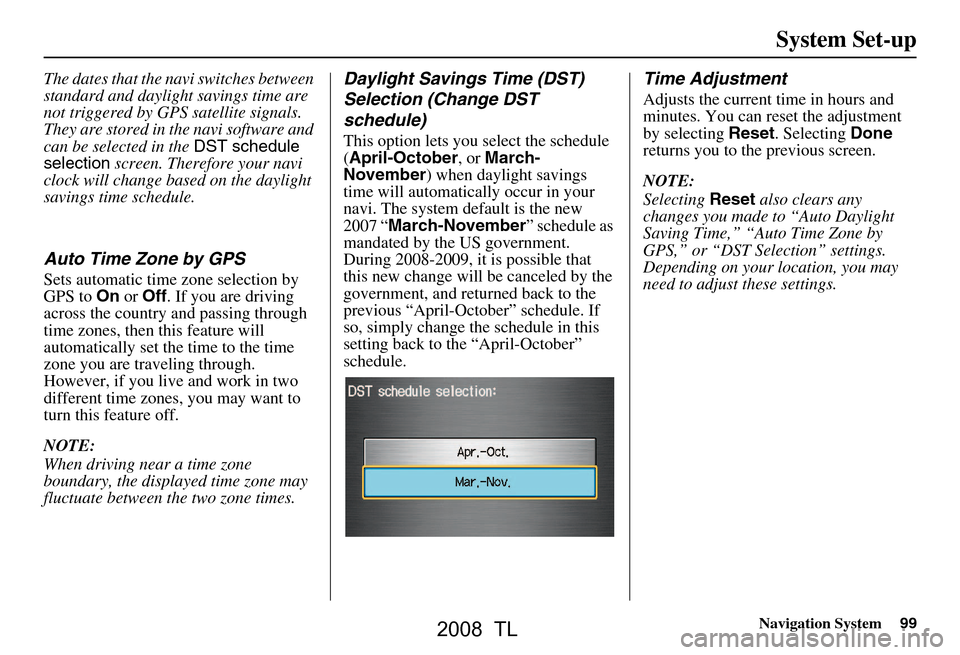
Daylight Savings Time (DST)
Selection (Change DST
schedule)
This option lets you select the schedule
( April-October , or March-
November ) when daylight savings
time will automatically occur in your
navi. The system default is the new
2007 “ March-November ” schedule as
mandated by the US government.
During 2008-2009, it is possible that
this new change will be canceled by the
government, and retu rned back to the
previous “April-October” schedule. If
so, simply change the schedule in this
setting back to the “April-October”
schedule.
Time Adjustment
Adjusts the current time in hours and
minutes. You can reset the adjustment
by selecting Reset. Selecting Done
returns you to the previous screen.
NOTE:
Selecting Reset also clears any
changes you made to “Auto Daylight
Saving Time,” “Auto Time Zone by
GPS,” or “DST Selection” settings.
Depending on your location, you may
need to adjust these settings.
System Set-up
2008 TL
Page 101 of 152
Navigation System101
System Set-up
AcuraLink/Messages
For complete details on setting up your
AcuraLink messaging, refer to the
AcuraLink section in your Owner’s
manual. Or, you can go to the Owner
Link section on the TL page in
www.acura.com .
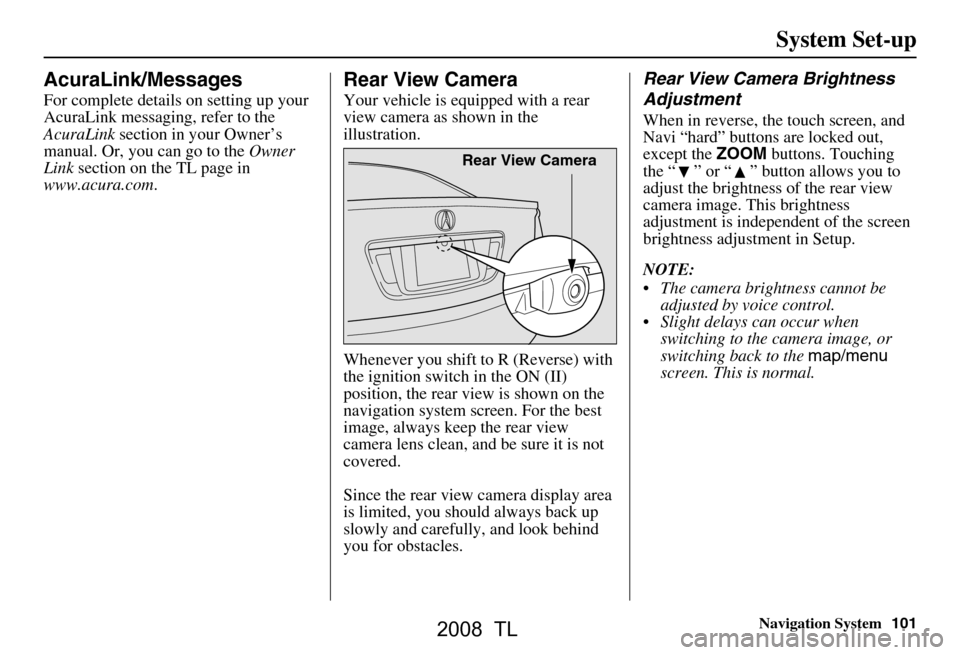
Rear View Camera
Your vehicle is equipped with a rear
view camera as shown in the
illustration.
Whenever you shift to R (Reverse) with
the ignition switch in the ON (II)
position, the rear view is shown on the
navigation system screen. For the best
image, always keep the rear view
camera lens clean, and be sure it is not
covered.
Since the rear view camera display area
is limited, you should always back up
slowly and carefully, and look behind
you for obstacles.
Rear View Camera Brightness
Adjustment
When in reverse, the touch screen, and
Navi “hard” buttons are locked out,
except the ZOOM buttons. Touching
the “ ” or “ ” button allows you to
adjust the brightness of the rear view
camera image. This brightness
adjustment is indepe ndent of the screen
brightness adjustment in Setup.
NOTE:
The camera brightness cannot be adjusted by voice control.
Slight delays can occur when switching to the ca mera image, or
switching back to the map/menu
screen. This is normal.
Rear View Camera
2008 TL
Page 102 of 152
102Navigation System
System Initialization
System Initialization
If for any reason, you lose power to the
navigation system (like the battery was
disconnected), the navigation system
will require initialization. Once
completed, your system will be ready to
use.
This initialization requires the
following:
Entry of the 4-digit anti-theft security code to “unlock” the navigation
system.
GPS initialization (may not be needed depending on the le ngth of time the
system was without power).
Map matching to align the GPS coordinates to a place on the map
(displays current street at the bottom
of the map).
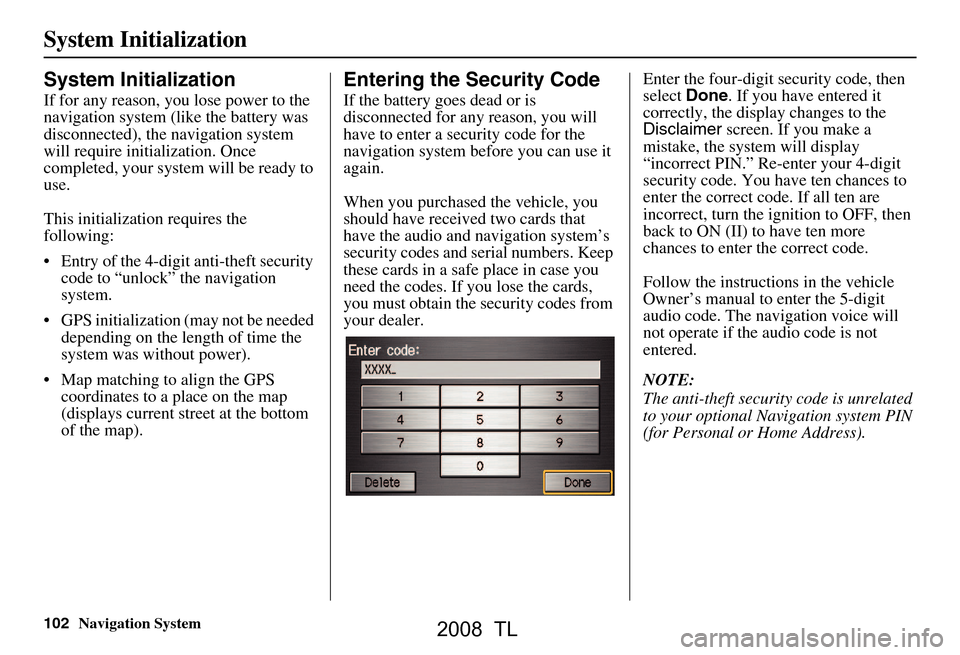
Entering the Security Code
If the battery goes dead or is
disconnected for any reason, you will
have to enter a security code for the
navigation system before you can use it
again.
When you purchased the vehicle, you
should have received two cards that
have the audio and navigation system’s
security codes and serial numbers. Keep
these cards in a sa fe place in case you
need the codes. If you lose the cards,
you must obtain the security codes from
your dealer. Enter the four-digit security code, then
select
Done. If you have entered it
correctly, the display changes to the
Disclaimer screen. If you make a
mistake, the system will display
“incorrect PIN.” Re-enter your 4-digit
security code. You have ten chances to
enter the correct code. If all ten are
incorrect, turn the i gnition to OFF, then
back to ON (II) to have ten more
chances to enter the correct code.
Follow the instructio ns in the vehicle
Owner’s manual to enter the 5-digit
audio code. The navigation voice will
not operate if the audio code is not
entered.
NOTE:
The anti-theft security code is unrelated
to your optional Navigation system PIN
(for Personal or Home Address).
2008 TL
Page 105 of 152
Navigation System105
The destination icon shows the
approximate location of the destination.
This occurs because a city block can
have as many as 100 possible addresses
(for example, the 1400 block is followed
by the 1500 block.) Since most cities
use only a portion of the 100 possible
addresses (for example, in the 1400
block, the addresses may only go up to
1425 before the 1500 block starts), the
address 1425 will be shown a quarter of
the way down the block by the system
instead of at the end of the block where
the destination is actually located.
You may find that the system
occasionally “reboots.” This is indicated
by the display returning to the globe
screen. A reboot can be caused by a
number of things, such as extreme
temperatures or shock from bumpy
roads. It does not necessarily indicate a
problem that requires service. If this
happens frequently, please see your
dealer.
System Limitations
2008 TL
Page 123 of 152
Navigation System123
Coverage Areas
Map Coverage
All roads displayed on the Hawaii map
screens are detailed coverage roads.
Text related to “unverified” roads or
areas are not applicable. The following
topics do not apply in Hawaii:
Unverified road descriptions (see page
6 , 88)
Cautions and pop-up windows related to unverified roads (see page
65)
Setup entries that relate to turning on or off unverified routing (see
page
89)
When zooming in and out, there is no 350 mile scale for Hawaii
Other Map Issues
See the coverage section for a list of islands with coverage (see page
111)
The map scale “traffic” indicator, shown beneath the map scale bar,
may show at vehicle start, but
disappear later. This is normal. Freeway Exit information does not
exist in Hawaii, so if the “Freeway
Exit Info” icon is shown on the icon
bar, the button may be selected, but
there is no data for Hawaii.
Address and POI Entry Screens
When in Hawaii, the following
differences occur for map, address, and
POI selection:
It is not possible to enter US mainland addresses or scroll the map
east to the US mainland.
Selection of the “State” is confined to the state of Hawaii only
Entry of a destination address or POI on an island other than your current
island may result in a screen caution
message. This is normal because
there are no “ferry” routes between
islands available in the database.
If the “Guidance Prompts” setting on the main Setup screen is set to
normal or maximum, street names
will not be spoken in voice guidance
commands.
Setup Screen Differences
The Setup screen differences are minor,
and are listed below. See the Setup
section (page
78) for additional
information.
Routing and Guidance (Unverified
Area Routing On/Off)
This feature is unavailable. All roads
displayed on the map are verified.
Clock Adjust Screen
There is no Daylight Savings Time for
Hawaii. In the Setup Clock
adjustment screen, ensure that the
Auto Daylight Saving Time setting
is Off . To test your adjustment, use the
voice control system, and say, “What
time is it?” (see page
98) .
2008 TL