audio Acura TL 2012 Advanced Technology Guide
[x] Cancel search | Manufacturer: ACURA, Model Year: 2012, Model line: TL, Model: Acura TL 2012Pages: 20, PDF Size: 11.76 MB
Page 2 of 20
A D V A N C E D T E C H N O L O G Y G U I D E
The Advanced Technology Guide is designed to help you get
acquainted with your new Acura and provide basic instructions
on technology and convenience features.
This guide is not intended as a substitute for the Owner’s
Manual. For complete information on vehicle controls and
operation\b please refer to the respective sections in the
Owner’s Manual.
As with the Owner’s Manual\b this guide covers all trim levels of
the Acura TL. Therefore\b you may find descriptions of
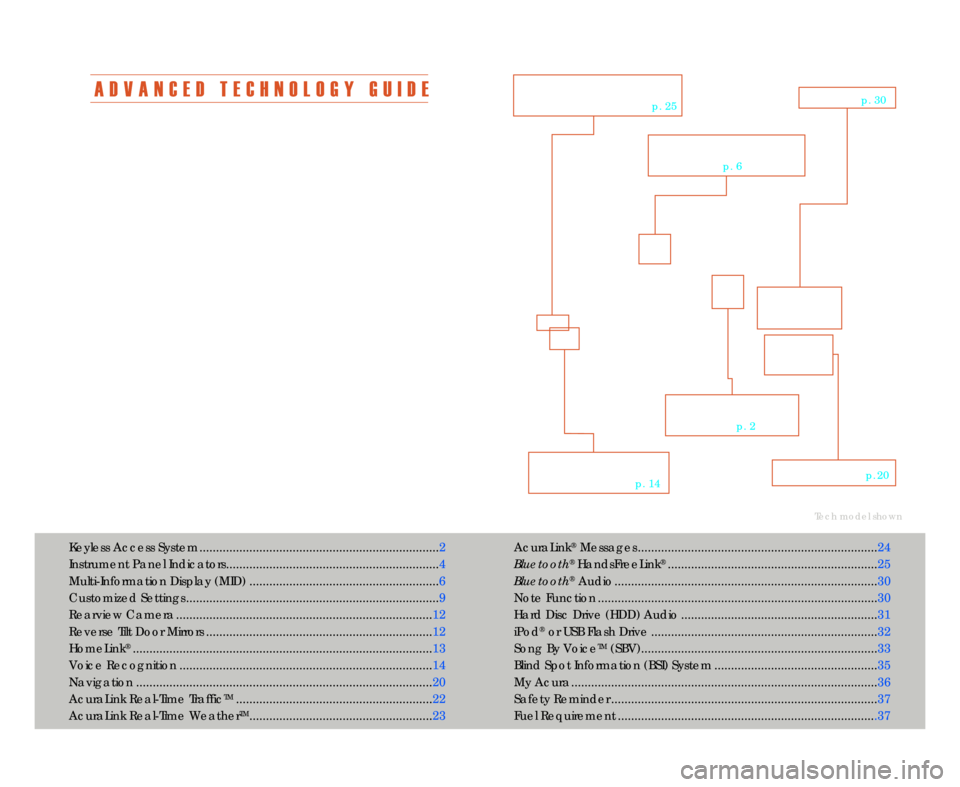
equipment and features that are not on your particular vehicle.AcuraLink
®Messages ........................................................................24
Bluetooth
®HandsFreeLink®............................................................... 25
Bluetooth
®Audio ............................................................................... 3\f
Note Function ....................................\1....................................\1............ 3\f
Hard Disc Drive (HDD) Audio ........................................................... 31
iPod
®or USB Flash Drive .................................................................... 32
Song By Voice
TM(SBV).....................................................\1.................. 33
Blind Spot Information (BSI) System ................................................. 35
My Acura............................................................................................ 36
Safety Reminder ....................................\1............................................ 37
Fuel Requirement ..............................................................................37
Tech model shown
Keyless Access System ........................................................................ 2
Instrument Panel Indicators................................................................ 4
Multi�Information Display (MID) .........................................................6
Customized Settings ............................................................................ 9
Rearview Camera ............................................................................. 12
Reverse Tilt Door Mirrors .................................................................... 12
HomeLink
®.......................................................................................... 13
Voice Recognition ............................................................................ 14
Navigation ......................................................................................... 2\f
AcuraLink Real�Time Traffic
TM........................................................... 22
AcuraLink Real�Time Weather
TM....................................................... 23
V O I C E
R E C O G N I T I O N
p. 14
K E Y L E S S A C C E S S
S Y S T E M
p. 2
N A V I G A T I O Np. 2\f
B L \f E T O O T H®
H A N D S F R E E L I N K ®
p. 25
M U L T I � I N F O R M A T I O N
D I S P L A Y
p. 6
A U D I Op. 3\f
12 TL ATG\fATG_NEW STYLE 1/27/2011 1\f30 PM Page 2
Page 3 of 20
23
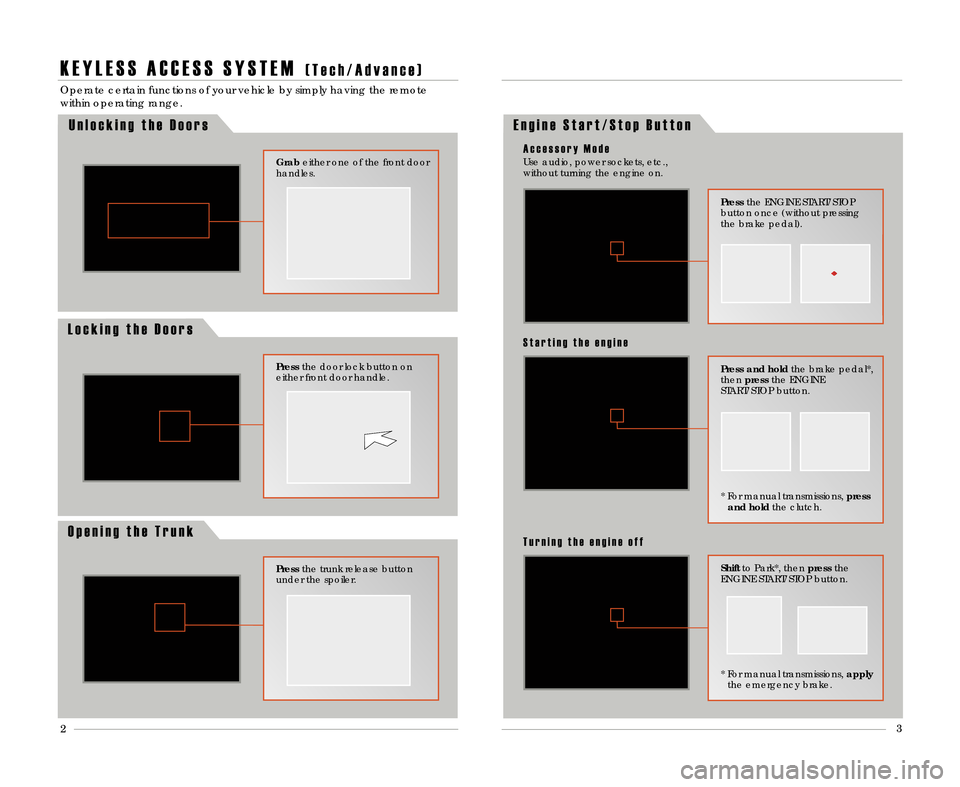
K E Y L E S S A C C E S S S Y S T E M( T e c h \b A d v a n c e )
Operate certain functions of your vehicle by simply having the remote
within operating range.
Press
the door lock button on
either front door handle.
Grab either one of the front door
handles.
O p e n i n g t h e T r u n k
Press the trunk release button
under the spoiler.
E n g i n e S t a r t \b S t o p B u t t o n
Press and hold the brake pedal*\b
then press the ENGINE
START/STOP button.
* For manual transmissions\b press
and hold the clutch.
S t a r t i n g t h e e n g i n e
Shiftto Park*\b then pressthe
ENGINE START/STOP button.
T u r n i n g t h e e n g i n e o f f
Press the ENGINE START/STOP
button once (without pressing
the brake pedal).
Use audio\b power sockets\b etc.\b
without turning the engine on.
A c c e s s o r y M o d e
* For manual transmissions\b
apply
the emergency brake.
L o c k i n g t h e D o o r s U n l o c k i n g t h e D o o r s
12 TL ATG\fATG_NEW STYLE 1/27/2011 1\f30 PM Page 3
Page 4 of 20
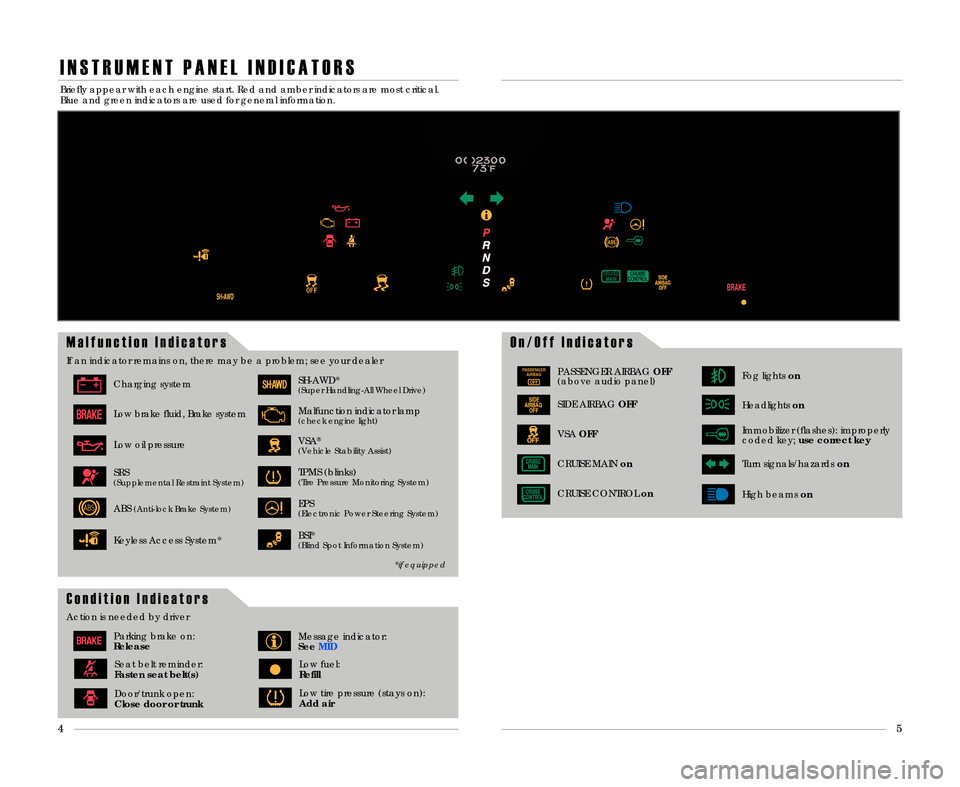
I N S T R U M E N T P A N E L I N D I C A T O R S
O n \b O f f I n d i c a t o r sM a l f u n c t i o n I n d i c a t o r s
If an indicator remains on\b there may be a problem; see your dealer
Charging system
Low brake fluid\b Brake system
Low oil pressure
SH�AWD*(Super Handling�All Wheel Drive)
VSA®
(Vehicle Stability Assist)
Malfunction indicator lamp(check engine light)
TPMS (blinks)(Tire Pressure Monitoring System)SRS(Supplemental Restraint System)
ABS(Anti�lock Brake System)EPS(Electronic Power Steering System)
PASSENGERAIRBAG
OFFPASSENGER AIRBAG OFF
(above audio panel)
SIDE AIRBAG OFF
VSAOFF
Fog lights on
Immobilizer (flashes): improperly
coded key; use correct key
Headlightson
Turn signals/hazards on
CRUISE CONTROLon
CRUISE MAINon
High beamson
Briefly appear with each engine start. Red and amber indicators are most critical.
Blue and green indicators are used for general information.
*if equipped
5
4
C o n d i t i o n I n d i c a t o r s
Action is needed by driver
Parking brake on:
ReleaseMessage indicator:
See MID
Door/trunk open:
\flose door or trunkLow tire pressure (stays on):
Add air
Seat belt reminder:
Fasten seat belt(s)Low fuel:
Refill
BSI*(Blind Spot Information System)Keyless Access System*
12 TL ATG\fATG_NEW STYLE 1/27/2011 1\f31 PM Page 4
Page 6 of 20
8
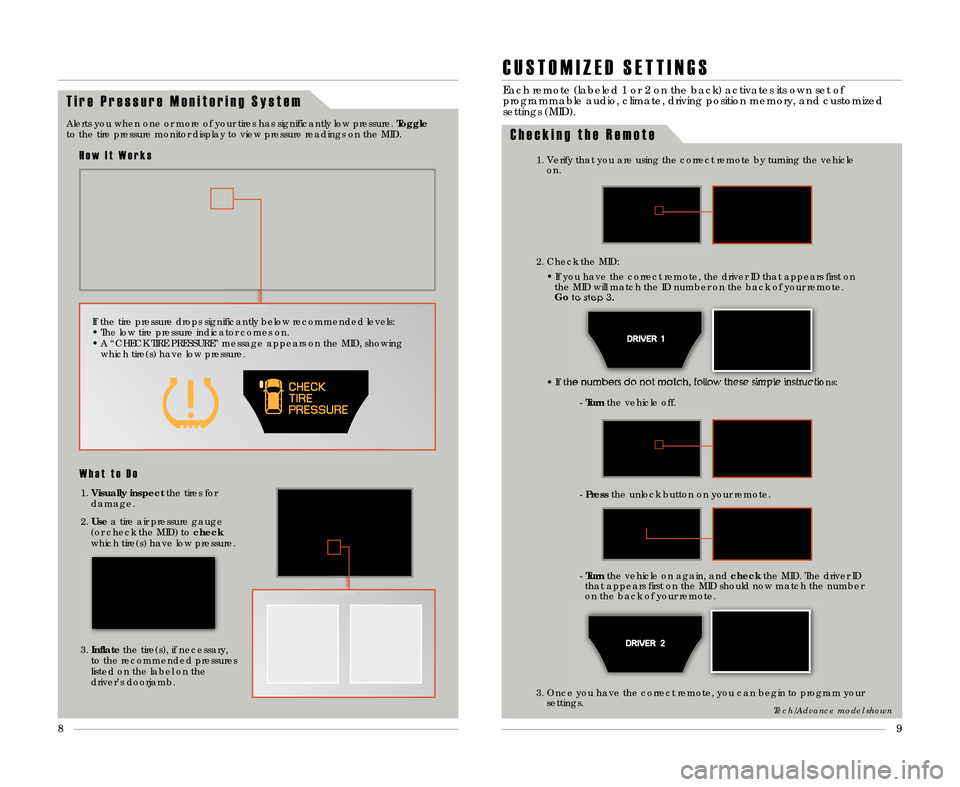
T i r e P r e s s u r e M o n i t o r i n g S y s t e m
Alerts you when one or more of your tires has significantly low pressure.Toggle
to the tire pressure monitor display to view pressure readings on the MID.
H o w I t W o r k s
W h a t t o D o
1. Visually inspect the tires for
damage.
2. Use a tire air pressure gauge
(or check the MID) to check
which tire(s) have low pressure.
3. Inflate the tire(s)\b if necessary\b
to the recommended pressures
listed on the label on the
driver’s doorjamb.
9
If the tire pressure drops significantly below recommended levels:
• The low tire pressure indicator comes on.
• A “CHECK TIRE PRESSURE” message appears on the MID\b showing which tire(s) have low pressure.
2. Check the MID:
• If you have the correct remote\b the driver ID that appears first onthe MID will match the ID number on the back of your remote.
Go to step 3.
• If the numbers do not match\b follow these simple instructions:
�Turn the vehicle off.
� Press the unlock button on your remote.
� Turn the vehicle on again\b and checkthe MID. The driver ID
that appears first on the MID should now match the number
on the back of your remote.
C U S T O M I Z E D S E T T I N G S
Each remote (labeled 1 or 2 on the back) activates its own set of
programmable audio\b climate\b driving position memory\b and customized
settings (MID).
1. Verify that you are using the correct remote by turning the vehicle on.
C h e c k i n g t h e R e m o t e
3. Once you have the correct remote\b you can begin to program yoursettings.
Tech/Advance model shown
12 TL ATG\fATG_NEW STYLE 1/27/2011 1\f31 PM Page \b
Page 7 of 20
9
1\f
11
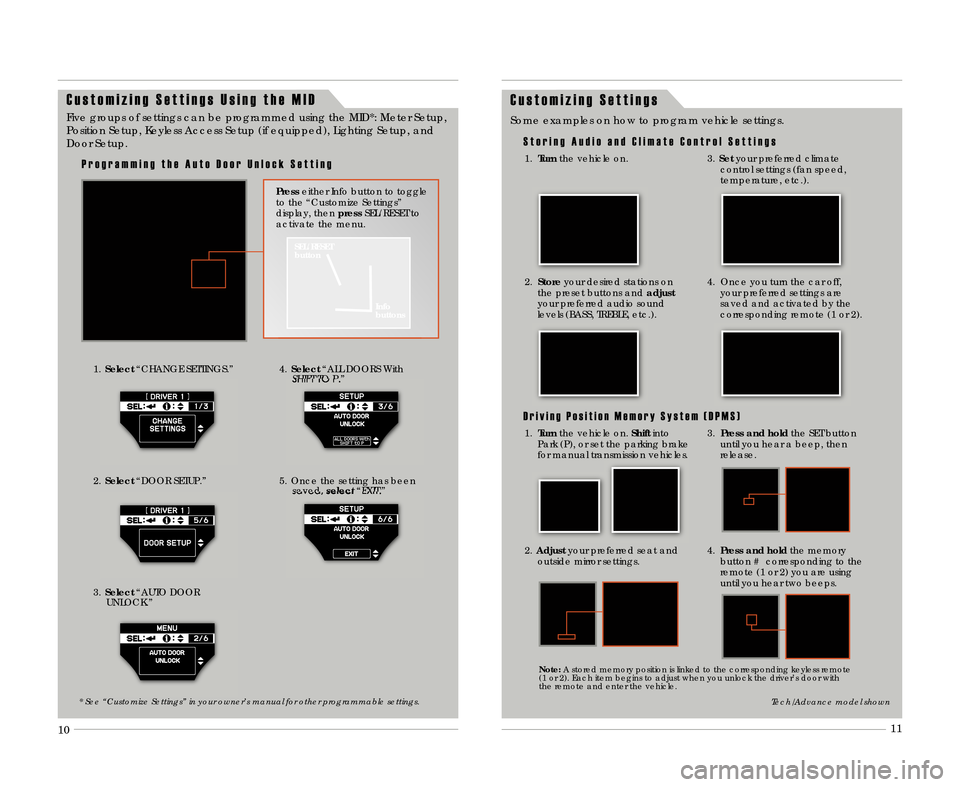
C u s t o m i z i n g S e t t i n g s
S t o r i n g A u d i o a n d C l i m a t e C o n t r o l S e t t i n g s
Some examples on how to program vehicle settings.
1.
Turn the vehicle on.
2.Store your desired stations on
the preset buttons and adjust
your preferred audio sound
levels (BASS\b TREBLE\b etc.).
3. Set your preferred climate
control settings (fan speed\b
temperature\b etc.).
4. Once you turn the car off\b your preferred settings are
saved and activated by the
corresponding remote (1 or 2).
D r i v i n g P o s i t i o n M e m o r y S y s t e m ( D P M S )
3. Press and hold the SET button
until you hear a beep\b then
release.
2. Adjust your preferred seat and
outside mirror settings.
4. Press and hold the memory
button # corresponding to the
remote (1 or 2) you are using
until you hear two beeps.
Tech/Advance model shown
Note: A stored memory position is linked to the corresponding keyless remote
(1 or 2). Each item begins to adjust when you unlock the driver’s door with
the remote and enter the vehicle.
C u s t o m i z i n g S e t t i n g s U s i n g t h e M I D
1. Select “CHANGE SETTINGS.”
3. Select “AUTO DOOR
UNLOCK.”4. Select “ALL DOORS With
SHIFT TO P.”
5. Once the setting has been saved\b select“EXIT.”
Five groups of settings can be programmed using the MID*: Meter Setup\b
Position Setup\b Keyless Access Setup (if equipped)\b Lighting Setup\b and
Door Setup.
SEL/RESET
button
Info
buttons
Presseither Info button to toggle
to the “Customize Settings”
display\b then pressSEL/RESET to
activate the menu.
P r o g r a m m i n g t h e A u t o D o o r U n l o c k S e t t i n g
* See “Customize Settings” in your owner’s manual for other programmable settings\b
2. Select “DOOR SETUP.”
1.Turn the vehicle on. Shiftinto
Park (P)\b or set the parking brake
for manual transmission vehicles\b
12 TL ATG\fATG_NEW STYLE 1/27/2011 1\f32 PM Page 7
Page 9 of 20
B L U E T O O T H® H A N D S F R E E L I N K ®p. 25
A C U R A L I N K *p. 24
A U D I O *p. 19
C L I M A T E *p. 19
N A V I G A T I O N *p. 2\f
* voice commands available on Tech/Advance model only
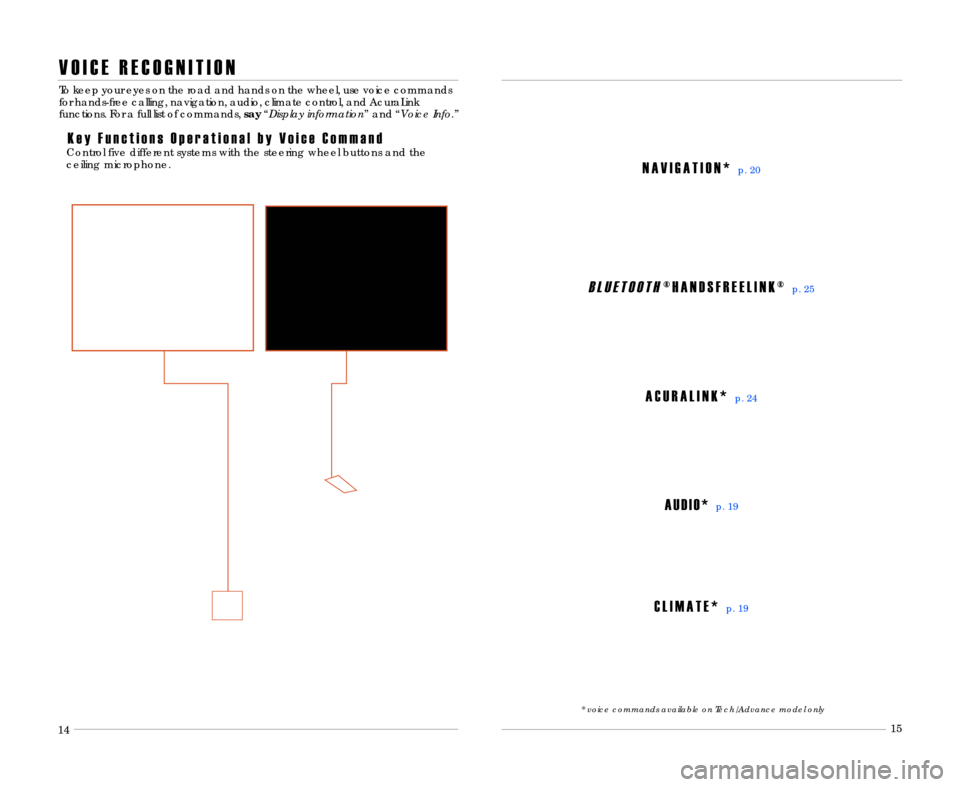
V O I C E R E C O G N I T I O N
K e y F u n c t i o n s O p e r a t i o n a l b y V o i c e C o m m a n d
To keep your eyes on the road and hands on the wheel\b use voice commands
for hands�free calling\b navigation\b audio\b climate control\b and AcuraLink
functions. For a full list of commands\bsay“Display information ” and “Voice Info\b ”
Control five different systems with the steering wheel buttons and the
ceiling microphone.
14 15
12 13
12 TL ATG\fATG_NEW STYLE 1/27/2011 1\f32 PM Page 9
Page 10 of 20
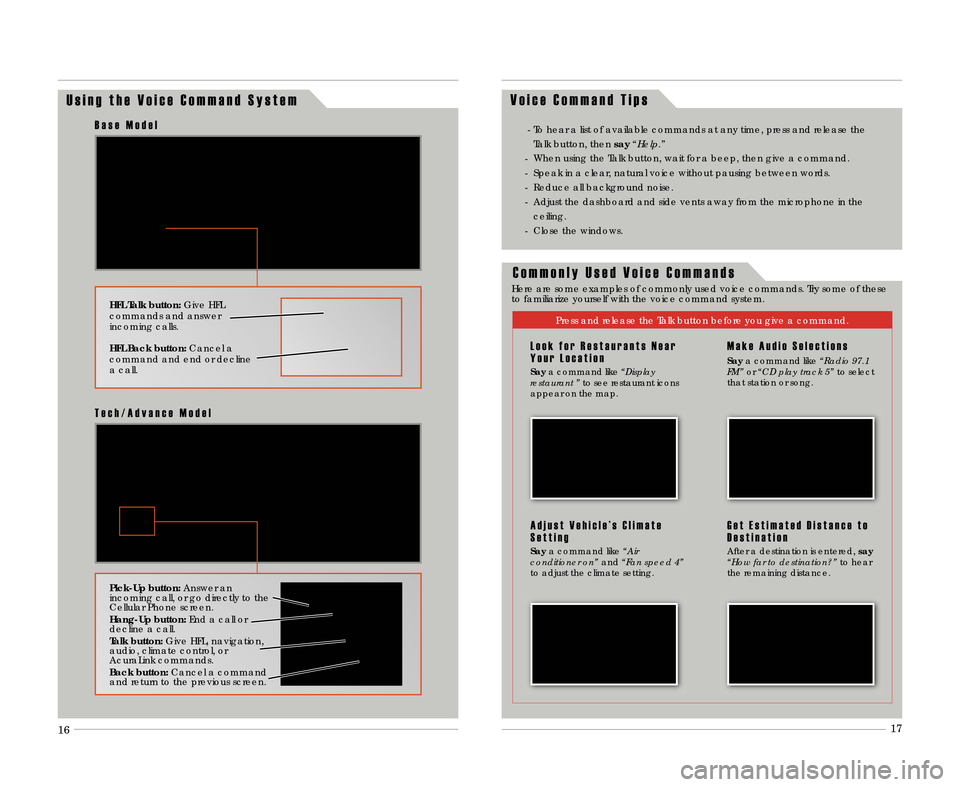
U s i n g t h e V o i c e C o m m a n d S y s t e mV o i c e C o m m a n d T i p s
HFL Talk button:
Give HFL
commands and answer
incoming calls.
HFL Back button: Cancel a
command and end or decline
a call.
B a s e M o d e l
Pick�Up button: Answer an
incoming call\b or go directly to the
Cellular Phone screen.
Hang�Up button: End a call or
decline a call.
Talk button: Give HFL\b navigation\b
audio\b climate control\b or
AcuraLink commands.
Back button: Cancel a command
and return to the previous screen.
T e c h \b A d v a n c e M o d e l
� To hear a list of available commands at any time\b press and release the
Talk button\b then say“Help\b”
� When using the Talk button\b wait for a beep\b then give a command.
� Speak in a clear\b natural voice without pausing between words.
� Reduce all background noise.
� Adjust the dashboard and side vents away from the microphone in the ceiling.
� Close the windows.
C o m m o n l y U s e d V o i c e C o m m a n d s
Here are some examples of commonly used voice commands. Try some of these
to familiarize yourself with the voice command system.
Press and release the Talk button before you give a command.
L o o k f o r R e s t a u r a n t s N e a r
Y o u r L o c a t i o n
Say a command like “Display
restaurant ” to see restaurant icons
appear on the map.
A d j u s t V e h i c l e ’ s C l i m a t e
S e t t i n g
Say a command like “Air
conditioner on” and“Fan speed 4”
to adjust the climate setting.
M a k e A u d i o S e l e c t i o n s
Say a command like “Radio 97\b1
FM” or“CD play track 5” to select
that station or song.
G e t E s t i m a t e d D i s t a n c e t o
D e s t i n a t i o n
After a destination is entered\b say
“How far to destination?” to hear
the remaining distance.
16 17
12 TL ATG\fATG_NEW STYLE 1/27/2011 1\f33 PM Page 10
Page 11 of 20
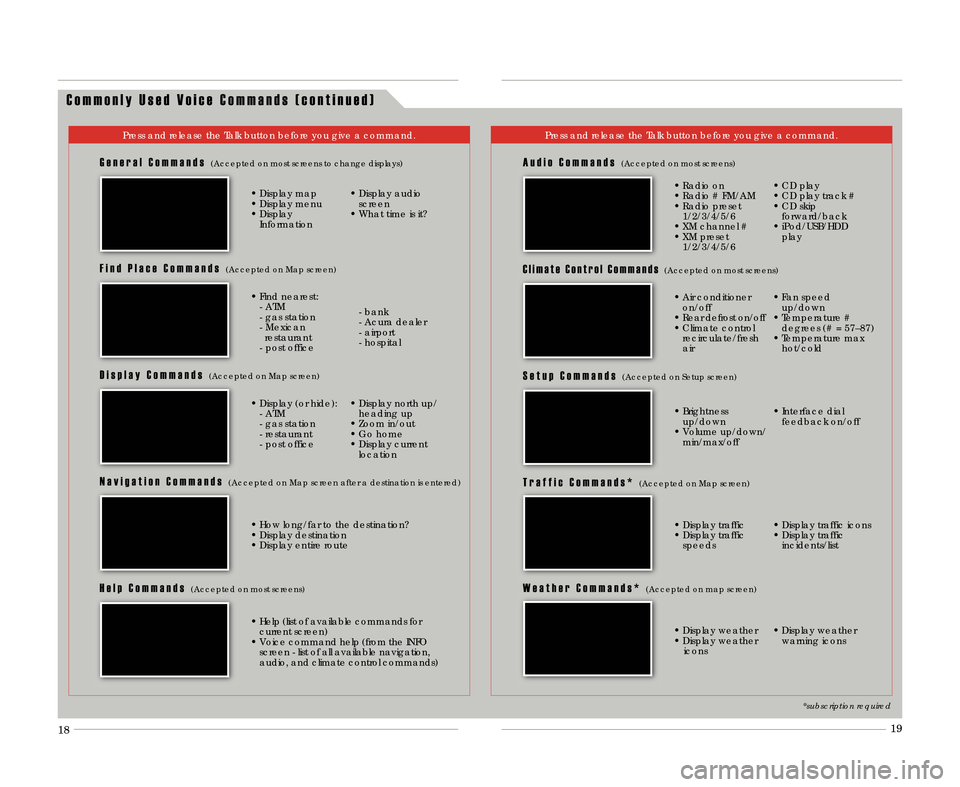
C o m m o n l y U s e d V o i c e C o m m a n d s ( c o n t i n u e d )
Press and release the Talk button before you give a command.Press and release the Talk button before you give a command.
G e n e r a l C o m m a n d s(Accepted on most screens to change displays)
• Display map
• Display menu
• DisplayInformation • Display audio
screen
• What time is it?
F i n d P l a c e C o m m a n d s(Accepted on Map screen)
• Find nearest: � ATM
� gas station
� Mexicanrestaurant
� post office � bank
� Acura dealer
� airport
� hospital
D i s p l a y C o m m a n d s(Accepted on Map screen)
• Display (or hide):
� ATM
� gas station
� restaurant
� post office • Display north up/
heading up
• Zoom in/out
• Go home
• Display current location
N a v i g a t i o n C o m m a n d s(Accepted on Map screen after a destination is entered)
A u d i o C o m m a n d s(Accepted on most screens)
• Radio on
• Radio # FM/AM
• Radio preset1/2/3/4/5/6
• XM channel #
• XM preset 1/2/3/4/5/6 • CD play
• CD play track #
• CD skip
forward/back
• iPod/USB/HDD play
S e t u p C o m m a n d s(Accepted on Setup screen)
W e a t h e r C o m m a n d s *(Accepted on map screen)
• Brightnessup/down
• Volume up/down/ min/max/off • Interface dial
feedback on/off
• Display weather
• Display weather icons • Display weather
warning icons
H e l p C o m m a n d s(Accepted on most screens)
• Help (list of available commands forcurrent screen)
• Voice command help (from the INFO screen � list of all available navigation\b
audio\b and climate control commands)
C l i m a t e C o n t r o l C o m m a n d s(Accepted on most screens)
T r a f f i c C o m m a n d s *(Accepted on Map screen)
• Display traffic
• Display trafficspeeds • Display traffic icons
• Display traffic
incidents/list
*subscription required
• How long/far to the destination?
• Display destination
• Display entire route • Air conditioner
on/off
• Rear defrost on/off
• Climate control recirculate/fresh
air • Fan speed
up/down
• Temperature # degrees (# = 57–87)
• Temperature max hot/cold
18 19
12 TL ATG\fATG_NEW STYLE 1/27/2011 1\f33 PM Page 11
Page 14 of 20
22
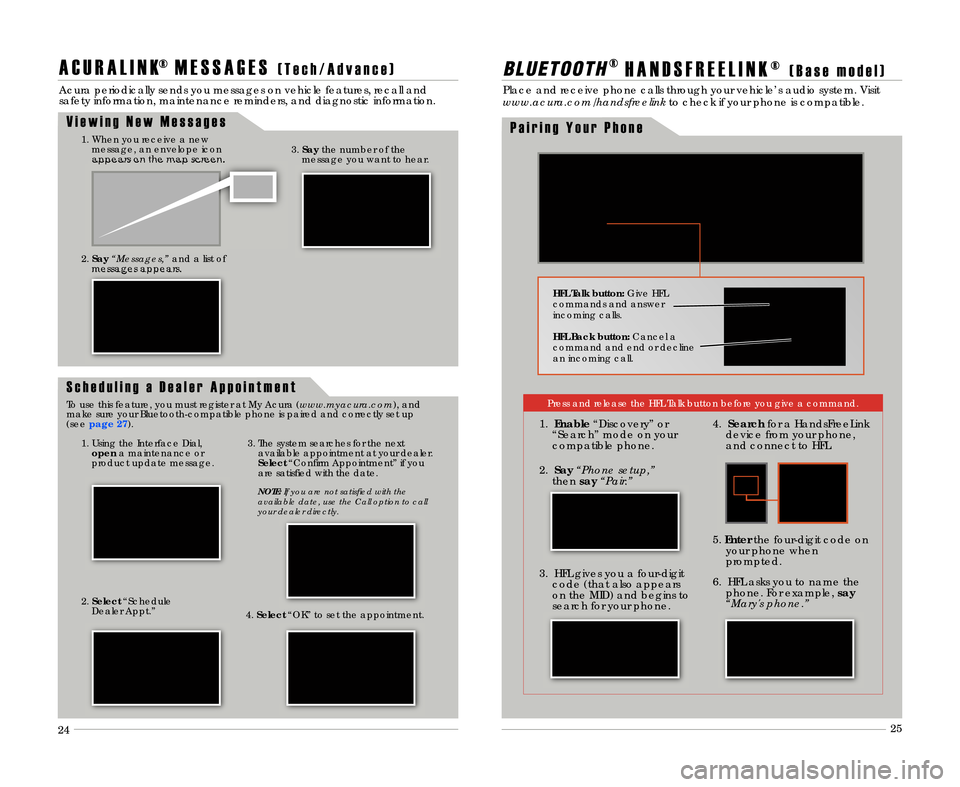
A C U R A L I N K® M E S S A G E S( T e c h \b A d v a n c e )
Acura periodically sends you messages on vehicle features\b recall and
safety information\b maintenance reminders\b and diagnostic information.23
B L \f E T O O T H®H A N D S F R E E L I N K ®( B a s e m o d e l )
Place and receive phone calls through your vehicle’s audio system. Visit
www\bacura\bcom/handsfreelink to check if your phone is compatible.
HFL Talk button:Give HFL
commands and answer
incoming calls.
HFL Back button: Cancel a
command and end or decline
an incoming call.
P a i r i n g Y o u r P h o n e
V i e w i n g N e w M e s s a g e s1. When you receive a new
message\b an envelope icon
appears on the map screen.
2. Say “Messages,” and a list of
messages appears.
1. Using the Interface Dial\b open a maintenance or
product update message. 3. The system searches for the next
available appointment at your dealer.
Select “Confirm Appointment” if you
are satisfied with the date.
NOTE: If you are not satisfied with the
available date, use the Call option to call
your dealer directly\b
2. Select “Schedule
Dealer Appt.” 4.Select “OK” to set the appointment.3.
Say the number of the
message you want to hear.
S c h e d u l i n g a D e a l e r A p p o i n t m e n t
To use this feature\b you must register at My Acura (www\bmyacura\bcom)\b and
make sure your Bluetooth�compatible phone is paired and correctly set up
(see page 2\b).
24 25
Press and release the HFL Talk button before you give a command.
1.
Enable “Discovery” or
“Search” mode on your
compatible phone.
3. HFL gives you a four�digit code (that also appears
on the MID) and begins to
search for your phone. 6. HFL asks you to name the
phone. For example\b say
“Mary's phone\b”
5.
Enter the four�digit code on
your phone when
prompted.
2. Say “Phone setup,”
then say“Pair\b” 4.
Search for a HandsFreeLink
device from your phone\b
and connect to HFL.
12 TL ATG\fATG_NEW STYLE 1/27/2011 1\f34 PM Page 14
Page 15 of 20
24
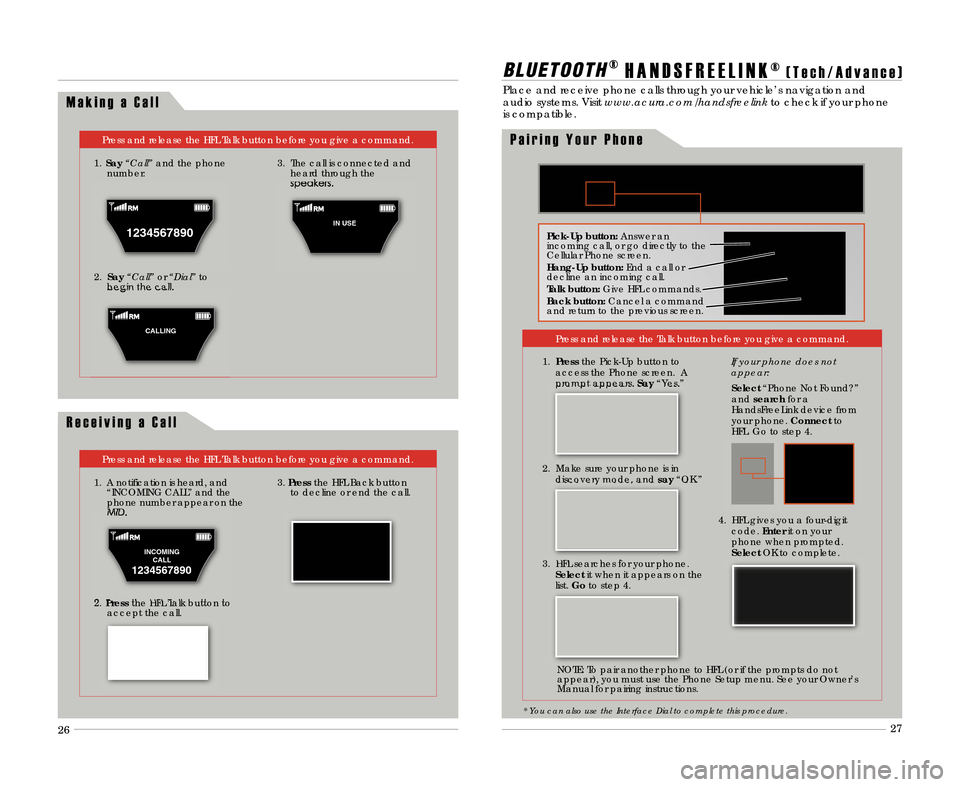
M a k i n g a C a l l
Press and release the HFL Talk button before you give a command.
1. Say “Call” and the phone
number\b
2. Say “Call” or“Dial” to
begin the call. 3. The call is connected and
heard through the
speakers.
R e c e i v i n g a C a l l
Press and release the HFL Talk button before you give a command.
1. A notification is heard\b and “INCOMING CALL” and the
phone number appear on the
MID.
2. Press the HFL Talk button to
accept the call.
3. Press the HFL Back button
to decline or end the call.
B L \f E T O O T H® H A N D S F R E E L I N K ®( T e c h \b A d v a n c e )
Place and receive phone calls through your vehicle’s navigation and
audio systems. Visit www\bacura\bcom/handsfreelink to check if your phone
is compatible.
Press and release the Talk button before you give a command.
* You can also use the Interface Dial to complete this procedure\b
25
1. Press the Pick�Up button to
access the Phone screen. A
prompt appears. Say“Yes.”
Pick�Up button: Answer an
incoming call\b or go directly to the
Cellular Phone screen.
Hang�Up button: End a call or
decline an incoming call.
Talk button: Give HFL commands.
Back button: Cancel a command
and return to the previous screen.
P a i r i n g Y o u r P h o n e
1234567890
1
IN USE
C
CALLING
INCOMING CALL
1234567890
26 27
2. Make sure your phone is in
discovery mode\b and say“OK.”
3. HFL searches for your phone. Select it when it appears on the
list. Go to step 4. If your phone does not
appear:
Select
“Phone Not Found?”
and search for a
HandsFreeLink device from
your phone. \fonnectto
HFL. Go to step 4.
4. HFL gives you a four�digit code. Enterit on your
phone when prompted.
Select OK to complete.
NOTE: To pair another phone to HFL (or if the prompts do not
appear)\b you must use the Phone Setup menu. See your Owner’s
Manual for pairing instructions.
12 TL ATG\fATG_NEW STYLE 1/27/2011 1\f34 PM Page 15