buttons Acura TL 2013 Navigation Manual
[x] Cancel search | Manufacturer: ACURA, Model Year: 2013, Model line: TL, Model: Acura TL 2013Pages: 183, PDF Size: 5.19 MB
Page 13 of 183
Getting Started
Navigation System13
Voice Control Basics
Your vehicle has a voice control system
that allows hands-free operation of most
of the navigation system functions. You
can also control the audio system and
the climate control system. The voice
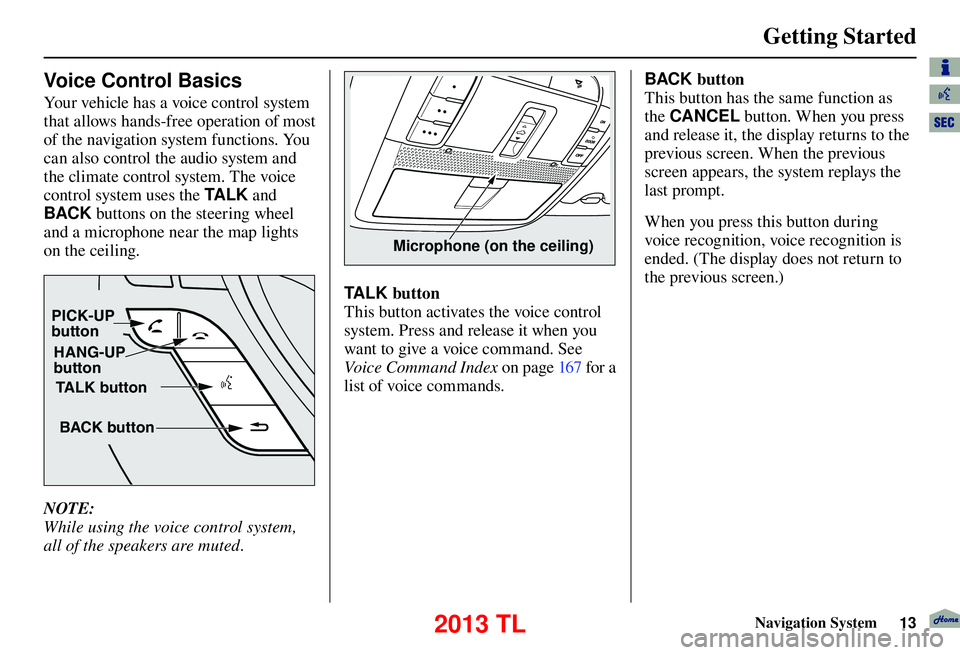
control system uses the TA L K and
BACK buttons on the steering wheel
and a microphone near the map lights
on the ceiling.
TALK button
BACK button
PICK-UP
button
HANG-UP
button
NOTE:
While using the voice control system,
all of the speakers are muted.
Microphone (on the ceiling)
TALK button
This button activates the voice control
system. Press and release it when you
want to give a voice command. See
Voice Command Index on page 167 for a
list of voice commands. BACK button
This button has the same function as
the
CANCEL button. When you press
and release it, the display returns to the
previous screen. When the previous
screen appears, the system replays the
last prompt.
When you press this button during
voice recognition, voice recognition is
ended. (The display does not return to
the previous screen.)
2013 TL
Page 15 of 183
Getting Started
Navigation System15
• The fan speed automatically lowers
when the TA L K button is pressed.
Adjust the airfl ow from both the
dashboard and side vents so air does
not blow against the microphone on
the ceiling.
• If more than one person is speaking at the same time, the system may
misinterpret your command.
• After pressing and releasing the TA L K button, wait for the beep, then
give a voice command.
• Give a voice command in a clear, natural speaking voice without
pausing between words.
• Try to reduce any background noise.
• If you are still having trouble with the voice control system, refer to Voic e
Info on the INFO screen (Main
Info ).
NOTE:
The voice control system can only be
used from the driver’s position. The
microphone does not recognize voice
commands from anywhere else in the
vehicle.Selecting an Item (Button)
on the Screen
On most screens, there are items that
can be selected (like buttons with titles
such as OK or Return ). To select
an item on any screen, do one of the
following:
• Use the voice control system and say the name of the desired item.
Almost all selectable items on the
screen, including some listed items,
are recognized by the voice control
system.
• Move the highlighting to the desired item with the Interface Dial or its
knob , then push in on the Interface
Dial .
Tip:
If items are grayed out, this means that
they cannot be selected.
Selecting an Item in a List
To scroll through a list, do one of the
following:
• Rotate the Interface Dial knob to
scroll one item at a time.
• Use the voice control system to scroll page by page. For example, to scroll
up, say “Up” or “Previous.” To scroll
down, say “Next” or “Down.”
If you cannot fi nd the desired name,
or have made an error, return to
the previous screen by pressing the
CANCEL or the BACK button.
To select the desired item in the list, do
one of the following:
• Use the voice control system, and say the item number of the desired item.
• Rotate the Interface Dial knob to
move the highlighting to the item,
then push in on the Interface Dial .
2013 TL
Page 127 of 183
System Setup
Navigation System127
Rearview Camera
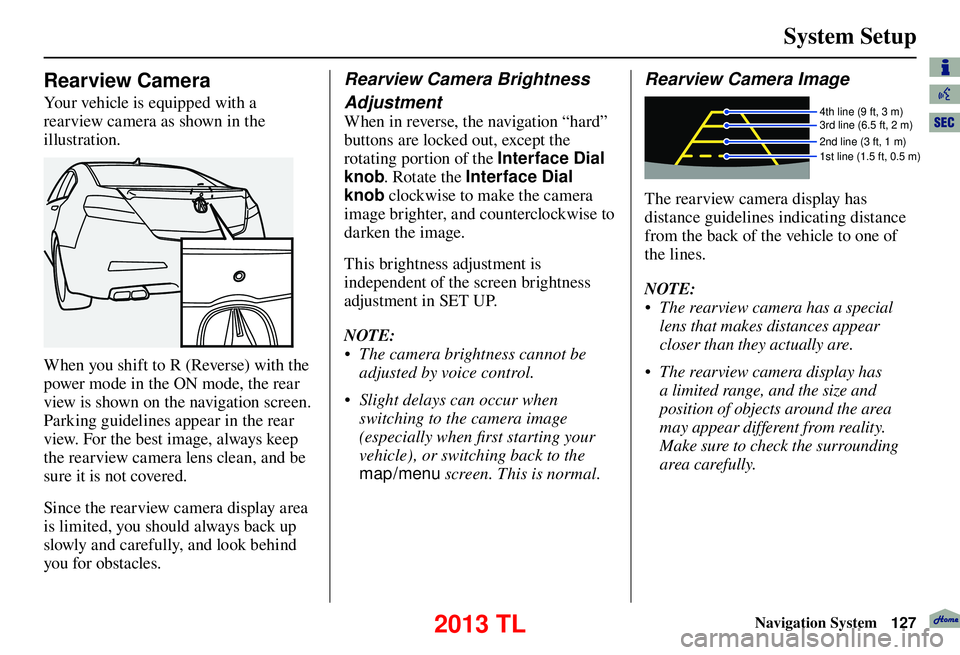
Your vehicle is equipped with a
rearview camera as shown in the
illustration.
When you shift to R (Reverse) with the
power mode in the ON mode, the rear
view is shown on the navigation screen.
Parking guidelines appear in the rear
view. For the best image, always keep
the rearview camera lens clean, and be
sure it is not covered.
Since the rearview camera display area
is limited, you should always back up
slowly and carefully, and look behind
you for obstacles.
Rearview Camera Brightness
Adjustment
When in reverse, the navigation “hard”
buttons are locked out, except the
rotating portion of the Interface Dial
knob. Rotate the Interface Dial
knob clockwise to make the camera
image brighter, and counterclockwise to
darken the image.
This brightness adjustment is
independent of the screen brightness
adjustment in SET UP.
NOTE:
• The camera brightness cannot be adjusted by voice control.
• Slight delays can occur when switching to the camera image
(especially when fi rst starting your
vehicle), or switching back to the
map/menu screen. This is normal.
Rearview Camera Image
4th line (9 ft, 3 m)
3rd line (6.5 ft, 2 m)
2nd line (3 ft, 1 m)
1st line (1.5 ft, 0.5 m)
The rearview camera display has
distance guidelines indicating distance
from the back of the vehicle to one of
the lines.
NOTE:
• The rearview camera has a special
lens that makes distances appear
closer than they actually are.
• The rearview camera display has a limited range, and the size and
position of objects around the area
may appear different from reality.
Make sure to check the surrounding
area carefully.
2013 TL
Page 128 of 183
System Initialization
128 Navigation System
System Initialization
If for any reason you lose power
to the vehicle (e.g., the battery is
disconnected), the navigation and audio
system will require initialization. Once
completed, your system will be ready
to use.
This initialization requires the
following:
• Entry of the 5-digit anti-theft security
code to “unlock” the navigation and
audio system.
• GPS initialization (may not be needed depending on the length of
time the system was without power).
(See GPS Initialization o n p a g e 1 2 9 . )
• Map matching to align the GPS coordinates to a place on the map
(displays current street at the bottom
of the map). (See Map Matching on
page 129 .)
Entering the Security Code
When you purchased the vehicle,
you should have received one card
containing a 5-digit anti-theft code
used to activate both the navigation and
audio system.
Enter the 5-digit security code in
accordance with the instructions in your
owner’s manual. If you do not enter the
security code, navigation, audio, and
voice recognition will not function.
If you lose the card or do not have
access to it, you can retrieve it using
one of the following methods:
1) G o t o www.myacura.com , if you
previously set up your account in
accordance with the vehicle owner’s
manual.
2) C all Acu ra C lient Relations at (800) 382-2238.
3) Visit your dealer.
You will need your radio serial number
and vehicle VIN to retrieve the anti-
theft code. To retrieve the radio serial number,
press and hold the audio preset 1 and 6
buttons. Continue to hold the buttons,
then turn on the radio. Record the serial
number shown on the radio display.
NOTE:
The anti-theft security code is
unrelated to your optional navigation
system PIN (for Address Book or
Home Address).
2013 TL
Page 166 of 183
Glossary
166 Navigation System
USB - Universal Serial Bus. A
computer hardware interface used to
store and play audio fi les from USB
devices, such as thumb drives or
iPods. Image fi les can also be stored
to USB devices and uploaded to the
HDD. See the Audio section in your
owner’s manual for more information.
Vehicle Speed Sensor - Provides speed
signal to the navigation system for
moving the VP icon on the map.
Ve r i fi ed Streets - These streets consist
of the detailed metropolitan coverage
areas and all other inter-town
connection roads. These roads are
shown in black, red, or pink on the
map.
Voice Control - See VR. VP
- Vehicle Position. When in map
mode, this circular icon shows the
vehicle position on the map. Push in
on the Interface Dial , select Map
Informaton on the Map menu ,
and then rotate the Interface Dial
Knob to select the CURRENT
LOCATION . It shows the latitude,
longitude, and elevation of your
current position.
VR - Voice Recognition. This allows
voice control of many of the
navigation functions. The hardware
consists of the microphone, voice
control switch ( TA L K/BACK
buttons), and the front speakers.
Way p o i nt - A temporary destination
you may enter while en route (e.g., a
gas station, ATM, etc.). See page 77 . Yaw Rate Sensor - Senses when the
vehicle makes a turn, which makes
the VP change direction on the map
as you turn.
Zagat Ratings - Restaurant ratings
information provided by Zagat
Survey. See the INFO screen on page
83 for an explanation of the ratings.
2013 TL
Page 171 of 183
Voice Command Index
Navigation System171
Fan speed up
Fan speed down
Fan speed # (#:1-7) (for best voice
control, lower the fan speed)
Driver temperature # degrees
(#: 57 - 87 degrees F)
Passenger temperature # degrees (#: 57 - 87 degrees F)
Driver temperature up
Driver temperature down
Passenger temperature up
Passenger temperature down
Driver temperature max hot
Driver temperature max cold
Passenger temperature max hot
Passenger temperature max cold
Radio Voice Commands
The system accepts these commands on
most screens.
Audio on *
Audio off *
Audio
Radio on *
Radio off *
Radio
Radio select FM1
Radio select FM2
Radio select AM
Radio tune to # FM (#: frequency. Example Radio 95.5 FM)
Radio tune to # AM (#: frequency. Example Radio 1020 AM)
Radio seek up
Radio seek down
Radio next station
Radio preset # (#: 1-6)
Radio FM preset # (#: 1-6)
Radio FM1 preset # (#: 1-6)
Radio FM2 preset # (#: 1-6)
Radio AM preset # (#: 1-6)
Radio auto select *
Radio scan *
Radio select XM1
Radio select XM2 XM channel # (#: 1-255)
XM channel up
XM channel down
XM category up
XM category down
XM preset # (#: 1-6)
XM1 preset # (#: 1-6)
XM2 preset # (#: 1-6)
XM scan
*
XM category scan *
XM channel scan *
XM category mode
XM channel mode
* Repeating these commands switches
(toggles) the function between On and Off, so the action that occurs may not match the
command you speak.
NOTE:
Radio volume levels cannot be
controlled using voice control. Use
the buttons on your steering wheel.
See your owner’s manual for more
information.
Climate control bi-level (vent and fl oor)
Climate control fl oor
Climate control fl oor and defrost
2013 TL