Gas Acura TLX 2015 User Guide
[x] Cancel search | Manufacturer: ACURA, Model Year: 2015, Model line: TLX, Model: Acura TLX 2015Pages: 545, PDF Size: 19.64 MB
Page 421 of 545
420Driving
RefuelingFuel Information■Fuel recommendation
Use of lower octane gasoline can cause occasional metallic knocking noise in the
engine and will result in decreased engine performance.
Use of gasoline with a pump octane less than 87 can lead to engine damage.■Top tier detergent gasoline
Because the level of detergency and additives in gasoline vary in the market, Acura
endorses the use of “TOP TIER Detergent Gasoline” where available to help
maintain the performance and reliability of your vehicle. TOP TIER Detergent
Gasoline meets a new gasoline standard jointly established by leading automotive
manufacturers to meet the needs of today’s advanced engines.
Qualifying gasoline retailers will, in most cases, identify their gasoline as having met
“TOP TIER Detergent Gasoline” standards at the retail location. This fuel is
guaranteed to contain the proper lev el of detergent additives and be free of metallic
additives. The proper level of detergent additives, and absence of harmful metallic
additives in gasoline, help avoid build-up of deposits in your engine and emission
control system.
For further important fuel-related in formation for your vehicle, or on information on
gasoline that does not contain MMT, visit Acura Owners at owners.acura.com. In
Canada, visit www.acura.ca for additional information on gasoline. For more
information on top tier gasoline, visit www.toptiergas.com.■Fuel tank capacity: 17.2 US gal (65 liters)Unleaded premium gasoline, pump octane number 91 or higher
1Fuel InformationNOTICEWe recommend quality gasoline containing
detergent additives that help prevent fuel system and
engine deposits. In addition, in order to maintain
good performance, fuel economy, and emissions
control, we strongly recommend the use of gasoline
that does NOT contain harmful manganese-based
fuel additives such as MMT, if such gasoline is
available.
Use of gasoline with these additives may adversely
affect performance, and cause the malfunction
indicator lamp on your instrument panel to come on.
If this happens, contact a dealer for service.
Some gasoline today is blended with oxygenates such
as ethanol. Your vehicle is designed to operate on
oxygenated gasoline containing up to 15% ethanol
by volume. Do not use gasoline containing methanol.
If you notice any undesirable operating symptoms, try
another service station or switch to another brand of
gasoline.
Page 422 of 545
421
uuRefueling uHow to Refuel
Driving
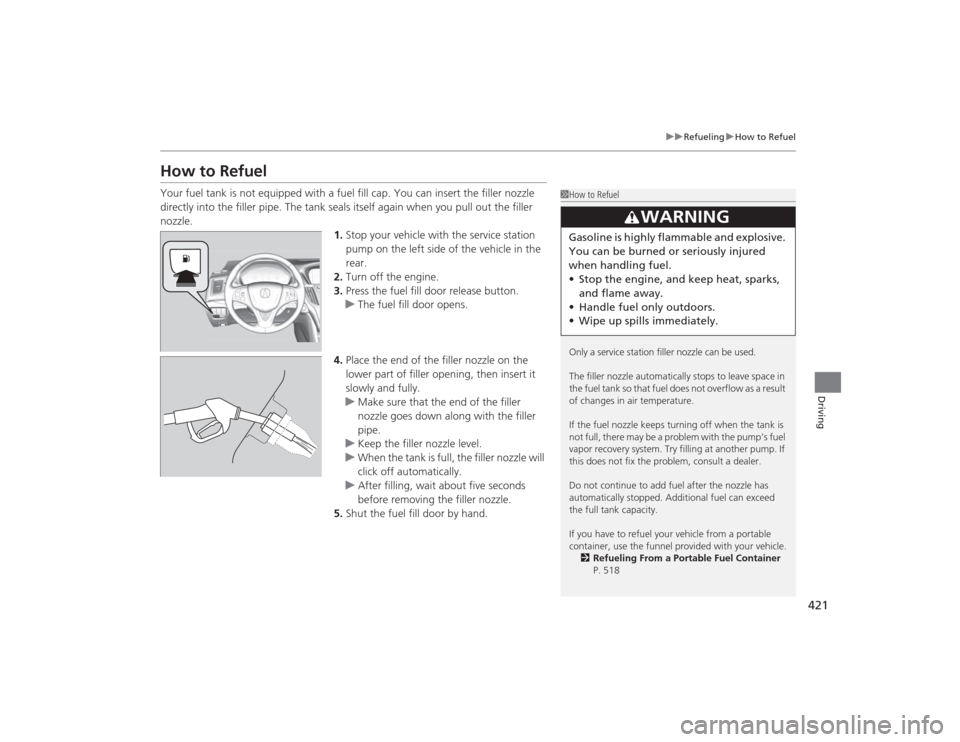
How to RefuelYour fuel tank is not equipped with a fuel fill cap. You can insert the filler nozzle
directly into the filler pipe. The tank seals itself again when you pull out the filler
nozzle.
1.Stop your vehicle with the service station
pump on the left side of the vehicle in the
rear.
2. Turn off the engine.
3. Press the fuel fill door release button.
u The fuel fill door opens.
4. Place the end of the filler nozzle on the
lower part of filler opening, then insert it
slowly and fully.
u Make sure that the end of the filler
nozzle goes down along with the filler
pipe.
u Keep the filler nozzle level.
u When the tank is full, the filler nozzle will
click off automatically.
u After filling, wait about five seconds
before removing the filler nozzle.
5. Shut the fuel fill door by hand.
1How to Refuel
Only a service station filler nozzle can be used.
The filler nozzle automatically stops to leave space in
the fuel tank so that fuel does not overflow as a result
of changes in air temperature.
If the fuel nozzle keeps turning off when the tank is
not full, there may be a problem with the pump’s fuel
vapor recovery system. Try filling at another pump. If
this does not fix the problem, consult a dealer.
Do not continue to add fuel af ter the nozzle has
automatically stopped. Additional fuel can exceed
the full tank capacity.
If you have to refuel your vehicle from a portable
container, use the funnel provided with your vehicle. 2 Refueling From a Portable Fuel Container
P. 518
3
WARNING
Gasoline is highly flammable and explosive.
You can be burned or seriously injured
when handling fuel.
• Stop the engine, and keep heat, sparks,
and flame away.
• Handle fuel only outdoors.
• Wipe up spills immediately.
Page 428 of 545

427
uuBefore Performing Maintenance uSafety When Performing Maintenance
Maintenance
Safety When Performing MaintenanceSome of the most important safety precautions are given here.
However, we cannot warn you of every conc eivable hazard that can arise in
performing maintenance. Only you can decide whether or not you should perform
a given task.
• To reduce the possibility of fire or explosion, keep cigarettes, sparks, and flames
away from the battery and all fuel related parts.
• Never leave rags, towels, or other flammable objects under the hood.
u Heat from the engine and exhaust can ignite them causing a fire.
• To clean parts, use a commercially available degreaser or parts cleaner, not
gasoline.
• Wear eye protection and protective clothing when working with the battery or
compressed air.
• Engine exhaust contains carbon monoxide, which is poisonous and can kill you.
u Operate the engine only when there is sufficient ventilation.
• The vehicle must be in a stationary condition.
u Make sure your vehicle is parked on level ground, the parking brake is set, and
the engine is off.
• Be aware that hot parts can burn you.
u Make sure to let the engine and exhaust system cool thoroughly before
touching vehicle parts.
• Be aware that moving parts can injure you.
u Do not start the engine unless instructed, and keep your hands and limbs away
from moving parts.
u Do not open the hood while the Auto Idle Stop function
* is activated.
■
Maintenance Safety
■
Vehicle Safety
1Safety When Performing Maintenance
3
WARNING
Improperly maintaining this vehicle or
failing to correct a problem before driving
can cause a crash in which you can be
seriously hurt or killed.
Always follow the inspection and
maintenance recommendations according
to the schedules in this owner’s manual.
3
WARNING
Failure to properly follow maintenance
instructions and precautions can cause you
to be seriously hurt or killed.
Always follow th e procedures and
precautions in this owner’s manual.
* Not available on all models
Page 442 of 545
441
uuMaintenance Under the Hood uChanging the Engine Oil and Oil Filter
Continued
Maintenance
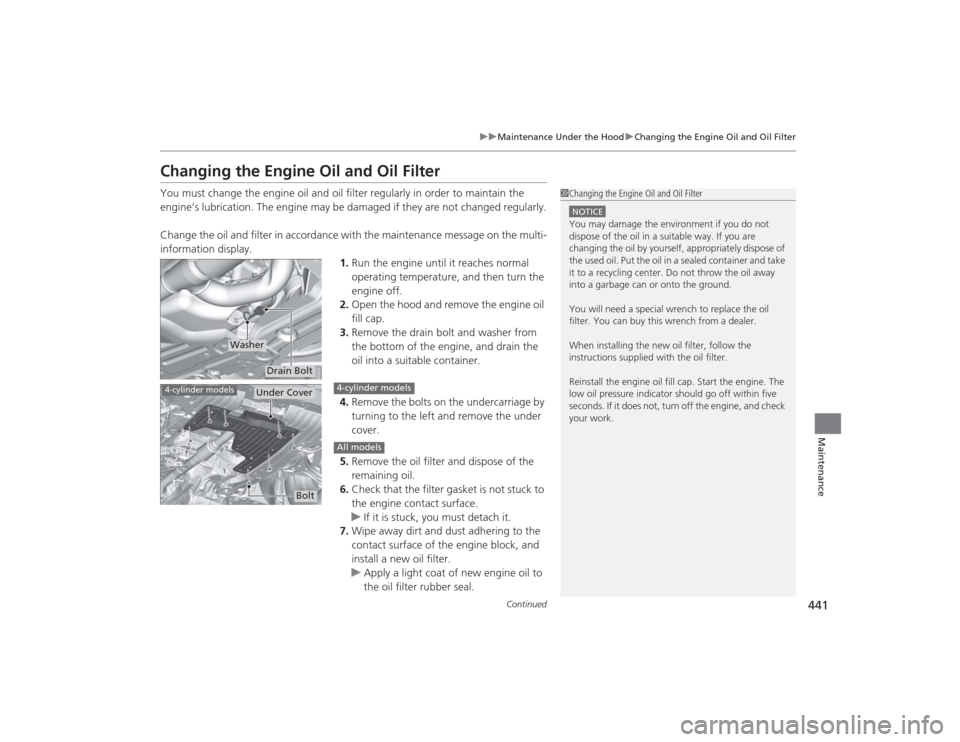
Changing the Engine Oil and Oil FilterYou must change the engine oil and oil filter regularly in order to maintain the
engine’s lubrication. The engine may be damaged if they are not changed regularly.
Change the oil and filter in accordance with the maintenance message on the multi-
information display.
1.Run the engine until it reaches normal
operating temperature, and then turn the
engine off.
2. Open the hood and remove the engine oil
fill cap.
3. Remove the drain bolt and washer from
the bottom of the engine, and drain the
oil into a suitable container.
4. Remove the bolts on the undercarriage by
turning to the left and remove the under
cover.
5. Remove the oil filter and dispose of the
remaining oil.
6. Check that the filter gasket is not stuck to
the engine contact surface.
u If it is stuck, you must detach it.
7. Wipe away dirt and dust adhering to the
contact surface of the engine block, and
install a new oil filter.
u Apply a light coat of new engine oil to
the oil filter rubber seal.
1Changing the Engine Oil and Oil FilterNOTICEYou may damage the environment if you do not
dispose of the oil in a suitable way. If you are
changing the oil by yourself, appropriately dispose of
the used oil. Put the oil in a sealed container and take
it to a recycling center. Do not throw the oil away
into a garbage can or onto the ground.
You will need a special wrench to replace the oil
filter. You can buy this wrench from a dealer.
When installing the new oil filter, follow the
instructions supplied with the oil filter.
Reinstall the engine oil fill cap. Start the engine. The
low oil pressure indicator should go off within five
seconds. If it does not, turn off the engine, and check
your work.
Drain Bolt
Washer
4-cylinder models
Under Cover
Bolt
4-cylinder modelsAll models
Page 466 of 545
465Maintenance
BatteryChecking the BatteryThe battery condition is being monitored by the sensor on the negative terminal. If
there is a problem with the sensor, the warning message on multi-information
display will let you know. Have your vehicle checked by a dealer.
If your vehicle’s battery is disconnected or goes dead:
• The audio system is disabled.
2 Reactivating the audio system P. 213
•The clock resets.
2 Clock P. 138
•The navigation system
* is disabled.
2 Refer to the Navigation System Manual
Charging the Battery
*
Disconnect both battery cables to prevent damaging your vehicle’s electrical system.
Always disconnect the negative (–) cable first, and reconnect it last.
1 BatteryWARNING: Battery post, terminals,
and related accessori es contain lead
and lead compounds.
Wash your hands after handling.When you find corrosion, clean the battery terminals
by applying a baking powder and water solution.
Clean terminals with a damp towel. Cloth/towel dry
the battery. Coat the termina ls with grease to help
prevent future corrosion.
When replacing the battery, the replacement must be
of the same specifications.
Please consult a dealer for more information.
3
WARNING
The battery gives off explosive hydrogen
gas during normal operation.
A spark or flame can cause the battery to
explode with enough force to kill or
seriously hurt you.
When conducting any battery
maintenance, wear protective clothing and
a face shield, or have a skilled technician do
it.
* Not available on all models
Page 471 of 545
470Maintenance
CleaningInterior CareUse a damp cloth with a mixture of mild detergent and warm water to remove dirt.
Use a clean cloth to remove detergent residue.
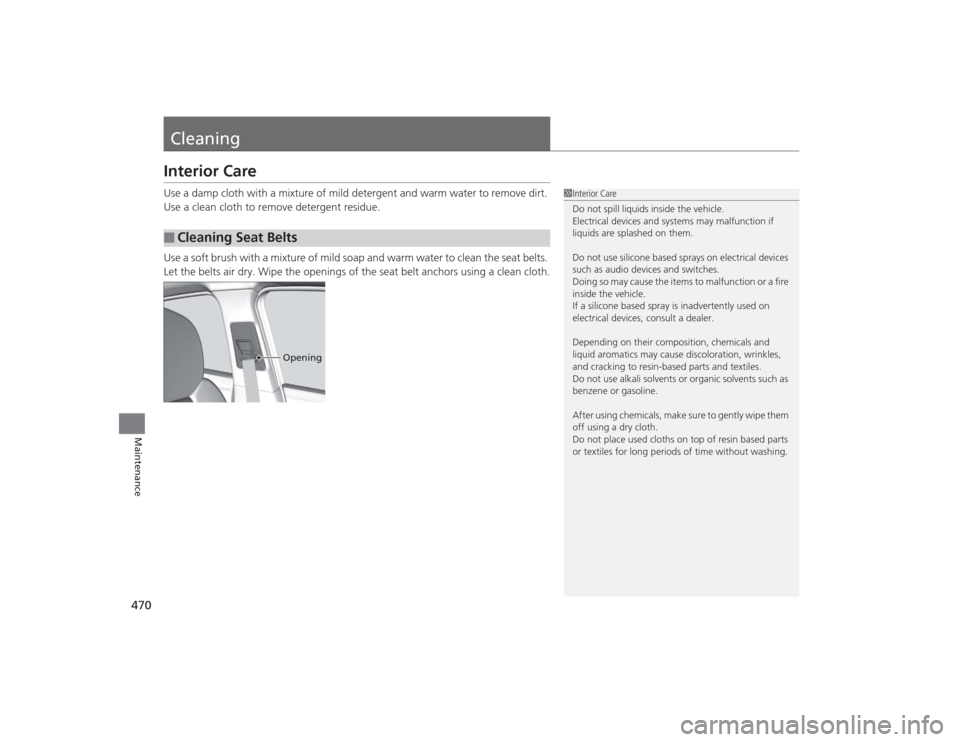
Use a soft brush with a mixture of mild soap and warm water to clean the seat belts.
Let the belts air dry. Wipe the openings of the seat belt anchors using a clean cloth.■
Cleaning Seat Belts
1Interior Care
Do not spill liquids inside the vehicle.
Electrical devices and systems may malfunction if
liquids are splashed on them.
Do not use silicone based sprays on electrical devices
such as audio devices and switches.
Doing so may cause the items to malfunction or a fire
inside the vehicle.
If a silicone based spray is inadvertently used on
electrical devices, consult a dealer.
Depending on their composition, chemicals and
liquid aromatics may cause discoloration, wrinkles,
and cracking to resin-based parts and textiles.
Do not use alkali solvents or organic solvents such as
benzene or gasoline.
After using chemicals, make sure to gently wipe them
off using a dry cloth.
Do not place used cloths on top of resin based parts
or textiles for long periods of time without washing.
Opening
Page 474 of 545

Continued
473
uuCleaning uExterior Care
Maintenance
A good coat of automotive body wax helps protect your vehicle’s paint from the
elements. Wax will wear off over time and exp ose your vehicle’s paint to the
elements, so reapply as necessary.
If you get gasoline, oil, engine coolant, or battery fluid on resin coated parts, they
may be stained or the coating may peel. Promptly wipe it away using a soft cloth and
clean water.
Wipe using a glass cleaner.
Aluminum is susceptible to deterioration caused by salt and other road
contaminants. Use a sponge and mild detergent to wipe away promptly.
Be careful not to use harsh chemicals (including some commercial wheel cleaners) or
a stiff brush. They can damage the clear coat of the aluminum alloy wheels that
helps keep the aluminum from corroding and tarnishing.■
Applying Wax
■
Maintaining the Bumpers and Other Resin Coated Parts
■
Cleaning the Window
■
Maintaining Aluminum Wheels
1 Applying WaxNOTICEChemical solvents and strong cleaners can damage
the paint, metal, and plastic on your vehicle. Wipe up
spills immediately.1Maintaining the Bumpers and Other Resin Coated Parts
Ask a dealer about the correct coating material when
you want to repair the painted surface of the parts
made of resin.1Cleaning the Window
Wires are mounted to the inside of the rear window.
Wipe along the same direction as the wires with a
soft cloth so as not to damage them.
Page 482 of 545

Continued
481
uuIf a Tire Goes Flat uTemporarily Repairing a Flat Tire
Handling the Unexpected
4. Plug in the compressor to the accessory
power socket.
u Be careful not to pinch the cord in a
door or window.
u Do not plug any other electronic
devices into other accessory power
sockets.
2 Accessory Power Sockets P. 193
5.Start the engine.
u Keep the engine running while injecting
sealant and air.
2 Carbon Monoxide Gas P. 66
6.Turn the selector switch to SEALANT/
AIR .
1Injecting Sealant and AirNOTICEDo not operate the temporary tire repair kit
compressor for more than 15 minutes. The
compressor can overheat and become permanently
damaged.
Until the sealant injection is complete, the pressure
shown on the pressure gauge will appear higher than
actual. After the sealan t injection is complete the
pressure will drop and then begin to rise again as the
tire is inflated with air. This is normal. To accurately
measure the air pressure using the gauge, turn the air
compressor off only after the sealant injection is
complete.
3
WARNING
Running the engine with the vehicle in an
enclosed or even partly enclosed area can
cause a rapid build-up of toxic carbon
monoxide.
Breathing this colorless, odorless gas can
cause unconsciousness and even death.
Only run the engi ne to power the air
compressor with the vehicle outdoors.
SEALANT/AIR side
Page 486 of 545

Continued
485
uuIf a Tire Goes Flat uTemporarily Repairing a Flat Tire
Handling the Unexpected
• Greater than 19 psi (130 kPa), but less
than 32 psi (220 kPa):
Turn the air compressor on to inflate the
tire until the tire pressure reaches 32 psi
(220 kPa).2 Inflating an Under-inflated Tire P. 486Then drive carefully for 10 more minutes or
until you reach the nearest service station.
Do not exceed 50 mph (80 km/h).
u You should repeat this procedure as long
as the air pressure is within this range.
7. Press the pressure relief button until the
gauge returns to 0 psi (0 kPa).
8. Repackage and properly stow the kit.
AIR ONLY
side
ON
Pressure Relief Button
1 Distributing the Sealant in the Tire
3
WARNING
Running the engine with the vehicle in an
enclosed or even partly enclosed area can
cause a rapid build-up of toxic carbon
monoxide.
Breathing this colorless, odorless gas can
cause unconsciousness and even death.
Only run the engi ne to power the air
compressor with the vehicle outdoors.
Page 488 of 545

Continued
487
uuIf a Tire Goes Flat uTemporarily Repairing a Flat Tire
Handling the Unexpected
7. Plug in the kit to the accessory power
socket.
u Be careful not to pinch the cord in a
door or window.
u Do not plug any other electronic
devices into other accessory power
sockets.
2 Accessory Power Sockets P. 193
8.Start the engine.
u Keep the engine running while injecting
air.
2 Carbon Monoxide Gas P. 66
9.Turn the selector switch to AIR ONLY.
10. Press the inflator switch to turn on the kit.
u The compressor starts to inject air into
the tire.
11. Inflate the tire to the specified air pressure.
1Inflating an Under-inflated Tire
3
WARNING
Running the engine with the vehicle in an
enclosed or even partly enclosed area can
cause a rapid build-up of toxic carbon
monoxide.
Breathing this colorless, odorless gas can
cause unconsciousness and even death.
Only run the engi ne to power the air
compressor with the vehicle outdoors.
AIR ONLY
side
ON