Box Acura TLX 2015 Owner's Manual
[x] Cancel search | Manufacturer: ACURA, Model Year: 2015, Model line: TLX, Model: Acura TLX 2015Pages: 545, PDF Size: 19.64 MB
Page 7 of 545
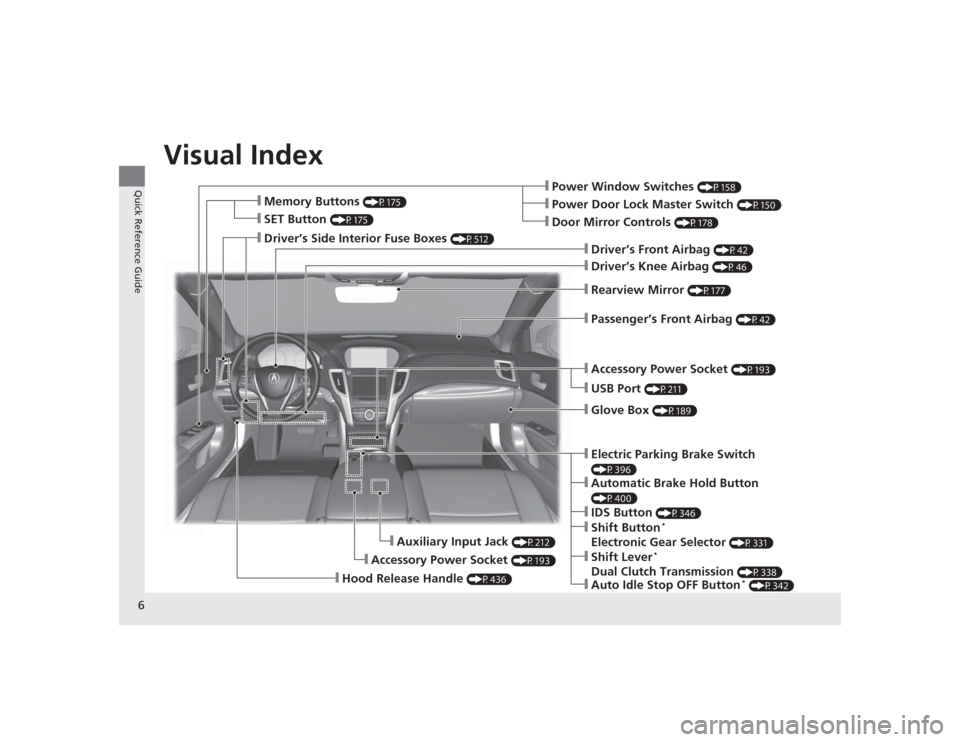
Visual Index
6Quick Reference Guide
❙Power Window Switches
(P158)
❙Driver’s Front Airbag
(P42)
❙Driver’s Knee Airbag
(P46)
❙Door Mirror Controls
(P178)
❙Power Door Lock Master Switch
(P150)
❙Accessory Power Socket
(P193)
❙Auxiliary Input Jack
(P212)
❙Accessory Power Socket
(P193)
❙USB Port
(P211)
❙Rearview Mirror
(P177)
❙Hood Release Handle
(P436)
❙Memory Buttons
(P175)
❙SET Button
(P175)
❙Glove Box
(P189)
❙Passenger’s Front Airbag
(P42)
❙Driver’s Side Interior Fuse Boxes
(P512)
❙Electric Parking Brake Switch (P396)❙IDS Button
(P346)
❙Shift Button
*
Electronic Gear Selector
(P331)
❙Automatic Brake Hold Button (P400)❙Shift Lever
*
Dual Clutch Transmission
(P338)
❙Auto Idle Stop OFF Button
* (P342)
Page 155 of 545

154
uuOpening and Closing the Trunk uTrunk Main Switch
Controls
Trunk Main Switch
The trunk main switch disables the trunk
release button on the remote transmitter, the
trunk release button on the trunk lid and
trunk release on the driver side control panel
to protect cargo in the trunk.
1. Make sure the rear seat-back is not folded
down.
2. Turn off the trunk main switch in the glove
box.
3. Lock the glove box.
Emergency Trunk Opener
The trunk release lever allows you to open the
trunk from inside for your safety.
Slide the release lever in the direction of the
arrow.
1Trunk Main Switch
If you need to give the key to someone else, remove
the built-in key from the keyless access remote by
sliding the release knob, and give the remote as a
valet key.
Main Switch
OFFON
1Emergency Trunk Opener
Parents should decide if their children should be
shown how to use this feature.
Lever
Page 164 of 545
163
uuOperating the Switches Around the Steering Wheel uENGINE START/STOP Button
Controls
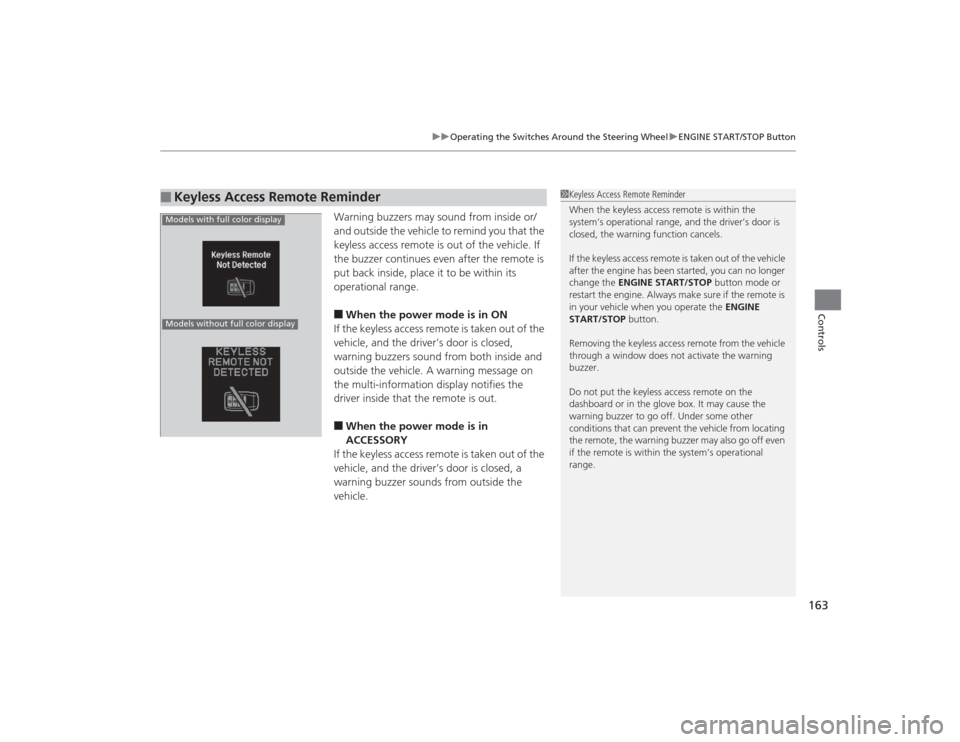
Warning buzzers may sound from inside or/
and outside the vehicle to remind you that the
keyless access remote is out of the vehicle. If
the buzzer continues even after the remote is
put back inside, place it to be within its
operational range.■When the power mode is in ON
If the keyless access remote is taken out of the
vehicle, and the driver’s door is closed,
warning buzzers sound from both inside and
outside the vehicle. A warning message on
the multi-information display notifies the
driver inside that the remote is out.■When the power mode is in
ACCESSORY
If the keyless access remote is taken out of the
vehicle, and the driver’s door is closed, a
warning buzzer sounds from outside the
vehicle.
■
Keyless Access Remote Reminder
1 Keyless Access Remote Reminder
When the keyless access remote is within the
system’s operational range, and the driver’s door is
closed, the warning function cancels.
If the keyless access remote is taken out of the vehicle
after the engine has been started, you can no longer
change the ENGINE START/STOP button mode or
restart the engine. Al ways make sure if the remote is
in your vehicle when you operate the ENGINE
START/STOP button.
Removing the keyless access remote from the vehicle
through a window does not activate the warning
buzzer.
Do not put the keyless access remote on the
dashboard or in the glove box. It may cause the
warning buzzer to go off. Under some other
conditions that can prevent the vehicle from locating
the remote, the warning buzzer may also go off even
if the remote is withi n the system’s operational
range.
Models with full color displayModels without full color display
Page 190 of 545
189
uuInterior Lights/Interior Convenience Items uInterior Convenience Items
Continued
Controls
Interior Convenience Items
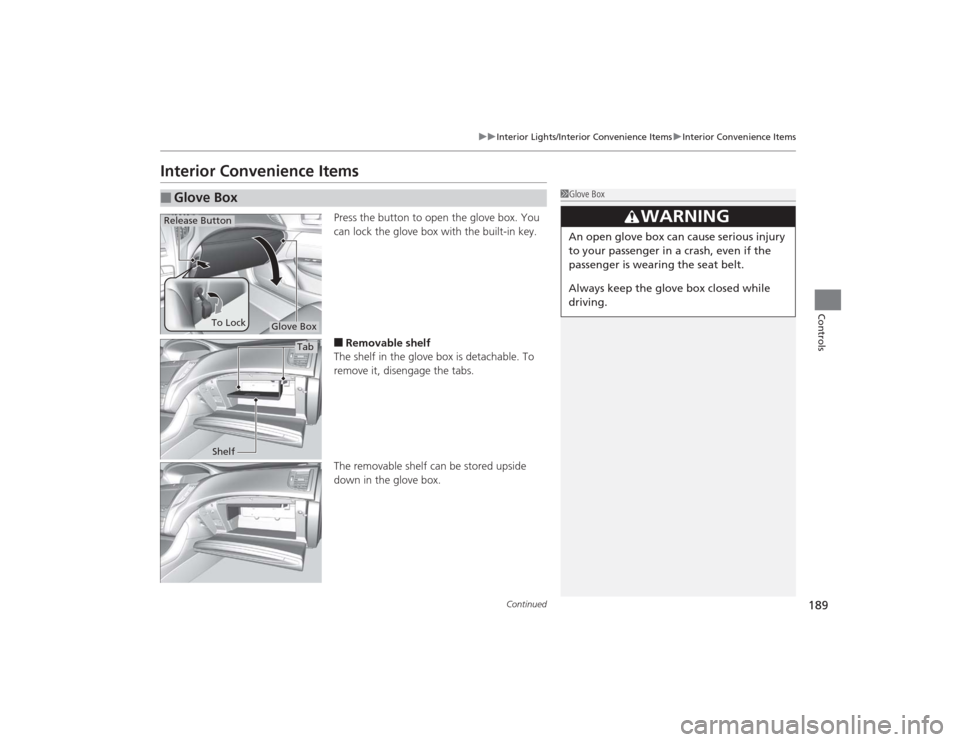
Press the button to open the glove box. You
can lock the glove box with the built-in key.■Removable shelf
The shelf in the glove box is detachable. To
remove it, disengage the tabs.
The removable shelf can be stored upside
down in the glove box.
■
Glove Box
1 Glove Box
3
WARNING
An open glove box can cause serious injury
to your passenger in a crash, even if the
passenger is wearing the seat belt.
Always keep the glove box closed while
driving.
Glove Box
Release Button
To Lock
Tab
Shelf
Page 310 of 545

Continued
309
uuBluetooth ® HandsFreeLink ®u HFL Menus
Features
■Displaying text messages
1. Press the PHONE button.
2. Press the MENU button.
3. Rotate to select Text/Email , then press
.
u Select account if necessary.
4. Rotate to select a message, then press
.
u The text message is displayed. The
system automatically starts reading the
message aloud.
■
Displaying Messages
1Displaying Messages
The icon appears next to an unread message.
If you delete a message on the phone, the message is
also deleted in the system. If you send a message
from the system, the message goes to your phone’s
outbox.
To see the previous or next message, move or
on the text message screen.
Message List
Text Message
Page 433 of 545
432
uuMaintenance Minder
TMuTo Use Maintenance Minder
TM
Maintenance
■
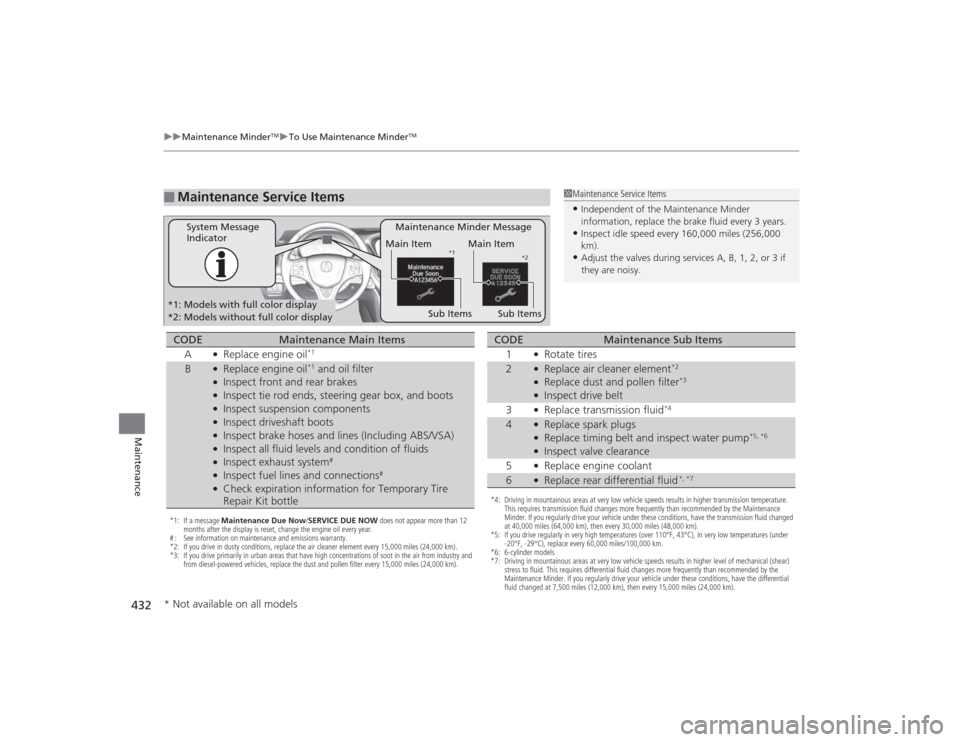
Maintenance Service Items
1Maintenance Service Items•Independent of the Maintenance Minder
information, replace the brake fluid every 3 years.•Inspect idle speed every 160,000 miles (256,000
km).•Adjust the valves during services A, B, 1, 2, or 3 if
they are noisy.
Maintenance Minder Message
System Message
Indicator
Main Item
Sub Items
Main ItemSub Items
*1 *2
*1: Models with full color display
*2: Models without full color display*1: If a message Maintenance Due Now/SERVICE DUE NOW does not appear more than 12
months after the display is reset, change the engine oil every year.
# : See information on maintenance and emissions warranty.
*2: If you drive in dusty conditions, replace the air cleaner element every 15,000 miles (24,000 km).
*3: If you drive primarily in urban areas that have high concentrations of soot in the air from industry and from diesel-powered vehicles, replace the dust and pollen filter every 15,000 miles (24,000 km).CODE
Maintenance Main Items
A
●Replace engine oil
*1
B
●Replace engine oil
*1 and oil filter
●Inspect front and rear brakes●Inspect tie rod ends, steering gear box, and boots●Inspect suspension components●Inspect driveshaft boots●Inspect brake hoses and lines (Including ABS/VSA)●Inspect all fluid levels and condition of fluids●Inspect exhaust system
#
●Inspect fuel lines and connections
#
●Check expiration information for Temporary Tire
Repair Kit bottle
*4: Driving in mountainous areas at very low vehicle speeds results in higher transmission temperature. This requires transmission fluid changes more frequently than recommended by the Maintenance
Minder. If you regularly drive your vehicle under these conditions, have the transmission fluid changed
at 40,000 miles (64,000 km), then every 30,000 miles (48,000 km).
*5: If you drive regularly in very high temperatures (over 110°F, 43°C), in very low temperatures (under -20°F, -29°C), replace every 60,000 miles/100,000 km.
*6: 6-cylinder models
*7: Driving in mountainous areas at very low vehicle speeds results in higher level of mechanical (shear) stress to fluid. This requires differential fluid changes more frequently than recommended by the
Maintenance Minder. If you regularly drive your vehicle under these conditions, have the differential
fluid changed at 7,500 miles (12,000 km), then every 15,000 miles (24,000 km).CODE
Maintenance Sub Items
1
●Rotate tires
2
●Replace air cleaner element
*2
●Replace dust and pollen filter
*3
●Inspect drive belt
3●Replace transmission fluid
*4
4
●Replace spark plugs●Replace timing belt and inspect water pump
*5, *6
●Inspect valve clearance
5●Replace engine coolant
6
●Replace rear differential fluid
*, *7
* Not available on all models
Page 511 of 545
510Handling the Unexpected
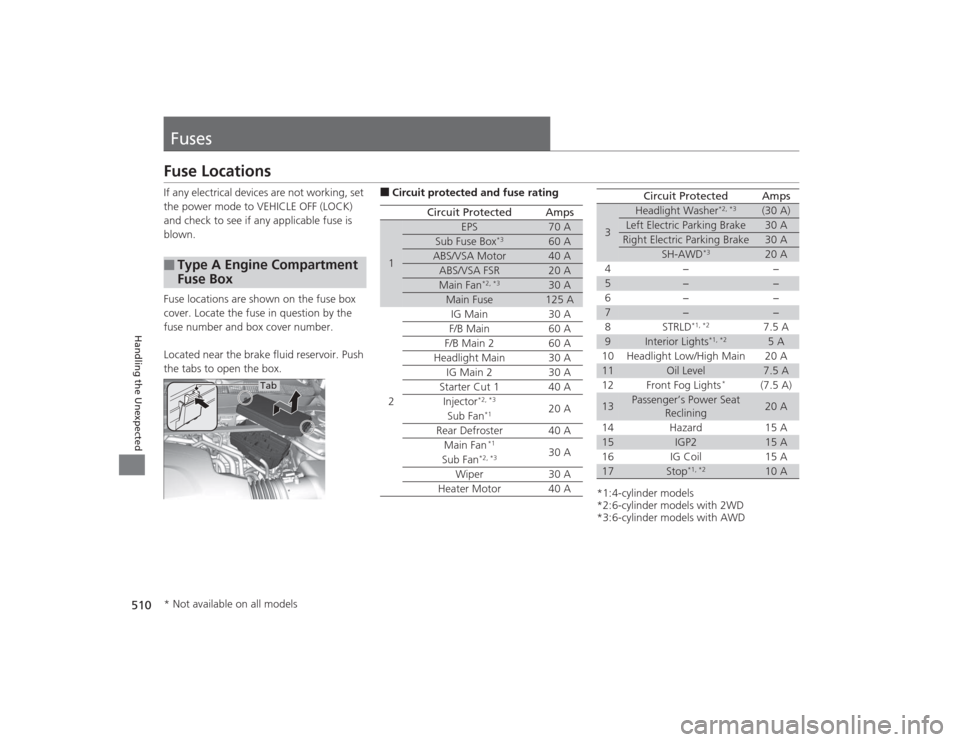
FusesFuse LocationsIf any electrical devices are not working, set
the power mode to VEHICLE OFF (LOCK)
and check to see if any applicable fuse is
blown.
Fuse locations are shown on the fuse box
cover. Locate the fuse in question by the
fuse number and box cover number.
Located near the brake fluid reservoir. Push
the tabs to open the box.■
Type A Engine Compartment
Fuse Box
Tab
■Circuit protected and fuse rating
Circuit Protected
Amps
1
EPS
70 A
Sub Fuse Box
*3
60 A
ABS/VSA Motor
40 A
ABS/VSA FSR
20 A
Main Fan
*2, *3
30 A
Main Fuse
125 A
2
IG Main
30 A
F/B Main
60 A
F/B Main 2
60 A
Headlight Main
30 A
IG Main 2
30 A
Starter Cut 1
40 A
Injector
*2, *3
20 A
Sub Fan
*1
Rear Defroster
40 A
Main Fan
*1
30 A
Sub Fan
*2, *3
Wiper
30 A
Heater Motor
40 A
*1:4-cylinder models
*2:6-cylinder models with 2WD
*3:6-cylinder models with AWD3
Headlight Washer
*2, *3
(30 A)
Left Electric Parking Brake
30 A
Right Electric Parking Brake
30 A
SH-AWD
*3
20 A
4− −
5
−
−
6− −
7
−
−
8STRLD
*1, *2
7.5 A
9
Interior Lights
*1, *2
5 A
10 Headlight Low/High Main 20 A
11
Oil Level
7.5 A
12 Front Fog Lights
*
(7.5 A)
13
Passenger’s Power Seat Reclining
20 A
14 Hazard 15 A
15
IGP2
15 A
16 IG Coil 15 A
17
Stop
*1, *2
10 A
Circuit Protected
Amps
* Not available on all models
Page 512 of 545
511
uuFuses uFuse Locations
Continued
Handling the Unexpected
*1:4-cylinder models
*2:6-cylinder models with 2WD
*3:6-cylinder models with AWD
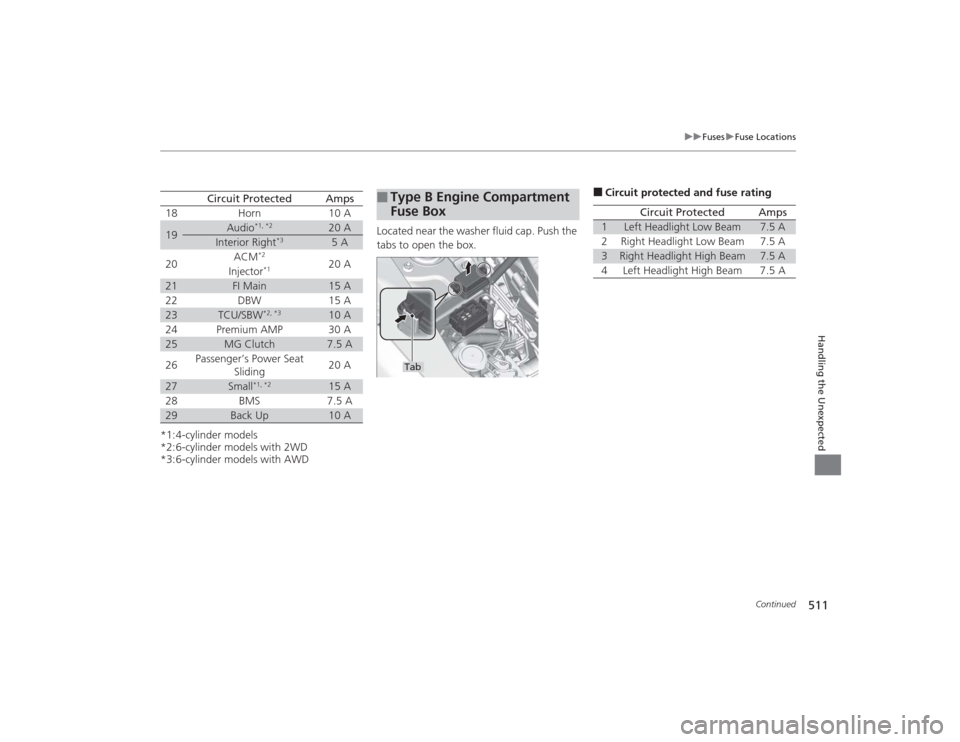
Circuit Protected
Amps
18 Horn 10 A
19
Audio
*1, *2
20 A
Interior Right
*3
5 A
20 ACM
*2
20 A
Injector
*1
21
FI Main
15 A
22 DBW 15 A
23
TCU/SBW
*2, *3
10 A
24 Premium AMP 30 A
25
MG Clutch
7.5 A
26 Passenger’s Power Seat
Sliding 20 A
27
Small
*1, *2
15 A
28 BMS 7.5 A
29
Back Up
10 A
Located near the washer fluid cap. Push the
tabs to open the box.■
Type B Engine Compartment
Fuse Box
Tab
■Circuit protected and fuse rating
Circuit Protected
Amps
1
Left Headlight Low Beam
7.5 A
2
Right Headlight Low Beam
7.5 A
3
Right Headlight High Beam
7.5 A
4 Left Headlight High Beam 7.5 A
Page 513 of 545
512
uuFuses uFuse Locations
Handling the Unexpected
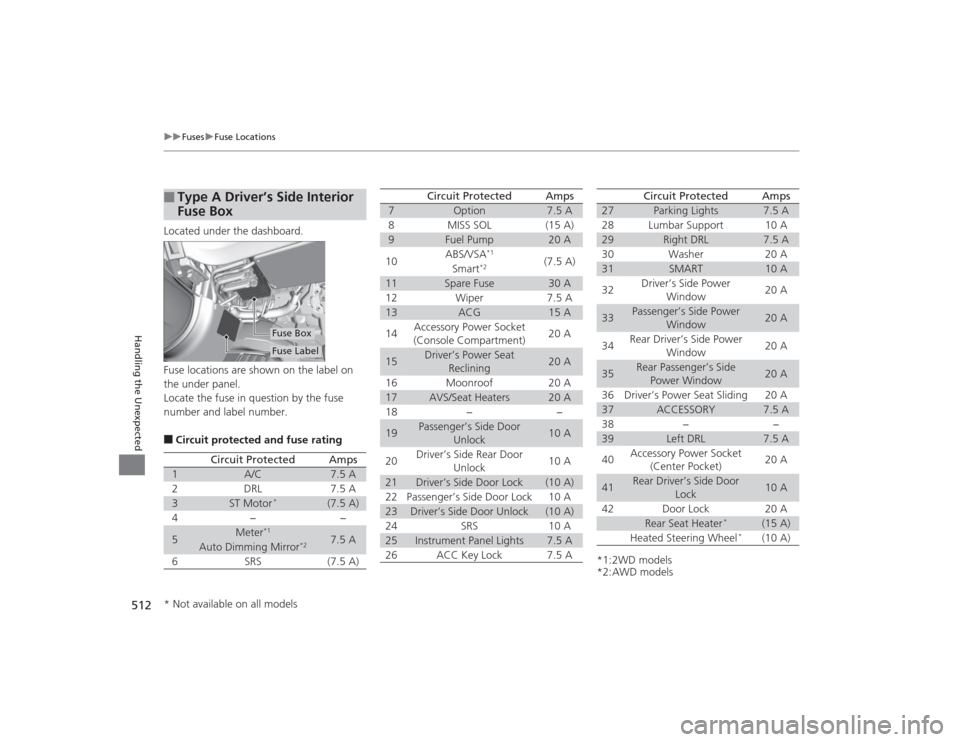
Located under the dashboard.
Fuse locations are shown on the label on
the under panel.
Locate the fuse in question by the fuse
number and label number.■Circuit protected and fuse rating■
Type A Driver’s Side Interior
Fuse Box
Fuse LabelFuse Box
Circuit Protected
Amps
1
A/C
7.5 A
2
DRL
7.5 A
3
ST Motor
*
(7.5 A)
4
−
−
5
Meter
*1
7.5 A
Auto Dimming Mirror
*2
6
SRS
(7.5 A)
7
Option
7.5 A
8
MISS SOL
(15 A)
9
Fuel Pump
20 A
10
ABS/VSA
*1
(7.5 A)
Smart
*2
11
Spare Fuse
30 A
12
Wiper
7.5 A
13
ACG
15 A
14
Accessory Power Socket
(Console Compartment)
20 A
15
Driver’s Power Seat Reclining
20 A
16
Moonroof
20 A
17
AVS/Seat Heaters
20 A
18
−
−
19
Passenger’s Side Door Unlock
10 A
20
Driver’s Side Rear Door
Unlock
10 A
21
Driver’s Side Door Lock
(10 A)
22
Passenger’s Side Door Lock
10 A
23
Driver’s Side Door Unlock
(10 A)
24
SRS
10 A
25
Instrument Panel Lights
7.5 A
26
ACC Key Lock
7.5 A
Circuit Protected
Amps
*1:2WD models
*2:AWD models27
Parking Lights
7.5 A
28
Lumbar Support
10 A
29
Right DRL
7.5 A
30
Washer
20 A
31
SMART
10 A
32
Driver’s Side Power Window
20 A
33
Passenger’s Side Power Window
20 A
34
Rear Driver’s Side Power Window
20 A
35
Rear Passenger’s Side
Power Window
20 A
36
Driver’s Power Seat Sliding
20 A
37
ACCESSORY
7.5 A
38
−
−
39
Left DRL
7.5 A
40
Accessory Power Socket (Center Pocket)
20 A
41
Rear Driver’s Side Door Lock
10 A
42
Door Lock
20 A
Rear Seat Heater
*
(15 A)
Heated Steering Wheel
*
(10 A)
Circuit Protected
Amps
* Not available on all models
Page 514 of 545
513
uuFuses uFuse Locations
Handling the Unexpected
*1:2WD models
*2:AWD models
Circuit Protected
Amps
A
−
−
B− −
C
Meter
*2
7.5 A
DBack Up
*2
10 A
E
Stop
*2
7.5 A
F Parking Lights
*2
15 A
G
Audio ACC
*2
7.5 A
Rear Seat Heater
*, *1, *2
(15 A)
A
ABS/VSA
*2
7.5 A
BMICU
*2
7.5 A
C
−
−
D− −
E
STRLD
*2
7.5 A
FAudio
*2
20 A
G
ACM
*2
7.5 A
Heated Steering Wheel
*, *1, *2
(10 A)
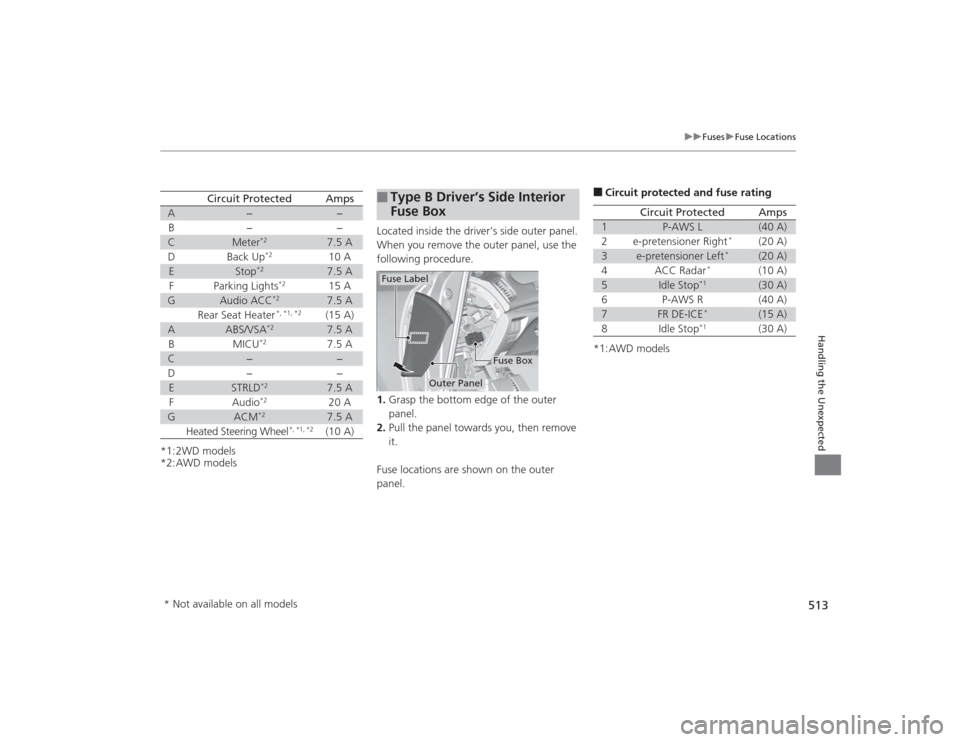
Located inside the driver’s side outer panel.
When you remove the outer panel, use the
following procedure.
1. Grasp the bottom edge of the outer
panel.
2. Pull the panel towards you, then remove
it.
Fuse locations are shown on the outer
panel.■
Type B Driver’s Side Interior
Fuse Box
Outer Panel
Fuse Box
Fuse Label
■Circuit protected and fuse rating
*1:AWD models
Circuit Protected
Amps
1
P-AWS L
(40 A)
2
e-pretensioner Right
*
(20 A)
3
e-pretensioner Left
*
(20 A)
4
ACC Radar
*
(10 A)
5
Idle Stop
*1
(30 A)
6
P-AWS R
(40 A)
7
FR DE-ICE
*
(15 A)
8
Idle Stop
*1
(30 A)
* Not available on all models