ECO mode Acura TLX 2020 Repair Manual
[x] Cancel search | Manufacturer: ACURA, Model Year: 2020, Model line: TLX, Model: Acura TLX 2020Pages: 589, PDF Size: 32.88 MB
Page 181 of 589
180
Controls
Adjusting the Seats
Front Seats
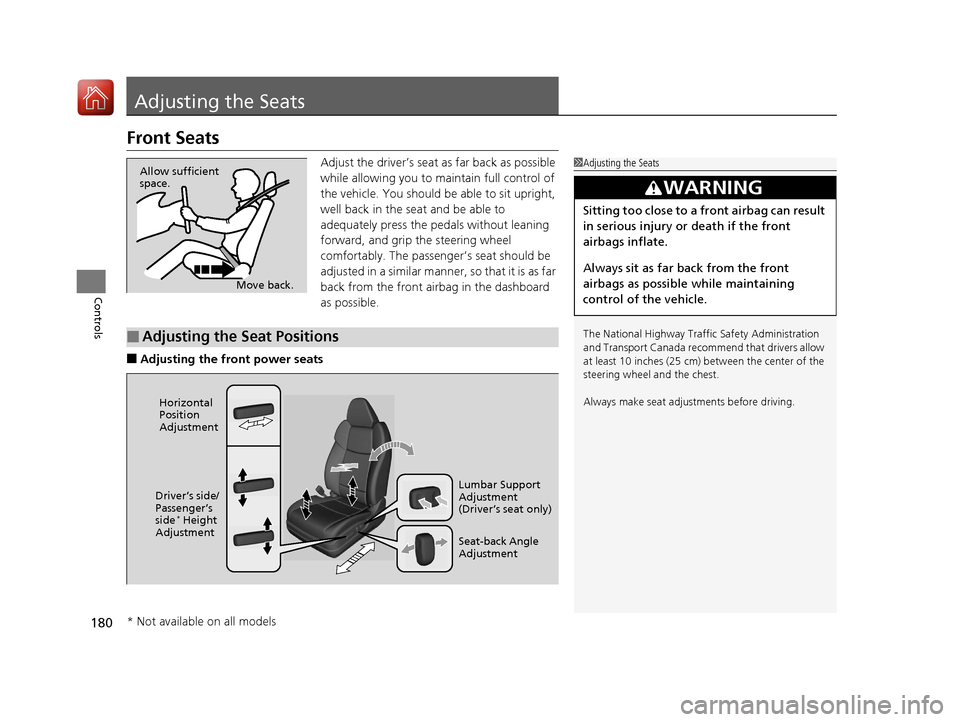
Adjust the driver’s seat as far back as possible
while allowing you to maintain full control of
the vehicle. You should be able to sit upright,
well back in the seat and be able to
adequately press the pedals without leaning
forward, and grip the steering wheel
comfortably. The passenger’s seat should be
adjusted in a similar manner, so that it is as far
back from the front airbag in the dashboard
as possible.
■Adjusting the front power seats
1Adjusting the Seats
The National Highway Traffic Safety Administration
and Transport Cana da recommend that drivers allow
at least 10 inches (25 cm) between the center of the
steering wheel and the chest.
Always make seat adjustments before driving.
3WARNING
Sitting too close to a front airbag can result
in serious injury or death if the front
airbags inflate.
Always sit as far back from the front
airbags as possible while maintaining
control of the vehicle.
Move back.
Allow sufficient
space.
■Adjusting the Seat Positions
Horizontal
Position
Adjustment
Seat-back Angle
Adjustment Lumbar Support
Adjustment
(Driver’s seat only)
Driver’s side/
Passenger’s
side
* Height
Adjustment
* Not available on all models
20 ACURA TLX-31TZ36500.book 180 ページ 2019年2月7日 木曜日 午後2時2分
Page 190 of 589
189Continued
Controls
Interior Lights/Interior Convenience Items
Interior Lights
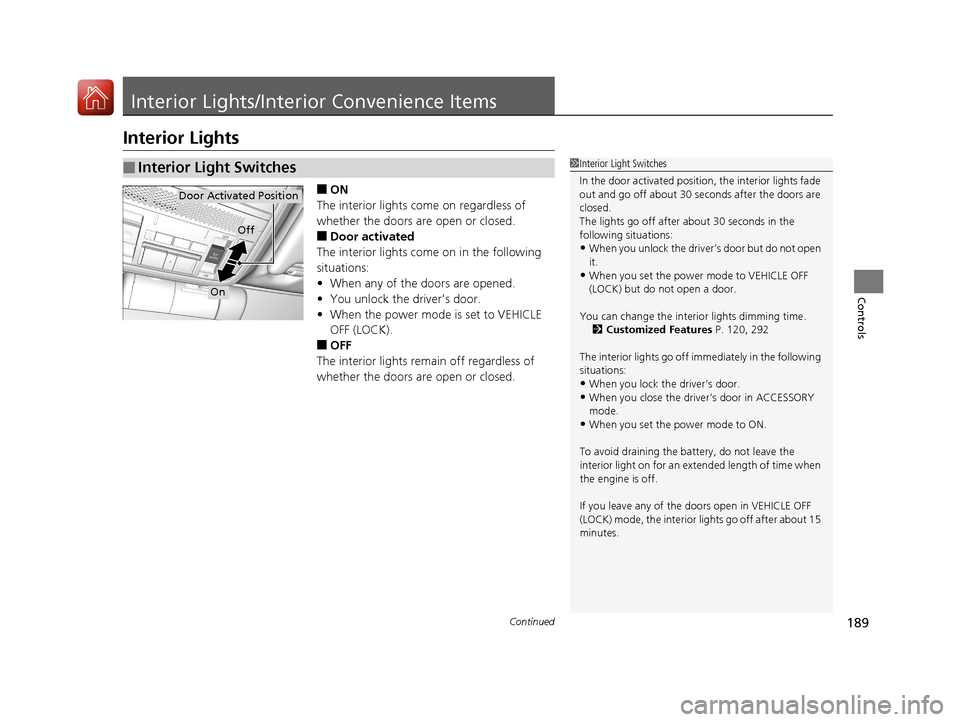
■ON
The interior lights come on regardless of
whether the doors are open or closed.
■Door activated
The interior lights come on in the following
situations:
• When any of the doors are opened.
• You unlock the driver’s door.
• When the power mode is set to VEHICLE
OFF (LOCK).
■OFF
The interior lights remain off regardless of
whether the doors are open or closed.
■Interior Light Switches1 Interior Light Switches
In the door activated position, the interior lights fade
out and go off about 30 se conds after the doors are
closed.
The lights go off after about 30 seconds in the
following situations:
•When you unlock the driver’s door but do not open
it.
•When you set the power mode to VEHICLE OFF
(LOCK) but do not open a door.
You can change the interi or lights dimming time.
2 Customized Features P. 120, 292
The interior lights go off i mmediately in the following
situations:
•When you lock the driver’s door.•When you close the driver’s door in ACCESSORY
mode.
•When you set the power mode to ON.
To avoid draining the ba ttery, do not leave the
interior light on for an extended length of time when
the engine is off.
If you leave any of the doors open in VEHICLE OFF
(LOCK) mode, the interior lights go off after about 15
minutes.
Door Activated Position
Off
On
20 ACURA TLX-31TZ36500.book 189 ページ 2019年2月7日 木曜日 午後2時2分
Page 207 of 589
uuClimate Control System uUsing Automatic Climate Control
206
Controls
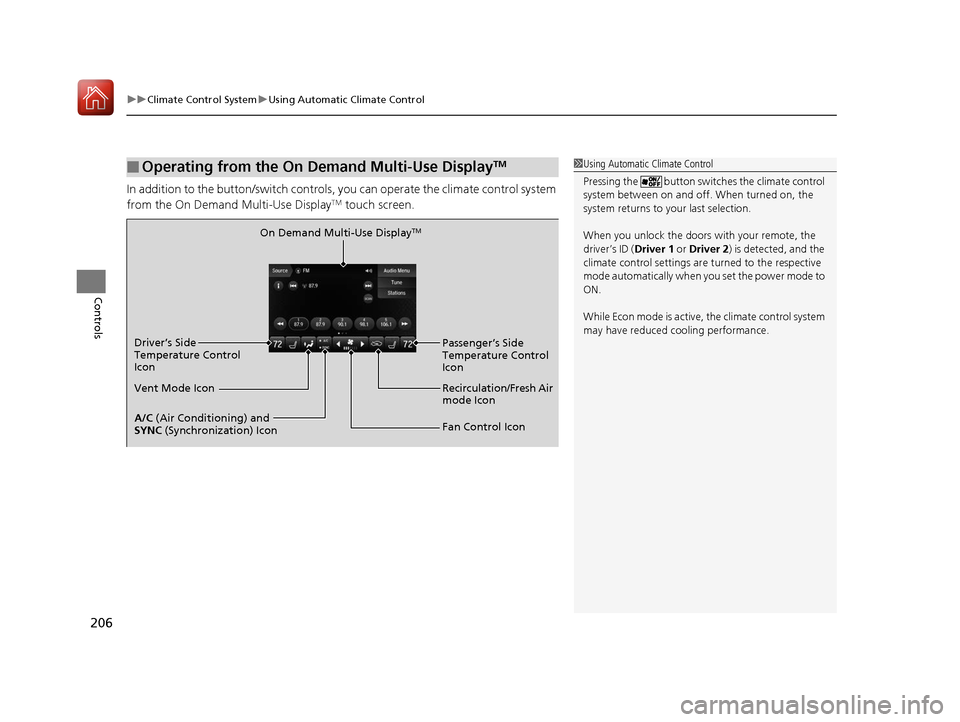
In addition to the button/switch controls, you can operate the climate control system
from the On Demand Multi-Use DisplayTM touch screen.
■Operating from the On Demand Multi-Use DisplayTM1 Using Automatic Climate Control
Pressing the button switch es the climate control
system between on and off. When turned on, the
system returns to your last selection.
When you unlock the doors with your remote, the
driver’s ID (Driver 1 or Driver 2) is detected, and the
climate control settings are turned to the respective
mode automatically when you set the power mode to
ON.
While Econ mode is active, the climate control system
may have reduced c ooling performance.
On Demand Multi-Use DisplayTM
A/C (Air Conditioning) and
SYNC (Synchronization) Icon
Vent Mode Icon Driver’s Side
Temperature Control
Icon
Recirculation/Fresh Air
mode Icon
Fan Control Icon Passenger’s Side
Temperature Control
Icon
20 ACURA TLX-31TZ36500.book 206 ページ 2019年2月7日 木曜日 午後2時2分
Page 210 of 589
Continued209
uuClimate Control System uUsing Automatic Climate Control
Controls
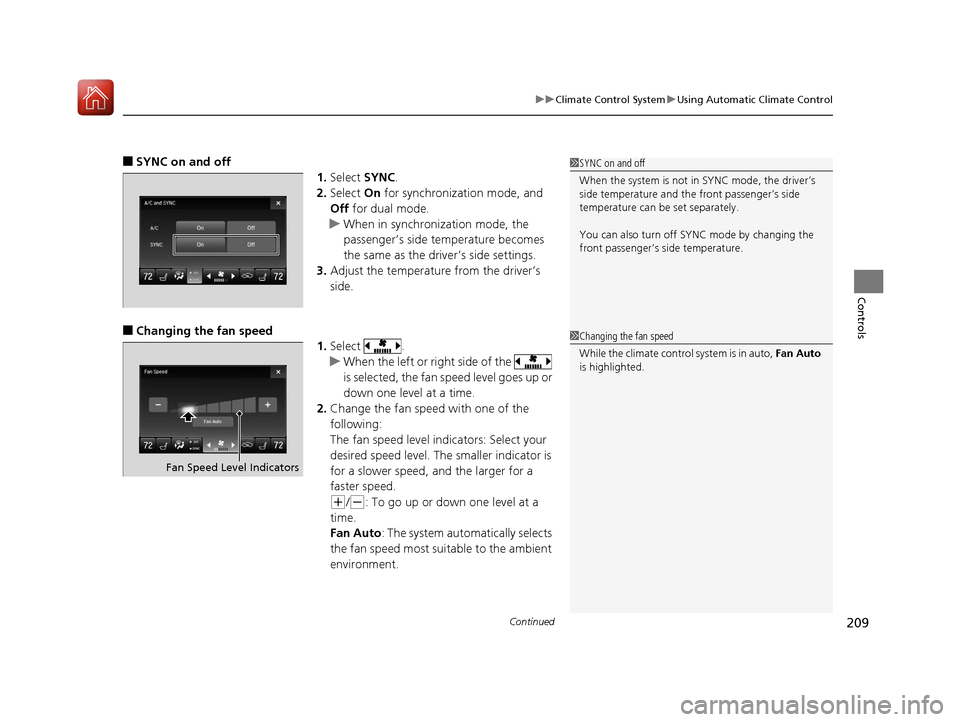
■SYNC on and off
1.Select SYNC.
2. Select On for synchronization mode, and
Off for dual mode.
u When in synchronization mode, the
passenger’s side temperature becomes
the same as the driv er’s side settings.
3. Adjust the temperature from the driver’s
side.
■Changing the fan speed
1.Select .
u When the left or right side of the
is selected, the fan speed level goes up or
down one level at a time.
2. Change the fan speed with one of the
following:
The fan speed level indicators: Select your
desired speed level. The smaller indicator is
for a slower speed, and the larger for a
faster speed.
(+/(-: To go up or down one level at a
time.
Fan Auto : The system automatically selects
the fan speed most suitable to the ambient
environment.
1 SYNC on and off
When the system is not in SYNC mode, the driver’s
side temperature and th e front passenger’s side
temperature can be set separately.
You can also turn off SYNC mode by changing the
front passenger’s si de temperature.
1Changing the fan speed
While the climate control system is in auto, Fan Auto
is highlighted.
Fan Speed Level Indicators
20 ACURA TLX-31TZ36500.book 209 ページ 2019年2月7日 木曜日 午後2時2分
Page 216 of 589
215
uuAudio System uUSB Port
Features
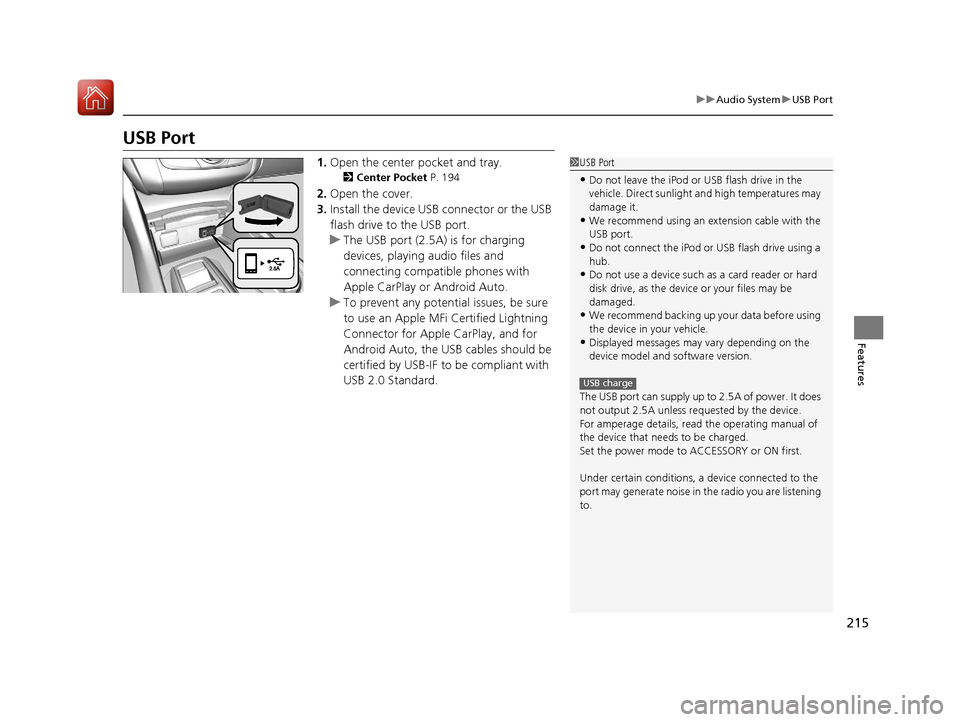
USB Port
1. Open the center pocket and tray.
2 Center Pocket P. 194
2.Open the cover.
3. Install the device USB connector or the USB
flash drive to the USB port.
u The USB port (2.5A) is for charging
devices, playing audio files and
connecting compatib le phones with
Apple CarPlay or Android Auto.
u To prevent any potenti al issues, be sure
to use an Apple MFi Certified Lightning
Connector for Apple CarPlay, and for
Android Auto, the USB cables should be
certified by USB-IF to be compliant with
USB 2.0 Standard.
1 USB Port
•Do not leave the iPod or USB flash drive in the
vehicle. Direct sunlight and high temperatures may
damage it.
•We recommend using an ex tension cable with the
USB port.
•Do not connect the iPod or USB flash drive using a
hub.
•Do not use a device such as a card reader or hard
disk drive, as the device or your files may be
damaged.
•We recommend backing up yo ur data before using
the device in your vehicle.
•Displayed messages may vary depending on the
device model and software version.
The USB port can supply up to 2.5A of power. It does
not output 2.5A unless requested by the device.
For amperage details, read the operating manual of
the device that ne eds to be charged.
Set the power mode to ACCESSORY or ON first.
Under certain condi tions, a device connected to the
port may generate noise in the radio you are listening
to.
USB charge
20 ACURA TLX-31TZ36500.book 215 ページ 2019年2月7日 木曜日 午後2時2分
Page 217 of 589
216
uuAudio System uAuxiliary Input Jack
Features
Auxiliary Input Jack
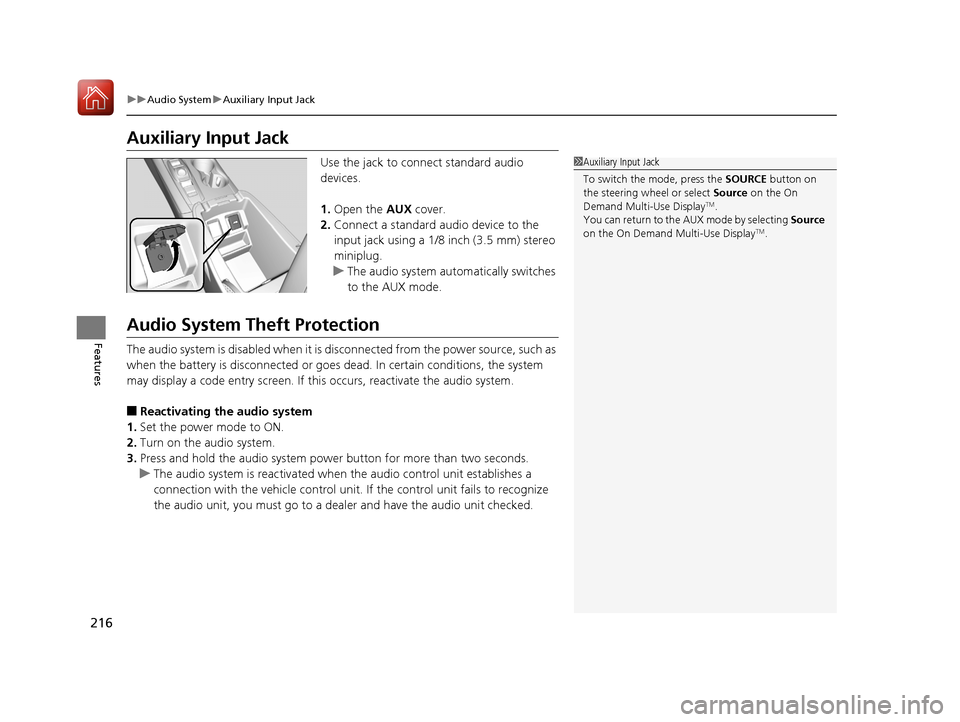
Use the jack to connect standard audio
devices.
1. Open the AUX cover.
2. Connect a standard audio device to the
input jack using a 1/8 inch (3.5 mm) stereo
miniplug.
u The audio system automatically switches
to the AUX mode.
Audio System Theft Protection
The audio system is disabled when it is di sconnected from the power source, such as
when the battery is disconnected or goes dead. In certain conditions, the system
may display a code entry screen. If this occurs, reactivate the audio system.
■Reactivating th e audio system
1. Set the power mode to ON.
2. Turn on the audio system.
3. Press and hold the audio system power button for more than two seconds.
u The audio system is reac tivated when the audio co ntrol unit establishes a
connection with the vehicle control unit. If the control unit fails to recognize
the audio unit, you must go to a dealer and have the audio unit checked.
1 Auxiliary Input Jack
To switch the mode, press the SOURCE button on
the steering wheel or select Source on the On
Demand Multi-Use Display
TM.
You can return to the AUX mode by selecting Source
on the On Demand Multi-Use Display
TM.
20 ACURA TLX-31TZ36500.book 216 ページ 2019年2月7日 木曜日 午後2時2分
Page 220 of 589
219
Features
Audio System Basic Operation
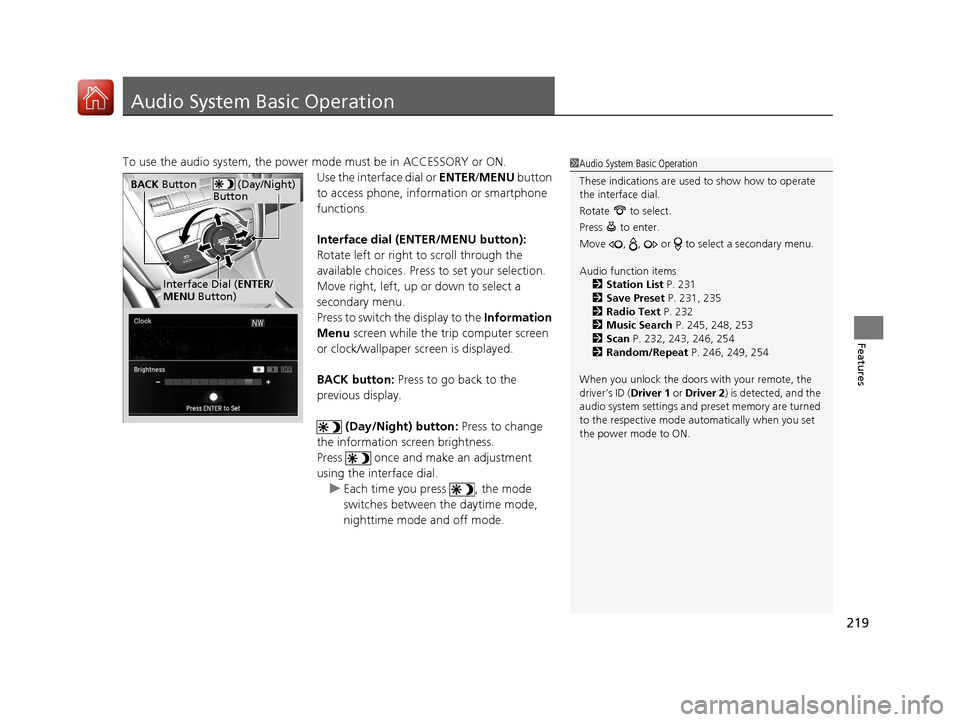
To use the audio system, the power mode must be in ACCESSORY or ON.Use the interface dial or ENTER/MENU button
to access phone, info rmation or smartphone
functions.
Interface dial (E NTER/MENU button):
Rotate left or right to scroll through the
available choices. Press to set your selection.
Move right, left, up or down to select a
secondary menu.
Press to switch the display to the Information
Menu screen while the trip computer screen
or clock/wallpaper screen is displayed.
BACK button: Press to go back to the
previous display.
(Day/Night) button: Press to change
the information screen brightness.
Press once and make an adjustment
using the interface dial. u Each time you press , the mode
switches between the daytime mode,
nighttime mode and off mode.1Audio System Basic Operation
These indications are used to show how to operate
the interface dial.
Rotate to select.
Press to enter.
Move , , or to se lect a secondary menu.
Audio function items 2 Station List P. 231
2 Save Preset P. 231, 235
2 Radio Text P. 232
2 Music Search P. 245, 248, 253
2 Scan P. 232, 243, 246, 254
2 Random/Repeat P. 246, 249, 254
When you unlock the doors with your remote, the
driver’s ID (Driver 1 or Driver 2) is detected, and the
audio system settings and pr eset memory are turned
to the respective mode automatically when you set
the power mode to ON.
(Day/Night)
ButtonBACK Button
Interface Dial ( ENTER/
MENU Button)
20 ACURA TLX-31TZ36500.book 219 ページ 2019年2月7日 木曜日 午後2時2分
Page 239 of 589
uuAudio System Basic Operation uPlaying SiriusXM ® Radio
238
Features
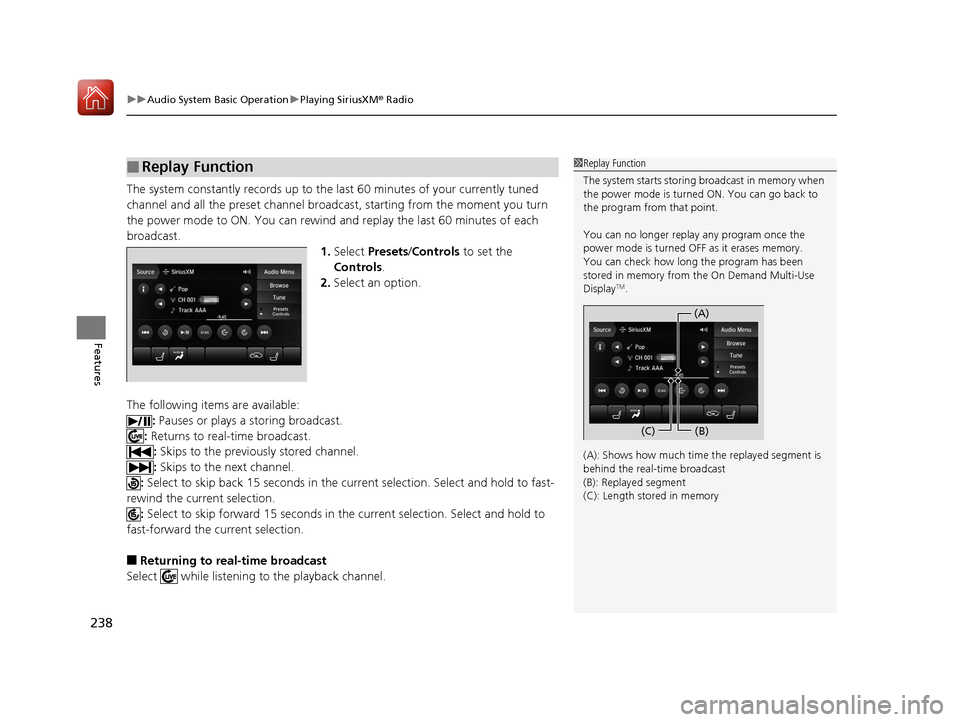
The system constantly records up to the last 60 minutes of your currently tuned
channel and all the preset channel broadc ast, starting from the moment you turn
the power mode to ON. You can rewind and replay the last 60 minutes of each
broadcast. 1.Select Presets /Controls to set the
Controls .
2. Select an option.
The following items are available: : Pauses or plays a storing broadcast.
: Returns to real-time broadcast.
: Skips to the previously stored channel.
: Skips to the next channel.
: Select to skip back 15 seconds in the current selection. Select and hold to fast-
rewind the current selection.
: Select to skip forward 15 seconds in the current selection. Select and hold to
fast-forward the current selection.
■Returning to real-time broadcast
Select while listening to the playback channel.
■Replay Function1Replay Function
The system starts storing broadcast in memory when
the power mode is turned ON. You can go back to
the program from that point.
You can no longer repl ay any program once the
power mode is turned OFF as it erases memory.
You can check how long the program has been
stored in memory from the On Demand Multi-Use
Display
TM.
(A): Shows how much time the replayed segment is
behind the real-time broadcast
(B): Replayed segment
(C): Length stored in memory
(A) (B)
(C)
20 ACURA TLX-31TZ36500.book 238 ページ 2019年2月7日 木曜日 午後2時2分
Page 244 of 589
243
uuAudio System Basic Operation uPlaying SiriusXM ® Radio
Features
Sample each channel on the selected mode for 10 seconds.
1. Select Presets /Controls to set the Controls.
2. Select SCAN.
3. Select Scan Channels or Scan Presets.
To turn off scan, select Stop Scan.
■Scan1Scan
You can select desired channel by songs using Scan
Presets .
The “Scan Songs in Preset s” function is based on
TuneScan
TM technology of SiriusXM ®.
The “Featured Channels ” function is based on
Featured Favorites
TM technology of SiriusXM ®.
TuneScan
TM and Featured FavoritesTM are registered
trademarks of SiriusXM ® Radio, Inc.
Scan Mode Menu Items
Scan Channels: Scans for channels with a strong
signal in the selected mode.
Scan Presets: Scans for desired preset channel by
songs. Select (skip up) or (skip down) to
skip to the next/previ ous stored selection.
20 ACURA TLX-31TZ36500.book 243 ページ 2019年2月7日 木曜日 午後2時2分
Page 245 of 589
244
uuAudio System Basic Operation uPlaying a CD
Features
Playing a CD
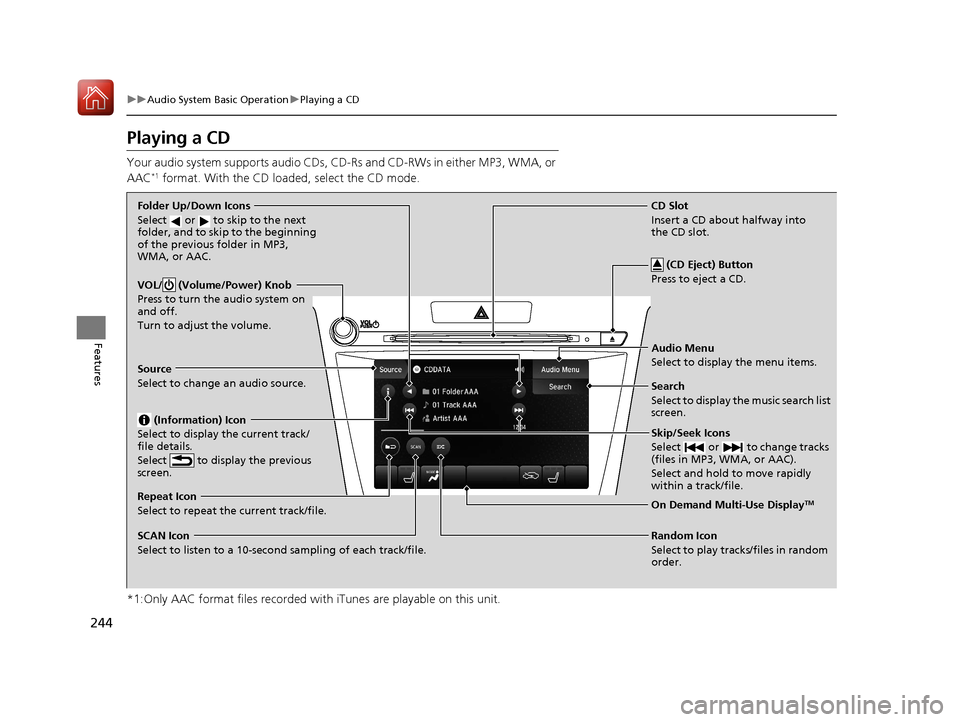
Your audio system supports audio CDs, CD-Rs and CD-RWs in either MP3, WMA, or
AAC*1 format. With the CD loaded, select the CD mode.
*1:Only AAC format files recorded with iTunes are playable on this unit.
VOL/ (Volume/Power) Knob
Press to turn the audio system on
and off.
Turn to adjust the volume.
Skip/Seek Icons
Select or to change tracks
(files in MP3, WMA, or AAC).
Select and hold to move rapidly
within a track/file.
Audio Menu
Select to display the menu items.
Source
Select to change an audio source.
(Information) Icon
Select to display the current track/
file details.
Select to display the previous
screen.
Search
Select to display the music search list
screen.
Folder Up/Down Icons
Select or to skip to the next
folder, and to skip to the beginning
of the previous folder in MP3,
WMA, or AAC.
On Demand Multi-Use DisplayTMRepeat Icon
Select to repeat the current track/file.
SCAN Icon
Select to listen to a 10-second sampling of each track/file. Random Icon
Select to play tracks/files in random
order.
(CD Eject) Button
Press to eject a CD.
CD Slot
Insert a CD about halfway into
the CD slot.
20 ACURA TLX-31TZ36500.book 244 ページ 2019年2月7日 木曜日 午後2時2分