lock Acura TLX 2020 Manual PDF
[x] Cancel search | Manufacturer: ACURA, Model Year: 2020, Model line: TLX, Model: Acura TLX 2020Pages: 589, PDF Size: 32.88 MB
Page 175 of 589
174
uuOperating the Switches Around the Steering Wheel uDriving Position Memory System
Controls
Driving Position Memory System
You can store two driver’s seat (except for power lumbar and thigh support*) and
door mirror positions with the driving position memory system.
When you unlock and open the driver’s doo r with a remote transmitter, or keyless
access system, door mirrors adjust to one of the two preset positions and the seat
adjusts to retracted positions of one of the two preset positions automatically.
The seat will move to th e stored position when you set the power mode to
ACCESSORY.
When you enter the vehicle, the multi-in formation display briefly shows you which
remote transmitter you used to unlock the vehicle.
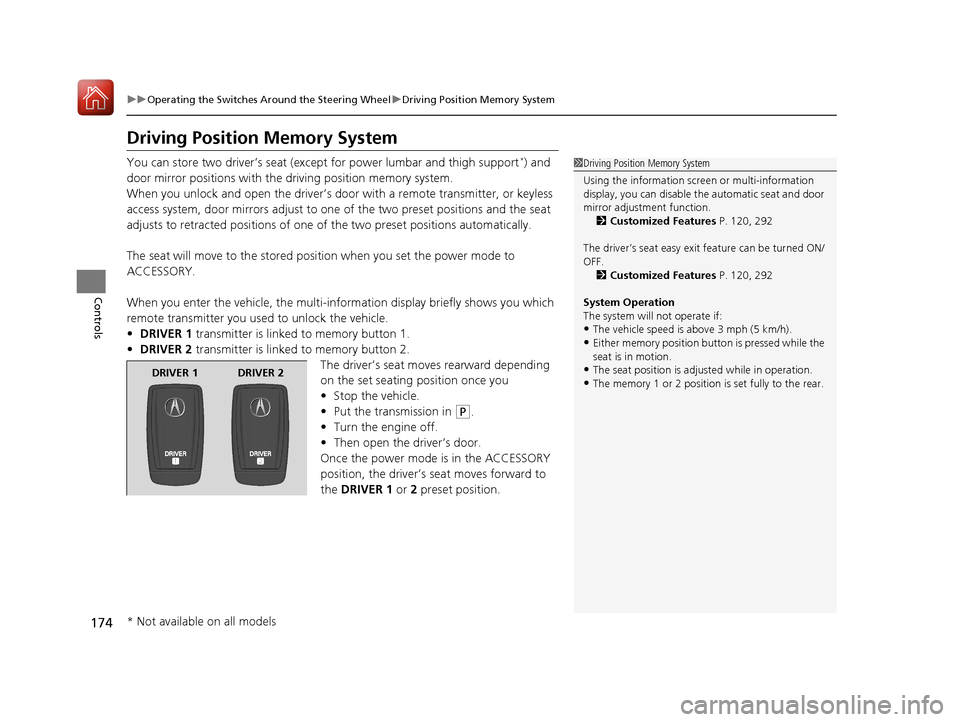
• DRIVER 1 transmitter is linked to memory button 1.
• DRIVER 2 transmitter is linked to memory button 2.
The driver’s seat moves rearward depending
on the set seating position once you
•Stop the vehicle.
• Put the transmission in
(P.
• Turn the engine off.
• Then open the driver’s door.
Once the power mode is in the ACCESSORY
position, the driver’s seat moves forward to
the DRIVER 1 or 2 preset position.
1 Driving Position Memory System
Using the information scr een or multi-information
display, you can disable th e automatic seat and door
mirror adjustment function. 2 Customized Features P. 120, 292
The driver’s seat easy exit feature can be turned ON/
OFF. 2 Customized Features P. 120, 292
System Operation
The system will not operate if:
•The vehicle speed is above 3 mph (5 km/h).
•Either memory position button is pressed while the
seat is in motion.
•The seat position is adju sted while in operation.
•The memory 1 or 2 position is set fully to the rear.DRIVER 1 DRIVER 2
* Not available on all models
20 ACURA TLX-31TZ36500.book 174 ページ 2019年2月7日 木曜日 午後2時2分
Page 177 of 589
176
uuOperating the Switches Around the Steering Wheel uAdjusting the Steering Wheel
Controls
Adjusting the Steering Wheel
The steering wheel height and distance from your body can be adjusted so that you
can comfortably grip the steering wheel in an appropriate driving posture.
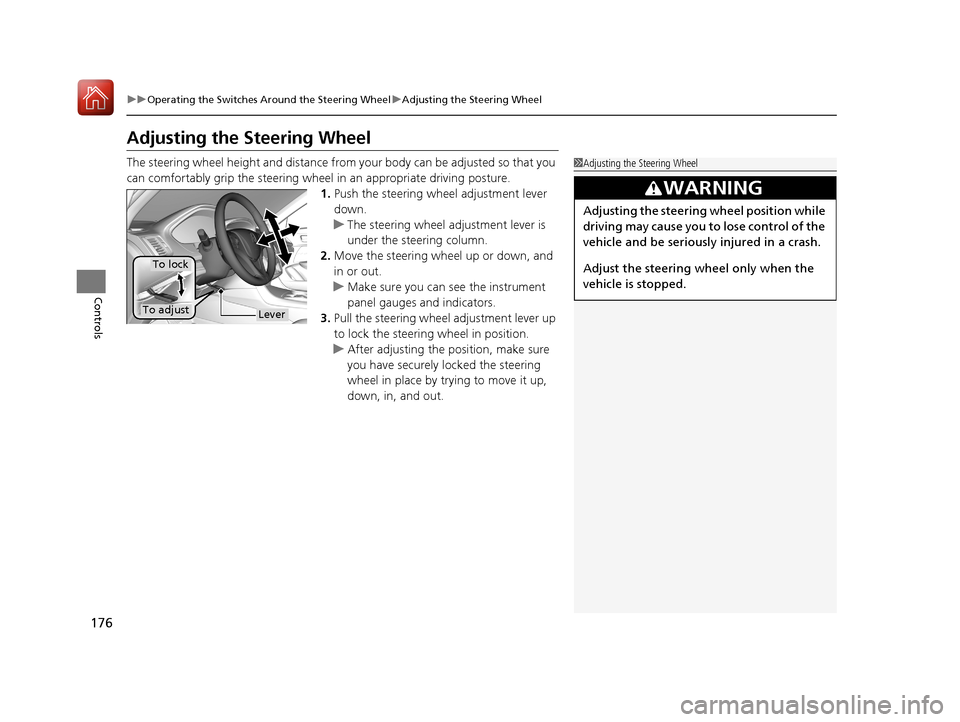
1.Push the steering wheel adjustment lever
down.
u The steering wheel adjustment lever is
under the steering column.
2. Move the steering wheel up or down, and
in or out.
u Make sure you can see the instrument
panel gauges and indicators.
3. Pull the steering wheel adjustment lever up
to lock the steerin g wheel in position.
u After adjusting the position, make sure
you have securely locked the steering
wheel in place by trying to move it up,
down, in, and out.1Adjusting the Steering Wheel
3WARNING
Adjusting the steering wheel position while
driving may cause you to lose control of the
vehicle and be seriously injured in a crash.
Adjust the steering wheel only when the
vehicle is stopped.
LeverTo adjust
To lock
20 ACURA TLX-31TZ36500.book 176 ページ 2019年2月7日 木曜日 午後2時2分
Page 180 of 589

179
uuAdjusting the Mirrors uPower Door Mirrors
Controls
■Folding in th e door mirrors
Press the lock button on the remote transm itter, or press the door lock button on
any door. u The mirrors start folding in automatically.
■Folding out the door mirrors
Unlock the driver’s door using the re mote transmitter or keyless access system.
u The mirrors start folding out automatically.
■Automatic Folding Door Mirror Function*1Automatic Folding Door Mirror Function*
You cannot turn the automatic folding out
automatically if they have been folded in using the
folding button.
You can turn the automa tic folding door mirror
function on and off. 2 Customized Features P. 120, 292
Door mirrors will not fold automatically when locking
from inside the vehicle usi ng lock tab or master door
lock switch.
* Not available on all models
20 ACURA TLX-31TZ36500.book 179 ページ 2019年2月7日 木曜日 午後2時2分
Page 186 of 589
185
uuAdjusting the Seats uHead Restraints
Controls
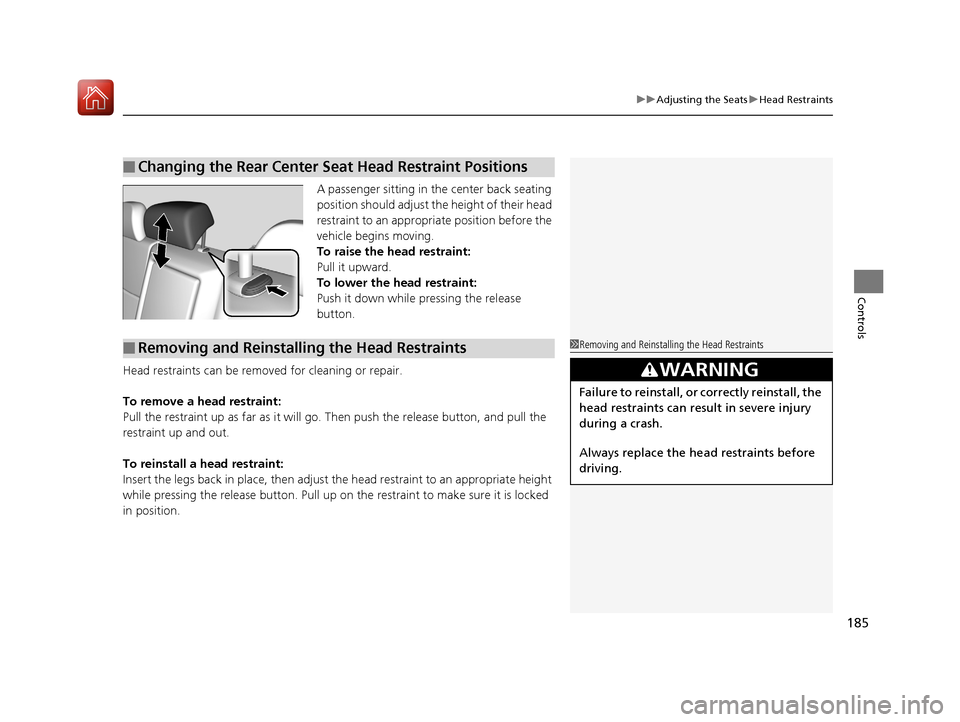
A passenger sitting in the center back seating
position should adjust the height of their head
restraint to an appropriate position before the
vehicle begins moving.
To raise the head restraint:
Pull it upward.
To lower the head restraint:
Push it down while pressing the release
button.
Head restraints can be removed for cleaning or repair.
To remove a head restraint:
Pull the restraint up as far as it will go. Then push the release button, and pull the
restraint up and out.
To reinstall a head restraint:
Insert the legs back in place, then adjust the head restraint to an appropriate height
while pressing the release button. Pull up on the restraint to make sure it is locked
in position.
■Changing the Rear Center Seat Head Restraint Positions
■Removing and Reinstalling the Head Restraints1 Removing and Reinstalling the Head Restraints
3WARNING
Failure to reinstall, or correctly reinstall, the
head restraints can result in severe injury
during a crash.
Always replace the he ad restraints before
driving.
20 ACURA TLX-31TZ36500.book 185 ページ 2019年2月7日 木曜日 午後2時2分
Page 188 of 589
187
uuAdjusting the Seats uRear Seats
Controls
Rear Seats
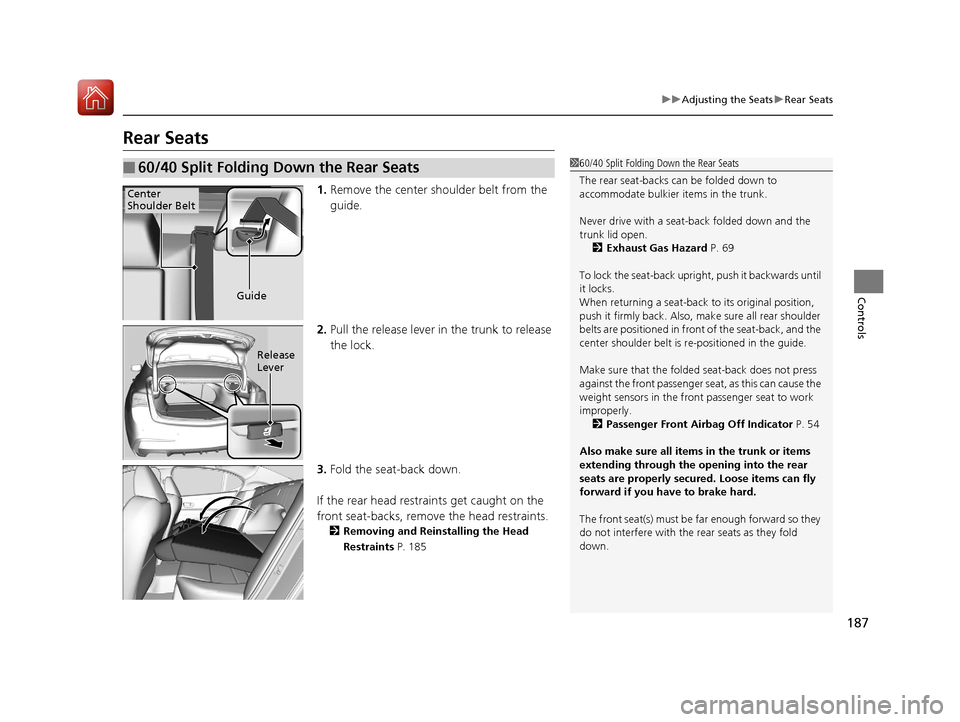
1. Remove the center shoulder belt from the
guide.
2. Pull the release lever in the trunk to release
the lock.
3. Fold the seat-back down.
If the rear head restraints get caught on the
front seat-backs, remove the head restraints.
2Removing and Reinstalling the Head
Restraints P. 185
■60/40 Split Folding Down the Rear Seats160/40 Split Folding Down the Rear Seats
The rear seat-backs can be folded down to
accommodate bulkier items in the trunk.
Never drive with a seat-back folded down and the
trunk lid open.
2 Exhaust Gas Hazard P. 69
To lock the seat-back upri ght, push it backwards until
it locks.
When returning a seat-back to its original position,
push it firmly back. Also, m ake sure all rear shoulder
belts are positioned in front of the seat-back, and the
center shoulder belt is re -positioned in the guide.
Make sure that the folded seat-back does not press
against the front passenger seat, as this can cause the
weight sensors in the front passenger seat to work
improperly. 2 Passenger Front Airbag Off Indicator P. 54
Also make sure all items in the trunk or items
extending through the opening into the rear
seats are properly secured. Loose items can fly
forward if you have to brake hard.
The front seat(s) must be far enough forward so they
do not interfere with the rear seats as they fold
down.
Center
Shoulder Belt
Guide
Release
Lever
20 ACURA TLX-31TZ36500.book 187 ページ 2019年2月7日 木曜日 午後2時2分
Page 190 of 589
189Continued
Controls
Interior Lights/Interior Convenience Items
Interior Lights
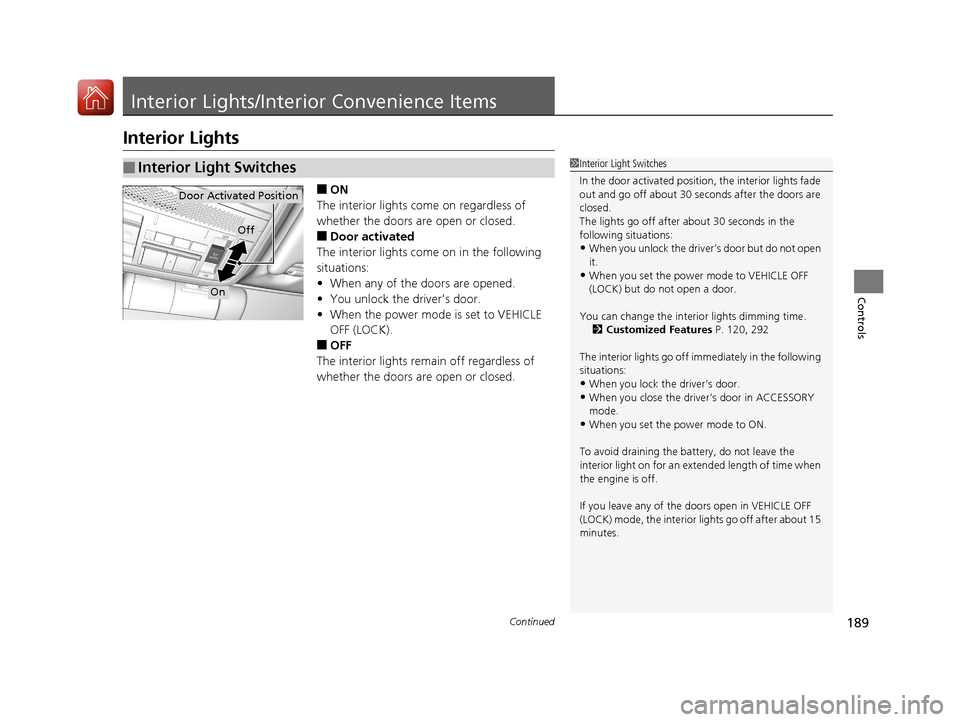
■ON
The interior lights come on regardless of
whether the doors are open or closed.
■Door activated
The interior lights come on in the following
situations:
• When any of the doors are opened.
• You unlock the driver’s door.
• When the power mode is set to VEHICLE
OFF (LOCK).
■OFF
The interior lights remain off regardless of
whether the doors are open or closed.
■Interior Light Switches1 Interior Light Switches
In the door activated position, the interior lights fade
out and go off about 30 se conds after the doors are
closed.
The lights go off after about 30 seconds in the
following situations:
•When you unlock the driver’s door but do not open
it.
•When you set the power mode to VEHICLE OFF
(LOCK) but do not open a door.
You can change the interi or lights dimming time.
2 Customized Features P. 120, 292
The interior lights go off i mmediately in the following
situations:
•When you lock the driver’s door.•When you close the driver’s door in ACCESSORY
mode.
•When you set the power mode to ON.
To avoid draining the ba ttery, do not leave the
interior light on for an extended length of time when
the engine is off.
If you leave any of the doors open in VEHICLE OFF
(LOCK) mode, the interior lights go off after about 15
minutes.
Door Activated Position
Off
On
20 ACURA TLX-31TZ36500.book 189 ページ 2019年2月7日 木曜日 午後2時2分
Page 193 of 589
192
uuInterior Lights/Interior Convenience Items uInterior Convenience Items
Controls
Interior Convenience Items
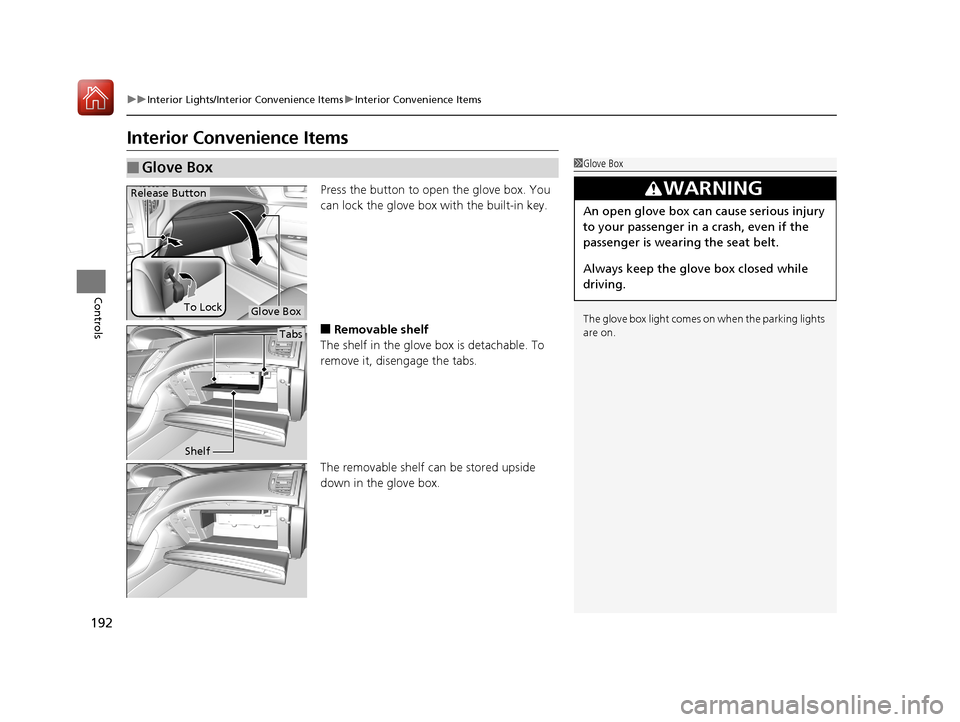
Press the button to open the glove box. You
can lock the glove box with the built-in key.
■Removable shelf
The shelf in the glove box is detachable. To
remove it, disengage the tabs.
The removable shelf can be stored upside
down in the glove box.
■Glove Box1 Glove Box
The glove box light comes on when the parking lights
are on.
3WARNING
An open glove box can cause serious injury
to your passenger in a crash, even if the
passenger is wearing the seat belt.
Always keep the glove box closed while
driving.
Glove Box
Release Button
To Lock
Tabs
Shelf
20 ACURA TLX-31TZ36500.book 192 ページ 2019年2月7日 木曜日 午後2時2分
Page 207 of 589
uuClimate Control System uUsing Automatic Climate Control
206
Controls
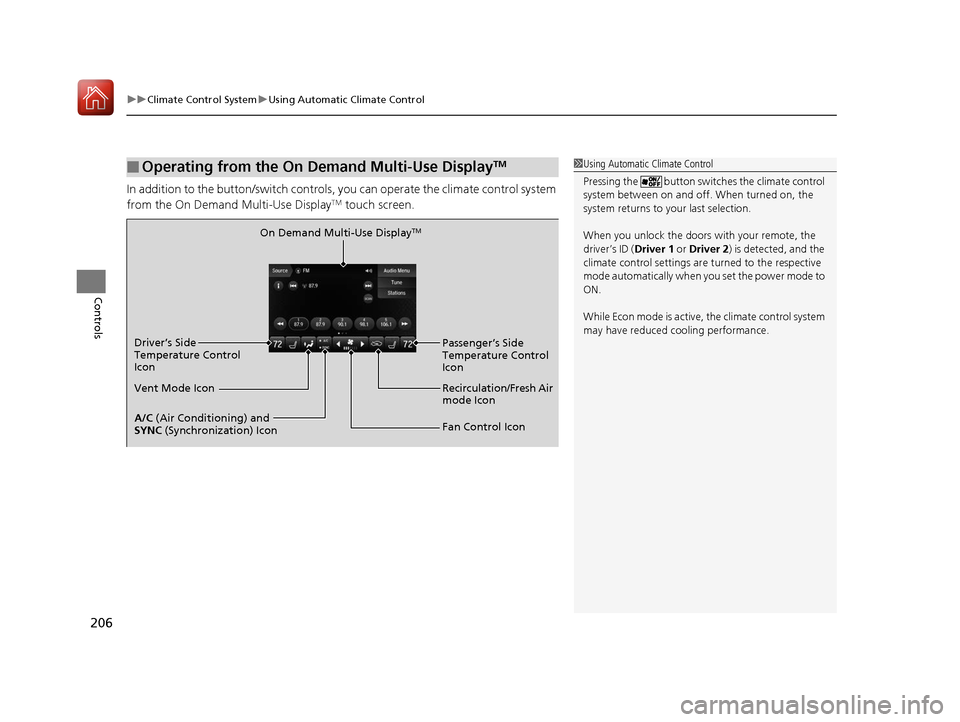
In addition to the button/switch controls, you can operate the climate control system
from the On Demand Multi-Use DisplayTM touch screen.
■Operating from the On Demand Multi-Use DisplayTM1 Using Automatic Climate Control
Pressing the button switch es the climate control
system between on and off. When turned on, the
system returns to your last selection.
When you unlock the doors with your remote, the
driver’s ID (Driver 1 or Driver 2) is detected, and the
climate control settings are turned to the respective
mode automatically when you set the power mode to
ON.
While Econ mode is active, the climate control system
may have reduced c ooling performance.
On Demand Multi-Use DisplayTM
A/C (Air Conditioning) and
SYNC (Synchronization) Icon
Vent Mode Icon Driver’s Side
Temperature Control
Icon
Recirculation/Fresh Air
mode Icon
Fan Control Icon Passenger’s Side
Temperature Control
Icon
20 ACURA TLX-31TZ36500.book 206 ページ 2019年2月7日 木曜日 午後2時2分
Page 220 of 589
219
Features
Audio System Basic Operation
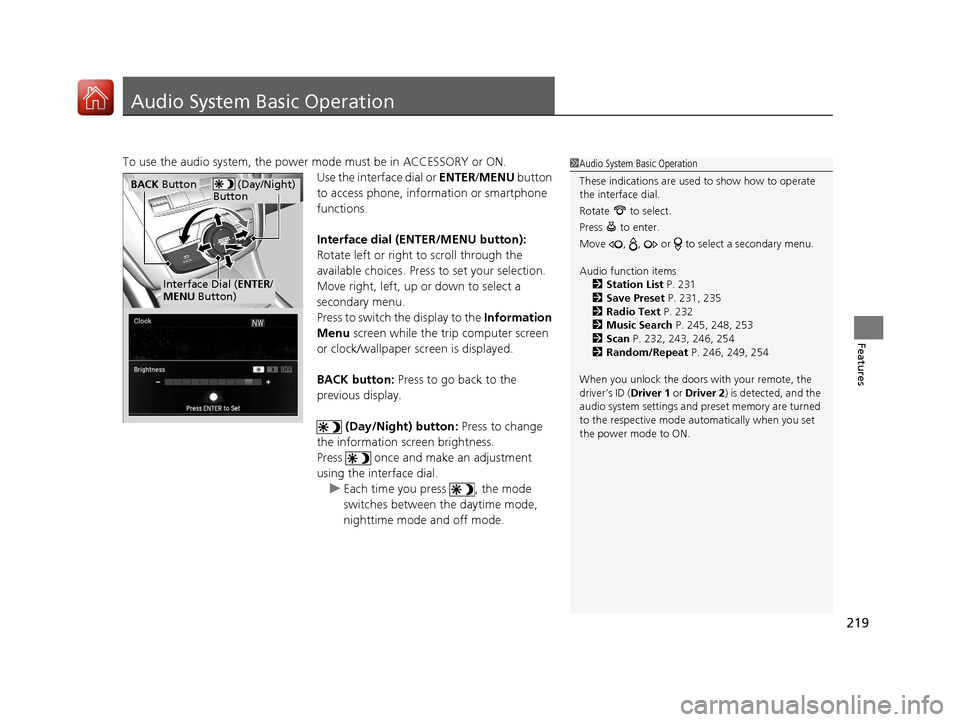
To use the audio system, the power mode must be in ACCESSORY or ON.Use the interface dial or ENTER/MENU button
to access phone, info rmation or smartphone
functions.
Interface dial (E NTER/MENU button):
Rotate left or right to scroll through the
available choices. Press to set your selection.
Move right, left, up or down to select a
secondary menu.
Press to switch the display to the Information
Menu screen while the trip computer screen
or clock/wallpaper screen is displayed.
BACK button: Press to go back to the
previous display.
(Day/Night) button: Press to change
the information screen brightness.
Press once and make an adjustment
using the interface dial. u Each time you press , the mode
switches between the daytime mode,
nighttime mode and off mode.1Audio System Basic Operation
These indications are used to show how to operate
the interface dial.
Rotate to select.
Press to enter.
Move , , or to se lect a secondary menu.
Audio function items 2 Station List P. 231
2 Save Preset P. 231, 235
2 Radio Text P. 232
2 Music Search P. 245, 248, 253
2 Scan P. 232, 243, 246, 254
2 Random/Repeat P. 246, 249, 254
When you unlock the doors with your remote, the
driver’s ID (Driver 1 or Driver 2) is detected, and the
audio system settings and pr eset memory are turned
to the respective mode automatically when you set
the power mode to ON.
(Day/Night)
ButtonBACK Button
Interface Dial ( ENTER/
MENU Button)
20 ACURA TLX-31TZ36500.book 219 ページ 2019年2月7日 木曜日 午後2時2分
Page 224 of 589
223
uuAudio System Basic Operation uInformation Screen
Continued
Features
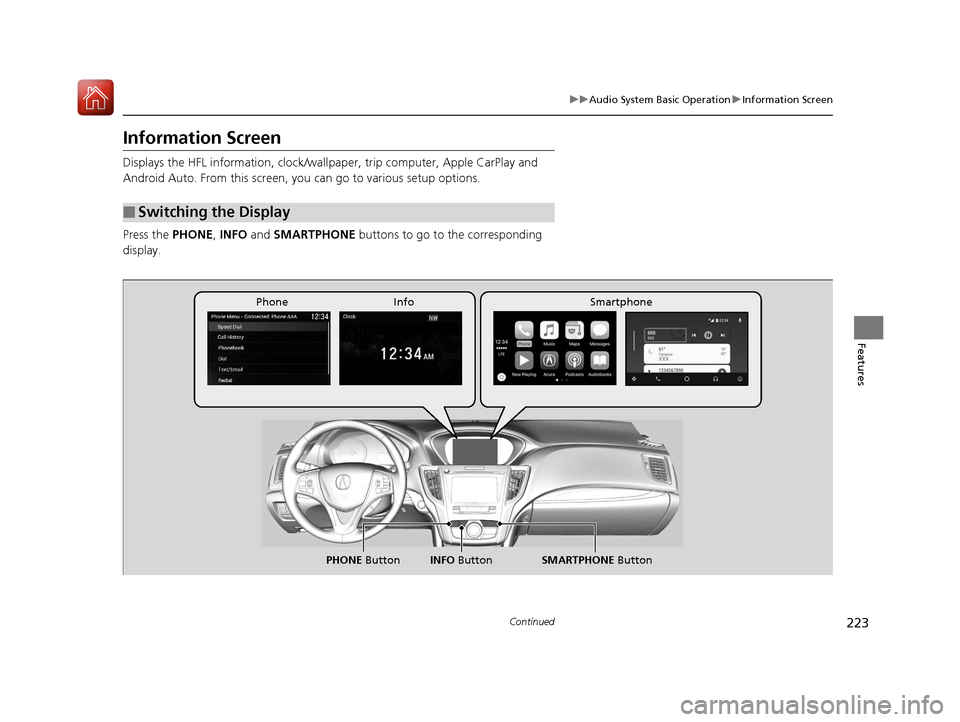
Information Screen
Displays the HFL information, clock/wall paper, trip computer, Apple CarPlay and
Android Auto. From this screen, you can go to various setup options.
Press the PHONE, INFO and SMARTPHONE buttons to go to the corresponding
display.
■Switching the Display
SMARTPHONE Button
PHONE Button INFO Button
Phone Info Smartphone
20 ACURA TLX-31TZ36500.book 223 ページ 2019年2月7日 木曜日 午後2時2分