glove box Acura TSX 2004 Owner's Manual
[x] Cancel search | Manufacturer: ACURA, Model Year: 2004, Model line: TSX, Model: Acura TSX 2004Pages: 364, PDF Size: 5.35 MB
Page 60 of 364

This section gives inf ormation about
the controls and displays that
contribute to the daily operation of
your Acura. All the essential controls
are within easy reach............................
Control Locations .58
...............................
Indicator Lights .59
.............................................
Gauges .65
...............................
Speedometer .65
.................................
Tachometer .65
.....................................
Odometer .65
Outside Temperature ...................................
Indicator .66
...................................
Trip Meter .66 ...................
Temperature Gauge . 66
..................................
Fuel Gauge .67
Maintenance Required ...................................
Indicator .67
Controls Near the Steering .......................................
Wheel .69
...................................
Headlights .70
Automatic Lighting Off .....................................
Feature .71
............
Daytime Running Lights . 72
....
Instrument Panel Brightness . 72
................................
Turn Signals .73
.....................
Windshield Wipers .73
..................
Windshield Washers . 75
..........................
Hazard Warning .75
.............
Rear Window Def ogger . 75
......
Steering Wheel Adjustment . 76
...............................
Keys and Locks .77
..............................................
Keys .77
....................
Immobilizer System . 79
............................
Ignition Switch .80
......................
Power Door Locks .81
...................
Remote Transmitter . 83
..............
Childproof Door Locks . 87
...........................................
Trunk .87
........
Emergency Trunk Opener . 88....................................
Glove Box .89
............................
Seat Adjustments .90
Driver’s Seat Full Power ............................
Adjustments .90
...........
Driver’s Lumbar Support . 91
Front Passenger’s Seat ............................
Adjustments .92
..........................
Head Restraints .93
.......................
Folding Rear Seat .94
......................
Rear Seat Armrest .95
....................................
Seat Heaters .96
..............................
Power Windows .97
.......................................
Moonroof .101
...........................................
Mirrors .102
..
Adjusting the Power Mirrors . 102
...............................
Parking Brake .104
.................
Console Compartment . 105
..........................................
Armrest .105
.........................
Beverage Holders .106
.........................
Center CD Pocket .107
.................................
Utility Pocket .107
........................................
Sun Visor .108
................................
Vanity Mirror .108
........................
Sunglasses Holder .109
............
Accessory Power Sockets . 109
...............................
Interior Lights .110
Instruments and Controls
Inst rument s and Cont rols57
Page 80 of 364
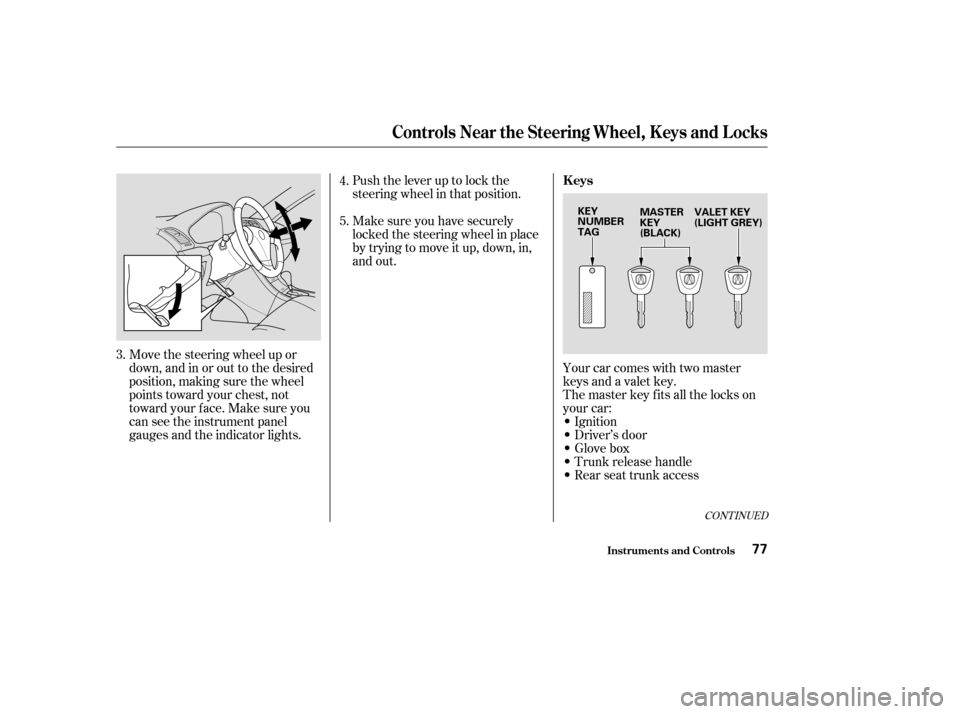
Push the lever up to lock the
steering wheel in that position.
Move the steering wheel up or
down, and in or out to the desired
position, making sure the wheel
points toward your chest, not
toward your f ace. Make sure you
can see the instrument panel
gauges and the indicator lights. Make sure you have securely
locked the steering wheel in place
by trying to move it up, down, in,
and out.
Your car comes with two master
keys and a valet key.
The master key fits all the locks on
your car:
Ignition
Driver’s door
Glovebox
Trunk release handle
Rear seat trunk access
3. 4.
5.
CONT INUED
Keys
Controls Near the Steering Wheel, K eys and L ocks
Inst rument s and Cont rols77
VALET KEY
(LIGHT GREY)
MASTER
KEY
(BLACK)
KEY
NUMBER
TAG
Page 81 of 364

The valet key works only in the
ignition and the driver’s door lock.
You can keep the trunk release
handle, rear seat trunk access, and
glove box locked when you leave
your car and the valet key at a
parking f acility.
Youshouldhavereceivedakey
number tag with your keys. You will
need this key number if you ever
have to get a lost key replaced. Keep
the tag stored in a safe place. If you
need to replace a key, use only an
Acura-approved key blank.These keys contain electronic
circuits that are activated by the
Immobilizer System. They will not
work to start the engine if the
circuits are damaged.
Protect the keys f rom direct
sunlight, high temperature, and
high humidity.
Donotdropthekeysorsetheavy
objects on them.
Keep the keys away f rom liquids.
If they get wet, dry them
immediately with a sof t cloth.
The keys do not contain batteries.
Do not try to take them apart. Your car also comes with two remote
transmitters; see page for an
explanation of the operation.
80Remote Transmitter
Keys and Locks
Inst rument s and Cont rols78
Page 92 of 364
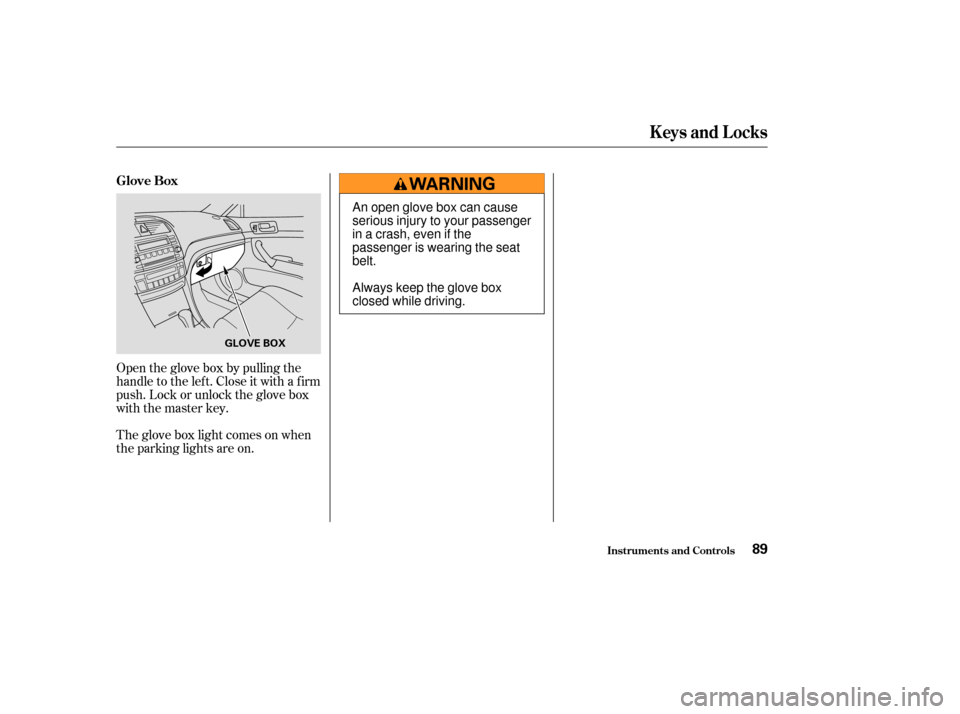
Open the glove box by pulling the
handle to the lef t. Close it with a f irm
push. Lock or unlock the glove box
with the master key.
The glove box light comes on when
the parking lights are on. Glove Box
Keys and Locks
Inst rument s and Cont rols89
GLOVE BOX
An open glove box can cause
serious injury to your passenger
inacrash,evenifthe
passenger is wearing the seat
belt.
Always keep the glove box
closed while driving.
Page 196 of 364
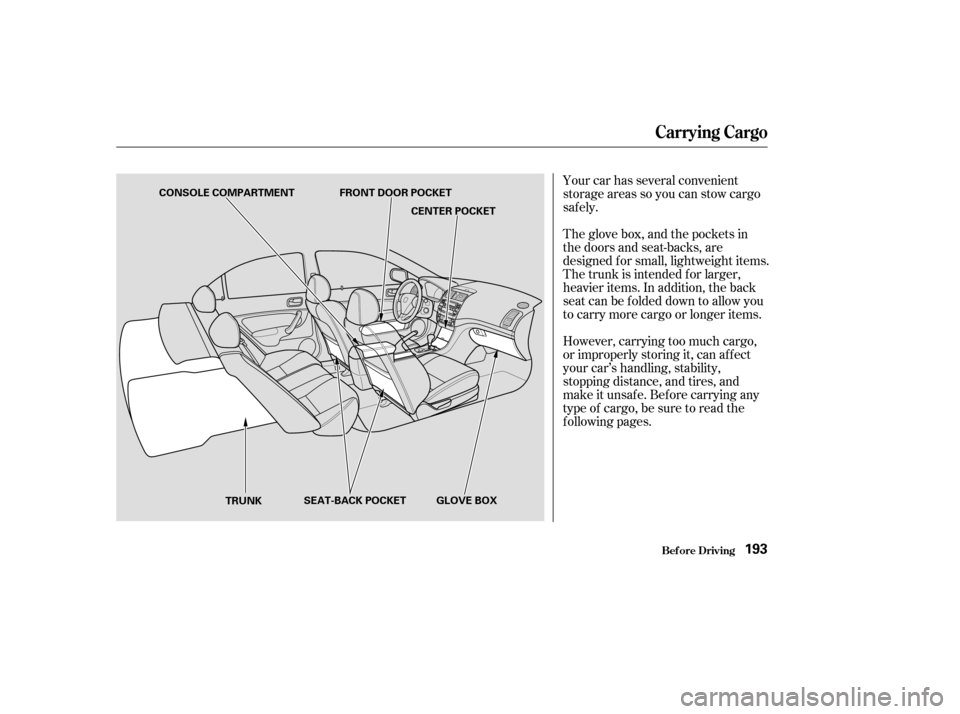
Your car has several convenient
storage areas so you can stow cargo
saf ely.
The glove box, and the pockets in
the doors and seat-backs, are
designed f or small, lightweight items.
The trunk is intended f or larger,
heavier items. In addition, the back
seatcanbefoldeddowntoallowyou
to carry more cargo or longer items.
However, carrying too much cargo,
or improperly storing it, can af f ect
your car’s handling, stability,
stopping distance, and tires, and
make it unsaf e. Bef ore carrying any
type of cargo, be sure to read the
f ollowing pages.
Carrying Cargo
Bef ore Driving193
CONSOLE COMPARTMENT FRONT DOOR POCKETTRUNK GLOVE BOX
SEAT-BACK POCKET CENTER POCKET
Page 198 of 364
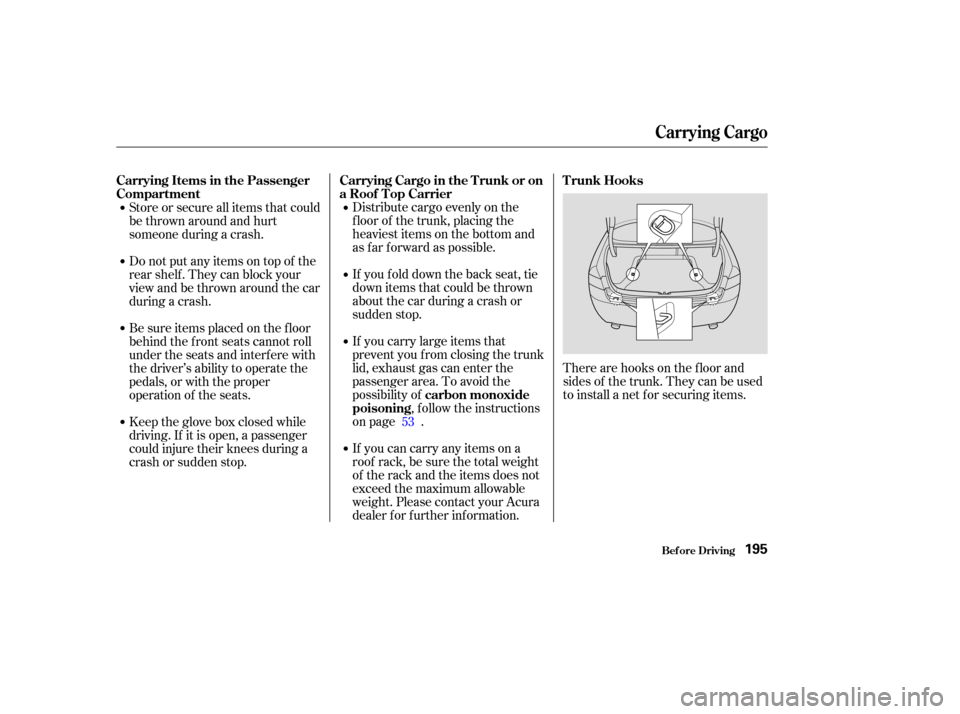
There are hooks on the f loor and
sides of the trunk. They can be used
to install a net f or securing items.
Distribute cargo evenly on the
f loor of the trunk, placing the
heaviest items on the bottom and
as f ar f orward as possible.
If youfolddownthebackseat,tie
down items that could be thrown
about the car during a crash or
sudden stop.
If you carry large items that
prevent you f rom closing the trunk
lid, exhaust gas can enter the
passenger area. To avoid the
possibility of
, f ollow the instructions
on page .
If you can carry any items on a
roof rack,besurethetotalweight
of the rack and the items does not
exceed the maximum allowable
weight. Please contact your Acura
dealer f or f urther inf ormation.
Store or secure all items that could
be thrown around and hurt
someone during a crash.
Do not put any items on top of the
rear shelf . They can block your
view and be thrown around the car
during a crash.
Be sure items placed on the f loor
behind the f ront seats cannot roll
under the seats and interf ere with
the driver’s ability to operate the
pedals, or with the proper
operation of the seats.
Keep the glove box closed while
driving. If it is open, a passenger
could injure their knees during a
crash or sudden stop.
53
Carrying Cargo
Bef ore Driving
T runk Hooks
Carrying Cargo in the Trunk or on
a Roof T op Carrier
carbon monoxide
poisoning
Carrying Items in the Passenger
Compartment
195
Page 273 of 364
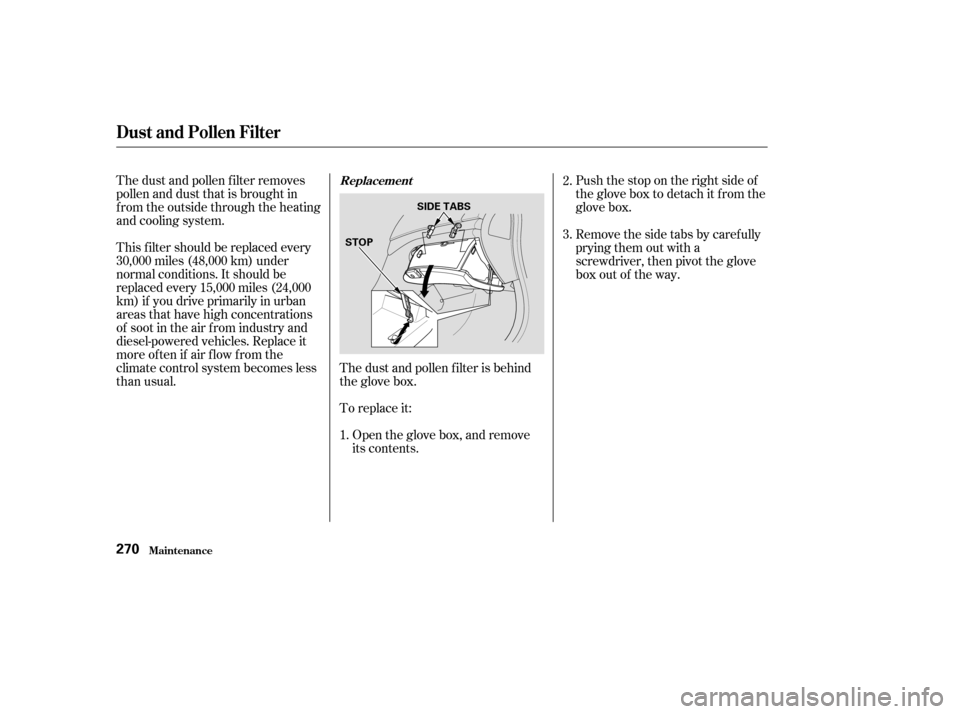
The dust and pollen f ilter removes
pollen and dust that is brought in
f rom the outside through the heating
andcoolingsystem.To replace it: Push the stop on the right side of
the glove box to detach it from the
glove box.
This f ilter should be replaced every
30,000 miles (48,000 km) under
normal conditions. It should be
replaced every 15,000 miles (24,000
km) if you drive primarily in urban
areas that have high concentrations
of soot in the air f rom industry and
diesel-powered vehicles. Replace it
more of ten if air f low f rom the
climate control system becomes less
than usual. The dust and pollen f ilter is behind
the glove box.
Open the glove box, and remove
its contents. Remove the side tabs by carefully
prying them out with a
screwdriver, then pivot the glove
box out of the way.
1. 3. 2.Replacement
Dust and Pollen Filter
Maint enance270
STOP
SIDE TABS
Page 274 of 364
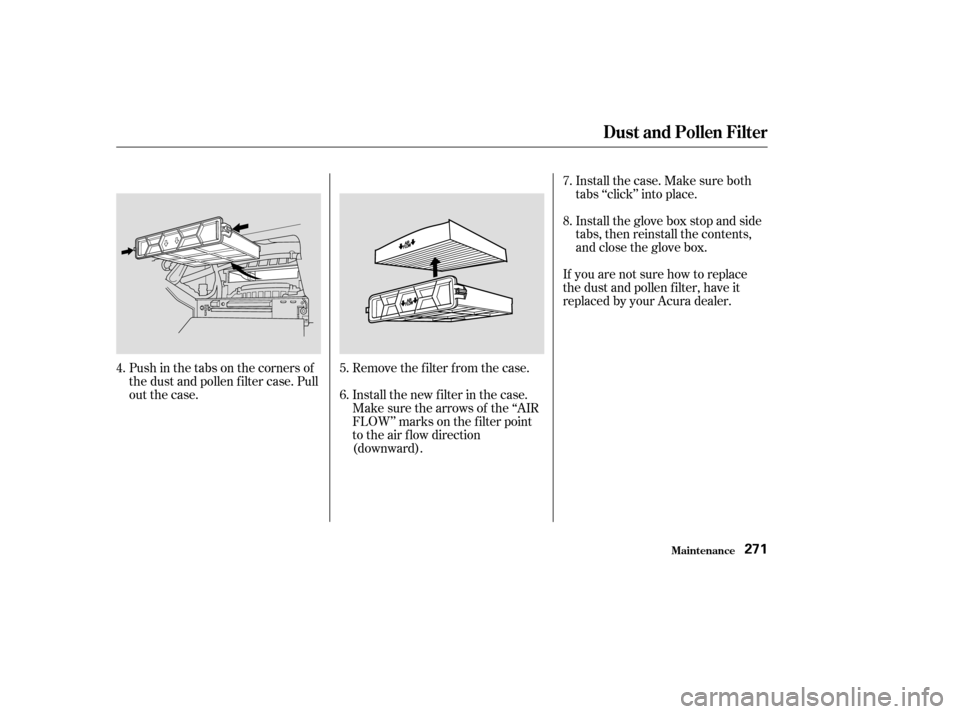
Pushinthetabsonthecornersof
the dust and pollen f ilter case. Pull
out the case.Remove the filter from the case.
Install the new f ilter in the case.
Make sure the arrows of the ‘‘AIR
FLOW’’ marks on the f ilter point
to the air flow direction
(downward).Install the case. Make sure both
tabs ‘‘click’’ into place.
Install the glove box stop and side
tabs, then reinstall the contents,
and close the glove box.
If you are not sure how to replace
the dust and pollen f ilter, have it
replaced by your Acura dealer.
5.
6. 7.
8.
4.
Dust and Pollen Filter
Maint enance271
Page 359 of 364

................
Gas Station Procedures . 184
Gauges ...
Engine Coolant Temperature . 66
...............................................
Fuel .67
...............................
Speedometer .65
.................................
Tachometer .65
Gearshif t Lever Positions ..........
Automatic Transmission . 204
6-speed Manual .........................
Transmission .201
..............................
Glass Cleaning .300
........................................
Glove Box .89
.............
Halogen Headlight Bulbs . 282
..............
Hazard Warning Flashers . 75
........................................
Headlights .70
........................................
Aiming .282
..............
Automatic Lighting Off . 71
............
Daytime Running Lights . 72
............
Low Beams, Turning on . 70
.........................
Reminder Chime .70
........
Replacing Halogen Bulbs . 282
...................................
Turning on .70
..............................
Head Restraints .93 .....................
Heating and Cooling .114
...............................
Heated Mirror .103
.............
High Altitude, Starting at . 200
HomeLink Wireless Control ........................................
System .177
.......................
Hood, Opening the .186
...........................
Hydraulic Clutch .260
.................................
Hydroplaning .220
...
Identif ication Number, Vehicle . 332
Ignition ..............................................
Keys .77
...........................................
Switch .80
............
Timing Control System . 343
........................
Immobilizer System .79
.........
Important Safety Precautions . 6
.........
Indicators, Instrument Panel . 59
...............................
Inf ant Restraint .30
......................................
Inf ant Seats .30
..........
Tether Anchorage Points . 39
...................
Inf lation, Proper Tire . 273
.................................
Inside Mirror .102
.............................
Inspection, Tire .275
............................
Instrument Panel .59 ........
Instrument Panel Brightness . 72
...........................
Interior Cleaning .298
...............................
Interior Lights .110
........................................
Introduction .i
........................
Jacking up the Car .307
.......................................
Jack, Tire .305
................................
Jump Starting .312
..................................................
Keys .77
.......................
Label, Certif ication .332
.................
Lane Change, Signaling . 73
........................
Lap/Shoulder Belts .43
.........................
Leather, Cleaning .299
Lights ....................
Bulb Replacement .282
.......................................
Indicator .59
.........................................
Parking .70
..................................
Turn Signal .73
Index
H IJ
K
L
IV
Page 360 of 364
CONT INUED
......
LOCK (Ignition Key Position) . 80
Locks .......
Anti-thef t Steering Column . 80
............................
Fuel Fill Door .184
....................................
Glove Box .89
...........................................
Trunk .87
........................
Low Coolant Level .189
...
Lower Gear, Downshif ting to a . 201
...
Low Oil Pressure Indicator . 60,317
...
Lubricant Specif ications Chart . 334
.........................................
Luggage .193
..................................
Maintenance .229
...
Owner Maintenance Checks . 242
........................................
Record .239
......................
Required Indicator .67
..........................................
Saf ety .230
.............................
Schedule .234-238
.
Malf unction Indicator Lamp . 60,319
...................
Manual Transmission . 202
........
Manual Transmission Fluid . 257
...............................
Meters, Gauges .65
...................
Methanol in Gasoline . 340
........................
Mirrors, Adjusting .102 .......................................
Moonroof .101
......................
Closing Manually .322
...................................
Operation .101
...................
Neutral Gear Position . 206
..................
New Vehicle Break-in . 184
.....................
Normal Shif t Speeds .202
..................
NOTICE, Explanation of . ii
...............
Numbers, Identif ication . 332..............
Panel Brightness Control . 72
........................
Park Gear Position .205
...........................................
Parking .211
...............................
Parking Brake .104
.................................
Parking Lights .70
..
Parking Over Things that Burn . 344
.............................
PGM-FI System .343
..................
Polishing and Waxing . 297
...................................
Pollen Filter .270
............
Pre-Drive Saf ety Checklist . 11
.........
Pregnancy, Using Seat Belts . 19
............................
Protecting Adults .12
...
Additional Safety Precautions . 20
.....
Advice f or Pregnant Women . 19
...
Octane Requirement, Gasoline . 184
.........................................
Odometer .65
Odometer/Outside Temperature ......................................
Indicator .66
...............................
Odometer, Trip .66
Oil ........................
Change, How to .246
......................
Change, When to .232
......................
Checking Engine .187
..............
Pressure Indicator . 60,317
Selecting Proper Viscosity ......................................
Chart .245 ...........
ON (Ignition Key Position) . 81
..
Operation in Foreign Countries . 341
............................
Outside Mirrors .102
.....................
Outside Temperature .66
....................
Overheating, Engine .315
.......
Owner Maintenance Checks . 242
..........................
Oxygenated Fuel .340
Index
MO N
P
V