automatic transmission Acura TSX 2011 Owner's Guide
[x] Cancel search | Manufacturer: ACURA, Model Year: 2011, Model line: TSX, Model: Acura TSX 2011Pages: 324, PDF Size: 7.85 MB
Page 230 of 324
229
Maintenance Under the Hood
Maintenance
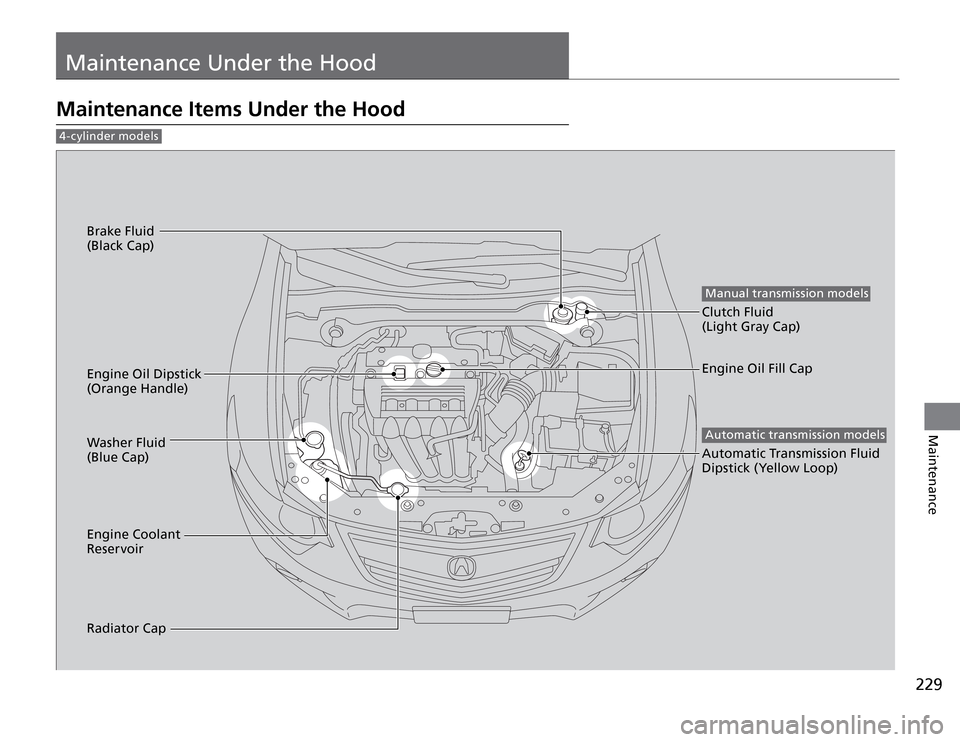
Maintenance Items Under the Hood 4-cylinder models
Brake Fluid
(Black Cap)
Engine Oil Dipstick
(Orange Handle)
Washer Fluid
(Blue Cap)
Engine Coolant
Reservoir
Radiator Cap
Manual transmission models Clutch Fluid
(Light Gray Cap)
Engine Oil Fill Cap Automatic transmission models Automatic Transmission Fluid
Dipstick (Yellow Loop)
Page 231 of 324
Maintenance Under the Hood
Maintenance Items Under the Hood
230Maintenance
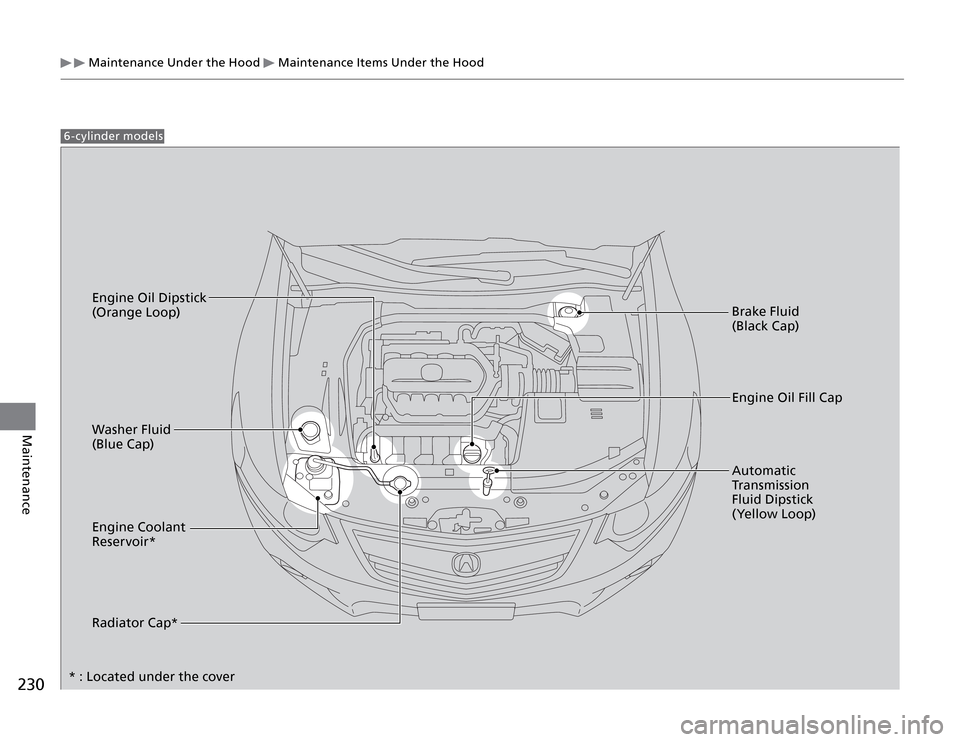
6-cylinder models
Engine Oil Dipstick
(Orange Loop)
Washer Fluid
(Blue Cap)
Engine Coolant
Reservoir*
Radiator Cap*
* : Located under the coverBrake Fluid
(Black Cap)
Engine Oil Fill Cap
Automatic
Transmission
Fluid Dipstick
(Yellow Loop)
Page 243 of 324
Maintenance Under the Hood
Transmission Fluid
242Maintenance
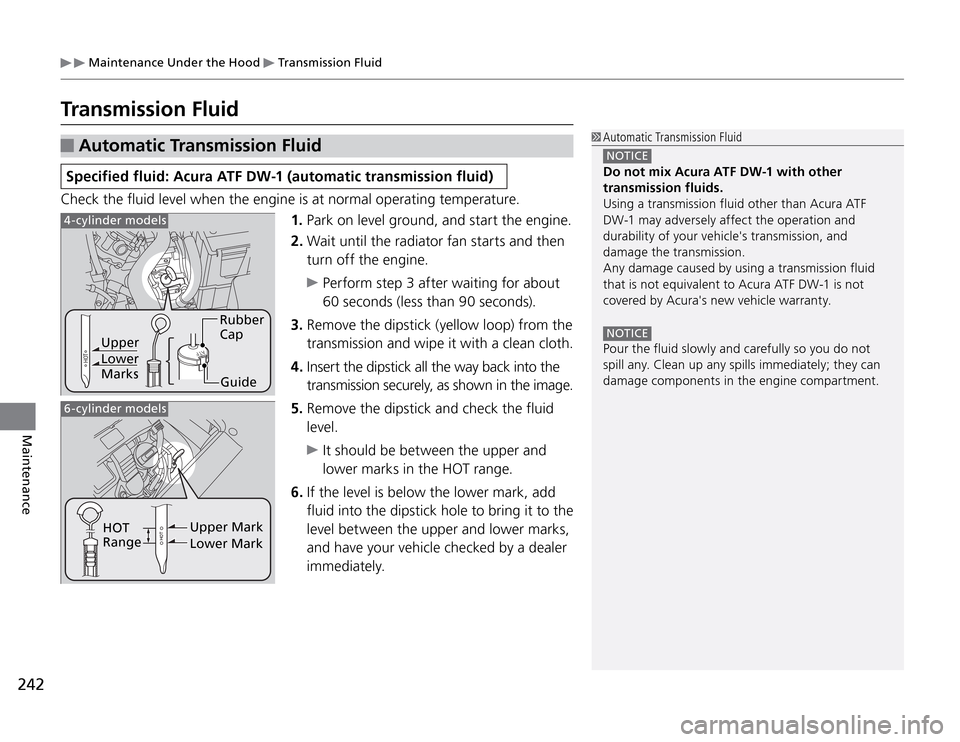
1. Park on level ground, and start the engine.
2. Wait until the radiator fan starts and then
turn off the engine.
Perform step 3 after waiting for about
60 seconds (less than 90 seconds).
3. Remove the dipstick (yellow loop) from the
transmission and wipe it with a clean cloth.
4. Insert the dipstick all the way back into the
transmission securely, as shown in the image.
5. Remove the dipstick and check the fluid
level. It should be between the upper and
lower marks in the HOT range.
6. If the level is below the lower mark, add
fluid into the dipstick hole to bring it to the
level between the upper and lower marks,
and have your vehicle checked by a dealer
immediately.
Automatic Transmission Fluid
Transmission FluidCheck the fluid level when the engine is at normal operating temperature.Specified fluid: Acura ATF DW-1 (automatic transmission fluid)
Automatic Transmission Fluid NOTICE Do not mix Acura ATF DW-1 with other
transmission fluids.
Using a transmission fluid other than Acura ATF
DW-1 may adversely affect the operation and
durability of your vehicle's transmission, and
damage the transmission.
Any damage caused by using a transmission fluid
that is not equivalent to Acura ATF DW-1 is not
covered by Acura's new vehicle warranty. NOTICE Pour the fluid slowly and carefully so you do not
spill any. Clean up any spills immediately; they can
damage components in the engine compartment.
Upper
Lower
MarksRubber
Cap
Guide
4-cylinder models 6-cylinder models
HOT
RangeUpper Mark
Lower Mark
Page 278 of 324
277
If a Tire Goes Flat
Continued
Handling the Unexpected
If a tire goes flat while driving, grasp the steering wheel firmly, and brake gradually
to reduce speed. Then, stop in a safe place. Replace the flat tire with the compact
spare tire. Go to a dealer as soon as possible to have the full size tire repaired or
replaced.
1. Park the vehicle on firm, level, and non-slippery ground. Automatic transmission models 2. Put the shift lever in P
.
Manual transmission models 2. Put the shift lever in R
.
All models 3. Set the parking brake.
4. Turn on the hazard warning lights and turn the ignition switch to LOCK 0
.
Changing a Flat Tire
Periodically check the tire pressure of the compact
spare. It should be set to the specified pressure.
Specified Pressure: 60 psi (420 kPa, 4.2 kgf/cm
2)
When driving with the compact spare tire, keep
the vehicle speed under 50 mph (80 km/h). Replace
with a full size tire as soon as possible.
The compact spare tire and wheel in your vehicle
are specifically for this model.
Do not use them with another vehicle.
Do not use another type of compact spare tire or
wheel with your vehicle.
Do not mount tire chains on a compact spare tire.
If a chain-mounted front tire goes flat, remove one
of the full-size rear tires and replace it with the
compact spare tire. Remove the flat front tire and
replace it will the full size tire that was removed
from the rear. Mount the tire chains on the front
tire.
Do not use a puncture-repairing agent on a flat tire,
as it can damage the tire pressure sensor.
Changing a Flat Tire
Page 286 of 324

285
Continued
Handling the Unexpected
Battery performance degrades in cold conditions
and may prevent the engine from starting. Jump Starting
5. Connect the other end of the second
jumper cable:
4 -cylinder models with automatic transmission
Engine mounting bolt
4 -cylinder models with manual transmission
Transmission mounting bolt
6-cylinder models
Engine hanger
Do not connect this jumper cable to any
other part of the engine.
6. If your vehicle is connected to another
vehicle, start the assisting vehicle's engine
and increase its rpm slightly.
7. Attempt to start your vehicle's engine. If
it turns over slowly, check that the jumper
cables have good metal-to-metal contact.
Jump Starting
6-cylinder models 4-cylinder models with
automatic transmission 4-cylinder models with
manual transmissionBooster Battery
Page 288 of 324

287
Shift Lever Does Not Move
Handling the Unexpected
Automatic transmission models Follow the procedure below if you cannot move the shift lever out of P
position.
1. Set the parking brake.
2. Remove the key from the ignition switch.
3. Wrap a cloth around the tip of a small flat-
tip screwdriver and remove the cover of
the shift lock release slot.
Put the tip of the flat-tip screwdriver
into the slot and remove it as shown in
the image.
4. Insert the key into the shift lock release
slot.
5. While pushing on the key, press the shift
lever release button and place the shift
lever into N
.
The lock is now released. Have the shift
lever checked by a dealer as soon as
possible.
Releasing the Lock
Cover
Slot
Release Button
Shift Lock Release Slot
Page 289 of 324
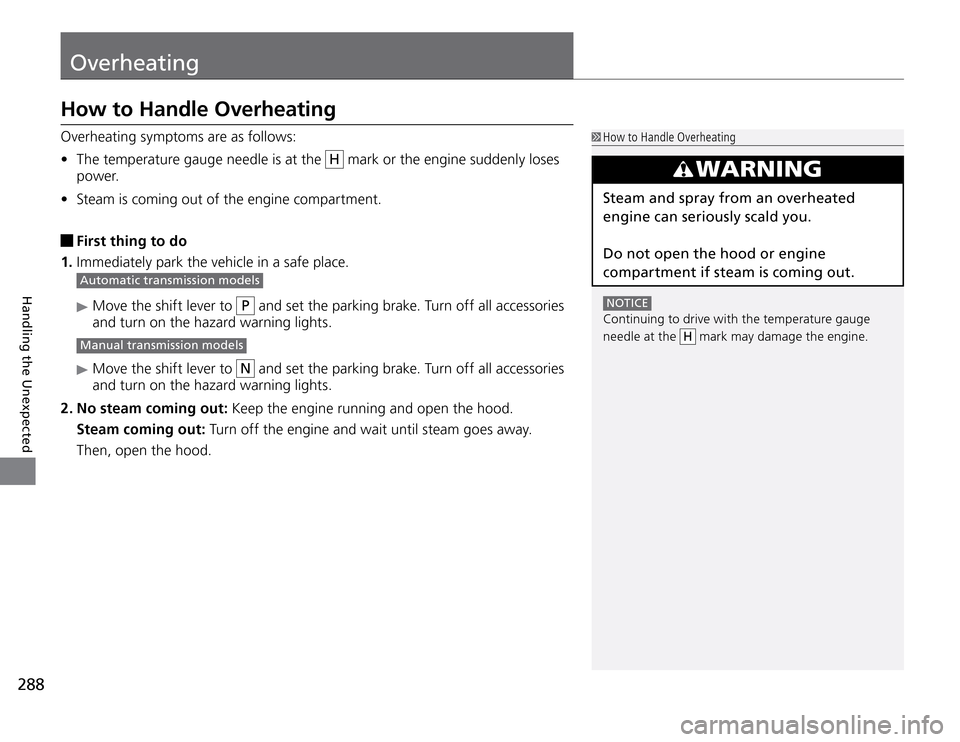
Overheating
288Handling the Unexpected
How to Handle OverheatingOverheating symptoms are as follows:
The temperature gauge needle is at the �tH
mark or the engine suddenly loses
power.
Steam is coming out of the engine compartment. �t
First thing to do
1. Immediately park the vehicle in a safe place. Automatic transmission models
Move the shift lever to P
and set the parking brake. Turn off all accessories
and turn on the hazard warning lights.
Manual transmission models
Move the shift lever to N
and set the parking brake. Turn off all accessories
and turn on the hazard warning lights.
2. No steam coming out: Keep the engine running and open the hood.
Steam coming out: Turn off the engine and wait until steam goes away.
Then, open the hood.
How to Handle Overheating NOTICE Continuing to drive with the temperature gauge
needle at the
H
mark may damage the engine.WARNING
Steam and spray from an overheated
engine can seriously scald you.
Do not open the hood or engine
compartment if steam is coming out.
Page 303 of 324
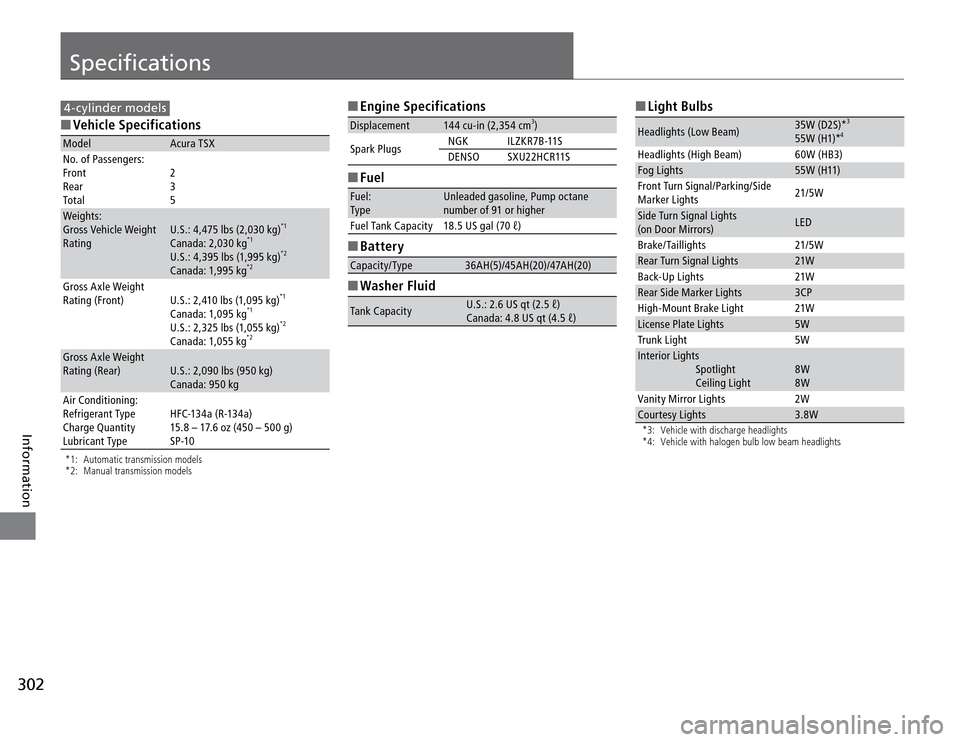
Specifications
302Information
4-cylinder models �O Vehicle SpecificationsModel Acura TSX
No. of Passengers:
Front
Rear
Tot al2
3
5
Weights:
Gross Vehicle Weight
RatingU.S.: 4,475 lbs (2,030 kg)
*1
Canada: 2,030 kg
*1
U.S.: 4,395 lbs (1,995 kg)
*2
Canada: 1,995 kg
*2
Gross Axle Weight
Rating (Front) U.S.: 2,410 lbs (1,095 kg)
*1
Canada: 1,095 kg
*1
U.S.: 2,325 lbs (1,055 kg)
*2
Canada: 1,055 kg
*2
Gross Axle Weight
Rating (Rear) U.S.: 2,090 lbs (950 kg)
Canada: 950 kg
Air Conditioning:
Refrigerant Type
Charge Quantity
Lubricant TypeH F C-13 4 a ( R -13 4 a)
15.8 – 17.6 oz (450 – 500 g)
SP-10*1: Automatic transmission models
*2: Manual transmission models
�O Engine SpecificationsDisplacement 144 cu-in (2,354 cm
3)
Spark PlugsNGK ILZKR7B-11S
DENSO SXU22HCR11S
�O FuelFuel:
Ty peUnleaded gasoline, Pump octane
number of 91 or higher
Fuel Tank Capacity 18.5 US gal (70 ℓ)�O BatteryCapacity/Type 36AH(5)/45AH(20)/47AH(20)�O Washer FluidTank CapacityU.S.: 2.6 US qt (2.5 ℓ)
Canada: 4.8 US qt (4.5 ℓ)
�O Light BulbsHeadlights (Low Beam)35W (D2S)*
3
55W (H1)*
4
Headlights (High Beam) 60W (HB3)
Fog Lights 55W (H11)
Front Turn Signal/Parking/Side
Marker Lights21/5W
Side Turn Signal Lights
(on Door Mirrors)LED
Brake/Taillights 21/5W
Rear Turn Signal Lights 21W
Back-Up Lights 21W
Rear Side Marker Lights 3CP
High-Mount Brake Light 21W
License Plate Lights 5W
Trunk Light 5W
Interior Lights
Spotlight
Ceiling Light 8W
8W
Vanity Mirror Lights 2W
Courtesy Lights 3.8W*3: Vehicle with discharge headlights
*4: Vehicle with halogen bulb low beam headlights
Page 304 of 324
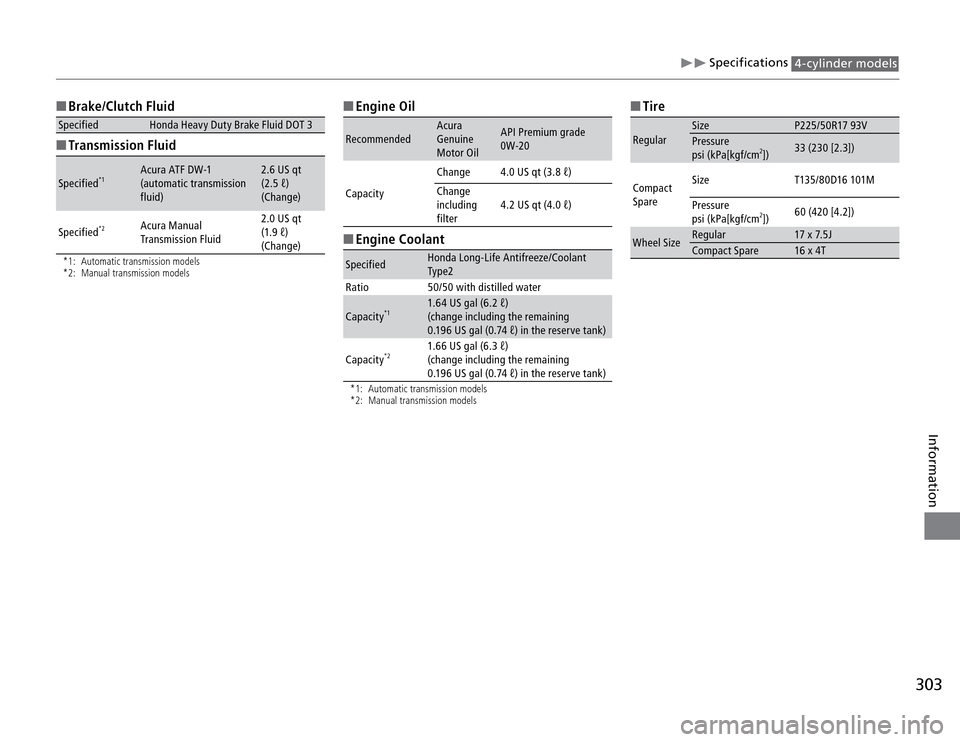
303
Information
Specifications
4-cylinder models
�O Brake/Clutch FluidSpecified Honda Heavy Duty Brake Fluid DOT 3�O Transmission FluidSpecified
*1
Acura ATF DW-1
(automatic transmission
fluid)2.6 US qt
(2.5 ℓ)
(Change)
Specified
*2
Acura Manual
Transmission Fluid2.0 US qt
(1.9 ℓ)
(Change)
*1: Automatic transmission models
*2: Manual transmission models
�O Engine OilRecommendedAcura
Genuine
Motor OilAPI Premium grade
0W-20
CapacityChange 4.0 US qt (3.8 ℓ)
Change
including
filter4.2 US qt (4.0 ℓ)�O Engine CoolantSpecifiedHonda Long-Life Antifreeze/Coolant
Ty pe2
Ratio 50/50 with distilled water
Capacity
*1
1.64 US gal (6.2 ℓ)
(change including the remaining
0.196 US gal (0.74 ℓ) in the reserve tank)
Capacity
*2
1.66 US gal (6.3 ℓ)
(change including the remaining
0.196 US gal (0.74 ℓ) in the reserve tank)
*1: Automatic transmission models
*2: Manual transmission models
�O TireRegularSize P225/50R17 93V
Pressure
psi (kPa[kgf/cm
2])33 (230 [2.3])
Compact
SpareSize T135/80D16 101M
Pressure
psi (kPa[kgf/cm2])60 (420 [4.2])
Wheel SizeRegular 17 x 7.5J
Compact Spare 16 x 4T
Page 306 of 324
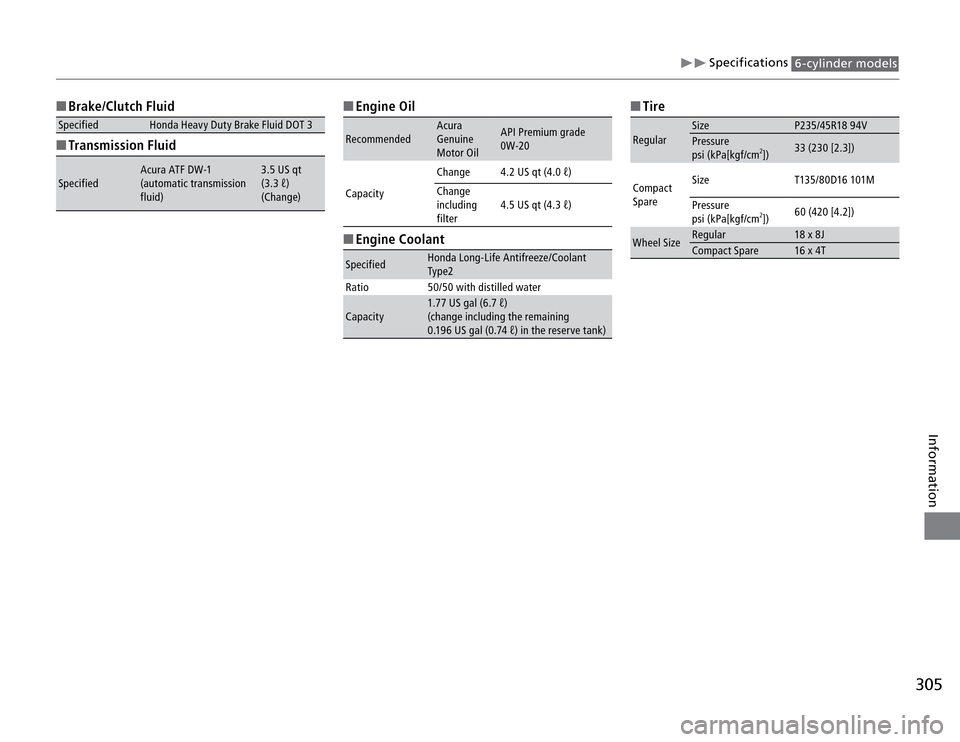
305
Information
Specifications
6-cylinder models
�O Brake/Clutch FluidSpecified Honda Heavy Duty Brake Fluid DOT 3�O Transmission FluidSpecifiedAcura ATF DW-1
(automatic transmission
fluid)3.5 US qt
(3.3 ℓ)
(Change)
�O Engine OilRecommendedAcura
Genuine
Motor OilAPI Premium grade
0W-20
CapacityChange 4.2 US qt (4.0 ℓ)
Change
including
filter4.5 US qt (4.3 ℓ)�O Engine CoolantSpecifiedHonda Long-Life Antifreeze/Coolant
Ty pe2
Ratio 50/50 with distilled water
Capacity1.77 US gal (6.7 ℓ)
(change including the remaining
0.196 US gal (0.74 ℓ) in the reserve tank)
�O TireRegularSize P235/45R18 94V
Pressure
psi (kPa[kgf/cm
2])33 (230 [2.3])
Compact
SpareSize T135/80D16 101M
Pressure
psi (kPa[kgf/cm2])60 (420 [4.2])
Wheel SizeRegular 18 x 8J
Compact Spare 16 x 4T