brake light Acura TSX 2011 Owner's Guide
[x] Cancel search | Manufacturer: ACURA, Model Year: 2011, Model line: TSX, Model: Acura TSX 2011Pages: 324, PDF Size: 7.85 MB
Page 232 of 324

Maintenance Under the Hood
Opening the Hood
231
Continued
Maintenance
Opening the Hood
1. Park the vehicle on a level surface, and set
the parking brake.
2. Pull the hood release handle under the
lower left corner of the dashboard.
The hood will pop up slightly.
3. Push up the hood latch lever in the center
of the hood to release the lock mechanism,
and open the hood.
4-cylinder models 4. Remove the support rod from the clamp
using the grip. Mount the support rod in
the hood.
When closing, remove the support rod, and
stow it in the clamp, then gently lower the
hood. Remove your hand at a height of
approximately 12 inches (30 cm) and let the
hood close.
Opening the Hood NOTICE Do not open the hood when the wiper arms are
raised.
The hood will strike the wipers, and may damage
either the hood or the wipers.
When closing the hood, check that the hood is
securely latched.
If the hood latch lever moves stiffly, or if you can
open the hood without lifting the lever, the latch
mechanism should be cleaned and lubricated.
Grip
ClipSupport Rod
Hood Release Handle
Pull
Lever
Page 249 of 324
Replacing Light Bulbs
Headlight Bulbs
248Maintenance
Headlight Bulbs
The exterior lights' inside lenses (headlights, brake
lamps, etc.) may fog temporarily after a vehicle
wash or while driving in the rain. This does not
impact the exterior light function.
However, if you see a large amount of water or ice
accumulated inside the lenses, have your vehicle
inspected by a dealer.
Driver side
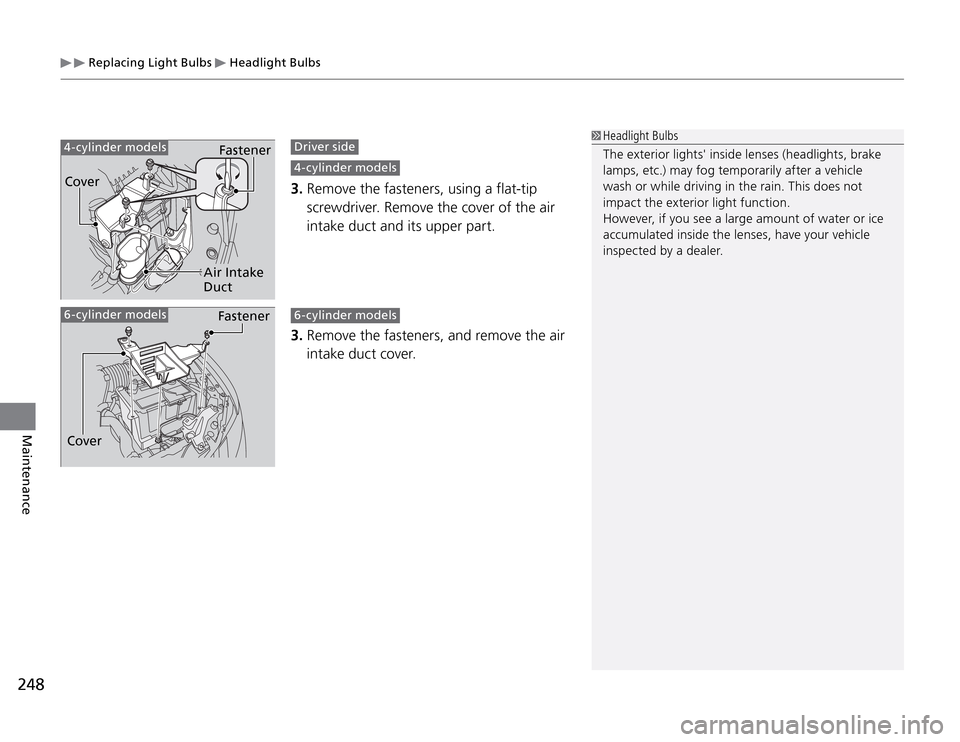
4-cylinder models 3. Remove the fasteners, using a flat-tip
screwdriver. Remove the cover of the air
intake duct and its upper part. 6-cylinder models 3. Remove the fasteners, and remove the air
intake duct cover.
Fastener
Fastener
Air Intake
Duct Cover
Cover
6-cylinder models 4-cylinder models
Page 254 of 324

Replacing Light Bulbs
Side Turn Signal/Emergency Indicator Light Bulbs
253
Continued
Maintenance
Brake Light, Taillight, Rear Turn Signal Light and
Rear Side Marker Light BulbsWhen replacing, use the following bulbs.
Brake/Taillight: 21/5W
Rear Turn Signal Light: 21W
Rear Side Marker Light: 3CP
1. Pull out and remove the cover.
Side Turn Signal/Emergency Indicator Light BulbsDoor mirrors have the side turn lights. Have an authorized Acura dealer inspect
and replace the light bulbs.
Cover
Page 257 of 324

Replacing Light Bulbs
High-Mount Brake Light Bulbs
256Maintenance
High-Mount Brake Light BulbsWhen replacing, use the following bulbs.
High-Mount Brake Light: 21W
1. Open the trunk.
2. Turn the socket to the left and remove it.
3. Remove the old bulb and insert the new
bulb.
BulbSocket
Page 278 of 324
277
If a Tire Goes Flat
Continued
Handling the Unexpected
If a tire goes flat while driving, grasp the steering wheel firmly, and brake gradually
to reduce speed. Then, stop in a safe place. Replace the flat tire with the compact
spare tire. Go to a dealer as soon as possible to have the full size tire repaired or
replaced.
1. Park the vehicle on firm, level, and non-slippery ground. Automatic transmission models 2. Put the shift lever in P
.
Manual transmission models 2. Put the shift lever in R
.
All models 3. Set the parking brake.
4. Turn on the hazard warning lights and turn the ignition switch to LOCK 0
.
Changing a Flat Tire
Periodically check the tire pressure of the compact
spare. It should be set to the specified pressure.
Specified Pressure: 60 psi (420 kPa, 4.2 kgf/cm
2)
When driving with the compact spare tire, keep
the vehicle speed under 50 mph (80 km/h). Replace
with a full size tire as soon as possible.
The compact spare tire and wheel in your vehicle
are specifically for this model.
Do not use them with another vehicle.
Do not use another type of compact spare tire or
wheel with your vehicle.
Do not mount tire chains on a compact spare tire.
If a chain-mounted front tire goes flat, remove one
of the full-size rear tires and replace it with the
compact spare tire. Remove the flat front tire and
replace it will the full size tire that was removed
from the rear. Mount the tire chains on the front
tire.
Do not use a puncture-repairing agent on a flat tire,
as it can damage the tire pressure sensor.
Changing a Flat Tire
Page 289 of 324
Overheating
288Handling the Unexpected
How to Handle OverheatingOverheating symptoms are as follows:
The temperature gauge needle is at the �tH
mark or the engine suddenly loses
power.
Steam is coming out of the engine compartment. �t
First thing to do
1. Immediately park the vehicle in a safe place. Automatic transmission models
Move the shift lever to P
and set the parking brake. Turn off all accessories
and turn on the hazard warning lights.
Manual transmission models
Move the shift lever to N
and set the parking brake. Turn off all accessories
and turn on the hazard warning lights.
2. No steam coming out: Keep the engine running and open the hood.
Steam coming out: Turn off the engine and wait until steam goes away.
Then, open the hood.
How to Handle Overheating NOTICE Continuing to drive with the temperature gauge
needle at the
H
mark may damage the engine.WARNING
Steam and spray from an overheated
engine can seriously scald you.
Do not open the hood or engine
compartment if steam is coming out.
Page 293 of 324

Indicator, Coming On/Blinking
If the Brake System Indicator Comes On
292Handling the Unexpected
If the Brake System Indicator Comes On
Reasons for the indicator to come on
The brake fluid is low. �t
There is a malfunction in the brake system. �t What to do when the indicator comes on while driving
Press the brake pedal lightly to check pedal pressure.
If normal, check the brake fluid level the next time you stop. �t
If abnormal, take immediate action. If necessary, downshift the �t
transmission to slow the vehicle using engine braking.
If the Brake System Indicator Comes On
Have your vehicle repaired immediately.
It is dangerous to drive with low brake fluid. If
there is no resistance from the brake pedal, stop
immediately in a safe place. If necessary downshift
the gears.
If the brake system indicator and ABS indicator
come on simultaneously, the brake distribution
system is not working. This can result in vehicle
instability under sudden braking.
Have your vehicle inspected by a dealer immediately.
U.S.
CanadaIf the EPS Indicator Comes On
Reasons for the indicator to come on
Comes on when there is a problem with EPS. �t
If you depress the accelerator pedal repeatedly to increase the �t
engine speed while the engine is idling, the indicator comes on, and
sometimes the steering wheel becomes harder to operate. What to do when the indicator comes on
Stop the vehicle in a safe place and restart the engine.
If the indicator comes on and stays on, immediately have your vehicle
inspected by a dealer.
If the EPS Indicator Comes On NOTICE If you repeatedly turn the steering wheel at an
extremely low speed, or hold the steering wheel
on the full left or right position for a while, the
system heats up. The system goes into a protective
mode, and limits its performance. The steering
wheel becomes harder and harder to operate. Once
the system cools down, EPS is restored. Repeated
operation under these conditions can eventually
damage the system.
Page 295 of 324
Fuses
294Handling the Unexpected
If any electrical devices are not working, turn the ignition switch to LOCK 0
and
check to see if any applicable fuse is blown.
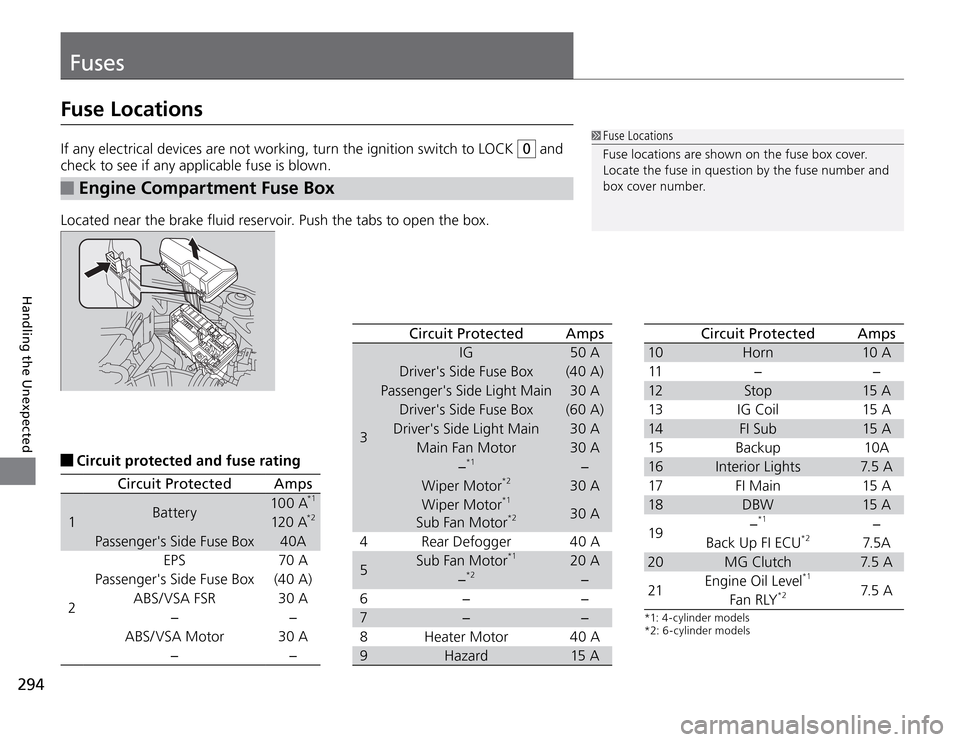
Engine Compartment Fuse Box
Located near the brake fluid reservoir. Push the tabs to open the box.
Fuse Locations
Fuse locations are shown on the fuse box cover.
Locate the fuse in question by the fuse number and
box cover number.
Circuit protected and fuse rating
Fuse Locations
Circuit Protected Amps
1Battery100 A
*1
120 A
*2
Passenger's Side Fuse Box 40A
2EPS 70 A
Passenger's Side Fuse Box (40 A)
ABS/ VSA FSR 30 A
−−
ABS/ VSA Motor 30 A
−−
Circuit Protected Amps
3IG 50 A
Driver's Side Fuse Box (40 A)
Passenger's Side Light Main 30 A
Driver's Side Fuse Box (60 A)
Driver's Side Light Main 30 A
Main Fan Motor 30 A
−
*1
−
Wiper Motor
*2
30 A
Wiper Motor
*1
Sub Fan Motor*2
30 A
4 Rear Defogger 40 A
5Sub Fan Motor
*1
20 A
−
*2
−
6− −
7− −
8 Heater Motor 40 A
9 Hazard 15 A
Circuit Protected Amps
10 H orn 10 A
11 − −
12 St o p 15 A
13 IG Coil 15 A
14 FI Sub 15 A
15 B a c ku p 10 A
16 Interior Lights 7.5 A
17 FI Main 15 A
18 DBW 15 A
19−
*1
−
Back Up FI ECU
*2
7. 5 A
20 MG Clutch 7.5 A
21Engine Oil Level
*1
7.5 A
Fan RLY
*2
*1: 4-cylinder models
*2: 6 -cylinder models
Page 303 of 324
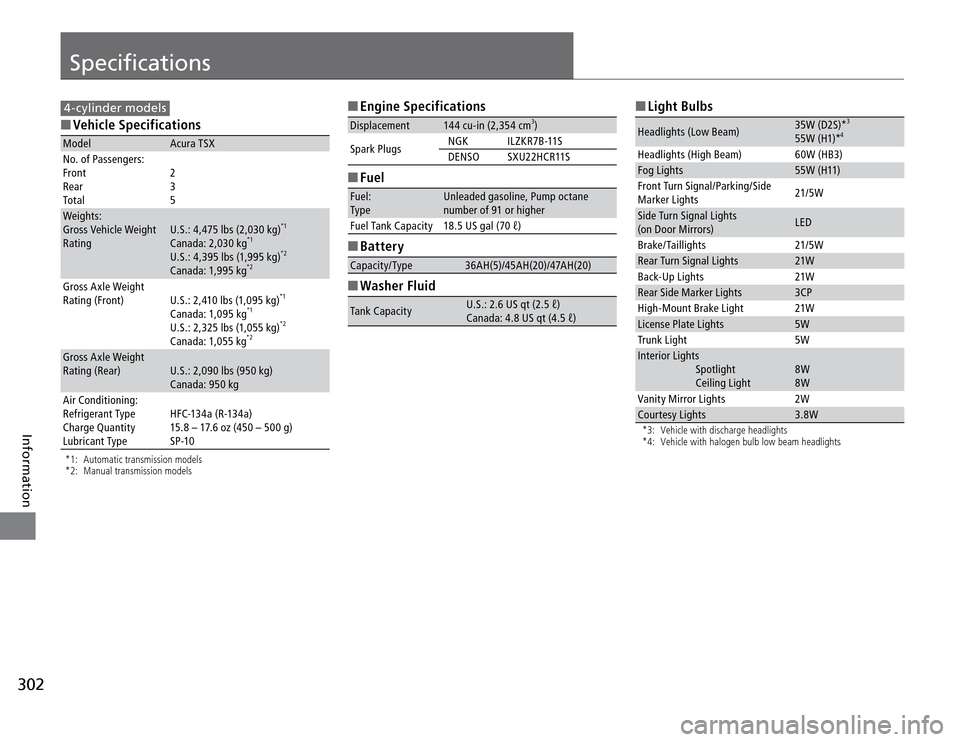
Specifications
302Information
4-cylinder models �O Vehicle SpecificationsModel Acura TSX
No. of Passengers:
Front
Rear
Tot al2
3
5
Weights:
Gross Vehicle Weight
RatingU.S.: 4,475 lbs (2,030 kg)
*1
Canada: 2,030 kg
*1
U.S.: 4,395 lbs (1,995 kg)
*2
Canada: 1,995 kg
*2
Gross Axle Weight
Rating (Front) U.S.: 2,410 lbs (1,095 kg)
*1
Canada: 1,095 kg
*1
U.S.: 2,325 lbs (1,055 kg)
*2
Canada: 1,055 kg
*2
Gross Axle Weight
Rating (Rear) U.S.: 2,090 lbs (950 kg)
Canada: 950 kg
Air Conditioning:
Refrigerant Type
Charge Quantity
Lubricant TypeH F C-13 4 a ( R -13 4 a)
15.8 – 17.6 oz (450 – 500 g)
SP-10*1: Automatic transmission models
*2: Manual transmission models
�O Engine SpecificationsDisplacement 144 cu-in (2,354 cm
3)
Spark PlugsNGK ILZKR7B-11S
DENSO SXU22HCR11S
�O FuelFuel:
Ty peUnleaded gasoline, Pump octane
number of 91 or higher
Fuel Tank Capacity 18.5 US gal (70 ℓ)�O BatteryCapacity/Type 36AH(5)/45AH(20)/47AH(20)�O Washer FluidTank CapacityU.S.: 2.6 US qt (2.5 ℓ)
Canada: 4.8 US qt (4.5 ℓ)
�O Light BulbsHeadlights (Low Beam)35W (D2S)*
3
55W (H1)*
4
Headlights (High Beam) 60W (HB3)
Fog Lights 55W (H11)
Front Turn Signal/Parking/Side
Marker Lights21/5W
Side Turn Signal Lights
(on Door Mirrors)LED
Brake/Taillights 21/5W
Rear Turn Signal Lights 21W
Back-Up Lights 21W
Rear Side Marker Lights 3CP
High-Mount Brake Light 21W
License Plate Lights 5W
Trunk Light 5W
Interior Lights
Spotlight
Ceiling Light 8W
8W
Vanity Mirror Lights 2W
Courtesy Lights 3.8W*3: Vehicle with discharge headlights
*4: Vehicle with halogen bulb low beam headlights
Page 305 of 324
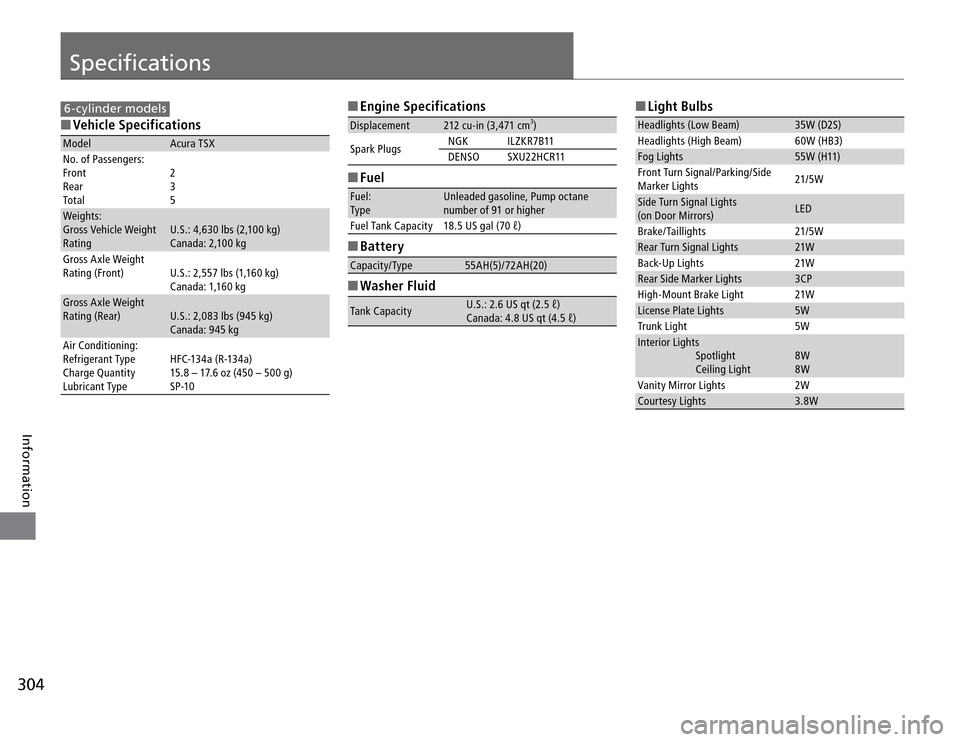
Specifications
304Information
6-cylinder models �O Vehicle SpecificationsModel Acura TSX
No. of Passengers:
Front
Rear
Tot al2
3
5
Weights:
Gross Vehicle Weight
RatingU.S.: 4,630 lbs (2,100 kg)
Canada: 2,100 kg
Gross Axle Weight
Rating (Front) U.S.: 2,557 lbs (1,160 kg)
Canada: 1,160 kg
Gross Axle Weight
Rating (Rear) U.S.: 2,083 lbs (945 kg)
Canada: 945 kg
Air Conditioning:
Refrigerant Type
Charge Quantity
Lubricant TypeH F C-13 4 a ( R -13 4 a)
15.8 – 17.6 oz (450 – 500 g)
SP-10
�O Engine SpecificationsDisplacement 212 cu-in (3,471 cm
3)
Spark PlugsNGK ILZKR7B11
DENSO SXU22HCR11
�O FuelFuel:
Ty peUnleaded gasoline, Pump octane
number of 91 or higher
Fuel Tank Capacity 18.5 US gal (70 ℓ)�O BatteryCapacity/Type 55AH(5)/72AH(20)�O Washer FluidTank CapacityU.S.: 2.6 US qt (2.5 ℓ)
Canada: 4.8 US qt (4.5 ℓ)
�O Light BulbsHeadlights (Low Beam) 35W (D2S)
Headlights (High Beam) 60W (HB3)
Fog Lights 55W (H11)
Front Turn Signal/Parking/Side
Marker Lights21/5W
Side Turn Signal Lights
(on Door Mirrors)LED
Brake/Taillights 21/5W
Rear Turn Signal Lights 21W
Back-Up Lights 21W
Rear Side Marker Lights 3CP
High-Mount Brake Light 21W
License Plate Lights 5W
Trunk Light 5W
Interior Lights
Spotlight
Ceiling Light 8W
8W
Vanity Mirror Lights 2W
Courtesy Lights 3.8W