key Acura TSX 2012 Owner's Guide
[x] Cancel search | Manufacturer: ACURA, Model Year: 2012, Model line: TSX, Model: Acura TSX 2012Pages: 324, PDF Size: 9.45 MB
Page 126 of 324

125
Controls
Interior Lights/Interior Convenience ItemsInterior Lights
■
ON
The interior lights come on regardless of
whether the doors are open or closed.
■
Door activated
The interior lights come on in the following
situations:
•When any of the doors are opened.
•You unlock the driver’s door.
•You remove the key from the ignition
switch.
■
OFF
The interior lights remain off regardless of
whether the doors are open or closed.
The map lights can be turned on and off by
pressing the lenses.
■
Interior Light Switches
1Interior Light Switches
In the door activated position, the interior lights fade
out and go off about 30 seconds after the doors are
closed.
The lights go off after 30 seconds in the following
situations:•When you unlock the driver’s door but do not open
it.•When you remove the key from the ignition switch
but do not open a door.
You can change the interior lights dimming time.
2Customized Features P. 80
The interior lights go off immediately in the following
situations:•When you lock the driver’s door.•When you close the driver’s door with the key in
the ignition switch.•When you turn the ignition switch to ON
(w
.
If you leave any of the doors open without the key in
the ignition switch, the interior lights go off after
about 15 minutes.
Door Activated Position
Off
Front
Door Activated Position
On
Off Rear
On
■
Map Lights
1Map Lights
When the ceiling light switch is in the door activated
position and any door is open, the map light will not
go off when you press the lens.
Page 127 of 324
126
uuInterior Lights/Interior Convenience ItemsuInterior Convenience Items
Controls
Interior Convenience Items
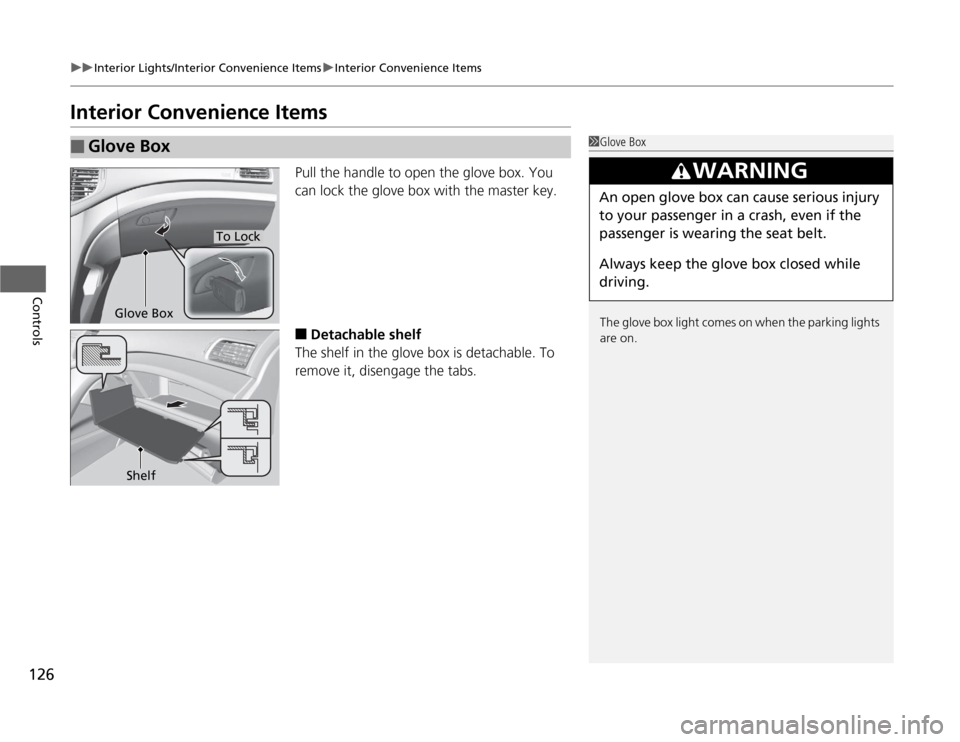
Pull the handle to open the glove box. You
can lock the glove box with the master key.■
Detachable shelf
The shelf in the glove box is detachable. To
remove it, disengage the tabs.
■
Glove Box
1Glove Box
The glove box light comes on when the parking lights
are on.
3
WARNING
An open glove box can cause serious injury
to your passenger in a crash, even if the
passenger is wearing the seat belt.
Always keep the glove box closed while
driving.
Glove Box
To Lock
Shelf
Page 171 of 324

170
uuBluetooth® HandsFreeLink®uHFL Menus
Features
“Change passcode”
Store a phonebook entry.
Edit the number of an existing phonebook entry.
Delete a phonebook entry.
Hear a list of all stored phonebook entries.
Transfer contacts from your phone to HFL.
Apply a security passcode to the system that must be input at each key
cycle to access the system.
Change your security passcode.
Set how you want to be notified of an incoming call.
Set to automatically transfer calls from your phone to HFL when you
enter the vehicle.
Switch the system language between English and French.
Hear a tutorial for general rules on using the system.
Hear a list of available commands and additional information describing each command.“Store”
“Edit”“Delete”“List”“Receive contact”
*
“Security”“Call notification”“Auto transfer”
“Phonebook”“System setup”“Change language”
*
“Tutorial”“Hands-free help”
Clear the system of all paired phones, phonebook entries, and security
passcode. “Clear”
* Not available on all models
Page 174 of 324
Continued
173
uuBluetooth® HandsFreeLink®uHFL Menus
Features
You can make calls using any phone number or a name in the HFL phonebook, and
redial the last number called.■
Direct dialing a phone number
1.Say “Call” or “Dial.”
2.Say the number you want to dial after the prompts.
3.Say “Call” or “Dial” after the prompts.
■
From the HFL phonebook
1.Say “Call” or “Dial.”
2.Say the name stored in the HFL phonebook after the prompts.
3.Follow the HFL prompts.
■
To redial the last number called by HFL
Say “Redial.”
■
To end a call
Press the (HFL back) button.
■
Making a Call
1Making a Call
Press the button and wait for a beep before
giving a command.
HFL uses a Class 2 Bluetooth, with has a maximum
range of about 30 feet (10 meters).
HFL allows you to talk up to 30 minutes after you
remove the key from the ignition switch. However,
this may weaken the vehicle’s battery.
Page 178 of 324
Continued
177
uuBluetooth® HandsFreeLink®uHFL Menus
Features
This command group allows you to change or customize HFL basic settings.■
To set a four-digit passcode to lock the HFL system for security
1.Say “System Setup.”
2.Say “Security.”
3.Follow the HFL prompts and say the four-digit number of your choice.
4.Follow the HFL prompts and confirm the number.
■
To change the security passcode
1.Say “System Setup.”
2.Say “Change Passcode” after the prompts.
3.Say the new four-digit passcode after the HFL prompts.
4.Follow the HFL prompts.
■
To select a ring tone or a prompt as the incoming call notification
1.Say “System Setup.”
2.Say “Call Notification” after the prompts.
3.Say “Ring Tone” or “Prompt” after the prompts. For no audible notification, say
“Off.”
■
System Setup
1System Setup
Press the button before a command.
Once a passcode is set, you are required to enter the
passcode with every new key cycle to use HFL.
If you forget the code, go to your dealer to have the
passcode reset. You can also cancel the passcode by
clearing all the data stored in the HFL system.
2To clear the system P. 178
The default setting of the incoming notification is a
ring tone.
Page 183 of 324
182Driving
Before DrivingDriving PreparationCheck the following items before you start driving.
•Make sure there are no obstructions on the windows, door mirrors, exterior
lights, or other parts of the vehicle.
uRemove any frost, snow, or ice.
uRemove any snow on the roof, as this can slip down and obstruct your field of
vision while driving. If frozen solid, remove ice once it has softened.
uWhen removing ice from around the wheels, be sure not to damage the wheel
or wheel components.
•Make sure the hood is securely closed.
uIf the hood opens while driving, your front view will be blocked.
•Make sure the tires are in good condition.
uCheck air pressure, check for damage and excessive wear.
2Checking and Maintaining Tires P. 259
•Make sure there are no people or objects behind or around the vehicle.
uThere are blind spots from the inside.■
Exterior Checks
1Exterior Checks
NOTICEWhen doors are frozen shut, use warm water around
the door edges to melt any ice. Do not try to force
them open, as this can damage the rubber trim
around the doors. When done, wipe dry to avoid
further freezing.
Do not pour warm water into the key cylinder.
You will be unable to insert key if the water freezes in
the hole.
Page 193 of 324
uuWhen DrivinguStarting the Engine
192Driving
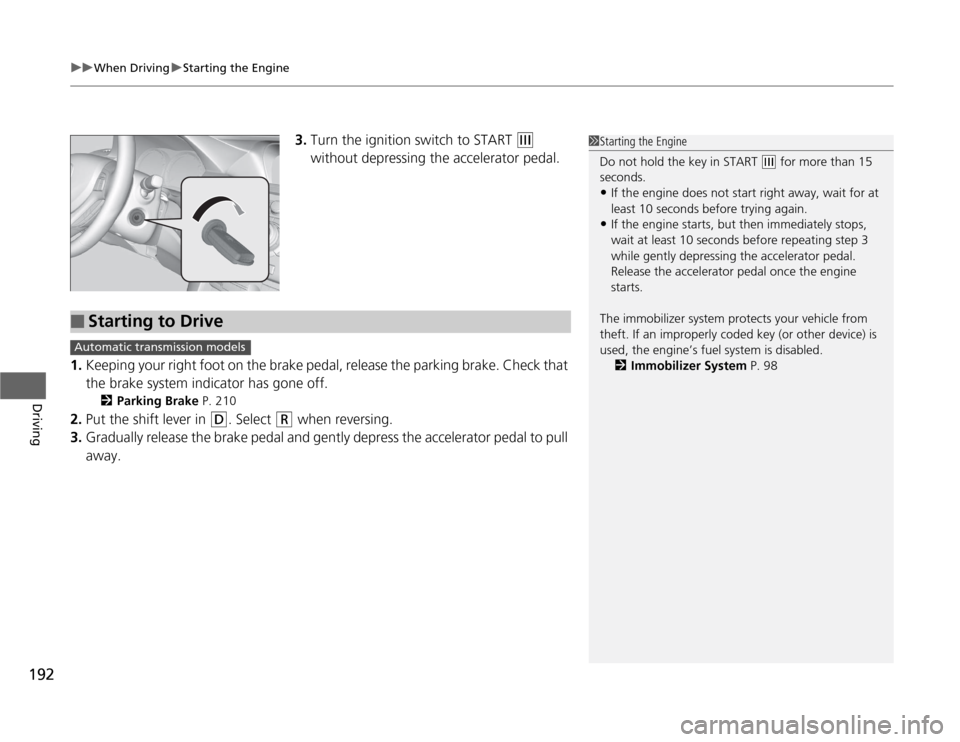
3.Turn the ignition switch to START
(e
without depressing the accelerator pedal.
1.Keeping your right foot on the brake pedal, release the parking brake. Check that
the brake system indicator has gone off.
2Parking Brake P. 210
2.Put the shift lever in
(D
. Select
(R
when reversing.
3.Gradually release the brake pedal and gently depress the accelerator pedal to pull
away.
1Starting the Engine
Do not hold the key in START
(e
for more than 15
seconds.
•If the engine does not start right away, wait for at
least 10 seconds before trying again.•If the engine starts, but then immediately stops,
wait at least 10 seconds before repeating step 3
while gently depressing the accelerator pedal.
Release the accelerator pedal once the engine
starts.
The immobilizer system protects your vehicle from
theft. If an improperly coded key (or other device) is
used, the engine’s fuel system is disabled.
2Immobilizer System P. 98
■
Starting to Drive
Automatic transmission models
Page 196 of 324

195
uuWhen DrivinguShifting
Continued
Driving
ShiftingChange the shift position in accordance with your driving needs.■
Shift lever positionsAutomatic transmission models
1Shifting
You cannot turn the ignition switch to LOCK
(0
and
remove the key unless the shift lever is in
(P
.
The vehicle may move forward very slightly even in
(N
while the engine is cold.
Depress the brake pedal firmly and, when necessary,
apply the parking brake.
Park
Used when parking or starting the
engine
Reverse
Used when reversing
Neutral
Used when idling
Drive
Used for:●Normal driving (gears change
between 1st and 5th automatically)●Temporarily driving in the sequential
mode
Drive (S)
Used for:●Automatically changing gears
between 1st and 4th (4th gear is used
only at high speed)●Driving in the sequential mode
Page 270 of 324

269
Maintenance
Remote Transmitter CareReplacing the BatteryIf the indicator does not come on when the button is pushed, replace the battery.
1.Unscrew the cover with a small Phillips-
head screwdriver. Push a button to pry
open the transmitter.
2.Open the keypad.
uWrap the small flat-tip screwdriver with a
cloth to prevent scratching the
transmitter.
3.Make sure to replace the battery with the
correct polarity.
1Replacing the Battery
NOTICEAn improperly disposed of battery can damage the
environment. Always confirm local regulations for
battery disposal.
Replacement batteries are commercially available or
at a dealer.
Keypad
Screw
Battery type: CR1616
Battery
Page 288 of 324
287
Handling the Unexpected
Shift Lever Does Not MoveFollow the procedure below if you cannot move the shift lever out of the
(P
position.
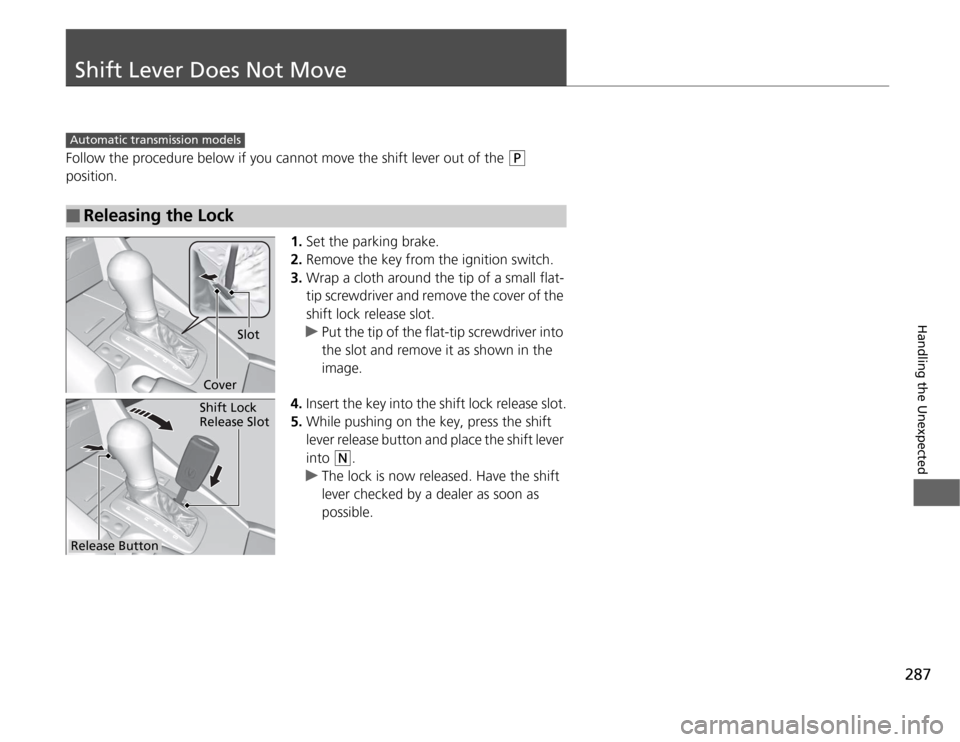
1.Set the parking brake.
2.Remove the key from the ignition switch.
3.Wrap a cloth around the tip of a small flat-
tip screwdriver and remove the cover of the
shift lock release slot.
uPut the tip of the flat-tip screwdriver into
the slot and remove it as shown in the
image.
4.Insert the key into the shift lock release slot.
5.While pushing on the key, press the shift
lever release button and place the shift lever
into
(N
.
uThe lock is now released. Have the shift
lever checked by a dealer as soon as
possible.
■
Releasing the Lock
Automatic transmission models
Slot
Cover
Release ButtonShift Lock
Release Slot