set clock Acura TSX 2012 Owner's Manual
[x] Cancel search | Manufacturer: ACURA, Model Year: 2012, Model line: TSX, Model: Acura TSX 2012Pages: 324, PDF Size: 9.45 MB
Page 1 of 324
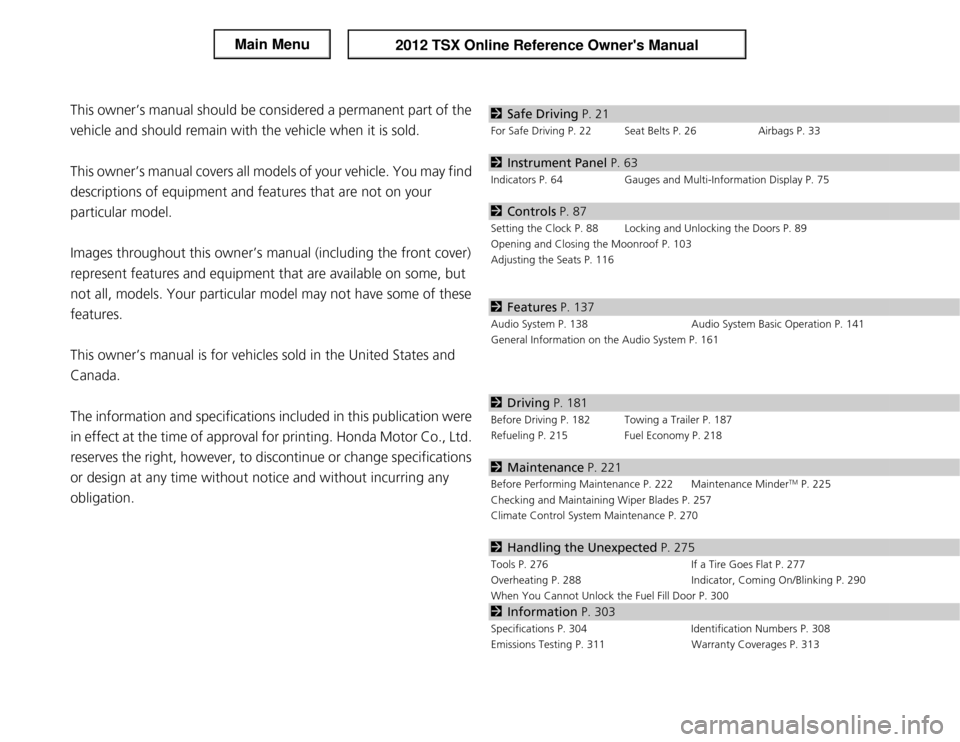
ContentsThis owner’s manual should be considered a permanent part of the
vehicle and should remain with the vehicle when it is sold.
This owner’s manual covers all models of your vehicle. You may find
descriptions of equipment and features that are not on your
particular model.
Images throughout this owner’s manual (including the front cover)
represent features and equipment that are available on some, but
not all, models. Your particular model may not have some of these
features.
This owner’s manual is for vehicles sold in the United States and
Canada.
The information and specifications included in this publication were
in effect at the time of approval for printing. Honda Motor Co., Ltd.
reserves the right, however, to discontinue or change specifications
or design at any time without notice and without incurring any
obligation.
2Safe Driving P. 21For Safe Driving P. 22 Seat Belts P. 26 Airbags P. 332Instrument Panel P. 63Indicators P. 64 Gauges and Multi-Information Display P. 752Controls P. 87Setting the Clock P. 88 Locking and Unlocking the Doors P. 89
Opening and Closing the Moonroof P. 103
Adjusting the Seats P. 1162Features P. 137Audio System P. 138 Audio System Basic Operation P. 141
General Information on the Audio System P. 1612Driving P. 181Before Driving P. 182 Towing a Trailer P. 187
Refueling P. 215 Fuel Economy P. 2182Maintenance P. 221Before Performing Maintenance P. 222 Maintenance Minder
TM P. 225
Checking and Maintaining Wiper Blades P. 257
Climate Control System Maintenance P. 270
2Handling the Unexpected P. 275Tools P. 276 If a Tire Goes Flat P. 277
Overheating P. 288 Indicator, Coming On/Blinking P. 290
When You Cannot Unlock the Fuel Fill Door P. 3002Information P. 303Specifications P. 304 Identification Numbers P. 308
Emissions Testing P. 311 Warranty Coverages P. 313
Page 12 of 324
11Quick Reference Guide
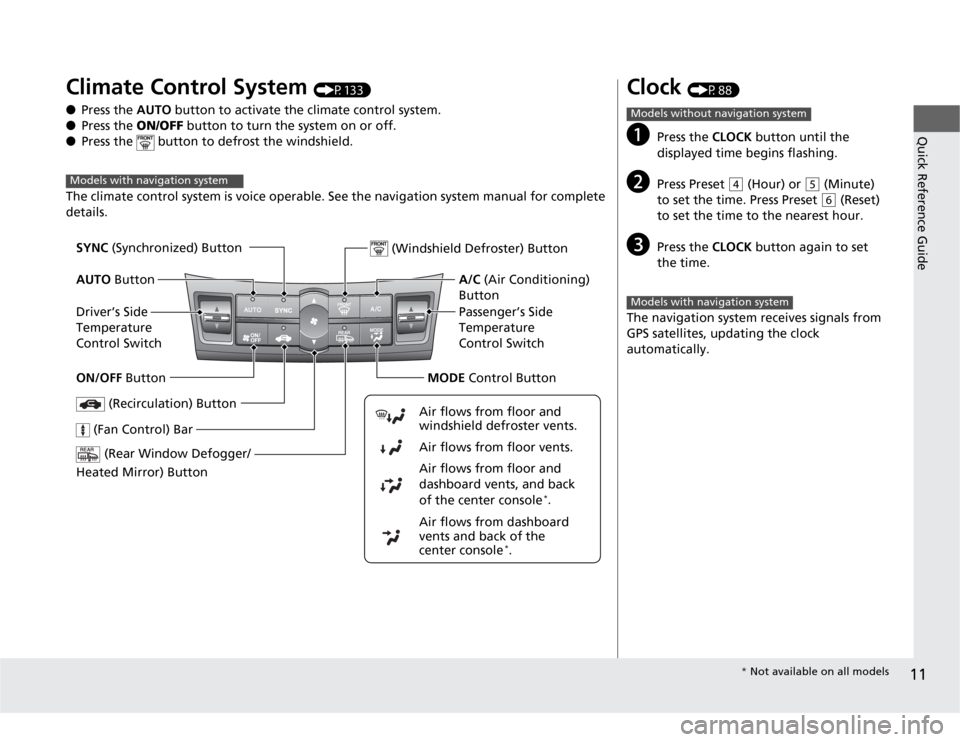
Climate Control System
(P133)
●Press the AUTO button to activate the climate control system.
●Press the ON/OFF button to turn the system on or off.
●Press the button to defrost the windshield.
The climate control system is voice operable. See the navigation system manual for complete
details.
Models with navigation system
(Rear Window Defogger/
Heated Mirror) Button
(Windshield Defroster) Button
A/C (Air Conditioning)
Button
Air flows from dashboard
vents and back of the
center console
*. Air flows from floor and
dashboard vents, and back
of the center console
*. Air flows from floor vents. Air flows from floor and
windshield defroster vents.
(Recirculation) Button
(Fan Control) Bar
Passenger’s Side
Temperature
Control Switch SYNC (Synchronized) Button
AUTO Button
Driver’s Side
Temperature
Control Switch
ON/OFF ButtonMODE Control Button
Clock
(P88)
a
Press the CLOCK button until the
displayed time begins flashing.
b
Press Preset
(4
(Hour) or
(5
(Minute)
to set the time. Press Preset (6
(Reset)
to set the time to the nearest hour.
c
Press the CLOCK button again to set
the time.
The navigation system receives signals from
GPS satellites, updating the clock
automatically.
Models without navigation systemModels with navigation system
* Not available on all models
Page 88 of 324
87
Controls
This chapter explains how to operate the various controls necessary for driving.
Setting the Clock................................ 88
Locking and Unlocking the Doors
Key Types and Functions .................... 89
Locking/Unlocking the Doors from the
Outside ............................................ 91
Locking/Unlocking the Doors from the
Inside ............................................... 93
Childproof Door Locks ....................... 94
Auto Door Lock/Unlock ...................... 94
Opening and Closing the Trunk......... 95
Security System.................................. 98
Immobilizer System ............................ 98
Security System Alarm ........................ 98
Opening and Closing the Windows... 100Opening and Closing the Moonroof.. 103
Operating the Switches Around the
Steering Wheel
Ignition Switch ................................. 104
Turn Signals ..................................... 105
Light Switches.................................. 105
Fog Lights ........................................ 107
Daytime Running Lights ................... 107
Wipers and Washers ........................ 108
Brightness Control ........................... 109
Rear Defogger/Heated Door Mirror
Button........................................ 110Driving Position Memory System
*.... 111
Adjusting the Steering Wheel........... 113Adjusting the Mirror........................ 114
Interior Rearview Mirror ................... 114
Power Door Mirrors ......................... 114
Adjusting the Seats.......................... 116
Adjusting the Seat Positions ............. 116
Interior Lights/Interior Convenience
Items................................................ 125
Interior Lights .................................. 125
Interior Convenience Items .............. 126
Climate Control System................... 133
Using Automatic Climate Control .... 133
Automatic Climate Control Sensors ... 136
* Not available on all models
Page 89 of 324
88Controls
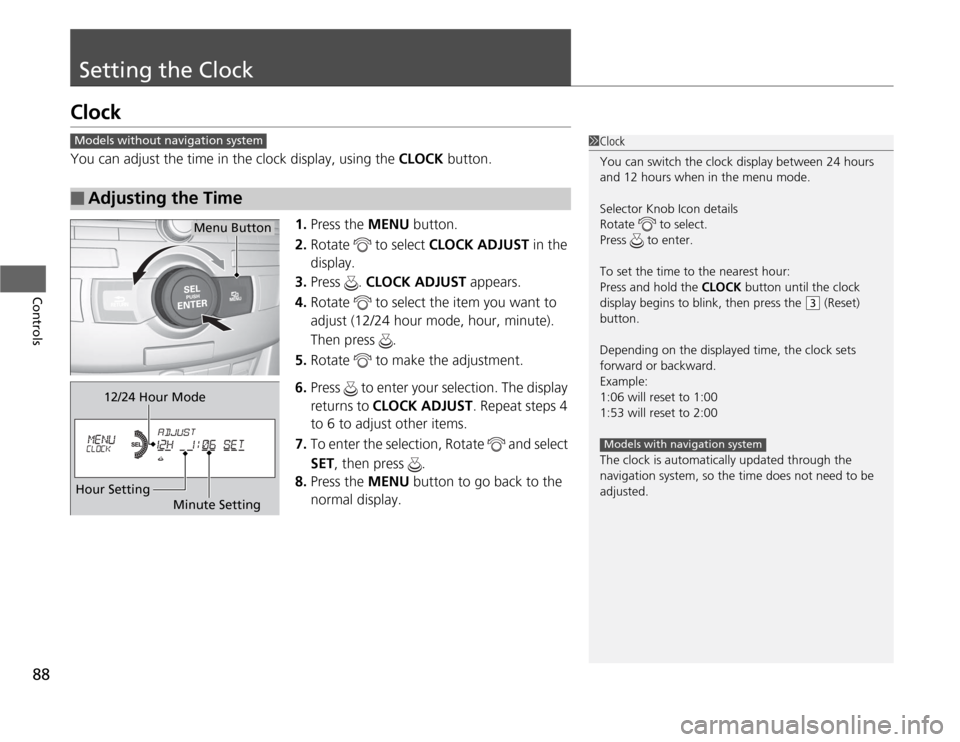
Setting the ClockClockYou can adjust the time in the clock display, using the CLOCK button.
1.Press the MENU button.
2.Rotate to select CLOCK ADJUST in the
display.
3.Press . CLOCK ADJUST appears.
4.Rotate to select the item you want to
adjust (12/24 hour mode, hour, minute).
Then press .
5.Rotate to make the adjustment.
6.Press to enter your selection. The display
returns to CLOCK ADJUST. Repeat steps 4
to 6 to adjust other items.
7.To enter the selection, Rotate and select
SET, then press .
8.Press the MENU button to go back to the
normal display.■
Adjusting the Time
1Clock
You can switch the clock display between 24 hours
and 12 hours when in the menu mode.
Selector Knob Icon details
Rotate to select.
Press to enter.
To set the time to the nearest hour:
Press and hold the CLOCK button until the clock
display begins to blink, then press the
(3
(Reset)
button.
Depending on the displayed time, the clock sets
forward or backward.
Example:
1:06 will reset to 1:00
1:53 will reset to 2:00
The clock is automatically updated through the
navigation system, so the time does not need to be
adjusted.
Models with navigation system
Models without navigation system
Menu Button
12/24 Hour Mode
Hour Setting
Minute Setting
Page 128 of 324
Continued
127
uuInterior Lights/Interior Convenience ItemsuInterior Convenience Items
Controls
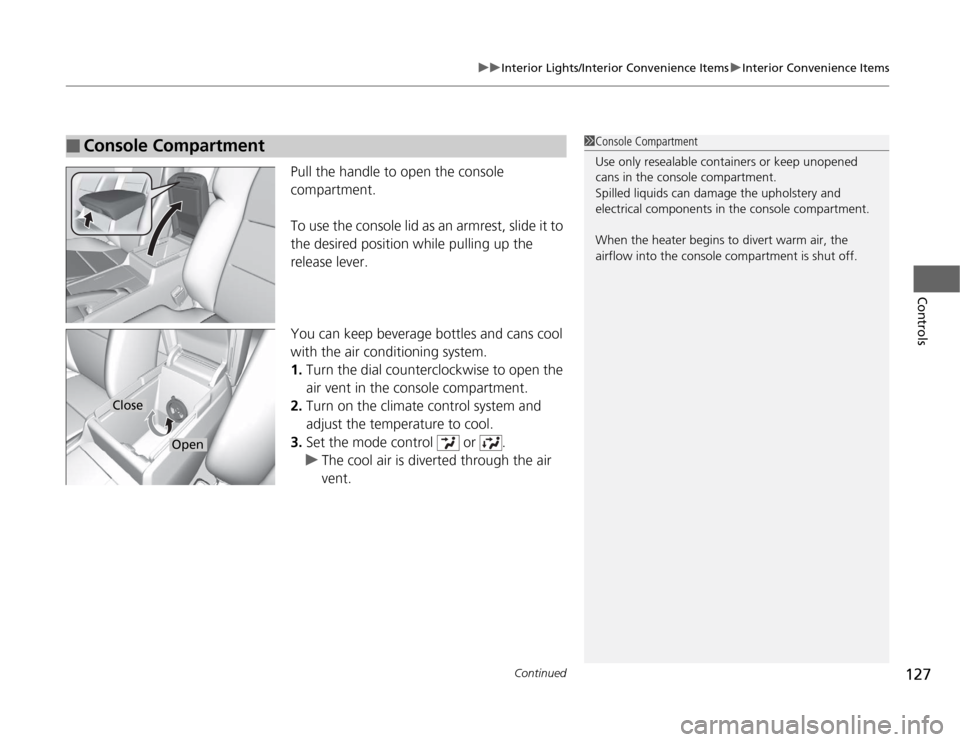
Pull the handle to open the console
compartment.
To use the console lid as an armrest, slide it to
the desired position while pulling up the
release lever.
You can keep beverage bottles and cans cool
with the air conditioning system.
1.Turn the dial counterclockwise to open the
air vent in the console compartment.
2.Turn on the climate control system and
adjust the temperature to cool.
3.Set the mode control or .
uThe cool air is diverted through the air
vent.
■
Console Compartment
1Console Compartment
Use only resealable containers or keep unopened
cans in the console compartment.
Spilled liquids can damage the upholstery and
electrical components in the console compartment.
When the heater begins to divert warm air, the
airflow into the console compartment is shut off.
Close
Open
Page 142 of 324

141
Features
Audio System Basic OperationTo use the audio system function, the ignition switch must be in ACCESSORY
(q
or
ON
(w
.
Use the selector knob or MENU button to
access some audio functions.
Press to switch between the normal and
extended display for some functions. The
extended display has three segments to
display detailed information.
Selector knob: Rotate left or right to scroll
through the available choices. Press to set
your selection.
MENU button: Press to select any setting
such as the clock, sound control, or the
compass. Press this button again to cancel the
menu display mode.
RETURN button: Press to go back to the
previous display.
1Audio System Basic Operation
These indications are used to show how to operate
the selector knob.
Rotate to select.
Press to ENTER.
RETURN
Button
Selector
Knob
MENU
Button
Menu Display
Page 143 of 324

142
uuAudio System Basic OperationuAdjusting the Sound
Features
Adjusting the Sound
Press the MENU button, and rotate to
adjust the setting. Rotate to scroll through
the following choices:
1Adjusting the Sound
When the adjustment level reaches the center, you
will see C in the display.
The SVC has four modes: OFF, LOW, MID, and
HIGH.
SVC adjusts the volume level based on the vehicle
speed. As you go faster, audio volume increases. As
you slow down, audio volume decreases.
FADER is selectable.
Selector
Knob
MENU
Button
RETURN
Button
BASS
TREBLE
FADER
BALANCE
SUBW
SVC
CLOCK ADJUST
Speed-sensitive
Volume
CompensationSubwoofer
Clock setting
Page 269 of 324
268Maintenance
BatteryChecking the Battery
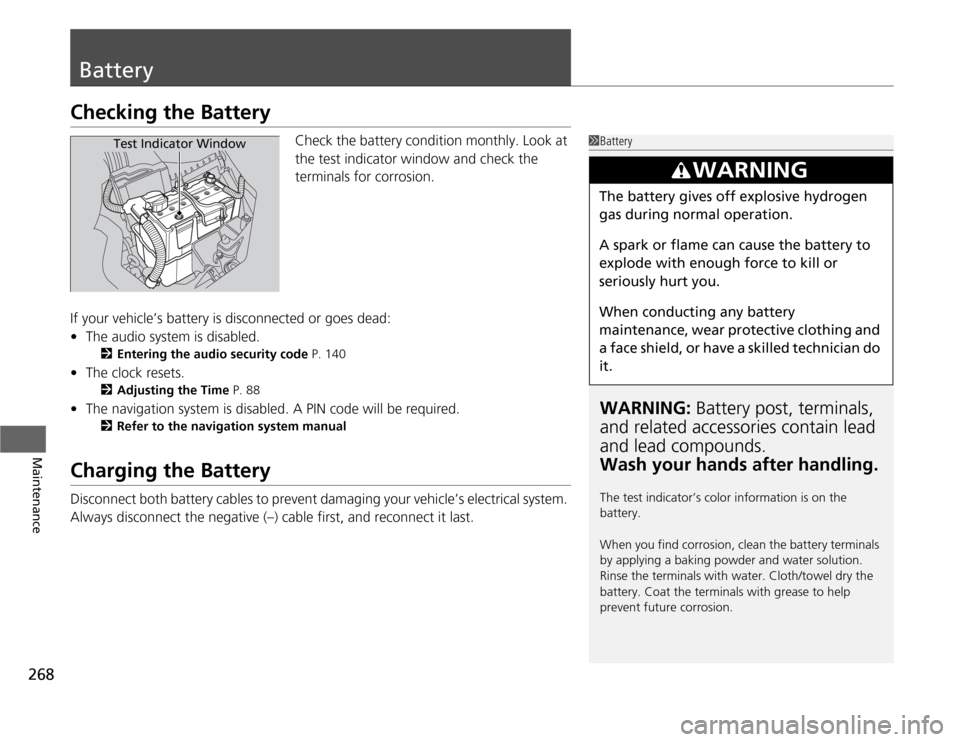
Check the battery condition monthly. Look at
the test indicator window and check the
terminals for corrosion.
If your vehicle’s battery is disconnected or goes dead:
•The audio system is disabled.
2Entering the audio security code P. 140
•The clock resets.
2Adjusting the Time P. 88
•The navigation system is disabled. A PIN code will be required.
2Refer to the navigation system manual
Charging the BatteryDisconnect both battery cables to prevent damaging your vehicle’s electrical system.
Always disconnect the negative (–) cable first, and reconnect it last.
1BatteryWARNING: Battery post, terminals,
and related accessories contain lead
and lead compounds.
Wash your hands after handling.The test indicator’s color information is on the
battery.
When you find corrosion, clean the battery terminals
by applying a baking powder and water solution.
Rinse the terminals with water. Cloth/towel dry the
battery. Coat the terminals with grease to help
prevent future corrosion.
3
WARNING
The battery gives off explosive hydrogen
gas during normal operation.
A spark or flame can cause the battery to
explode with enough force to kill or
seriously hurt you.
When conducting any battery
maintenance, wear protective clothing and
a face shield, or have a skilled technician do
it.
Test Indicator Window
Page 281 of 324
uuIf a Tire Goes FlatuChanging a Flat Tire
280Handling the Unexpected
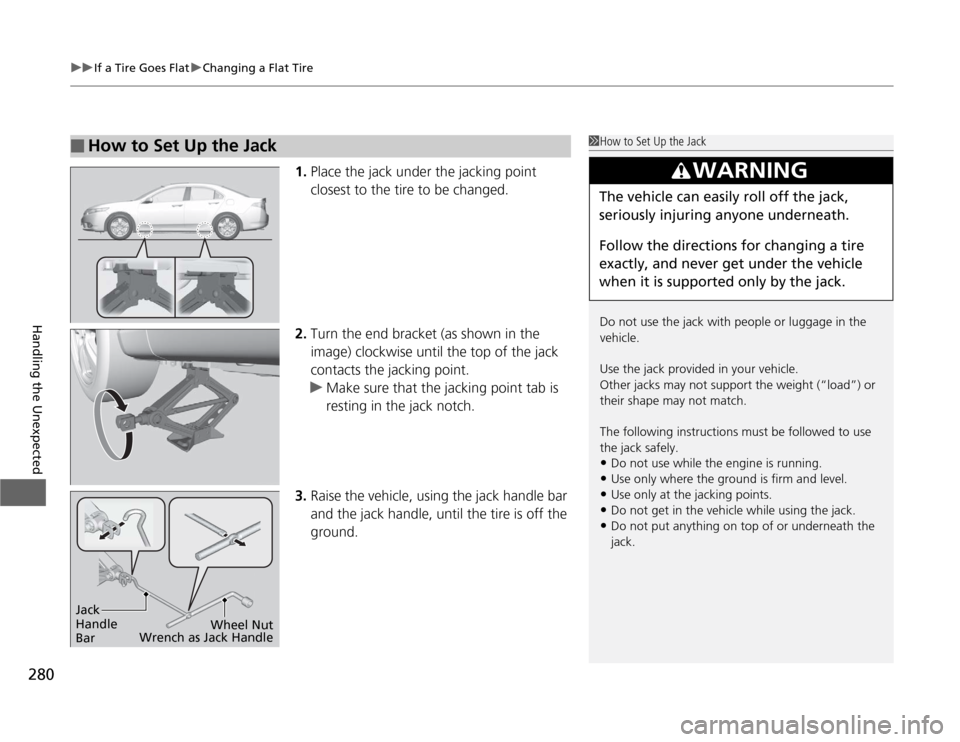
1.Place the jack under the jacking point
closest to the tire to be changed.
2.Turn the end bracket (as shown in the
image) clockwise until the top of the jack
contacts the jacking point.
uMake sure that the jacking point tab is
resting in the jack notch.
3.Raise the vehicle, using the jack handle bar
and the jack handle, until the tire is off the
ground.
■
How to Set Up the Jack
1How to Set Up the Jack
Do not use the jack with people or luggage in the
vehicle.
Use the jack provided in your vehicle.
Other jacks may not support the weight (“load”) or
their shape may not match.
The following instructions must be followed to use
the jack safely.•Do not use while the engine is running.•Use only where the ground is firm and level.•Use only at the jacking points.•Do not get in the vehicle while using the jack.•Do not put anything on top of or underneath the
jack.
3
WARNING
The vehicle can easily roll off the jack,
seriously injuring anyone underneath.
Follow the directions for changing a tire
exactly, and never get under the vehicle
when it is supported only by the jack.
Jack
Handle
BarWheel Nut
Wrench as Jack Handle
Page 323 of 324

322Index
Trunk......................................................... 95
Overheating.............................................. 288
PPaddle Shifters (Sequential Shift
Mode)................................................ 13, 198
Panic Mode................................................. 99
Parking...................................................... 214
Parking Brake............................................ 210
Parking Brake and Brake System
Indicator............................................ 64, 292
Passenger Airbag Off Indicator................. 45
Passing Indicators..................................... 105
Power Windows........................................ 100
Precautions While Driving........................ 193
Rain ......................................................... 193
Pregnant Women....................................... 31
Puncture (Tire).......................................... 277RRadiator..................................................... 241
Radio (AM/FM).......................................... 143
Radio Data System (RDS).......................... 144
Range.......................................................... 78
RDS (Radio Data System).......................... 144
Readiness Codes (Emissions Testing)....... 311
Rear Defogger/Heated Door Mirror
Button...................................................... 110
Rear Seats (Folding Down)....................... 123Rearview Mirror (Automatic Dimming).. 114
Refueling.................................................. 215
Fuel Gauge............................................ 8, 75
Gasoline .................................. 215, 304, 306
Low Fuel Indicator ..................................... 66
Regulations............................... 208, 262, 309
Remote Transmitter................................... 91
Replacement
Battery .................................................... 269
Bulbs ....................................................... 247
Fuses ....................................................... 294
Tires ........................................................ 265
Wiper Blade Rubber ................................ 257
Reporting Safety Defects......................... 310
Resetting a Trip Meter............................... 77
Retractable Master Keys............................ 89
Reverse Tilt Mirror.................................... 115
SSafe Driving................................................ 21
Safety Check............................................... 25
Safety Labels............................................... 61
Safety Message........................................... 20
Seat Belts.................................................... 26
Adjusting the Shoulder Anchor.................. 30
Automatic Seat Belt Tensioners ................. 28
Checking................................................... 32
Fastening .................................................. 29
Installing a Child Seat with a Lap/Shoulder
Seat Belt .................................................. 55Pregnant Women...................................... 31
Reminder .................................................. 27
Warning Indicator ............................... 27, 66
Seat Heaters............................................. 132
Seats.......................................................... 116
Adjusting ................................................ 116
Driver’s Seat Lumbar Support .................. 120
Front Seats.............................................. 116
Rear Seats ............................................... 123
Seat Heaters ........................................... 132
Security System.......................................... 98
Immobilizer System Indicator ..................... 70
Security System Alarm Indicator ................ 71
SEL/RESET Knob.......................................... 76
Select Lever................................ 13, 195, 199
Operation ................................. 13, 196, 199
Releasing ................................................ 287
Won’t Move ........................................... 287
Selecting a Child Seat................................ 52
Selector Knob (Audio)............................. 141
Sequential Shift Mode............................. 197
Setting the Clock........................................ 88
Shift Lever.................................. 13, 195, 199
Shift Position Indicator............................ 196
Shifting (Transmission).................... 195, 199
Shoulder Anchor........................................ 30
Side Airbags............................................... 40
Cutoff System ........................................... 42
Off Indicator ............................................. 42
Side Curtain Airbags.................................. 43
Snow Tires................................................ 267